Ya, if the kit is HG
the box itself will have the HG logo or words written
Model Kits GUNDAM & MECHA MODELLING THREAD V2, Share infos, tips & modification here
Model Kits GUNDAM & MECHA MODELLING THREAD V2, Share infos, tips & modification here
|
|
 Sep 11 2006, 11:08 AM Sep 11 2006, 11:08 AM
|

Senior Member
1,117 posts Joined: Jan 2003 From: KL |
Ya, if the kit is HG
the box itself will have the HG logo or words written |
|
|
|
|
|
Sep 11 2006, 11:19 AM
|

Junior Member
249 posts Joined: Apr 2005 |
QUOTE(mycomnet @ Sep 8 2006, 11:31 PM) hello guys. it's been a while since my last post in this thread. this is my current WIP: hey may i ask what is the procedures for painting? i noticed ure using tamiya acrylic paint, and since im using that too, i guess ure the best person to ask.mg zeta plus c1. i repainted the whole body coz i didn't like the original grey that much. the inner skeleton was painted with metallic grey / gunmetal color. the armor plating color is medium grey. everything is painted using handbrush. 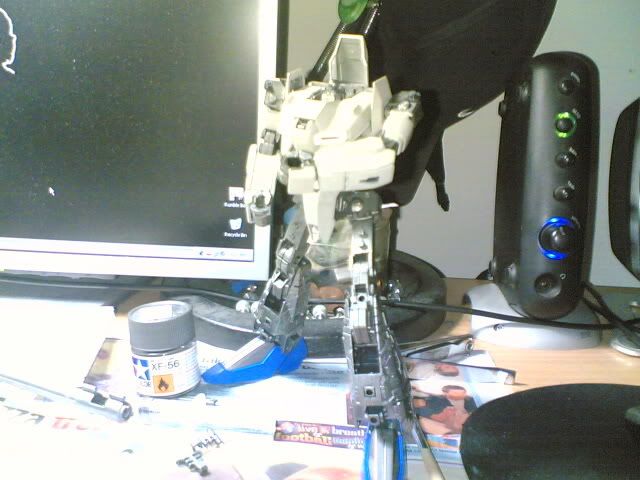 in this pic u can clearly see the diff of the original grey and the medium grey. medium grey color looks more like m9 armslave in the fmp series. 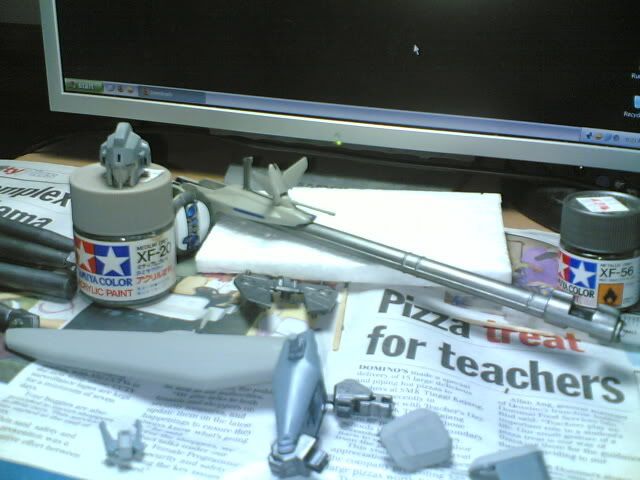 i'll post more pics when there's update in my work.  let me know if im right yea.. sandpaper> painting with acrylic paint> panel lining> top coat. my problem is that the paint kinda fills up the gaps for panel lines. so theres hardly any groove for panel lining. and another thing is that the paint dries really fast, and i really dread the appearance of stroke lines. is there any way to go about that? ah anyways, this is an open question. i'd appreciate if u guys can gimme some pointers cos im still new to handpainting. so thx in advance! This post has been edited by YenS: Sep 11 2006, 11:20 AM |
|
|
Sep 11 2006, 12:02 PM
|
|
Senior Member
1,117 posts Joined: Jan 2003 From: KL |
YenS:
1) sandpaper> painting with acrylic paint> top coat > panel lining. Top coat will dissolve the panel line paint, so at the end will make the panel line like "eat into" the paint 2) "my problem is that the paint kinda fills up the gaps for panel lines." You can use the blade or knife to carve the panel line become deeper before you paint it 3) "and another thing is that the paint dries really fast, and i really dread the appearance of stroke lines." Did you dilute your paint with water ?? You've to pour the paint out into another empty bottle & dilute it. Then you've to test brush the paint on a piece of white paper or other paper. If you feel it's not smooth while painting, then dilute the paint until you feel smooth to paint it |
|
|
Sep 11 2006, 12:22 PM
|

Senior Member
776 posts Joined: Jan 2003 |
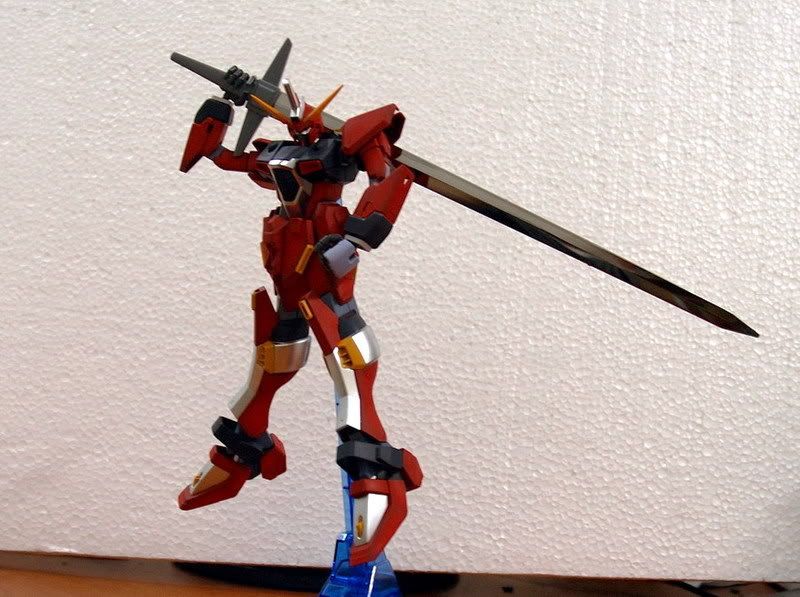
QUOTE(StormV @ Sep 10 2006, 07:39 PM) now, this sword is huge~~!!! zomg...juz look at those chopstick hand n legs.... » Click to show Spoiler - click again to hide... «  |
|
|
Sep 11 2006, 12:28 PM
|

Senior Member
798 posts Joined: Jan 2003 From: Jemapoh To Manchester |
QUOTE(YenS @ Sep 11 2006, 11:19 AM) hey may i ask what is the procedures for painting? i noticed ure using tamiya acrylic paint, and since im using that too, i guess ure the best person to ask. ok.. since this is a MG model so there's rarely gap that need to be puttied. the only place that i puttied is the head, to cover the seamline.let me know if im right yea.. sandpaper> painting with acrylic paint> panel lining> top coat. my problem is that the paint kinda fills up the gaps for panel lines. so theres hardly any groove for panel lining. and another thing is that the paint dries really fast, and i really dread the appearance of stroke lines. is there any way to go about that? ah anyways, this is an open question. i'd appreciate if u guys can gimme some pointers cos im still new to handpainting. so thx in advance! this is my method of painting: 1) cut the model from the sprue 2) trim the excessive plastic using nail clipper 3) sand the excessive surface using sandpaper (grade 400 then 600 and then 1000) 4) if the model is lower than MG, n there's a lot of seamlines, snap the pieces together using cement, make sure there's no gap between the pieces(try holding the snapped piece under any light source, n position it so that u can see if there's gap between them, there will be light passing through those gap. if it's perfect, no light shining through) 5) wait for the cement to dry and apply putty along the seamlines. wait for it to dry. usually left it for 1 whole day. 6) now take grade 400 sandpaper, sand the putty until it has smooth surface between 2 pieces, and gradually sand it with 600 and finally grade 1000 sandpaper. 7) if u have primer paint, use if u want to. let it dry. 8) all this time i've been using spray cans and acrylic paint. spray can is straight forward. spray from 30cm for better result. for handbrush, use this combination for good result: a) good paint brush( tamiya's is a good choice, nylon brush is ok but is not as soft as animal's hair. good brush = horse's hair, very soft) b)use paint thinner instead of water( i use mr. hobby thinner, normal water produce more bubbles when mix with paint) c) ratio of paint+thinner= 2:1 (i'm not sure about others, but that's my mixture ratio) 9) properly stir the acrylic paint in the bottle(shake the bottle if u want to). then using syringe (i'm using it), take the paint n put it in another any tray or bottle n then mix it with thinner using the 2:1 ratio. mix it well then soak the brush and start painting. dun apply too thick. 1 way brush stroke for good result. let it dry n reapply the paint. repeat the process until u satisfy. if the color is not even (some spot is glossy n some are very flat) dun worry. if u screwed up the layer(if there's bubble and it dried up, the layer wont be smooth, so use grade 2000 sandpaper and reapply the paint). tips: never paint in windy places, surely it will dried up very faster. 10) now since the color is very flat, u can use top coat to make it better. i use semi gloss top coat after i handbrushed the pieces. now u can have almost airbrushed quality paint for your model, except for the shading effect. ok for the paint that filled up the panel lines, that happens becoz the paint is too thick. my method of fixing it is by using razor blade or 'pisau lipat', carefully trace up the line, then using tooth pick, sharpen the edge n trace the line by applying pressure onto the line that u traced with the blade. works everytime. cheers |
|
|
Sep 11 2006, 01:43 PM
|

Senior Member
2,776 posts Joined: Jul 2006 |
Any NG 1/100 that's worth buying???
|
|
|
|
|
|
Sep 11 2006, 02:05 PM
|

Junior Member
387 posts Joined: Jan 2003 From: 1KM Under Sea Of India Coor 128x239 |
I working in Singapore. S$39.9 considered cheap. Shopping centre or hobbies shops selling normal price S$54.9
|
|
|
Sep 11 2006, 02:11 PM
|

Junior Member
189 posts Joined: Apr 2005 From: Silent Hill Prefecture |
QUOTE(mycomnet @ Sep 11 2006, 12:28 PM) 5) wait for the cement to dry and apply putty along the seamlines. wait for it to dry. usually left it for 1 whole day. |
|
|
Sep 11 2006, 02:20 PM
|

Junior Member
314 posts Joined: Jan 2006 From: ||MMU Cyber|| |
QUOTE(mycomnet @ Sep 11 2006, 12:28 PM) ok.. since this is a MG model so there's rarely gap that need to be puttied. the only place that i puttied is the head, to cover the seamline. whoa....nice guide dude....especially to me who've never painted before and planing to paint my Serpent on the next week... this is my method of painting: 1) cut the model from the sprue 2) trim the excessive plastic using nail clipper 3) sand the excessive surface using sandpaper (grade 400 then 600 and then 1000) 4) if the model is lower than MG, n there's a lot of seamlines, snap the pieces together using cement, make sure there's no gap between the pieces(try holding the snapped piece under any light source, n position it so that u can see if there's gap between them, there will be light passing through those gap. if it's perfect, no light shining through) 5) wait for the cement to dry and apply putty along the seamlines. wait for it to dry. usually left it for 1 whole day. 6) now take grade 400 sandpaper, sand the putty until it has smooth surface between 2 pieces, and gradually sand it with 600 and finally grade 1000 sandpaper. 7) if u have primer paint, use if u want to. let it dry. 8) all this time i've been using spray cans and acrylic paint. spray can is straight forward. spray from 30cm for better result. for handbrush, use this combination for good result: a) good paint brush( tamiya's is a good choice, nylon brush is ok but is not as soft as animal's hair. good brush = horse's hair, very soft) b)use paint thinner instead of water( i use mr. hobby thinner, normal water produce more bubbles when mix with paint) c) ratio of paint+thinner= 2:1 (i'm not sure about others, but that's my mixture ratio) 9) properly stir the acrylic paint in the bottle(shake the bottle if u want to). then using syringe (i'm using it), take the paint n put it in another any tray or bottle n then mix it with thinner using the 2:1 ratio. mix it well then soak the brush and start painting. dun apply too thick. 1 way brush stroke for good result. let it dry n reapply the paint. repeat the process until u satisfy. if the color is not even (some spot is glossy n some are very flat) dun worry. if u screwed up the layer(if there's bubble and it dried up, the layer wont be smooth, so use grade 2000 sandpaper and reapply the paint). tips: never paint in windy places, surely it will dried up very faster. 10) now since the color is very flat, u can use top coat to make it better. i use semi gloss top coat after i handbrushed the pieces. now u can have almost airbrushed quality paint for your model, except for the shading effect. ok for the paint that filled up the panel lines, that happens becoz the paint is too thick. my method of fixing it is by using razor blade or 'pisau lipat', carefully trace up the line, then using tooth pick, sharpen the edge n trace the line by applying pressure onto the line that u traced with the blade. works everytime. cheers  thanks,mycomnet!! |
|
|
Sep 11 2006, 02:47 PM
|

Senior Member
1,602 posts Joined: Aug 2005 From: KL/SG |
QUOTE(Savor_Savvy @ Sep 11 2006, 01:43 PM) Any NG 1/100 that's worth buying??? IMHO IJ and Legend is a good buy.1/100 Destiny doesnt have that colloid wings. i wouldnt recommend that. however 1/144 HG has that wings. Im waiting for the 1/100 "Pimp mobile" Akatsuki  |
|
|
Sep 11 2006, 03:18 PM
|
|
Junior Member
356 posts Joined: Jun 2006 |
Errr... no special tricks. Took the photo during a power surge with a flashlight as a light source.
QUOTE(young_soul @ Sep 11 2006, 02:04 AM) wow...dude, how you did that lighting effect? Cool  |
|
|
Sep 11 2006, 03:41 PM
|

Senior Member
1,111 posts Joined: Jan 2005 From: somewhere in the universe |
» Click to show Spoiler - click again to hide... « I also got a Zeta Plus C1 plus, but last time i tried to transform it until the leg become very loose oredi, now i just transform it back to the waverider, not going to transform in back to gundam oredi... |
|
|
Sep 11 2006, 05:57 PM
|
|
Senior Member
798 posts Joined: Jan 2003 From: Jemapoh To Manchester |
QUOTE(asuk @ Sep 11 2006, 02:11 PM) actually if you use cement there's no need to use putty anymore. the cement will 'melt' and fuse the plastic so you can just sand off the excess 'melted' plastic. unfortunately i dun have any pic to show to make it easier to understand well most of the time it is true that u dun need to use putty if use cement and i know what u mean when u said it 'melted' the parts together. but here's the case, the c1 has a big cannon. what i did was cement them together, wait for it to dry and sand off the excessive cement and then start painting. no light shining through the piece when i was checking for gap. but after the paint dried up i saw some just a little line maybe 2-3 mm that has gap between them. i swear that at 1st it looked smooth n perfect. so i had to clean the paint by sanding it and apply some putty to the gap. so, right now i always use putty as an extra precaution  QUOTE(Foxngn @ Sep 11 2006, 03:41 PM) I also got a Zeta Plus C1 plus, but last time i tried to transform it until the leg become very loose oredi, now i just transform it back to the waverider, not going to transform in back to gundam oredi... i'm not sure if your version got screws for the legs or not, but mine have 4 screws to tighten up the leg if necessary. now 1 more pic of the WIP c1, the other pics were blurry. just finished painting the head and the backpack  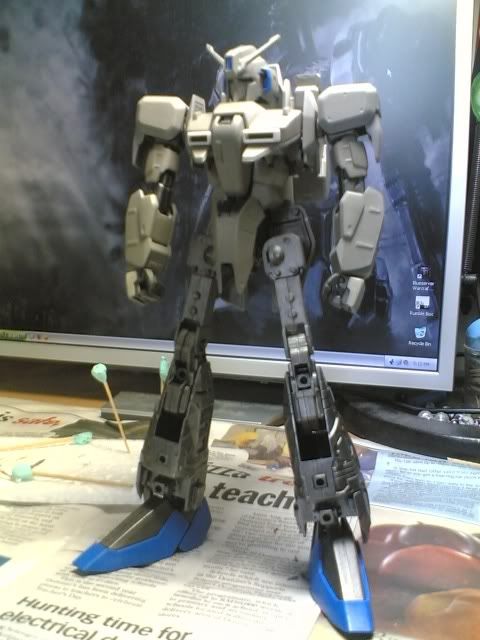 |
|
|
|
|
|
Sep 11 2006, 08:20 PM
|
|
Senior Member
890 posts Joined: Sep 2005 |
QUOTE(asuk @ Sep 11 2006, 02:11 PM) actually if you use cement there's no need to use putty anymore. the cement will 'melt' and fuse the plastic so you can just sand off the excess 'melted' plastic. unfortunately i dun have any pic to show to make it easier to understand Dood, tats not very easy to do.Melted plastic tends to be soft later on and surfaces can turn uneven. Putty is the best solution available. |
|
|
Sep 11 2006, 11:15 PM
|

Newbie
0 posts Joined: Jul 2006 |
 woot! MG strike+IWSP any1 interested ? |
|
|
Sep 11 2006, 11:57 PM
|
|
Senior Member
798 posts Joined: Jan 2003 From: Jemapoh To Manchester |
QUOTE(Balthasar @ Sep 11 2006, 08:20 PM) Dood, tats not very easy to do. actually it doesn't really "melt". it's just a term describing how the chemical inside the cement reacted to the surface of the plastic. it binds the molecules of both surfaces using chemical reaction n harden it. it doesn't get soft or turn uneven.. later i'll show a pic of my model that i only cement and not putty. u can see a tiny seam line that can be easily covered using putty. i'll show both using just cement and cement+putty.Melted plastic tends to be soft later on and surfaces can turn uneven. Putty is the best solution available. |
|
|
Sep 12 2006, 12:26 AM
|

Senior Member
5,355 posts Joined: Jan 2003 From: Cera |
QUOTE(xtracooljustin @ Sep 11 2006, 02:47 PM) IMHO IJ and Legend is a good buy. 1/100 Destiny is a better choice than the 1/144 HG. The 1/144 is simply too small, and there are much more uncolored areas such as the shield and the light blue parts of the chest. Of course, you get more gimmicks like the stand, beam wings; but less beam blades. I still prefer 1/100s than 1/144s though the smaller kit gives more goodies... 1/144s are too small and skinny... unless they are the newer MG like HGUC of course.1/100 Destiny doesnt have that colloid wings. i wouldnt recommend that. however 1/144 HG has that wings. Im waiting for the 1/100 "Pimp mobile" Akatsuki But since the prices for MG are so low, why spend 80+ on a 1/100 when you can get an MG for RM 100-130? This post has been edited by StarGhazzer: Sep 12 2006, 12:27 AM |
|
|
Sep 12 2006, 02:16 AM
|

Senior Member
548 posts Joined: Apr 2005 From: Penang, Malaya |
interesting point.
i'll juz skip da NG n wait for bandai to release da MG IJ, Legend, Akatsuki, Saviour etc then. |
|
|
Sep 12 2006, 09:29 AM
|

Newbie
10 posts Joined: Mar 2006 |
QUOTE(Jckk @ Sep 12 2006, 02:16 AM) interesting point. Ha .. Slow slow wait la my friend ... it will be like forever until bandai decided to make MG for IJ, Bimp Mobile (Akatsuki) and Saviour ... i dont think Bandai will justify the 1/100 Sales of Seed Series by introducing MG line for IJ, AK, Sav .... cos NG Saviour is out soon ....i'll juz skip da NG n wait for bandai to release da MG IJ, Legend, Akatsuki, Saviour etc then. |
|
|
Sep 12 2006, 11:10 AM
|

Senior Member
2,032 posts Joined: Jan 2003 From: BBC Studios |
yeah...models like Infinite Justice and Legend will probably never come out in MG
 YenS & mycomnet: do you guys use primer? Or is the Tamiya paint enough? I tried paint before...wasn't good the paint wasn't balanced...some spots too much, some too little  I know...I suck at painting I know...I suck at painting  This post has been edited by young_soul: Sep 12 2006, 11:12 AM |
|
Topic ClosedOptions
|
| Change to: |  0.0321sec 0.0321sec
 0.69 0.69
 6 queries 6 queries
 GZIP Disabled GZIP Disabled
Time is now: 14th December 2025 - 05:39 AM |
 Quote
Quote