Section 'D' : Required Testing When Purchasing & Warranty:If you're going to shell out a few thousand ringgit for a phone, it is sincerely hoped that you have the sensibility to conduct a COD transaction.
The steps outlined here is to help you ensure that you are not being scammed over by your seller. You should run through the following before making payment:
1)
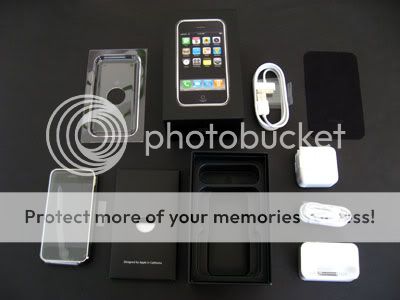
Physically inspect the phone and its packageIt doesn't really matter whether the box your iPhone comes in is still in plastic shrink wrap or not as it is normal for the package to be opened for inspection/activation by the telco carriers when your seller collects it from them. Your package should consist of the following items:
iPhone 2G:» Click to show Spoiler - click again to hide... «
 (credit: iLounge.com)
- iPhone
- Sync Dock
- Charger Adapter (charger design may vary from region to region)
- USB to iPhone Cable
- Earphones (with mic built in)
- Microfibre Cloth
- Documentation Pack
» Click to show Spoiler - click again to hide... «
 (credit: iLounge.com)
- iPhone
- Charger Adapter (charger design may vary from region to region)
- USB to iPhone Cable
- Earphones (with mic built in)
- Microfibre Cloth
- Documentation Pack (with a fancy SIM eject tool attached)
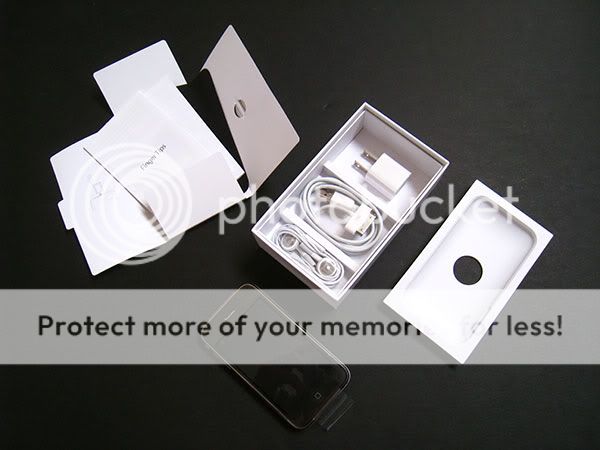
» Click to show Spoiler - click again to hide... «
 (credit: iLounge.com)
- iPhone
- Charger Adapter (charger design may vary from region to region)
- USB to iPhone Cable
- Earphones (with mic built in and remote with volume control)
- Documentation Pack (with a fancy SIM eject tool attached)
» Click to show Spoiler - click again to hide... «

- iPhone
- Charger Adapter (charger design may vary from region to region)
- USB to iPhone Cable
- Earphones (with mic built in and remote with volume control)
- Documentation Pack (with a fancy SIM eject tool attached)
Make sure you check the phone itself to see whether there are any physical deformities.
2)
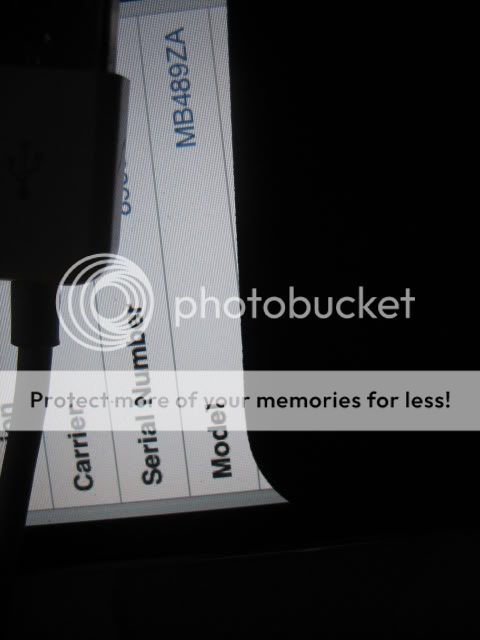
Cross reference the 3G iPhone part numberYou need to figure out where your phone is from first from your seller. Once you identify that, take down the 'iPhone 3G Part Numbers'. Cross reference the number you've taken down with the part number on the box as well as the phone itself. This step (and actually all the following steps) is not necessary for the iPhone 2G as it doesn't really matter where your phone is from since it can be unlocked with DevTeam tools regardless.
On the box:» Click to show Spoiler - click again to hide... «
 (credit: nokia2003)
 (via Settings> General> About> Model)
» Click to show Spoiler - click again to hide... «
 (credit: nokia2003)
3)
Verify that your iPhone is genuinely unlockedTo check if your iPhone 3G is legit and is
not a fake factory unlock look up on the iPhone under (Settings). The items list you should have there is Airplane Mode, WiFi, Carrier and Fetch New Data. As for the fake unlock iPhone 3G units, the 'Carrier' item is missing. If it is missing, you have been conned and if for some reason you already paid for it and there is no turning back, do not proceed to upgrade your iPhone firmware to FW2.2 as it will render your phone useless. A bit more info on this here:
https://forum.lowyat.net/topic/959711/+8204)
Make sure it is a new unitIf you are indeed paying for a new unit, you can get a rough idea whether if it really is new by looking it up on the iPhone (Settings> General> Usage). Note that the statistics shown there can be reset though.
5)
Test your iPhoneTest the phone out! Give it a run through making sure the touchscreen and buttons are working, the software is in order, earphones can be used, etc. You will also want to pop in your SIM and do a test call. Take note that it may for some reason take a few minutes for the SIM to register with the network. There have been cases where it has even taken up to 10 minutes for the phone to start connecting to a network but that is quite rare.
6)
WarrantyClaim warranty from the country that you bought the 3G/3GS/iPhone 4 from if there's defect or hardware related issues.

Online Service Assistance Warranty Check:
https://selfsolve.apple.com/GetWarranty.doIf you bought your iPhone 3G/3GS/4 from non Maxis dealers: To claim warranty you need the person who bought the iPhone which is under his name to be present. Most probably the person you bought the iPhone from purchased the iphone from a non-maxis dealer.
*
For those who have jailbreak your iPhone, warranty will be void. Do a Restore to the default settings before sending back for warranty.--
Important check points for iPhone 4 BuyersThings to check before you sync with iTunes for the first time:Outer Casing: Inspect for cracks in the glass, visible gaps, and loose joints. The phone should be solid, with no "give" anywhere -- a properly constructed iPhone 4 is pretty much a solid glass/steel slab. In particular, the front and rear glass should be flush against the stainless steel antenna band. Any gaps will not only allow dust inside the iPhone, they also act as a pivot point, reducing the structural integrity of the glass and making it more likely to break after an accidental drop. Such gaps are both incredibly rare (I'm probably the only guy "lucky" enough to get hit with this issue twice) and very difficult to see. Hold the iPhone sideways with a strong light source in the background. So long as you don't see anything like this, you're good to go:
Small gap, big problemHome/Sleep Buttons: Yet another item you can test before syncing the iPhone, these buttons should perform their intended functions right away and should neither be excessively loose nor too sticky. A miniscule wiggle or a little "clickiness" in either button is nothing to worry about, but if your Sleep button is rattling around in the casing or needs Herculean pressure to get it to work, there's a problem.
Vibrate switch/motor: Flick this switch to put the iPhone in vibrate. The button should slide smoothly, and you should immediately feel the phone's vibrate motor kick in, indicating successful activation.
Things to check during the first sync with iTunes:Dock connector: If there's anything wrong with the dock connector, you'll know right away; either your iPhone won't sync with your computer, or it won't charge.
Flash memory: It's not particularly common, but if the iPhone's flash memory chips are corrupted, this could show up as syncing errors in iTunes. One bad sync isn't enough to pin the problem on the iPhone itself -- iTunes is a fiddly beast at the best of times -- but if you're unable to get the iPhone to sync successfully despite numerous attempts and some basic iTunes troubleshooting, bad flash memory in the iPhone may be the culprit. The simplest way to test the memory is to use it; fill your iPhone with as much media as you can during that first sync. If you have a 32 GB iPhone 4, now's a good time to go do something else for an hour or two, because syncing that much data takes a while.
Things to check after syncing with iTunes:Volume buttons: It'll be obvious right away if these don't work. Note that a little bit of side-to-side "play" in these buttons is normal and nothing to fret over.
Headphone jack: Plug in the headphones that came with the iPhone. There should be no wiggle in this jack at all. You should hear sound in both headphones while playing media; if you don't, plug in a different set of headphones to make sure it's not a headphone problem rather than a jack problem. Test the headphones' controls, too; play/pause, track forward/back, VoiceOver, and volume up/down should all function normally. VoiceOver should be able to pick up your voice from the headphone microphone.
Camera: Verify that the shutter opens and closes on both the front- and rear-facing cameras by taking still photos with both. Test the iPhone's "tap to focus" feature by aiming the camera at a scene with marked differences in distance/brightness -- a bright window in the background of a dark room, for example -- and make sure the camera adjusts focus/brightness according to where you tap the screen. Check the photos for obvious issues like discoloration, pixellation, banding, etc. -- you're not going to get museum-quality images from the iPhone 4's 5 megapixel sensor, but the photos should be free of glaring, obvious defects. Test that the LED flash fires when you take photos by tapping the upper left corner of the screen until the flash setting reads "on." Now test both cameras again by taking videos with each one. Video from both cameras should be free of stuttering, and, obviously, you should be able to hear sound when you play the video back.
Accelerometer: You can test the accelerometer's function at the same time as the camera; on-screen controls should change position as you tilt the iPhone from portrait to landscape mode. Next, open any app that accepts text input, type a few characters, and then shake the iPhone; a dialog should pop up immediately asking if you want to undo typing or cancel.
Antennae:3G: If you're in an area with 3G service, the iPhone should pick up a signal without you having to do anything. Test your data connection with some basic browsing in Safari; speeds will vary depending on how good your signal/network is, but if you've got a 3G connection, you shouldn't have to wait several minutes for even complex pages to load. Try to avoid the temptation to test out the "Death Grip" phenomenon; not only does this vary from network to network, cell site to cell site, I've also found it varies from phone to phone. My first iPhone 4, purchased a little over two weeks ago, definitely exhibited signal loss in "Death Grip" mode, but my new iPhone 4 doesn't drop signal at all, no matter how I hold it.
EDGE/GPRS: Even if you have a 3G signal, there's an easy way to test if you can also pick up signal using a slower EDGE/GPRS connection if need be. Go into Settings > General > Network and set "Enable 3G" to Off. Your iPhone should fall back to EDGE/GPRS within a few seconds. Test your data connection again by browsing around in Safari, but be aware that the connection speed will be barely tolerable in EDGE and all but unusable in GPRS.
GPS: Open the Maps app and tap on the arrow icon in the lower left corner. Unless you're inside a structure with thick walls/ceilings, a blue dot should appear at or relatively near your current position almost right away. The iPhone 4's GPS antenna is both more accurate and more powerful than those in earlier iPhones -- my iPhone 3G was rarely able to find me at all unless I was outside -- so your position should show up in Maps quite quickly in most cases. If it doesn't, try again outside with a clear view to the sky; if your iPhone's GPS still can't get a fix on your location, it may be faulty.
Bluetooth: I don't have a Bluetooth headset, so the way I tested Bluetooth was by pairing it with my Mac for internet tethering. It took me many tries to get my iPhone 4 to pair with my Mac successfully, but I was finally able to do it by following this procedure:
1. On the iPhone, enable internet tethering by going to Settings > General > Network > Internet Tethering > On. You'll be asked if you want to activate Bluetooth; you do. (You can also enable Bluetooth by going to Settings > General > Bluetooth > On, but since there isn't much you can do with a Mac-iPhone pairing over Bluetooth other than internet tethering, you might as well save yourself the extra step.)
2. Open System Preferences on your Mac and open the Bluetooth preference pane. Turn your Mac's Bluetooth on, and click the checkbox next to "Discoverable" so your iPhone will be able to find your Mac. Click + to add a new Bluetooth device, and Bluetooth Assistant will open.
3. Once Bluetooth Assistant opens, your iPhone should show up in the list of devices right away. If it doesn't, this is your first indication there might be something wrong with your iPhone's Bluetooth. If the iPhone does show up, click on it and wait for Bluetooth Assistant to generate a passcode.
4. Here's the part where I got tripped up. Once Bluetooth Assistant generates a passcode for your iPhone, not only do you have to accept that passcode on the iPhone, after accepting the passcode you must immediately click "Continue" in Bluetooth Setup Assistant on your Mac, or else the pairing will fail. There's nothing in Bluetooth Setup Assistant that tells you to do this, which is very irritating -- I spent about 15 minutes cursing at my Mac until I figured this out.
5. Fortunately, once your iPhone successfully pairs with your Mac via Bluetooth, you shouldn't ever need to do it again. To use the iPhone's internet tethering over Bluetooth, click the Bluetooth icon on your Mac's menubar, select your iPhone, and then select "Connect to Network."
Wi-Fi: Fortunately, testing the iPhone's Wi-Fi is far simpler than Bluetooth. In fact, with the iPhone's default options enabled, you'll be prompted to connect to any nearby wireless networks. If the iPhone discovers a nearby network on its own, that's a good sign; if it then connects to a network successfully after you tell it to, the Wi-Fi antenna works just fine.
Touchscreen: There's two quick ways to make sure there's no dead spots on your iPhone's touchscreen. First, open any program that accepts text input (Notepad, Safari, etc.) and type "The quick brown fox jumps over the lazy dog" on the iPhone's keyboard with your iPhone in all three typing orientations: portrait, landscape with the home button on the left, and landscape with the home button on the right. This is a good test to ensure the touchscreen registers taps along most of its surface. To test swiping, open the Photo app, select any photo, zoom in on it, and swipe your finger over the whole screen; the photo should move around seamlessly with the motion of your finger.
LCD: Considering how pixel-dense the iPhone 4's Retina Display is, it's questionable if a dead pixel or two would be visible at all. You can test for dead pixels anyway using the free Flashlight app, which allows you to display many different solid and patterned colors on the screen. As for the LED backlight, it'll be obvious if it doesn't work at all, but you can test it further by going into Settings > Brightness and dragging the slider from one end of the scale to another.
Ambient Light Sensor: The simplest way to check this is by sitting in a darkened room and turning it on and off in Settings > Brightness. In a dark room and at the default brightness settings, the display should brighten with Auto-Brightness turned off, then darken slightly with Auto-Brightness on.
CPU/GPU: Playing any graphically-intense 3D game will give the iPhone 4's CPU and GPU a decent workout, particularly if the app is optimized for the Retina Display. The iPhone 4's processor and graphics hardware are surprisingly robust for a device its size, so you shouldn't see much graphical slowdown in any App Store game you fire up. Garbled or distorted graphics could indicate a fault in the GPU, while excessive heating or general slow performance could mean a faulty CPU. Playing a hi-res h.264 movie in the iPod app is a good check, too -- videos should play smoothly, with no stuttering or obvious artifacts like blocks, lines, pixellation, or distortion.
Magnetometer: Open the Compass app and tap the button in the lower right corner. Your iPhone should be able to switch between true north and magnetic north seamlessly. If your iPhone is unable to acquire a signal even after you do numerous "figure 8" movements to clear interference, the magnetometer may be faulty.
Gyroscope: The iPhone 4 doesn't come with any default apps that take advantage of its gyroscope. Fortunately, there's a free app called Gyroscope in the App Store that demonstrates the iPhone 4's ability to detect its orientation in 3D space. Once you download and open this app, it'll be obvious right away if your iPhone 4's gyroscope is faulty, because one or more of the values for pitch, roll, or yaw won't change when you move the device.
Things to test during a phone call:Microphone: Test the microphone in both normal and speakerphone mode. The person on the other phone should be able to hear you clearly, with minimal distortion, if any. There's been a few reports of failed microphones in the iPhone 4, with people unable to hear speech from callers using an iPhone 4; whether this is a microphone fault or due to an overzealous noise-cancelling microphone is unclear.
Speakers: Both the earpiece speaker and the bottom speaker should be audible and free of static or distortion. Listen for interference from the noise-cancelling mic or an unshielded/poorly shielded earpiece speaker -- my first two iPhone 4 units made a very annoying "beatbox" sound during phone calls.
Proximity Sensor: The touchscreen should shut off when the iPhone is held up to your ear, then swiftly come back on when moved away. There have been reports of iPhone 4 proximity sensors randomly activating during phone calls and causing people to inadvertently hang up on calls with their cheeks (how's that for FaceTime), but this is likely a problem with the iOS software rather than a hardware issue. If the proximity sensor doesn't work at all, that's a hardware fault.
All of the above tests done together take about 15-20 minutes, not counting the time it takes to sync data onto the iPhone for the first time. Putting the iPhone 4 through its paces using the tests above should find any glaring defects with the iPhone 4 right away. The last bit of the iPhone 4's hardware that requires testing takes significantly longer to test:
Battery: I haven't done any specific tests of the iPhone 4's battery, but the life I've gotten out of it over the past 24 hours is consistent with Apple's estimates. There's any number of battery tests you can perform to test your battery's capacity, but one of the most popular is putting a video on repeat and letting it play until the battery runs dry. According to Apple's tests you should get around 10 hours of video playback out of one battery charge, but there's some leeway in those results. I'd say that anything less than 7 hours or so of video playback on a fully-charged, brand-new iPhone 4, at default brightness, that's done nothing but play video during that time, may indicate a battery fault.
courtesy of TUAW
http://www.tuaw.com/2010/08/13/hardware-test-your-iphone-4/---
Now pay up and go feel joyful for you are now an iPhone Owner! Congrats!  This post has been edited by davidgary73: Oct 7 2010, 04:24 PM

 Dec 11 2008, 12:53 AM

 Quote
Quote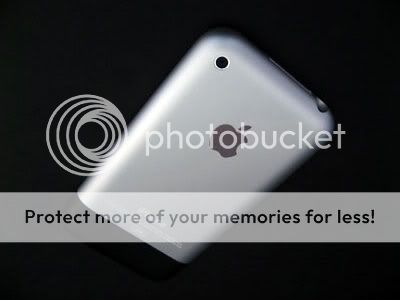


 .....only to find out about the thing called SIRIM AP+Sales tax+RM18


 0.0573sec
 0.44
0.44
 6 queries
 GZIP Disabled