


This post has been edited by maxxon: Sep 29 2013, 03:51 AM
The makeover of my humble abode, Sharing my renovation journey
|
|
 Sep 29 2013, 03:51 AM Sep 29 2013, 03:51 AM
|
 
Senior Member
773 posts Joined: Dec 2010 |
The BRC footing for car porch is now done. It will be finished with pebble wash & tiles later.
This post has been edited by maxxon: Sep 29 2013, 03:51 AM |
|
|
|
|
|
Sep 29 2013, 05:05 AM
|
|
Senior Member
773 posts Joined: Dec 2010 |
I've bought my indoor & outdoor water filter from Nesh during Homedec last year Oct. The Indoor filter has been installed right away at my current place while the outdoor's will only be installed in my new place later.
I paid RM4608 for the indoor Qoozo series (Ozonation + filtration system) & the membrane outdoor pre-filter. I remembered I was their last customer the very last day of that Homedec event, who has won away the big prize of their lucky draw, a standalone Qoozo mini worth RM1798. This Ozone system combines with the faucet to allow instantaneous fusion of water and ozone that creates water that purifies, sterilizes and deodorises. There are so many types of water filtration system in the market and I was so confused when I was introduced to Elken's RO water, Amway's E-spring, Alkaline water, etc. I've listened to each brands selling their products giving the pros of theirs and explaining the cons on others competitor's. So, I realised that there will not be a perfect system because each products has its flaws. Thus, I decided to choose a basic one with affordable price, not too expensive kinda annual maintenance and good filtration. Will avoid RO and Alkaline water at the moment due to its controversial findings. I just need basic and clean water. The ozonation system from Nesh is just an extra features which I can use it to wash vegetables and meats. 
It's a table top filter but it comes in such a cute penguin design.  
The penguin filter comes with ozone system which can be used to wash vegetables and meats. 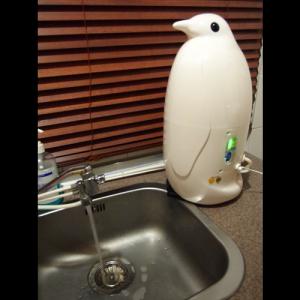
The buttons for different ozone usage. 
|
|
|
Oct 3 2013, 03:58 AM
|
|
Senior Member
773 posts Joined: Dec 2010 |
Progress nearly 1 month:-
- Checked the in-coming water pipe. It is PVC pipe all the way from the front yard, so no need to change the pipe. (Contractor suggested to check the in-coming pipe if it is PVC or steel. If it is of steel type and found rusted, will need to replace and lay new pipe, otherwise no point of installing the outdoor pre-filter with rusted in-coming pipe) 
- Building wall for new entrance. Gonna have a window there to bring sufficient lights into the foyer. We've forgotten to specify what types of brick to be used for our reno before we begin, but I am happy to find out that they are giving me these solid red bricks.  Checked the cement which the mixture is of satisfactory too... We are kinda cautious on this as we have seen quite a number of friend's house with those terrible cracked lines on the walls after renovating. 

This post has been edited by maxxon: Oct 3 2013, 12:40 PM |
|
|
Oct 3 2013, 04:18 AM
|
|
Senior Member
773 posts Joined: Dec 2010 |
Wiring works has been started couple of days ago.

This is the wiring for 2 power sockets located at both side of my bed, which I'm going to use them for the table lamps. However, I've requested the electrician to adjust the distance from current 6.5' to be parted further abit more than that. Reason being that the king size mattress is already 6' and the bed frame will normally take up a few good inches from there. I'm worrying that the bed frame will clashes with the socket. Besides that, I've also requested it to be relocated to abit lower height so that I won't feel such uncomfortable, thinking of the 'electro magnetic' thing flowing just right above my head....  
This post has been edited by maxxon: Oct 3 2013, 04:20 AM |
|
|
Oct 3 2013, 04:37 AM
|
|
Senior Member
580 posts Joined: Aug 2013 |
Wow, you're up early!
|
|
|
Oct 3 2013, 05:20 AM
|
|
Senior Member
773 posts Joined: Dec 2010 |
QUOTE(maxxon @ Sep 20 2013, 04:04 AM) I've also ordered some mixed-material kinda mosaics for the bathrooms' feature walls but they rang me that they are out of stock on the designs on second and third pic... For the bathrooms' feature wall, I've found another vendor who has ready stocks for both mosaics above (ST-7058 and MOSWEN).  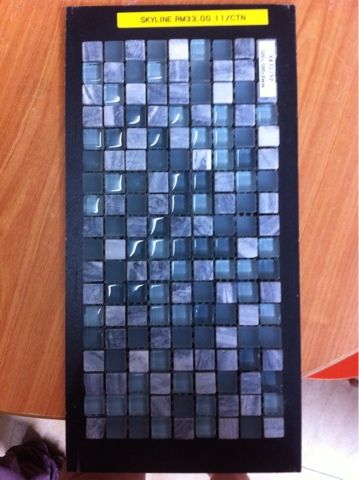 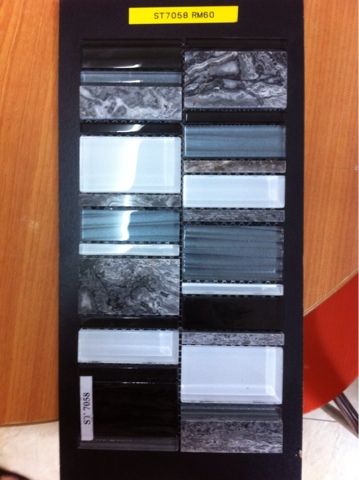 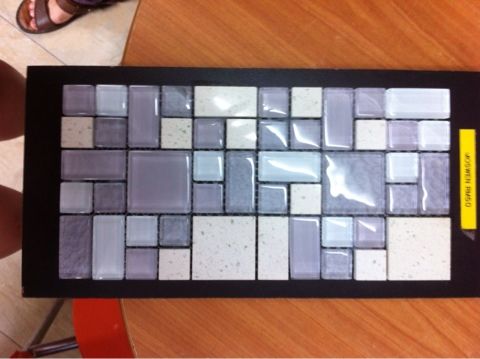 So, i went 'window-shopping' here today in hometown and found something else which I pretty like them too... They are more 3D textured and mixed with aluminum. Took the pic and gonna search for it when I return to KL later... 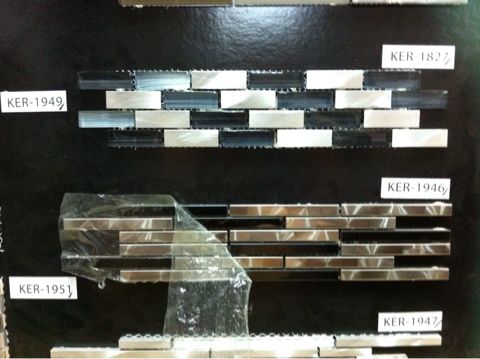  Nevertheless, will check with Ga Hing again in case they get their stocks already for ST-7058 because GH is selling cheaper at RM48/sqft, while this vendor is selling RM52. If GH is still out of stock, I've got no choice but to get it more expensive...  I'm not feeling like giving up this mosaics despite the steep price as I kinda love its mixed materials. 
For the MOSWEN mosaics, we have changed our mind after viewing the samples installed in the bathroom at the other vendor's place. We just do not like it anymore seeing it on the wall with white grouts.  After all, we manage to find a real cheap alternative from Super Ceramic to replace this. It is just RM11.80/ea after discount for 1'x2'. Instead of 3' width feature wall, we gonna change it to 2' feature like picture below. Coincidentally, they have this samples in the showroom which is very much similar to our colour match. I don't think you can see very clearly from the pic but the texture is quite nice and it should be easier to maintain with such minimal grouts. So happy that this changes is saving us RM920 in the pocket!!  

As for the stainless steel strips mosaics shown in previous post (It is a mistake that I thought it was aluminium strips), I've found the vendor but they insist to sell it in full carton (11pcs/ctn). It is also slightly pricey. Thus, I dropped this choice. This post has been edited by maxxon: Oct 3 2013, 05:21 AM |
|
|
|
|
|
Oct 3 2013, 05:27 AM
|
|
Senior Member
773 posts Joined: Dec 2010 |
QUOTE(OneMoreDay @ Oct 3 2013, 04:37 AM) Wow, you're up early! haha...I've yet to rest actually... Just want to add some updates before going to bed... |
|
|
Oct 3 2013, 05:42 AM
|
|
Senior Member
580 posts Joined: Aug 2013 |
QUOTE(maxxon @ Oct 3 2013, 05:27 AM) haha...I've yet to rest actually... I've been awake all night because we had to pick my mother up at the airport. Red-eye flight. Just want to add some updates before going to bed... Thanks for the updates! Shame about the stainless steel mosaic tiles. but money saved. This post has been edited by OneMoreDay: Oct 3 2013, 05:45 AM |
|
|
Oct 3 2013, 07:30 PM
|
|
Junior Member
202 posts Joined: Aug 2013 |
Wow you pay RM 4608 for nesh system ? I do it for my customer POE membrane with Auto Back wash+ POU Bio Energy 6 filter drinking water + wash tangki + ozonation unit At RM 2420.00 and another Customer POE membrane with Auto Back wash + POU Bio Energy 6 filter drinking water + wash tangki + UV unit to kill bacteria 100% At RM 2170.00. What a ripping Price Nesh charge at RM 4608. If you use my system you will manage to save RM 2188 ~2438
This post has been edited by Solar freak: Oct 3 2013, 07:31 PM |
|
|
Oct 13 2013, 06:46 PM
|
|
Senior Member
773 posts Joined: Dec 2010 |
It's already the middle of 6th week since the renovation started. Quite some progress since my last updates but I haven't got time to actually sit down and do the write up.
Ok, let's take a look at what has been done lately. Wetworks: Bathroom in master bedroom has been pushed out to the balcony. 

There will be a long stretch of top hung windows in the bathroom. It is purposely made to be narrow to avoid intruders... 
The new extended main entrance is up. I'm placing a casement window there to bring in lights for a brighter entrance foyer. In between the window and existing beam will be a fixed glass panel. The glass to be installed there so that people couldn't hide themselves out of sight there to break my main door. Btw, I'm gonna install a 5' x 7' security door in white colour. 
The front facade has another slight changes where I've taken out the existing door and made the window bigger measuring 12' x 5'H. After the discussion with the vendor, i will most probably going for a sliding window instead of 6 x normal casement windows. Reason being I know myself very well that I'm a super lazy bug who hate the daily tasks of opening all the window panels one by one. Sliding type will definitely makes my life much easier...  
grills and awning at rear of the house have been taken down and to be proceed with the rear extension. 
Grounding for beam and manhole relocation. 
This post has been edited by maxxon: Oct 14 2013, 11:53 AM |
|
|
Oct 13 2013, 07:27 PM
|

Junior Member
392 posts Joined: Sep 2004 From: Klang |
QUOTE(maxxon @ Oct 13 2013, 06:46 PM) It's already the middle of 6th week since the renovation started. Quite some progress since my last updates but I haven't got time to actually sit down and do the write up. Good progressing so far. Maybe you have a month or two to complete, not to hurry... Ok, let's take a look at what has been done lately. Wetworks: Master bedroom's has been pushed out to the balcony.
There will be a long stretch of top hung windows in the bathroom. It is purposely made to be narrow to avoid intruders...
The new extended main entrance is up. I'm placing a casement window there to bring in lights for a brighter entrance foyer. In between the window and existing beam will be a fixed glass panel. The glass to be installed there so that people couldn't hide themselves out of sight there to break my main door. Btw, I'm gonna install a 5' x 7' security door in white colour.
The front facade has another slight changes where I've taken out the existing door and made the window bigger measuring 12' x 5'H. After the discussion with the vendor, i will most probably going for a sliding window instead of 6 x normal casement windows. Reason being I know myself very well that I'm a super lazy bug who hate the daily tasks of opening all the window panels one by one. Sliding type will definitely makes my life much easier...
grills and awning at rear of the house have been taken down and to be proceed with the rear extension.
Grounding for beam and manhole relocation.
|
|
|
Oct 13 2013, 07:38 PM
|
|
Senior Member
773 posts Joined: Dec 2010 |
Wiring:-
Initial phase of wiring points has been done till further works later on lighting and switches installation. As this house is for own occupation, I've added a good number of extra power sockets too... so that I won't be regretting in future. 
We checked that the wiring contractor is generally giving cables with sirim endorsement instead of those cheapo china made.. 
The old ceiling lights have been moved to the wall temporary to allow works on plaster ceiling. 
This post has been edited by maxxon: Oct 13 2013, 08:35 PM |
|
|
Oct 13 2013, 07:50 PM
|
|
Senior Member
773 posts Joined: Dec 2010 |
Plaster ceilings for ground floor and first floor are up except for kitchen, pending for the extension works. Down light holes will be cut later by wiring contractor.

|
|
|
|
|
|
Oct 13 2013, 08:14 PM
|

Senior Member
2,770 posts Joined: Feb 2012 |
Your living room seems very spacious, quite a number of progress have taken place since your last update. Look forward to full completion plus furnishing. Keep us posted.
|
|
|
Oct 13 2013, 08:31 PM
|
|
Senior Member
773 posts Joined: Dec 2010 |
Termites prevention:-
After some calls for quotation, I decided to hire Stopest for the termites prevention. My house and my near neighbours' are not infected with termites (9 years old houses), but I decided to do the perimeter drilling as a prevention though... Just some simple info on the quotation i got for perimeter drilling prevention: Ridpest - RM2500, 5 years warranty, using chemical from Sumitomo Rentokil- RM3500, 5 years warranty. Did not bother to ask what brand of chemical used after knowing the cost. Stopest - RM2500 bargained down to RM2300, 5 years warranty with annual inspection within warranty period, using chemical from Bayer's Agenda. Given 1 year's free general pest control (6 visits/year) It was just some simple arrangements that I've dealed with Stopest: - Rang them for a quote over the phone. - Received their official quote thru email. - Rang them again, negotiating down to RM2300, and made an appointment. - Their 2 workers came on time for the work - drilling holes around the built-up perimeter (each hole at a foot distance), injecting chemical into the holes, and plastering the holes at my living room as I'm going to remain the marble flooring. - Paid cash to the guy after the work was done and received a warranty certificate straight away with my address pre-printed on it. - Have to call them in again after all reno works to do the general pest control on rats, cockroaches, ants, etc. 
Drilling holes at the built-up perimeter. 
Drilling is best before new flooring. 
drilling on marble flooring. 
The chemical solution was prepared in a big drum and it was pumped and injected into each holes (5 liters of solution per hole). They splashed some remaining solution to the soil at my front yard as well. 
Covering up the holes for marble flooring. I find the marks are somehow acceptable as my marble is kinda light in colours and hope it will be even less visible after the polishing. For my store room's floor, they are covering the holes with brown colours plaster to match my existing brown colour tiles. 
This post has been edited by maxxon: Nov 12 2013, 12:06 PM |
|
|
Oct 13 2013, 08:56 PM
|
|
Senior Member
773 posts Joined: Dec 2010 |
QUOTE(cheeshion @ Oct 13 2013, 07:27 PM) Good progressing so far. Maybe you have a month or two to complete, not to hurry... Hopefully can finish by end Nov... |
|
|
Oct 13 2013, 08:58 PM
|
|
Senior Member
773 posts Joined: Dec 2010 |
QUOTE(Xccess @ Oct 13 2013, 08:14 PM) Your living room seems very spacious, quite a number of progress have taken place since your last update. Look forward to full completion plus furnishing. Keep us posted. Yup..things seem to be sped up a little..hope no major hiccup along the progress.. |
|
|
Oct 13 2013, 09:22 PM
|

Senior Member
5,867 posts Joined: Feb 2006 |
QUOTE(maxxon @ Oct 13 2013, 07:38 PM) Wiring:- Don't forget to conceal the following cables too:Initial phase of wiring points has been done till further works later on lighting and switches installation. As this house is for own occupation, I've added a good number of extra power sockets too... so that I won't be regretting in future. Fiber optic for fiber Internet. Network cable to very room especially TV area. For stable media content and iptv delivery and to prevent wifi blind spot. Alarm n CCTV cables. Astro cable. Speaker cable. Armoured cable for auto gate. 10mA wall mounted RCCB at each water heater switch. (To double fail safe from electrocution during shower.) Inverter aircon piping incase you want to instal inverter aircond instead of non inverter. |
|
|
Oct 13 2013, 09:37 PM
|
|
Senior Member
773 posts Joined: Dec 2010 |
QUOTE(aeiou228 @ Oct 13 2013, 09:22 PM) Don't forget to conceal the following cables too: Thanks for reminder..Fiber optic for fiber Internet. Network cable to very room especially TV area. For stable media content and iptv delivery and to prevent wifi blind spot. Alarm n CCTV cables. Astro cable. Speaker cable. Armoured cable for auto gate. 10mA wall mounted RCCB at each water heater switch. (To double fail safe from electrocution during shower.) Inverter aircon piping incase you want to instal inverter aircond instead of non inverter. - Network cable Cat5e to Study cums TV room in first floor was done. So as for Astro cable. 
- Armoured cable for auto gate, aircond, heater and alarm system were done too.. - Haven't been thinking of the speaker's wire though... thanks for your reminder really... - As of the Unifi fiber optic cable, I've yet to get a contractor who can do that...perhaps anyone here can recommend to me? One more problem with Unifi connection, the TM sales guy told me that my area's port is already full so I can't be connected to Unifi unless TM opens up extra ports but not sure when they gonna do it... gosshh...how am I gonna live without Unifi!?  |
|
|
Oct 13 2013, 09:57 PM
|
|
All Stars
12,019 posts Joined: Jan 2003 |
Why your power point cables coming from bottom?
|
| Change to: |  0.0211sec 0.0211sec
 0.92 0.92
 6 queries 6 queries
 GZIP Disabled GZIP Disabled
Time is now: 1st December 2025 - 04:19 PM |
 Quote
Quote