Is it safe to airbrush gloss paint on MG Hyaku Shiki chrome parts?
i wanna seal the decals but afraid of any adverse effects
Model Kits/Toys Painting, Building, Modding Thread, v3
Model Kits/Toys Painting, Building, Modding Thread, v3
|
|
 Aug 2 2010, 12:56 AM Aug 2 2010, 12:56 AM
|
 
Junior Member
326 posts Joined: Sep 2005 From: Deldrimor Warcamp |
Is it safe to airbrush gloss paint on MG Hyaku Shiki chrome parts?
i wanna seal the decals but afraid of any adverse effects |
|
|
|
|
|
Aug 2 2010, 04:09 PM
|

Junior Member
21 posts Joined: Oct 2005 |
Anyone can recommend a compressor for ab? Which shop & the price ... thinking of getting new compressor ..
|
|
|
Aug 5 2010, 02:41 AM
|

Newbie
0 posts Joined: Dec 2007 |
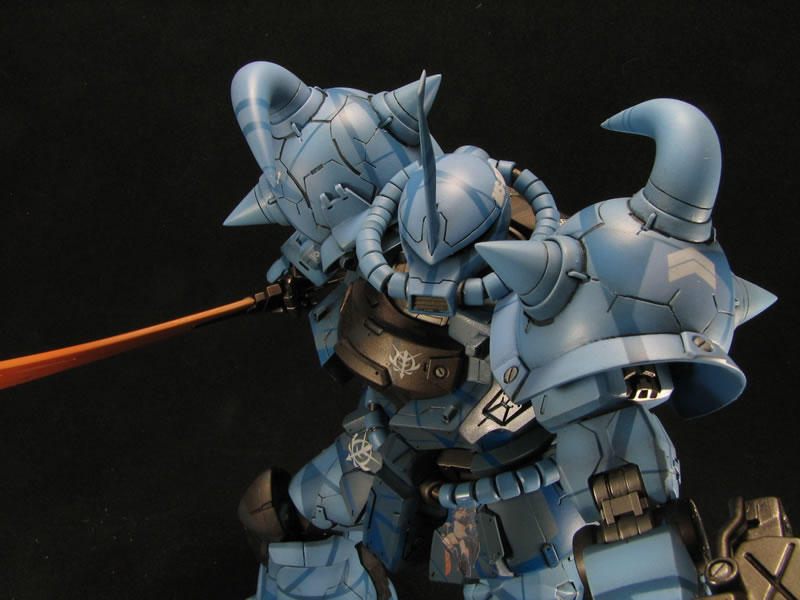
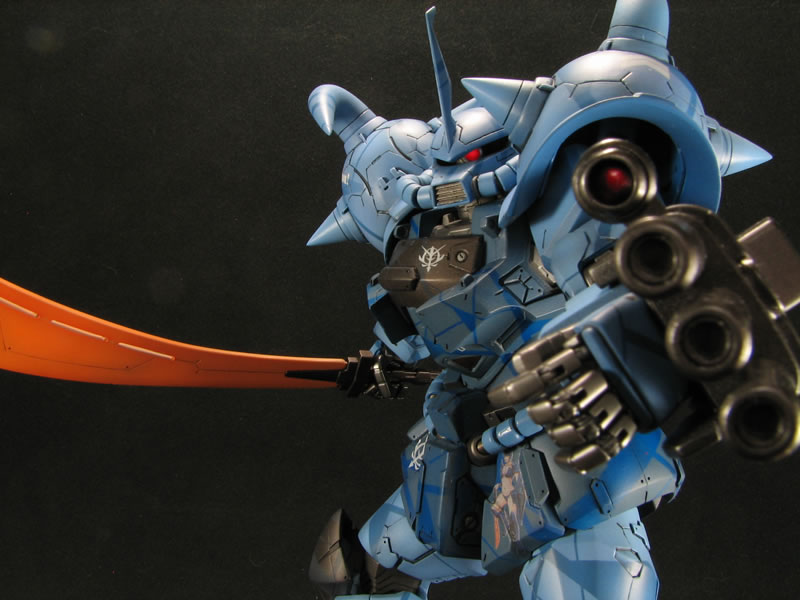
While working on my current gouf conversion project, I decided to add an LED and do an update to an old tutorial that I wrote over 7 years ago...
This time around, as opposed to having all sorts of wires running through the kit, using a fairly sizable switch assembly, a big battery holder and battery assembly; I’m going small scale. Below is a list of the components I will be using for this modification: * 3mm Red LED rated at 1.85 forward Volt at 10mA * 150 ohm resistor * Small reed switch * SR521 watch batteries that put out 1.55 Volts each * A rare earth magnet And here is a picture of the above mentioned parts: 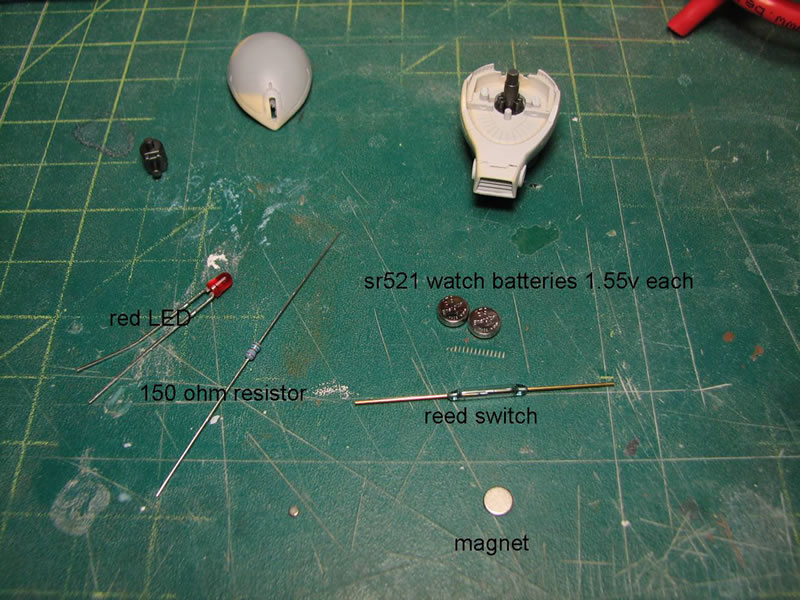 The idea here is to keep the components as small as possible so as to fit within the confines of the head assembly. The reed switch is a magnetic switch. It is basically two leads piped into a glass tube, so when placing a magnet over the leads or over the glass the leads connect and a connection is formed. It’s pretty damn cool, and these switches were about a buck a piece, so this beats the hell out of building my own magnetic switch or just using your standard mechanical switch. The resistor is calculated out according to my power source and the LED’s specs. It’s pretty basic math: resistor ® = (Power Supply Voltage – LED’s forward Voltage)/LED’s current rating. OR you can just cheat and use an online LED calculator. So with what I have, I need to use a 150 ohm resistor. First things first, connecting all the components and just doing a quick test. Next up is to modify the head and internals so that everything fits into place. The mono eye holder is cut and sanded, then two small holes are drilled to accommodate the LED anode and cathode. The LED assembly is test fitted, which resulted in the need to further grind down the mono eye holder. About a third of the part was sanded away. This was the only part that required significant modifications, and it was just trimming down the part by sanding it down and drilling holes. Keeping the LED alone is kinda tacky as it’s just one long bulb; so to make it look more mono-eye like, a metal collar is added. Even with the small mono eye window, this small amount of detail is still fairly clear, and should still be visible once the mono eye lights up. 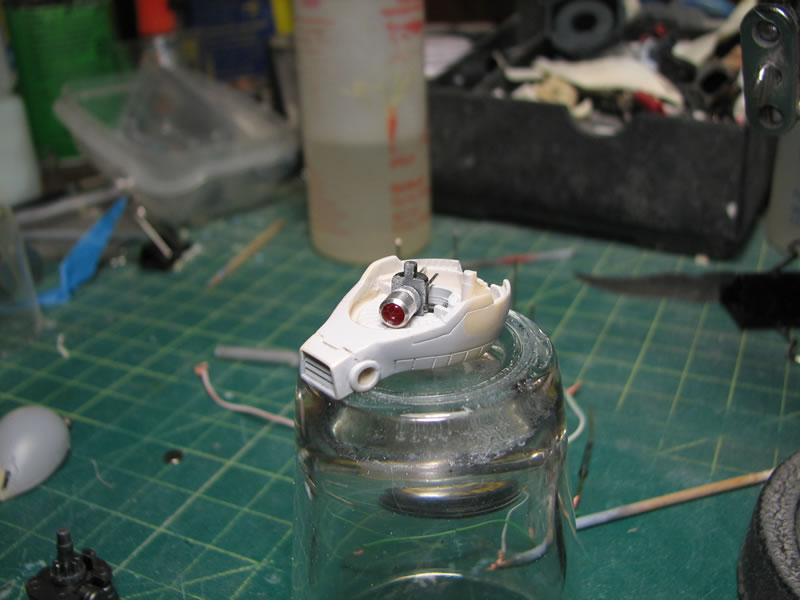 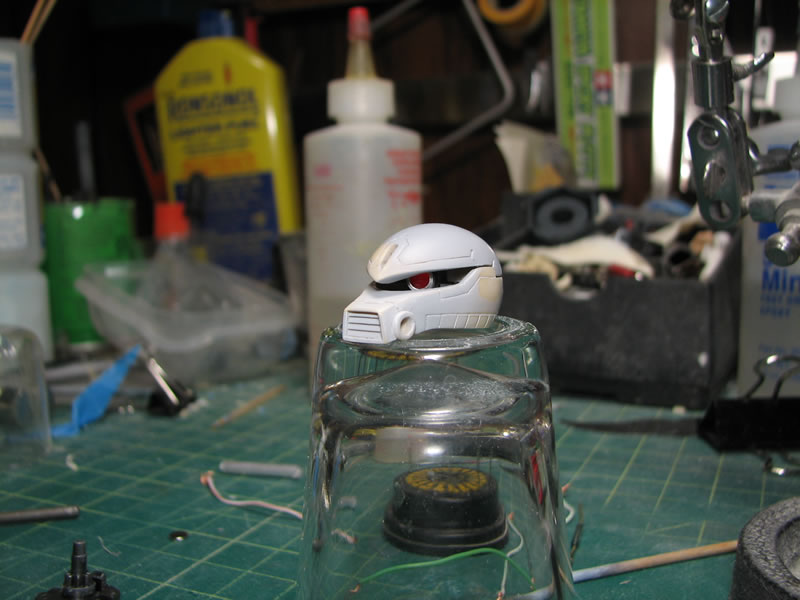 With the LED bulb in place I can now focus on the rest of the electronic components. The batteries are wrapped with duct tape and placed in series so that I get a total output of 3.1 volts. 1.55 volts in the single battery cell isn’t enough power to light up the 1.85 volt LED. The internal section of the head at the back is an open space and perfect for fitting most of the electronics. A bit of resin carving and shaving was needed to get the battery pack to fit just right and have the top half of the head come down. 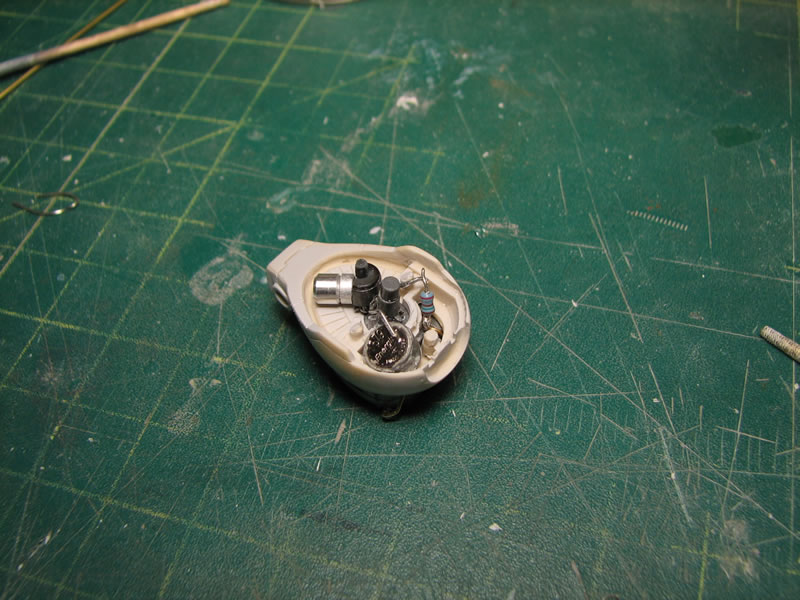 The reed switch, as small as it is, wasn’t small enough to fit inside the head assembly, so a modification to the bottom of the neck piece was needed. A concave cavity was carved out of the bottom that fit the reed switch. The leads were then carefully bent. Side note: the reed switches are fairly delicate, while I was bending my first reed switch, the glass broke causing the entire switch to come apart. The leads are positioned to run up the back of the back corners of the neck and through bottom of the head. The only issue I have is that the switch leads are exposed and run up the side of the neck, but this is an easy fix with some mesh tubing, it’ll even look like a small bit of added detailing. 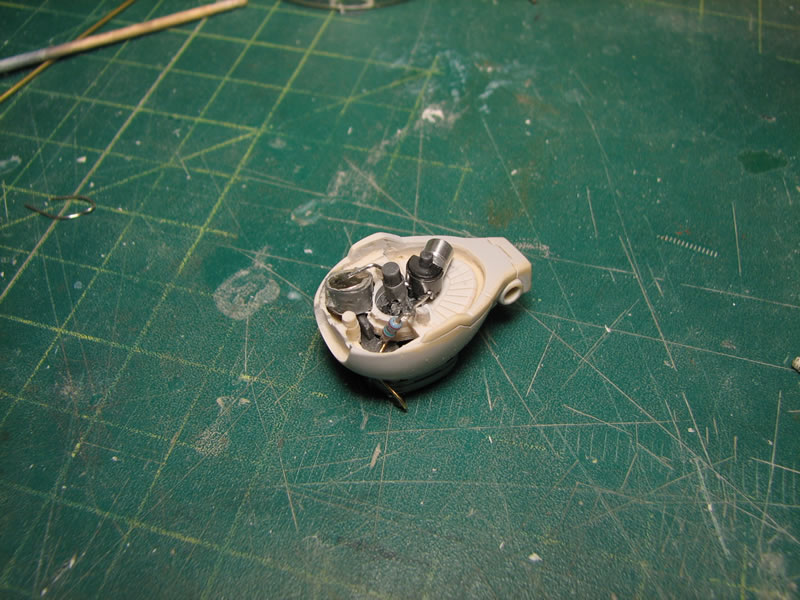 After some fiddling with the fit of all the components to get all the connections set; everything came together quite well. And placing a magnet at the bottom of the neck assembly turns on the LED. The entire assembly resides within the head and neck and operating the LED only requires placing a magnet at the bottom of the neck.  And now for the pictures of the completed assembly. 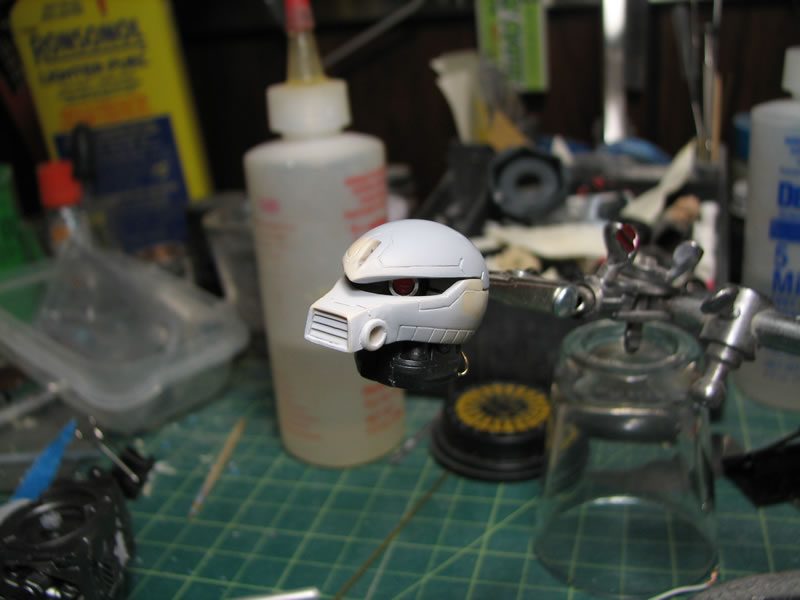 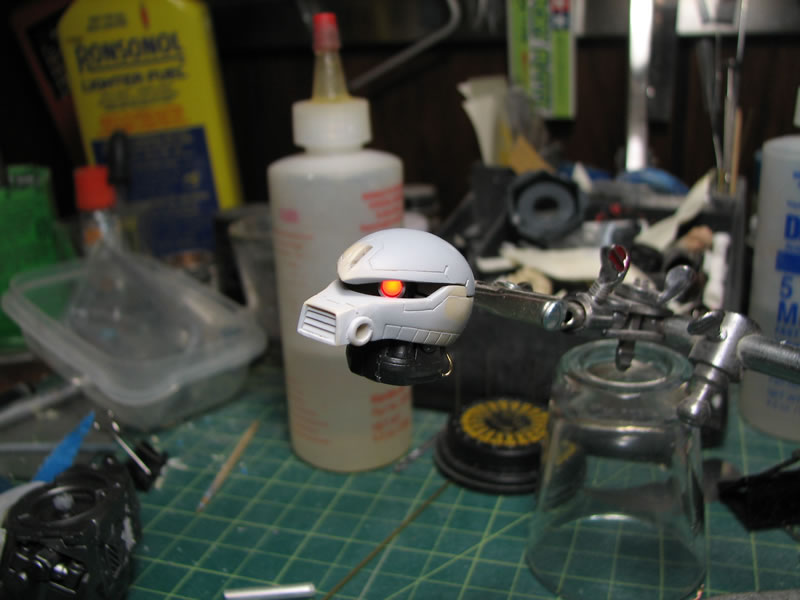  This post has been edited by VincC454: Aug 5 2010, 11:23 AM |
|
|
Aug 5 2010, 11:18 AM
|

Junior Member
11 posts Joined: Jul 2008 |
^woa ... great tuts there. thanks alot.
|
|
|
Aug 7 2010, 12:22 AM
|
|
Junior Member
326 posts Joined: Sep 2005 From: Deldrimor Warcamp |
will lacquer clear coat (gunze or gaia) ruin the chrome parts of Hyaku Shiki?
|
|
|
Aug 7 2010, 12:41 AM
|

Junior Member
302 posts Joined: Sep 2009 |
hi, i just bought HG Reborns Gundam but i dont like the lame yellow parts and want to colour it... anyone can suggest what colour can replace the yellow one?
and one noob question, what tool can cut the fabric tube from MG RX-178 MK-II 2.0? the one that use for backpack and leg parts  This post has been edited by nazrul90: Aug 7 2010, 01:10 AM |
|
|
|
|
|
Aug 7 2010, 09:42 AM
|

Senior Member
2,239 posts Joined: Jun 2006 From: K.L |
QUOTE(Haneda @ Aug 7 2010, 12:22 AM) will lacquer clear coat (gunze or gaia) ruin the chrome parts of Hyaku Shiki? clear coat to cover the chrome parts... no point doing that.... it will ruin the chrome parts.. To repaint the parts, you'll need to strip the paints first.. PS: what type of clear coat u were planning to use? ( Flat, semi, gloss) QUOTE(nazrul90 @ Aug 7 2010, 12:41 AM) hi, i just bought HG Reborns Gundam but i dont like the lame yellow parts and want to colour it... anyone can suggest what colour can replace the yellow one? it's funny when u ask that.. u mentioned u wanna change the color yet u ask us what color can be replaced.. isn't that your decision?and one noob question, what tool can cut the fabric tube from MG RX-178 MK-II 2.0? the one that use for backpack and leg parts scissors can't cut the fabric tube? if not try design knife/ pen knife |
|
|
Aug 7 2010, 01:00 PM
|
|
Junior Member
326 posts Joined: Sep 2005 From: Deldrimor Warcamp |
QUOTE(z3r0717 @ Aug 7 2010, 09:42 AM) clear coat to cover the chrome parts... no point doing that.... it will ruin the chrome parts.. The reason i wanna coat the chrome parts is to seal the dry transfer/waterslide decals and also to give the chrome parts some protective coat. I'll be using gloss coat.To repaint the parts, you'll need to strip the paints first.. PS: what type of clear coat u were planning to use? ( Flat, semi, gloss) what type of clear coat is suitable for that if laquer coat won't do the job? |
|
|
Aug 7 2010, 01:31 PM
|
|
Senior Member
2,239 posts Joined: Jun 2006 From: K.L |
QUOTE(Haneda @ Aug 7 2010, 01:00 PM) The reason i wanna coat the chrome parts is to seal the dry transfer/waterslide decals and also to give the chrome parts some protective coat. I'll be using gloss coat. yes , it's true we need to "protect" the decals.what type of clear coat is suitable for that if laquer coat won't do the job? AFAIK, no one spray coat over chrome parts because those chrome paints can last for awhile... i think it's better to let someone more experienced to answer you as i've not dealt with chrome parts much.  |
|
|
Aug 7 2010, 01:53 PM
|

VIP
4,077 posts Joined: Jan 2003 From: 한국 |
those chrome part no need to be coated if you wanna to keep the chrome effect as it is....
even with decal....at least for me....i never coated it |
|
|
Aug 7 2010, 04:45 PM
|
|
Junior Member
302 posts Joined: Sep 2009 |
QUOTE(z3r0717 @ Aug 7 2010, 09:42 AM) it's funny when u ask that.. u mentioned u wanna change the color yet u ask us what color can be replaced.. isn't that your decision? i only ask for opinion... if i use some random colour it will turn bad so what the suitable colour can replace the yellow one?scissors can't cut the fabric tube? if not try design knife/ pen knife i already use normal scissor to cut it but the result are not fine... maybe i should use the scissor that are designed to cut the fabric |
|
|
Aug 7 2010, 05:53 PM
|
|
Senior Member
2,239 posts Joined: Jun 2006 From: K.L |
QUOTE(nazrul90 @ Aug 7 2010, 04:45 PM) i only ask for opinion... if i use some random colour it will turn bad so what the suitable colour can replace the yellow one? seriously, the color thingy is self-preference unless a you ask a designer..i already use normal scissor to cut it but the result are not fine... maybe i should use the scissor that are designed to cut the fabric i may say blue then you don't like and the opinions will just be non-stop... hmm, if normal scissors also can't cut then i don't know, i havn't cut them b4..  |
|
|
Aug 9 2010, 01:42 PM
|

Junior Member
34 posts Joined: Sep 2007 |
QUOTE(Haneda @ Aug 7 2010, 12:22 AM) will lacquer clear coat (gunze or gaia) ruin the chrome parts of Hyaku Shiki? Even chrome, there r various thickness n different plastic component underneath the chrome that makes a chrome strong or weak.For hyaku, i m not too sure. Used to coat car chrome bumper n no problem. Even if i say no problem, i believe not all cars, different brand might have different reaction. Best is to cut of part of the chrome spru/runner and spray it on yourself. Within minutes, u will already know whether it can be done on hyaku or not instantly. Aint that faster n easier than asking question while nobody answer u for a week? Something that can be easily tested out is always best to test than keep on asking. QUOTE(nazrul90 @ Aug 7 2010, 12:41 AM) hi, i just bought HG Reborns Gundam but i dont like the lame yellow parts and want to colour it... anyone can suggest what colour can replace the yellow one? go search the net, gets lots of references, not only on reborn but other mecha that can help u visualize the color on your reborn.and one noob question, what tool can cut the fabric tube from MG RX-178 MK-II 2.0? the one that use for backpack and leg parts Being irresponsible, i can just tell u "Red". But there r millions of tones in red. So if u screwed up, it's not my fault. Hence in forum discussion, it's always good to at least find some reference, share them, and state your opinions n questions. With that, it's always easier to start a discussion n other people to throw u ideas. For your reference, there's a tutorial on how to customize the color of your mecha digitally. I think it's pretty easy to use. http://forum.zerogunz.com/viewtopic.php?f=44&t=8378 *mod, if u think this is not proper, please delete this. This post has been edited by rayloke: Aug 9 2010, 01:52 PM |
|
|
|
|
|
Aug 12 2010, 10:14 AM
|

Senior Member
1,131 posts Joined: Jan 2003 From: Kuching |
hi guys ..........does anyone here knows where to get a resin thing or things to make a mould ? like i wan to duplicate parts of my model ... anyone ?
|
|
|
Aug 12 2010, 12:24 PM
|
|
Junior Member
34 posts Joined: Sep 2007 |
Are u serious about this?
Recasting is pretty advance level stuff in modeling; or it can be a hobby by itself. Be ready to invest quite a bit for first, the resin n the molding rubber aint cheap; plus other accessories. Besides that, need to do some trial n error plus some experiment or practices first. To me, throw in at least 2 MG's price for it. Besides that, resin does release fume n it's quite toxic. So i suggest u go find more tutorial about recasting first. If u dont even know the component n materials needed, we r not even talking about chemical components, I would foresee there ll be some disaster. Go search, there r quite some tutorial about this matter. Even Dengeki Hobby did featured some in some issues a few years back. There's another cheaper n fairly easy way to do some simple recasting by using epoxy putty or polyster putty with molding rubber. Is actually quite effective especially if u r doing one side mold. For the molding rubber, do check out with tkting or mgs2u.com. In fact tkting has some experience in resin recasting. If u manage to meet up with him, nag him n ask lots of questions. However i still recommend u to search n read a bit before u do so. U wouldnt want to annoy him by asking general or stupid questions right? |
|
|
Aug 13 2010, 03:11 PM
|
|
Senior Member
1,131 posts Joined: Jan 2003 From: Kuching |
bro thanks for ur reply
 i have do some research ed .... i know how to do it but malaysia really hard to find the materials leh... someomre i m form sarawak kuching here , harder for me to find the molding rubber .. haih i have do some research ed .... i know how to do it but malaysia really hard to find the materials leh... someomre i m form sarawak kuching here , harder for me to find the molding rubber .. haihbtw i search it at mgs2u.com there for this http://mgs2u.com/shop/browse.php?mode=t&s=...=51&prrfnbr=520 do u think tats wat i wan ? cause it doesnt have alot of detail on how to use it |
|
|
Aug 13 2010, 04:54 PM
|

Junior Member
249 posts Joined: Jun 2006 |
hey guys, i'm new to working with putty, and i've got a tube of Mr White putty from Gunze. question is, is this the same as epoxy putty which i see people working with alot in the WIP section?
also, i have read that it can be thinned down with thinner. is that true? i personally find the putty abit stringy and hard to mold sometimes, and as wondering if diluting it would help at all. thanks for not ignoring me |
|
|
Aug 13 2010, 06:38 PM
|
|
Junior Member
34 posts Joined: Sep 2007 |
QUOTE(Jackygwh @ Aug 13 2010, 03:11 PM) bro thanks for ur reply yeah it should be the molding rubber for creating the mould. btw, i sms him liao, he should contact u when he's less bz. i have do some research ed .... i know how to do it but malaysia really hard to find the materials leh... someomre i m form sarawak kuching here , harder for me to find the molding rubber .. haihbtw i search it at mgs2u.com there for this http://mgs2u.com/shop/browse.php?mode=t&s=...=51&prrfnbr=520 do u think tats wat i wan ? cause it doesnt have alot of detail on how to use it QUOTE(shauno @ Aug 13 2010, 04:54 PM) hey guys, i'm new to working with putty, and i've got a tube of Mr White putty from Gunze. question is, is this the same as epoxy putty which i see people working with alot in the WIP section? no that's not the same.also, i have read that it can be thinned down with thinner. is that true? i personally find the putty abit stringy and hard to mold sometimes, and as wondering if diluting it would help at all. thanks for not ignoring me epoxy come with 2 parts; looks like 2 plastestine where u cut them out in equal qty and use finger to mix. epoxy ll become very hard after curing and remains the body. so u can use it to build up or mold or create something. The putty u have is just a normal apply putty. main function is to fill up gaps, like cover seamlines. it lack body, so cannot use it to "create something in 3D. yes, need to dillute to use. just use normal gunze thinner will do. |
|
|
Aug 13 2010, 11:41 PM
|
|
Senior Member
1,131 posts Joined: Jan 2003 From: Kuching |
rayloke : thanks for ur help i pm him ed he say onces the stock arrive he will put up at the site
|
|
|
Aug 15 2010, 03:53 PM
|
|
Newbie
0 posts Joined: Dec 2007 |
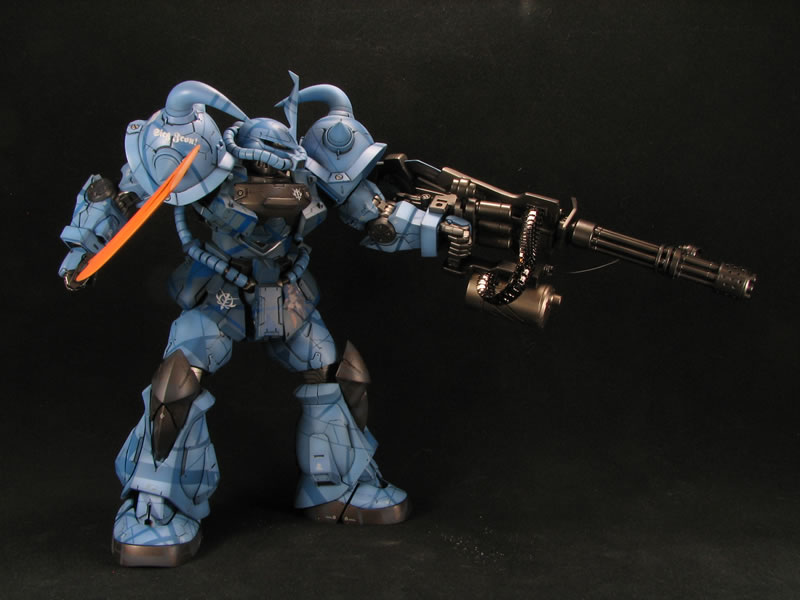
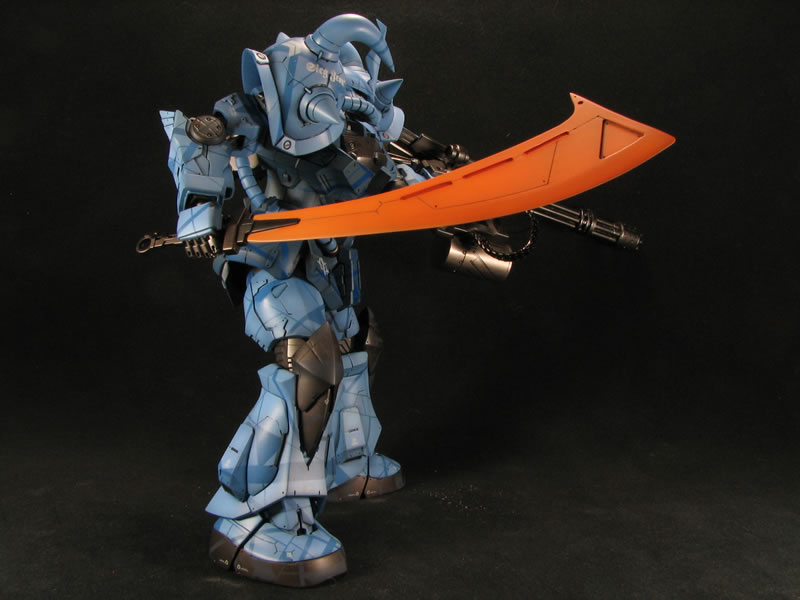
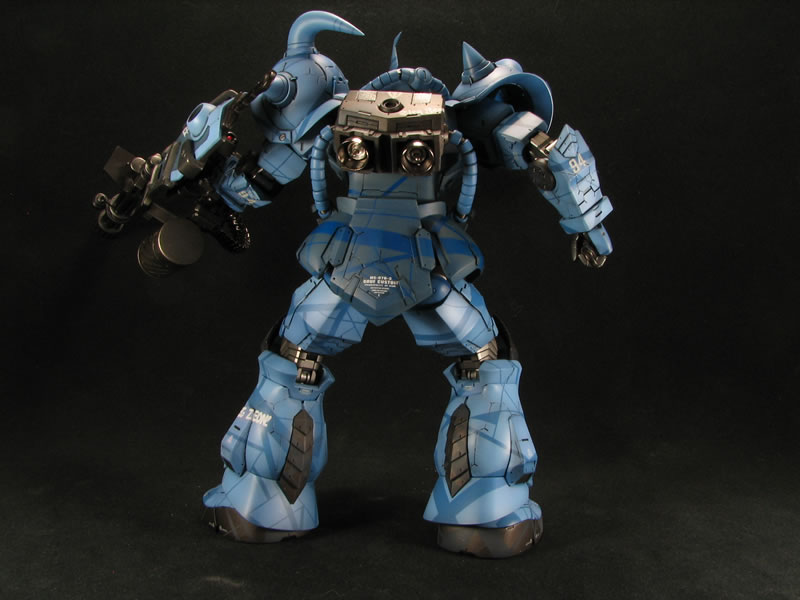
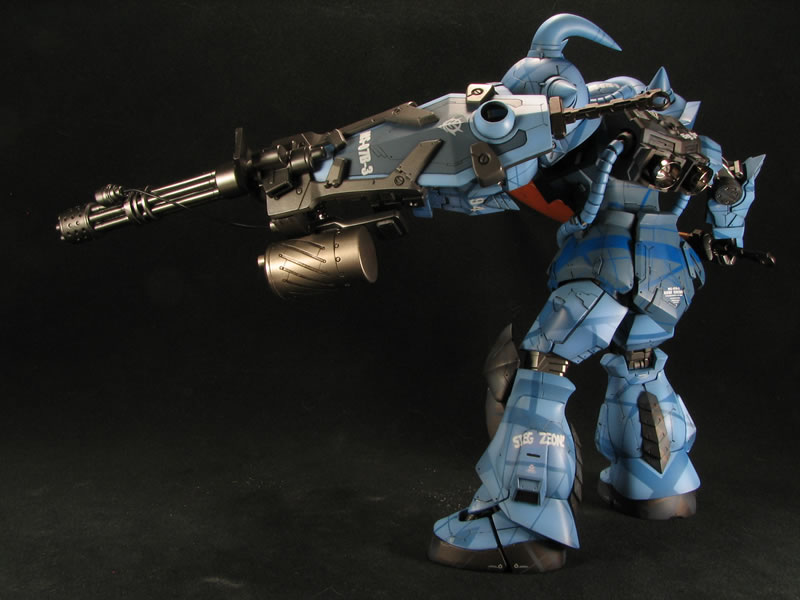
Just finished this kit:
 It's a conversion kit from Neograde to change the Gouf 2.0 to the Gouf Custom. Hope you guys like it. More pictures: » Click to show Spoiler - click again to hide... « |
|
Topic ClosedOptions
|
| Change to: |  0.0202sec 0.0202sec
 0.58 0.58
 6 queries 6 queries
 GZIP Disabled GZIP Disabled
Time is now: 5th December 2025 - 05:11 AM |
 Quote
Quote