FINAL STEP - Undo the damageWe now come to the final and most crucial stage of the 3ROL repair process:
Actually attempting some repairing (instead of constantly taking the whole damn thing apart).
Tools and materials you will need:
Arctic Silver 5
ArctiCleaner
8 x 10mm Screw (M5)
16 x Nylon washer (M6)
Cotton wool and cotton buds(the cotton ear digger for you laymen)...lots and lots and lots of them.
I would like to take this space to thank Djinn for acquiring all these things for me.
Further special thanks for the screws and washers

(He must've sympathized me when he saw the look on my face after telling me the cost of the AS5 and cleaner.

)

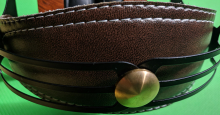
We start by cleaning the heatsinks.
Remove the screws from the heatsinks first. You won't be needing them anymore now that you've removed the x-clamps. Pliers will be helpful here.
Once you have the nuts removed from both heatsinks, it's now time to clean them.
Note: You don't necessarily have to use ArctiCleaner. Any industrial alcohol will do.If you are using ArctiCleaner, start by dropping 2-3 drops of Solution 1 onto the surface. Let it seep in for about 30 seconds as stated in the instructions.
While waiting, put a few drops of Solution 1 onto the cotton wool as well.
Now start wiping, beginning with soft gentle movements and gradually increasing the pressure on the surface.
You're not going to get it all off in the first round of wiping. You'll be repeating this process at least 3-4 times from my own experience.
By the time I was done, I had a mountain of used cotton wool next to me (and my whole room smelled of ArctiCleaner alcohol, rofl).
If you're lucky, all the thermal gunk will come off and leave you with a clean (but rough) heatsink surface.
If you're unlucky (like yours truly), no matter how hard you scrub, some residual paste has already hardened and really bonded itself with the surface.
As you can see from the picture below, the only way I'm going to get those residual amounts out is either lapping the heatsink or using some superstrength cleaners on it. But that's another thing for another day. For now, this surface will have to do for me.

Next up, the CPU and GPU.
Like the heatsinks, drop a few drops of ArctiCleaner and on the cotton wool and start wiping.
Only difference here is that
YOU HAVE TO BE EXTRA CAREFUL.
For goodness sake, you don't need this guide to tell you that those itty-bitty components on the CPU & GPU (as well as those on the motherboard) are bloody brittle.

A little tip here is to use the cotton wool first to clear off the majority of the gunk.
You're going to find that the 'canyons' and 'longkangs' between the chips are difficult to clean. Change to cotton buds here.
Dab with alcohol, and use a single wipe through the 'canyons'. Don't go back and forth as you'll just be making a huge mess.
Imagine you're trying to wipe a scoop of ice-cream of your floor. You'll want to pick up as much as you can with one wipe, yes? Not paint your whole floor with it.
Again, if you're a perfectionist, you're going to be doing this a few times until you get every single speck of that gunk off the CPU & GPU.
Luckily for us, the paste doesn't bond itself to the chips like it does with the heatsinks.
Once you're done, take a break and enjoy the mirror finish surface of the dice and give yourself another pat on the back.

Okay, enough rest, back to work.
Now to apply a new layer of thermal paste onto the dice.
If you are using ArctiCleaner, drop 1-2 drops of Solution 2 onto the die and let it seep in for about 15 seconds before wiping it off.
The core should now look and feel slightly oily. Don't worry, that's what the Solution 2 does.
Now to apply Arctic Silver 5 onto the dice.
Here's another useful tip about applying thermal paste some of you might not know about:
Before applying,
PULL BACK the syringe plunger and
TURN it (doesn't matter clockwise or anticlockwise).
Reason for doing this is so that the paste inside the tube will be less compacted which then allows the paste to come out easier with the slightest push.
Otherwise you have to push into the plunger very hard and risk having a burst of paste suddenly coming out.
When applying thermal paste, use the most minimal amount possible.
Thermal paste is only suppose to fill the microscopic holes and gaps between the heatsink and core. It only functions well as an interface for heat if there is a THIN layer. Too much and you'll have the opposite effect.
From my experience, the suggested amount you should put should be
LESS than the size of a grain of rice.
Spread the paste evenly on the die using a razor or something similar.
If you're lazy like me, just use your finger. You'll get a silver-tipped finger, but IMO I find this method having more control over the spreading and I'm also not comfortable with accidentally scratching the die with something sharp like a razor.
Now to prepare the motherboard for replacing the heatsinks.
I got stuck here abit. Trying to figure out what's the best way to reattach the heatsinks proved problematic because BOTH sides of the board requires you to have the plastic washers to protect from any excessive pressure.
Furthermore, you have to put the screws from
underneath the board.
So to summarise things:
1. You need to screw the board from underneath.
2. While positioning the heatsink from the top.
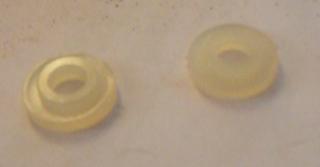
3. While 4 plastic washers need to be underneath the heatsink.
As you can imagine, there are just too many moving parts and not enough supernatural powers.
My first attempt was to put the CPU heatsink (the big fat one), upside down on the table and place the plastic washers on top the screw holes.
Then slowly lower the motherboard on top of it while not moving too much so the washers won't move out of place.
With everything in a delicate balance, I start screwing the screws in which were equipped with the plastic washers.

It worked, but hell that was tough. Furthermore, the GPU heatsink is much smaller and it won't balance well if I try this method on it.
After much pondering, the obvious finally hit me.
As shown in the diagram below, all you need to do is
place the motherboard upright, put the the screws and washers in and it'll all balance themselves on the screw hole.

Next, all you need to do is
hold the heatsink and place it very near the screw tail-end, but not touching it.
With your other hand, take the screwdriver and push the screws into position and start screwing.
So basically, you're reattaching the heatsinks in 'mid-air'. Refer to the pictures below and you'll get what I mean.


You will find this method MUCH more easier than my first 'upside-down' method. I admit that was a very ineffective way to attach the heatsinks and I don't recommend it.
Note: As shown in the picture above, the washers from the GPU side which sits next to the washers from the CPU side may appear to block one another. You don't have to go to the extent of cutting off the washers to make them fit. Just push both washers apart from each other (As shown in pic) and they'll fit snuggly.
Think you're done? Nope. No way.
You're at the final boss now. Every step since the beginning has led to this one final point:
Applying the right amount of tightness and pressure to the screws.The whole source of the 3ROL problem is that (theoretically) the connection between CPU/GPU with the motherboard has broken off due to irregular pressure from the x-clamps and high heat.
Thus, we remove the clamps and put in our own screws. Hoping that we can provide a more balanced pressure as well as a TIGHTER grip in hopes to reattach the connection.
So that means all you need to do is tighten the screws as much as physically possible ?
NO. DO NOT DO THAT.The reason is that the Xbox 360 motherboard is particularly flimsy (another win for Microsoft for piss poor quality material) and an excessive amount of pressure from the screws will
FLEX the board out of shape.
What's the harm to that?
Imagine that you're trying to take out ice cubes from the ice cubes tray. How do you do it? You twist and flex the tray until the ice cubes break off right?
Same thing here. Warp and flex the motherboard too much and you risk breaking off more connectors than you previously may have.
Therefore, tighten the screws but not too tight.
Even though you can feel that the screws can still turn further, resist doing so.
You can tell that you've tightened it too much by just looking at the board as it will looked flexed at the points where the screw is putting pressure.
So, with the main task accomplished, nothing left to do but to test the handiwork.
You don't have to put back everything.
Just make sure you have the these things plugged in:
1. Fans
2. Air ducts
3. Ring of Light/RF panel
4. DVD drive
So far so good, the 3ROL doesn't pop up for a good 5 seconds or so...
 AND SUCCESS!!!
I've had it working since the 8th of June. Means it's been almost a week now since this post and my Xbox 360 is still running strong.
I've been stress testing it with 1080p games like Virtua Tennis and regular games like GOW and Lost Planet. Everything works. Not a single hiccup so far (knock on wood).
This post has been edited by Gurdian: Jun 14 2007, 01:53 PM 

 Jun 1 2007, 05:52 PM, updated 17y ago


 Quote
Quote


 M5 fits perfectly onto the stock heatsinks hence i do not need a nut for the other end..


 but i noticed that the red color starts to fade before freeze and Rrod


 ..........

 " its not like they DONT want to repair it, I'm guessing they CANT repair it...


 0.1238sec
 0.32
0.32
 6 queries
 GZIP Disabled