Welcome Guest ( Log In | Register )

Bump Topic Topic Closed RSS Feed
126 Pages « < 61 62 63 64 65 > » Bottom

Outline · [ Standard ] · Linear+

Model Kits Gundam & Mecha modelling thread V37, Ver Revive

views
     
xein
post Oct 18 2015, 08:01 AM

New Member
*
Junior Member
25 posts

Joined: Feb 2010
QUOTE(Nawar @ Oct 18 2015, 06:58 AM)
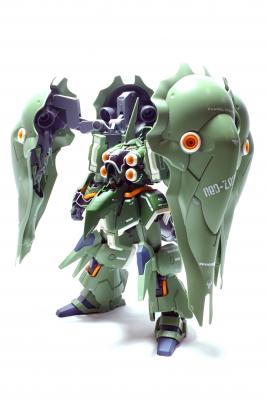
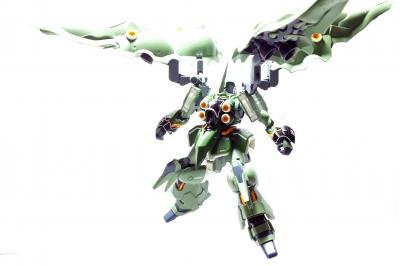
will this ms comes in MG?
Anyone can share how to flight pose the MG Sazabi KA... the manual says to attach the action base connector to the backside... but it can handle the weight..  it'll just droop down after some time, no matter how tighten the screw..

ive seen ppl using crotch adapter to flight pose it... is it stable enough?

» Click to show Spoiler - click again to hide... «
I think it would be stable as long as the model's center of gravity is aligned on top of the screw joint.
xein
post Oct 18 2015, 09:33 AM

New Member
*
Junior Member
25 posts

Joined: Feb 2010
Finished HG Barbatos.
Here are some more pics.
» Click to show Spoiler - click again to hide... «


I think barbatos looks nice without the 'power' symbols.
Some dissatisfaction about barbatos' design is that the calf is too long and the thigh is short. The feet design also looks out of place.

Currently waiting for Graze and the weapon set 1.
In the meantime I'll do the mk3.
TheEvilMan
post Oct 18 2015, 11:19 AM

囧囧囧囧囧囧囧囧囧囧囧囧
****
Senior Member
675 posts

Joined: Nov 2011


Done my decals for Kshatriya


Attached thumbnail(s)
Attached Image
Nawar
post Oct 18 2015, 07:00 PM

Getting Started
**
Junior Member
86 posts

Joined: May 2010
QUOTE(TheEvilMan @ Oct 18 2015, 07:08 AM)
doesn't seems to be a problem with my 1st try doing the flight pose, i think u have to try and keep the upper joint as straight as possibleso the weight does not tilt toward front or back
i use a new action base so in that case the screw probably will be tighter.
*
im using the back connector.. if keep it straight.. the sazabi will tilt facing upwards...
but if keep the sazabi at front.. the base hold up for a moment... and then it starts to droop slowly.. until become sazabi landed... like barbatos forgot to put fuel in thruster...

how long does your sazabi stay on the stand with the back connector?

» Click to show Spoiler - click again to hide... «
TheEvilMan
post Oct 18 2015, 07:13 PM

囧囧囧囧囧囧囧囧囧囧囧囧
****
Senior Member
675 posts

Joined: Nov 2011


QUOTE(Nawar @ Oct 18 2015, 07:00 PM)
im using the back connector.. if keep it straight..  the sazabi will tilt facing upwards...
but if keep the sazabi at front.. the base hold up for a moment... and then it starts to droop slowly.. until become sazabi landed... like barbatos forgot to put fuel in thruster...

how long does your sazabi stay on the stand with the back connector?

» Click to show Spoiler - click again to hide... «

*
standing since day one biggrin.gif
i place it in a shelf for display
try to use sazabi skirt to hold against the stick for better stability, that's how i hold it in place

anyway kshatriya is awesome

This post has been edited by TheEvilMan: Oct 18 2015, 08:55 PM


Attached thumbnail(s)
Attached Image Attached Image Attached Image
TSnazrul90
post Oct 18 2015, 10:10 PM

Casual
***
Junior Member
302 posts

Joined: Sep 2009
user posted image

so much ideas I think I will get more than one kit lol
not mine anyway
TSnazrul90
post Oct 18 2015, 10:11 PM

Casual
***
Junior Member
302 posts

Joined: Sep 2009
aduh double posted

This post has been edited by nazrul90: Oct 18 2015, 10:13 PM
xein
post Oct 19 2015, 12:50 AM

New Member
*
Junior Member
25 posts

Joined: Feb 2010
Gundam mk3 done:

» Click to show Spoiler - click again to hide... «


An easy build. Mostly because a lot of parts are symmetrical.
TheEvilMan
post Oct 19 2015, 10:18 AM

囧囧囧囧囧囧囧囧囧囧囧囧
****
Senior Member
675 posts

Joined: Nov 2011


QUOTE(xein @ Oct 19 2015, 12:50 AM)
Gundam mk3 done:

» Click to show Spoiler - click again to hide... «


An easy build. Mostly because a lot of parts are symmetrical.
*
Do u find the joint been loose or tight Compare to MG, since i check the manual scan it seems to use identical mechanism as HG, HG joint can hold nicely due to the size and weight been a lot lesser than a 1/100.

For ppl who interested in MG Nataku
there's some nice review out already

http://gundamguy.blogspot.my/2015/10/p-ban...-gundam_18.html

user posted image

This post has been edited by TheEvilMan: Oct 19 2015, 10:25 AM
xein
post Oct 19 2015, 10:37 AM

New Member
*
Junior Member
25 posts

Joined: Feb 2010
QUOTE(TheEvilMan @ Oct 19 2015, 10:18 AM)
Do u find the joint been loose or tight Compare to MG, since i check the manual scan it seems to use identical mechanism as HG, HG joint can hold nicely due to the size and weight been a lot lesser than a 1/100.

For ppl who interested in MG Nataku
there's some nice review out already

http://gundamguy.blogspot.my/2015/10/p-ban...-gundam_18.html

user posted image
*
Yeah. It can hold nicely. The joint parts, the female have teeth while the male part had a protrusion on the cylinder part. This allows higher stiffness of the joins. When you move the limbs, you can feel a bit of jumping in the degrees' rotation.
Some what similar to the megasize gundam.

This post has been edited by xein: Oct 19 2015, 10:39 AM
madmoz
post Oct 19 2015, 01:25 PM

New Member
*******
Senior Member
4,250 posts

Joined: Nov 2006


QUOTE(ascentic @ Oct 15 2015, 03:45 PM)
[attachmentid=5093195]

[attachmentid=5129418]

Latest update at the EXPO!..
*
When is this again?
SUSadvocado
post Oct 19 2015, 04:05 PM

Look at all my stars!!
*******
Senior Member
2,948 posts

Joined: Jun 2007
I'm having paint crack problem.

1st time i use Nippon Pylox spray cans Matte White. It's Lacquer based.

I almost used up the 1st can so i got a 2nd can, i did 2 coats on the old can, then few hours i spray another coat with the new can, after 3 minutes i notice the areas especially flat & corners have lots of crack, the cracked lines seems have no paint at all on the surface.

I had the same problem before because i sprayed an acrylic layer then lacquer i though it's the problem, but this time it's fresh Lacquer over Lacquer and same issue happened.

Anyone know the cause? The crack is all over the place but somehow small parts are not effected, only parts with deep corners & flat surface suffer.
heally82
post Oct 19 2015, 04:16 PM

New Member
*
Newbie
3 posts

Joined: Jun 2011
QUOTE(advocado @ Oct 19 2015, 04:05 PM)
I'm having paint crack problem.

1st time i use Nippon Pylox spray cans Matte White. It's Lacquer based.

I almost used up the 1st can so i got a 2nd can, i did 2 coats on the old can, then few hours i spray another coat with the new can, after 3 minutes i notice the areas especially flat & corners have lots of crack, the cracked lines seems have no paint at all on the surface.

I had the same problem before because i sprayed an acrylic layer then lacquer i though it's the problem, but this time it's fresh Lacquer over Lacquer and same issue happened.

Anyone know the cause? The crack is all over the place but somehow small parts are not effected, only parts with deep corners & flat surface suffer.
*
this only happens if the paint not fully dried and another layer put on top of it, different freshness of lacquer layer contracted differently during paint curing causing cracks.

need to confirm whether the layer is to thick to dry within hours?

some also argues can spray require dip in warm water and shake at least 30s to 1 min before spray but im an ab painter so cant confirm that.
SUSadvocado
post Oct 19 2015, 04:32 PM

Look at all my stars!!
*******
Senior Member
2,948 posts

Joined: Jun 2007
QUOTE(heally82 @ Oct 19 2015, 04:16 PM)
this only happens if the paint not fully dried and another layer put on top of it, different freshness of lacquer layer contracted differently during paint curing causing cracks.

need to confirm whether the layer is to thick to dry within hours?

some also argues can spray require dip in warm water and shake at least 30s to 1 min before spray but im an ab painter so cant confirm that.
*
I don't know, previous batch where i spray lacquer on top of acrylic, same batch, i notice the later ones i sprayed all had cracks, and the time gap is only less than 1 minute. Never had issues with spray cans until i used this Nippon can coz i saw it in Ace Hardware, the Mr.DIY ones are too diluted so can't cover the base color. Regret, i used NOW cans witch cost rm15.xx no issue. I guess pay peanuts get banana.

I sprayed the same way i did before than, only difference is i switch to newer can (should be same stock batch). The older can feels diluted near the bottom. I don't think paint not fully dry is the main issue since i've been doing the same thing. I did spray at good distance.
heally82
post Oct 19 2015, 05:23 PM

New Member
*
Newbie
3 posts

Joined: Jun 2011
QUOTE(advocado @ Oct 19 2015, 04:32 PM)
I don't know, previous batch where i spray lacquer on top of acrylic, same batch, i notice the later ones i sprayed all had cracks, and the time gap is only less than 1 minute. Never had issues with spray cans until i used this Nippon can coz i saw it in Ace Hardware, the Mr.DIY ones are too diluted so can't cover the base color. Regret, i used NOW cans witch cost rm15.xx no issue. I guess pay peanuts get banana.

I sprayed the same way i did before than, only difference is i switch to newer can (should be same stock batch). The older can feels diluted near the bottom. I don't think paint not fully dry is the main issue since i've been doing the same thing. I did spray at good distance.
*
seem like some stock issues there, then have to test it out 1st before really spray on the kit and work out a way if you still want to continue using it.
SUSadvocado
post Oct 19 2015, 05:28 PM

Look at all my stars!!
*******
Senior Member
2,948 posts

Joined: Jun 2007
QUOTE(heally82 @ Oct 19 2015, 05:23 PM)
seem like some stock issues there, then have to test it out 1st before really spray on the kit and work out a way if you still want to continue using it.
*
spray it on bare plastic no issue, issue only coats after, and result is inconsistent, some crack some don't.
heally82
post Oct 19 2015, 05:34 PM

New Member
*
Newbie
3 posts

Joined: Jun 2011
QUOTE(advocado @ Oct 19 2015, 05:28 PM)
spray it on bare plastic no issue, issue only coats after, and result is inconsistent, some crack some don't.
*
now the only explanation i can think of is there might be some inconsistency of lacquer thinner on both coats, but i do have to ask recently malaysia kinda rains a lot. are you doing your spray paint before or after rain? coz this kinda screw your paint works too...
:3mushy:3
post Oct 19 2015, 06:11 PM

<--~(--+<[o]>+--)~-->
*******
Senior Member
4,723 posts

Joined: Apr 2008
Humidity is a problem when spraying.
SUSadvocado
post Oct 19 2015, 06:59 PM

Look at all my stars!!
*******
Senior Member
2,948 posts

Joined: Jun 2007
QUOTE(heally82 @ Oct 19 2015, 05:34 PM)
now the only explanation i can think of is there might be some inconsistency of lacquer thinner on both coats, but i do have to ask recently malaysia kinda rains a lot. are you doing your spray paint before or after rain? coz this kinda screw your paint works too...
*
I spray just now 3-4pm, don't think it rained. I sprayed on another batch of bare plastic but don't have cracking issue, only happens when there's already painted.

i can understand mixture may be different but still cracking so much something must have gone wrong. because i have done even wetter coats on coats before and i get glossy finish not cracks.

anyway any good cheap way to remove the cracked paints? mr.thinner too expensive to use like this, normal thinner also difficult to wipe and damages the plastic. do lighter fluid work?

PS. The Crack happened on both cans in different situation:

1.3 parts cracked after spraying the lacquer on acrylic coat, rest same method but no crack.
2.cracked after spraying a new can of same brand/type after previous coat.

I then tried mist coat from very far, i guess it's not thick enough to do damage, but i kept quite a distance and the coat wasn't that thick for those cracked. And strange part is some crack some don't and seems the shape of the parts have consistency either that or the paint changed it's characteristic in between.

This post has been edited by advocado: Oct 19 2015, 07:04 PM
heally82
post Oct 19 2015, 10:12 PM

New Member
*
Newbie
3 posts

Joined: Jun 2011
QUOTE(advocado @ Oct 19 2015, 06:59 PM)
I spray just now 3-4pm, don't think it rained. I sprayed on another batch of bare plastic but don't have cracking issue, only happens when there's already painted.

i can understand mixture may be different but still cracking so much something must have gone wrong. because i have done even wetter coats on coats before and i get glossy finish not cracks.

anyway any good cheap way to remove the cracked paints? mr.thinner too expensive to use like this, normal thinner also difficult to wipe and damages the plastic. do lighter fluid work?

PS. The Crack happened on both cans in different situation:

1.3 parts cracked after spraying the lacquer on acrylic coat, rest same method but no crack.
2.cracked after spraying a new can of same brand/type after previous coat.

I then tried mist coat from very far, i guess it's not thick enough to do damage, but i kept quite a distance and the coat wasn't that thick for those cracked. And strange part is some crack some don't and seems the shape of the parts have consistency either that or the paint changed it's characteristic in between.
*
I use my china brand thinner but you can try general purpose thinner and use brush to brush the coat off with general purpose thinner stroke by stroke.

126 Pages « < 61 62 63 64 65 > » Top
Topic ClosedOptions
 

Change to:
| Lo-Fi Version
0.0382sec    0.73    6 queries    GZIP Disabled
Time is now: 19th December 2025 - 07:55 PM