Practical Mods/Add-ons For Sagas/Iswaras, Come share what you have done
Practical Mods/Add-ons For Sagas/Iswaras, Come share what you have done
|
|
 Oct 26 2007, 01:14 PM Oct 26 2007, 01:14 PM
|
 
Senior Member
1,216 posts Joined: Mar 2005 |
new pics for vacuum gauge setup just posted on 1st page
|
|
|
|
|
|
Oct 26 2007, 02:37 PM
|
|
Senior Member
10,975 posts Joined: Jan 2003 From: disini disana |
QUOTE(kevinlim001 @ Oct 25 2007, 02:03 AM) last time bicycle come with drum brake? i never aware of that? As far as i no my since bike since i m very very small is using the disc brake theory.. There is two rubber located on the top of the wheels when u press the brake the rubber will clamp the wheel to stop. Drum brake different case. Drum brake the rubber is located inside. When u press the brake the rubber will EXPAND to stop the wheel. But bicycle really got drum meh? when u pull the cable how to make that thing expand? even brembo nowadays produce brakes for bicycle....  I guess i have more to learn just learn from uncle wiki » Click to show Spoiler - click again to hide... « this is the image of drum brake for a bicycle which i find the explanation is even more complicated than a car drum brake   |
|
|
Oct 27 2007, 02:54 AM
|
|
Senior Member
1,216 posts Joined: Mar 2005 |
new pics for extra cigarette lighter socket just uploaded on 1st page!
|
|
|
Oct 28 2007, 03:45 PM
|
|
Senior Member
1,216 posts Joined: Mar 2005 |
ok
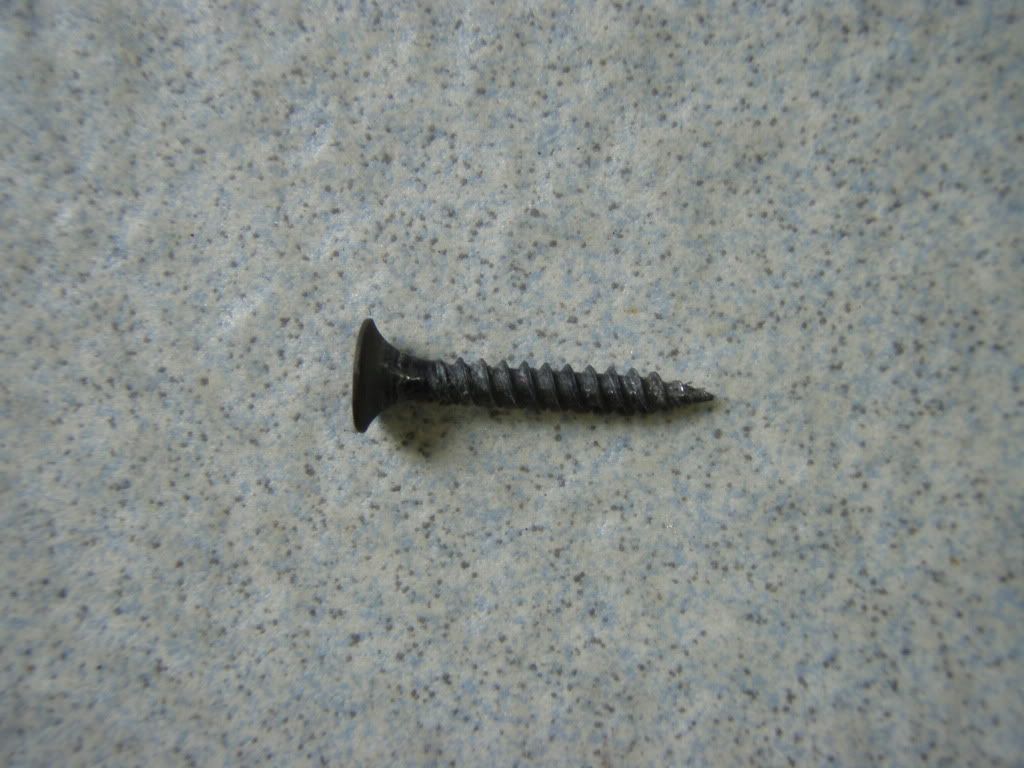
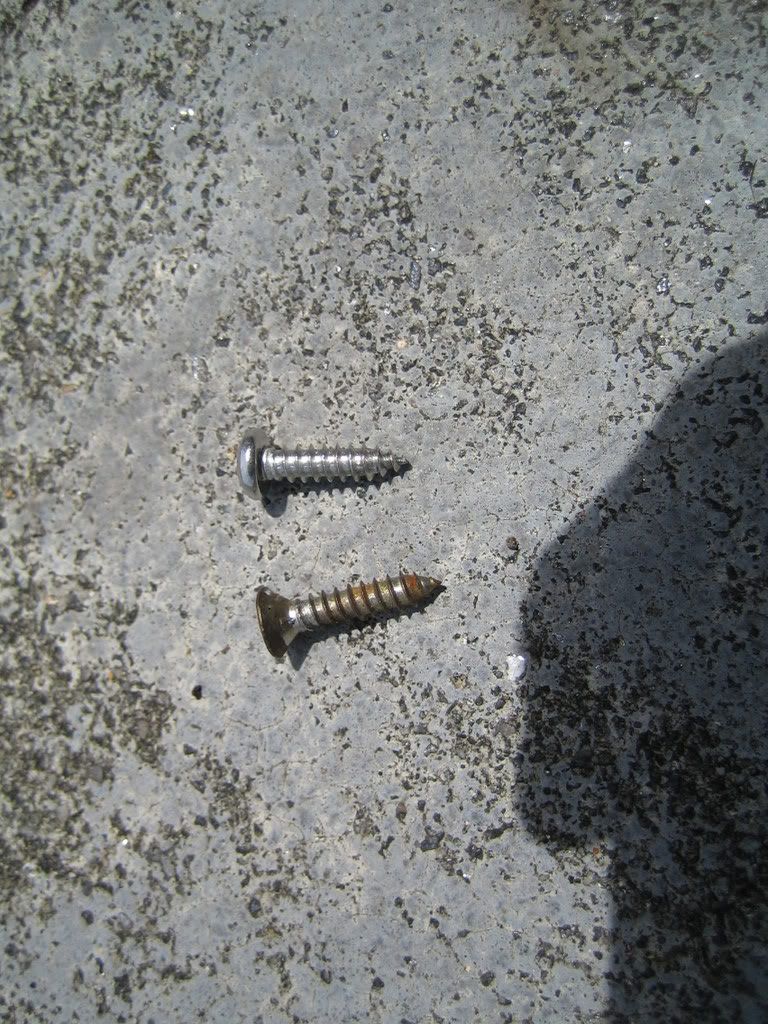
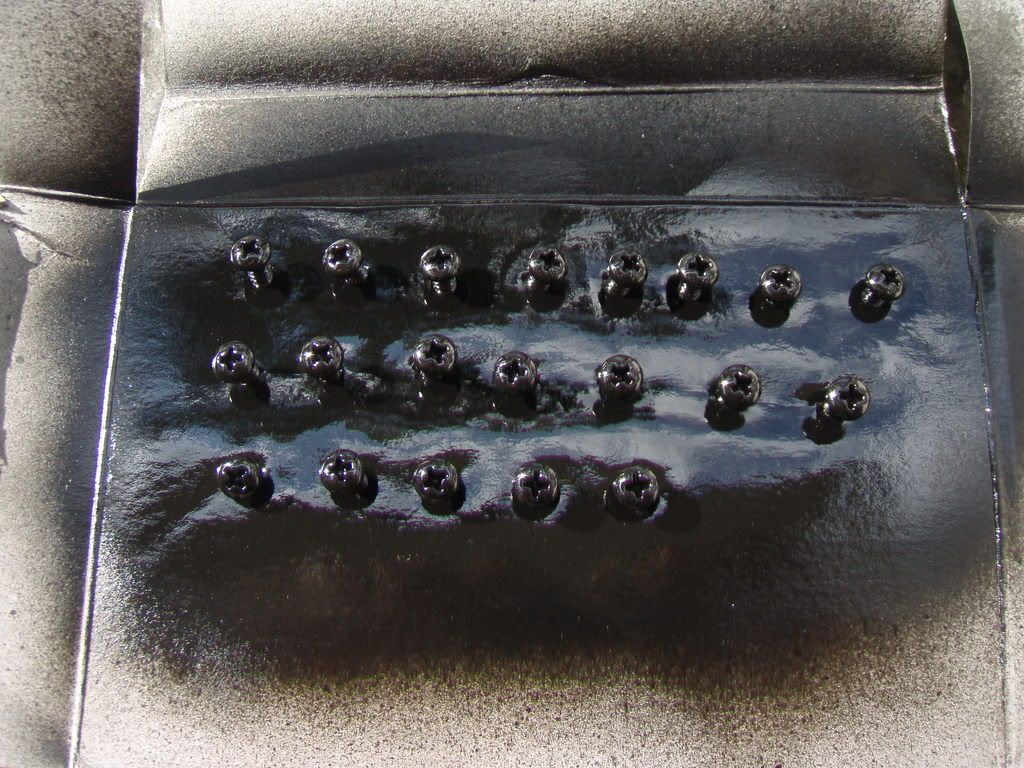
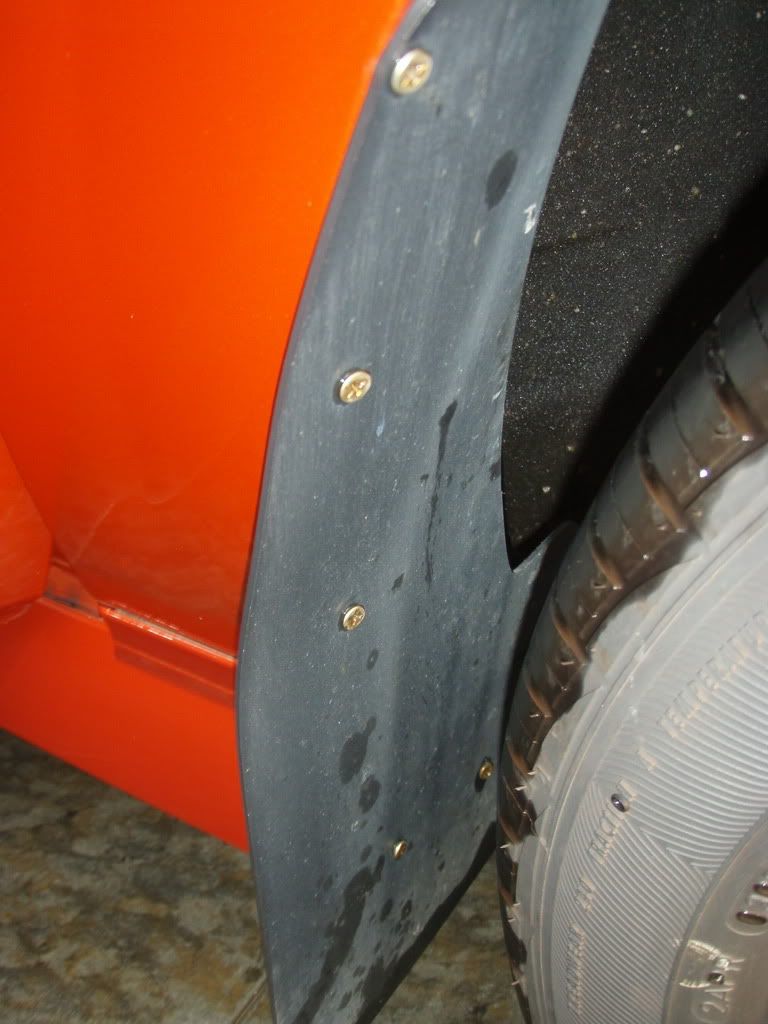
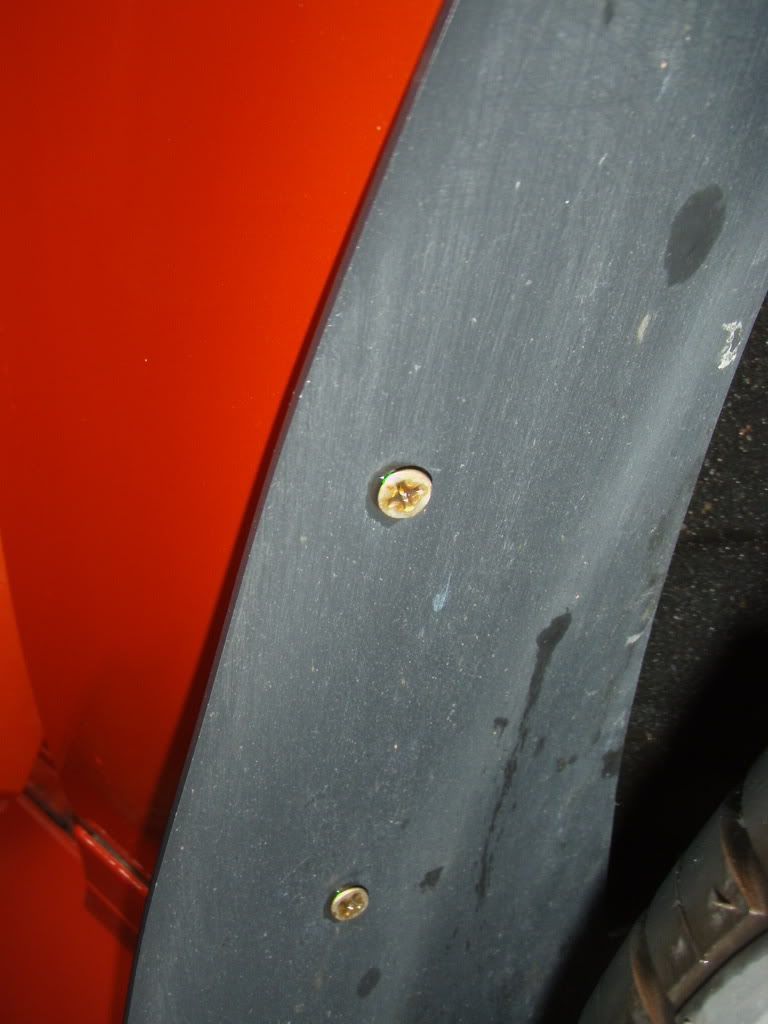
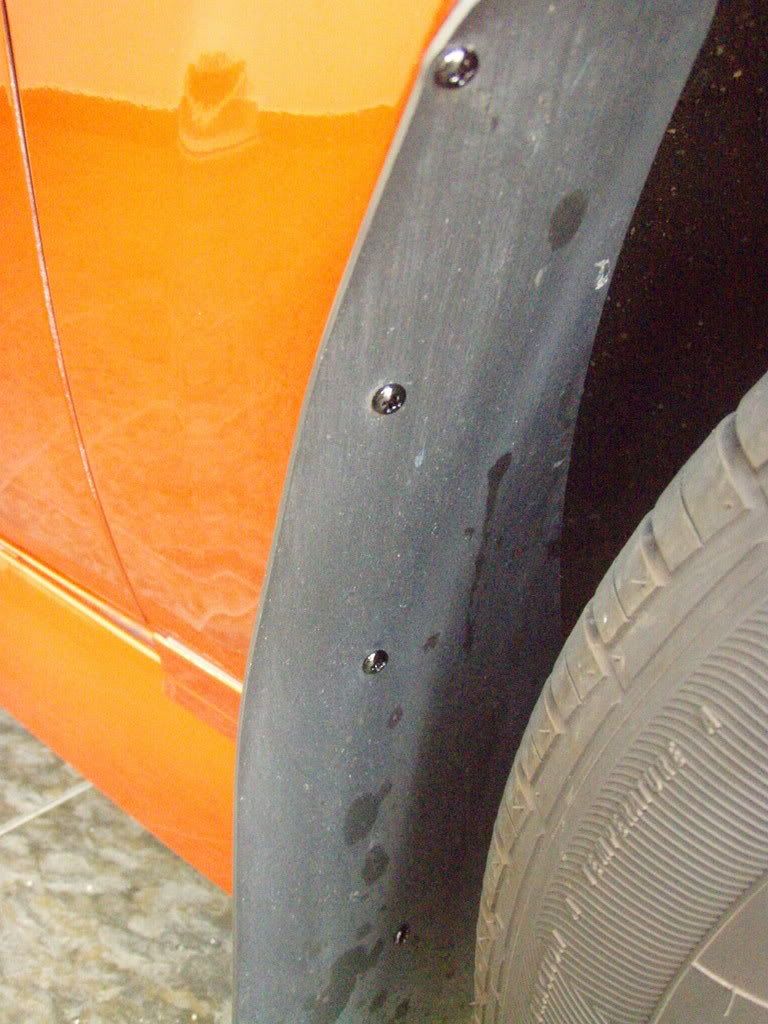
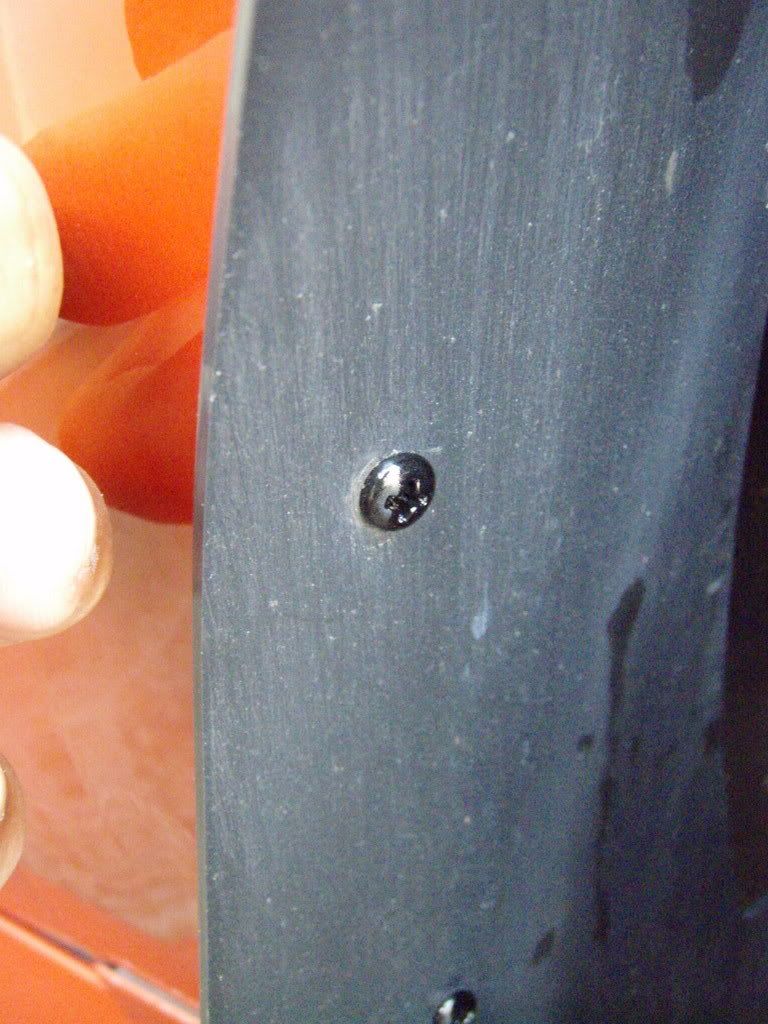
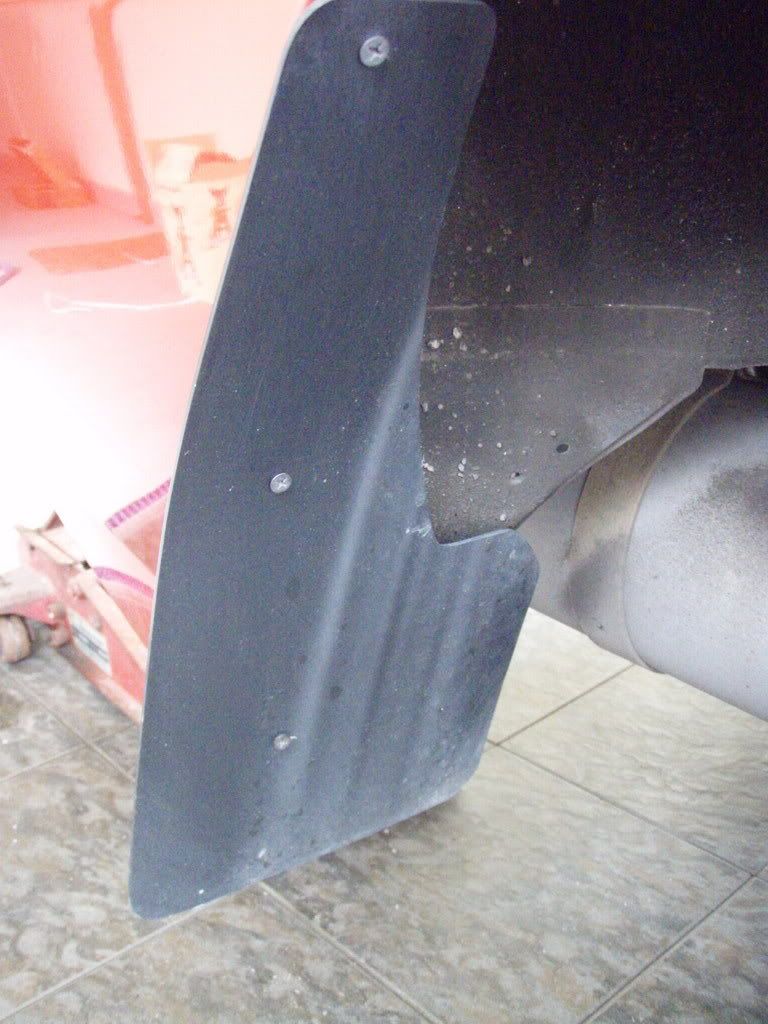
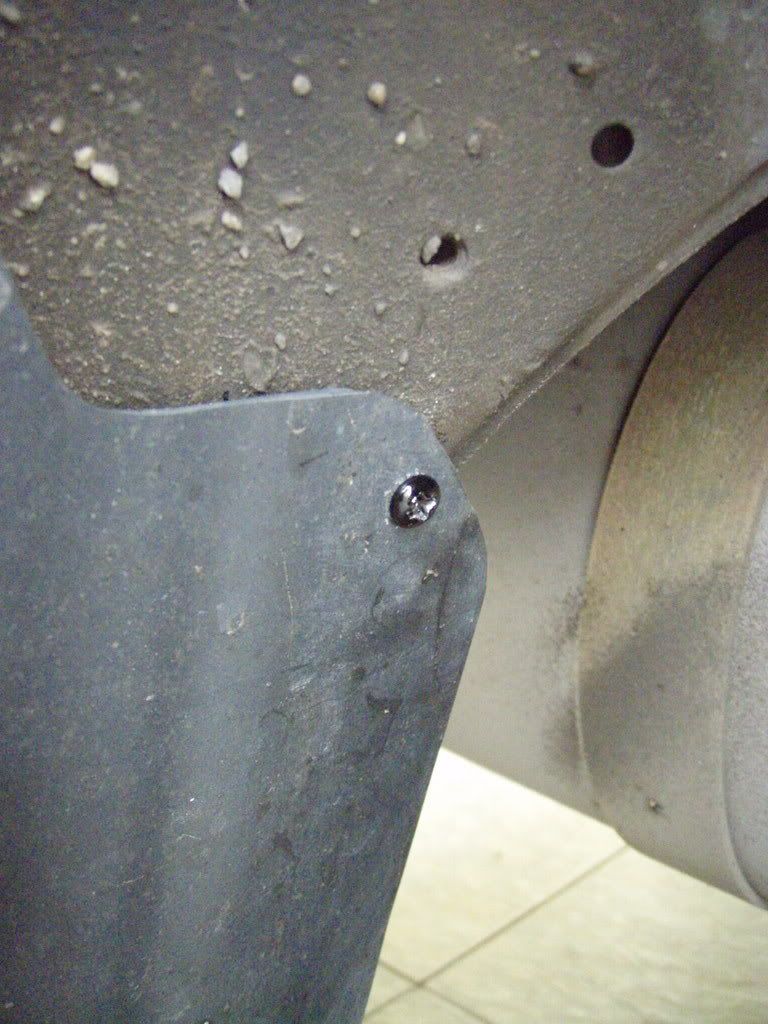
just changed the screws for my mud flaps the accessory shops use counter sink screws heres an example » Click to show Spoiler - click again to hide... « » Click to show Spoiler - click again to hide... « these screws eventually tear through the plastic as the head is tapered not to mention they rust mine were only about 6 months old and they were rusting already its no surprise tho as they are made from steel and the wheel wells are one of the worst places an unprotected steel part could be so what i did was i went down to my local everlast nuts & bolts outlet and got me a bunch of "stainless steel pan head self tapping screws" (which can be seen above in the 2nd picture on the right of the silver counter sink screw) they were 20cents a piece...but they wont rust...i needed 18 pieces so thats rm3.60...not too steep rite?  for the size, i took out one of the screws from the front as a sample once i got the ss screws, i then sprayed them with a couple of coats of flat black and another couple of coats of clear lacquer...(atleast they wil be less obvious on the black mud flaps now) » Click to show Spoiler - click again to hide... « for the front wheels you can just turn the wheel full lock and change all the screws for the inside most screw (there are five in all for the front) you'll have to use a stubby screwdriver they used silver screws for my front and the black screws (shown in d 1st pic) for the back flaps this is what it looks like with the shop installed screws (note the rust) » Click to show Spoiler - click again to hide... « » Click to show Spoiler - click again to hide... « and this is what it looks like after i have changed the screws » Click to show Spoiler - click again to hide... « » Click to show Spoiler - click again to hide... « for the back wheel flaps, they only used 3 screws this is because there are 2 plugs (i think for anchoring the bumper) on the inner edge of the bumper where the flaps will run on they did not put a screw on the inside (to create an L shape) like they do for the front wheels this is because they would have to remove the wheel to do this and they could not be bothered the result is that the flaps on the back are anchored to the bumper with 3 screws in a straight line this allows the flap to,...well,....flap  hahaha hahahaover time it will work itself lose and possibly tear off from the screws heres a pic of the original setup » Click to show Spoiler - click again to hide... « what i did was remove the back tyres and replace their 3 original screws and then i drilled another one on the inside to secure it in the 2nd dimension (basically to create an L shape like the front) the part that it is screwing into is metal...and the angle is kinda weird...so what i did was use a 2mm drill bit to get through the flap plastic then i used the black screw seen in picture no.1 (which has a very sharp point) to make the hole through the metal backing (i used a power screwdriver to do this) (i tried using the drill bit but the angle kept making it run off target) this is what the 4th screw looks like after its installed » Click to show Spoiler - click again to hide... « with this extra screw the back flaps become secure and sturdy just a note...all the screws were screwed in manually with a hand screwdriver and not a power screwdriver so as not to accidentally slip and thus damage the paint since it has only had a day to dry and thus wouldnt be so hard yet This post has been edited by neosaint99: Nov 2 2007, 10:31 PM |
|
|
Nov 2 2007, 09:24 PM
|

Junior Member
211 posts Joined: Sep 2007 From: JOHORE |
why i can't c the picture?
|
|
|
Nov 2 2007, 10:28 PM
|
|
Senior Member
1,216 posts Joined: Mar 2005 |
which pic u cant see?
|
|
|
|
|
|
Nov 3 2007, 07:49 PM
|
|
Junior Member
211 posts Joined: Sep 2007 From: JOHORE |
yeah can c now....hehe
|
|
|
Nov 4 2007, 04:52 PM
|
|
Senior Member
1,216 posts Joined: Mar 2005 |
update on the mud flaps for iswara lmst
aparently what the accessory shop lady told me was correct cant fix the stock iswara mud flaps on the lmst coz of the skirting we have to use the generic 'west' or 'sparco' type mud flaps just saw an lmst today that fixed stock proton flaps looks really bad here are the pics » Click to show Spoiler - click again to hide... « » Click to show Spoiler - click again to hide... « mud flaps are definitely recommended to be fixed for the lmst as the tyres kick up spray very easily but do not fix the proton flaps get the generic type  This post has been edited by neosaint99: Nov 5 2007, 08:39 PM |
|
|
Nov 6 2007, 12:07 AM
|

Senior Member
2,662 posts Joined: Dec 2005 From: Ipoh Mali ^^ KL Pergi |
how much it cost?????????
 This post has been edited by andychan: Nov 6 2007, 12:09 AM |
|
|
Nov 6 2007, 03:28 PM
|
|
Senior Member
1,216 posts Joined: Mar 2005 |
QUOTE(andychan @ Nov 6 2007, 12:07 AM) how much it cost????????? how much which one cost? |
|
|
Nov 6 2007, 04:00 PM
|
Senior Member
3,128 posts Joined: Sep 2006 From: Earth |
how long u have spend on sound proof diy?
This post has been edited by wkho555: Nov 6 2007, 04:00 PM |
|
|
Nov 6 2007, 10:41 PM
|
|
Senior Member
1,216 posts Joined: Mar 2005 |
QUOTE(wkho555 @ Nov 6 2007, 04:00 PM) how long u have spend on sound proof diy? my bro and i did it in 2 days from time of opening the 1st panel to the time the last screw was tightened backbut this is the 3rd car we did so a safe bet for a newbie would be 3 days to do the entire car including tar sheets in the door panels |
|
|
Nov 10 2007, 09:11 PM
|
|
Senior Member
1,216 posts Joined: Mar 2005 |
new update on volt meter on 1st page!
|
|
|
|
|
|
Nov 14 2007, 06:51 PM
|
|
Senior Member
3,128 posts Joined: Sep 2006 From: Earth |
» Click to show Spoiler - click again to hide... « errm u take out the floor carpet n paste the soundproof rite? what u use to paste n do u put back the floor carpet? This post has been edited by wkho555: Nov 14 2007, 06:51 PM |
|
|
Nov 14 2007, 07:03 PM
|
|
Senior Member
1,216 posts Joined: Mar 2005 |
QUOTE(wkho555 @ Nov 14 2007, 06:51 PM) » Click to show Spoiler - click again to hide... « errm u take out the floor carpet n paste the soundproof rite? what u use to paste n do u put back the floor carpet? and yes...i put back the carpet after that the insuflex is not as tough as the carpet and the heels of shoes are pretty harsh |
|
|
Nov 14 2007, 07:04 PM
|
|
Senior Member
3,128 posts Joined: Sep 2006 From: Earth |
QUOTE(neosaint99 @ Nov 14 2007, 07:03 PM) i used Dunlop CA glue then the boot u seal with carpet as well?and yes...i put back the carpet after that the insuflex is not as tough as the carpet and the heels of shoes are pretty harsh i thinking of put bitument strip b4 the soundproof. is it double work? or just soundproof good enough? Added on November 14, 2007, 7:10 pmwhere is the address of the soundproof u buy? i cant find it oledi. sorry. >.< This post has been edited by wkho555: Nov 14 2007, 07:10 PM |
|
|
Nov 14 2007, 10:59 PM
|
|
Senior Member
1,216 posts Joined: Mar 2005 |
QUOTE(wkho555 @ Nov 14 2007, 07:04 PM) then the boot u seal with carpet as well? no need put bitumen then insuflexi thinking of put bitument strip b4 the soundproof. is it double work? or just soundproof good enough? Added on November 14, 2007, 7:10 pmwhere is the address of the soundproof u buy? i cant find it oledi. sorry. >.< just choose one or the other imho bitumen would be better than insuflex from a performance point of view but the prob is the cost so from an economic point of view, insuflex makes more sense the address was on the other thread...the one about insulation i think its been closed as there was no activity there i dont have my file with me now so cant get the address will prolly get my hands on my car file next month or so only will post up the address once i get it mayb u can ask in the saga thread if any1 copied it down... u might get lucky...who knows |
|
|
Nov 14 2007, 11:03 PM
|
|
Senior Member
3,128 posts Joined: Sep 2006 From: Earth |
errm do u nid to paste back the floor carpet?
|
|
|
Nov 14 2007, 11:43 PM
|

Senior Member
1,510 posts Joined: Jul 2006 From: Klang Valley |
today just fix my headlamp..change to 100w,normal is 55w.
den change Dashboard Meter Bulb...red colour!  Next Mod List : 1.Extrator&Ekzos Setup 2.Pivot Volt Stabilizer 3.Strut Bar...etc 4.Tinted 5.Rims 6.Soundproof..(1door,RM150..if got sound coming in,got warranty to repack back.Total everything at least RM800. DAMN EXPENSIVE!) 7.Gauge Total everything cost RM2k++............  |
|
|
Nov 14 2007, 11:49 PM
|
|
Senior Member
1,216 posts Joined: Mar 2005 |
QUOTE(wkho555 @ Nov 14 2007, 11:03 PM) errm do u nid to paste back the floor carpet? the carpet is not stuck....even originallyit is just laid down and everything assembled onto it thats what keeps it in place  Added on November 14, 2007, 11:50 pm QUOTE(Gilbert5107 @ Nov 14 2007, 11:43 PM) today just fix my headlamp..change to 100w,normal is 55w. wahden change Dashboard Meter Bulb...red colour! Next Mod List : 1.Extrator&Ekzos Setup 2.Pivot Volt Stabilizer 3.Strut Bar...etc 4.Tinted 5.Rims 6.Soundproof..(1door,RM150..if got sound coming in,got warranty to repack back.Total everything at least RM800. DAMN EXPENSIVE!) 7.Gauge Total everything cost RM2k++............ so much mods  btw,... please read this before you fix tint http://forum.lowyat.net/topic/554135 This post has been edited by neosaint99: Nov 14 2007, 11:50 PM |
| Change to: |  0.0276sec 0.0276sec
 0.57 0.57
 6 queries 6 queries
 GZIP Disabled GZIP Disabled
Time is now: 6th December 2025 - 09:47 PM |
 Quote
Quote