as my first attempt above at embedding vids rosak, i redo for the posts below. here goes;
QUOTE
right, lets get started.
first, a vid to broadly explain the 2 major differences >
this will aid in understanding the requirements and challenges of each.
later posts will delve deeper into the minutia. enjoy!
------- now, we move on to the first of the stock removal methods.
below video is the most hardcore version of stock removal.
just need piece of steel, hack saw & file. thats it to start.
if the steel u use does not require heat treat (like mine) - even better/faster finish.
based on size of ur knife design & steel thickness - can be done in 3 - 5 hours.
the whole process is very zen...
-----
next is stock removal style using power tools - this is the style i use most frequently now.
u will need an angle grinder with cutting & grinding disc & a drill usually. can skip the drill if gonna paracord wrap the handle or do a burn through.
it will cut knife making time down tremendously. anywhere from 60 - 90% faster.
results will also be more uniform, especially if using a belt sander/grinder.
now everything is neatly in 1 post wid embedded codes. senang nampak
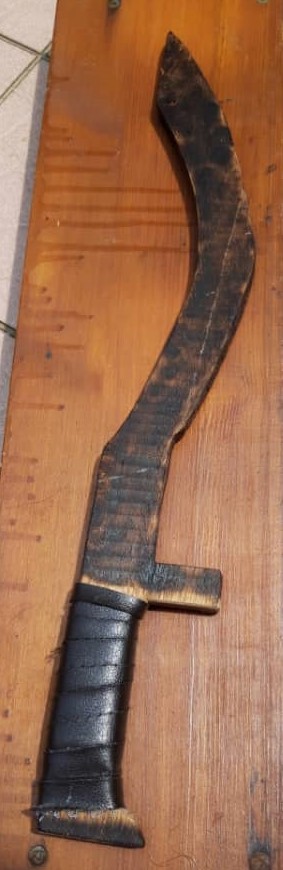
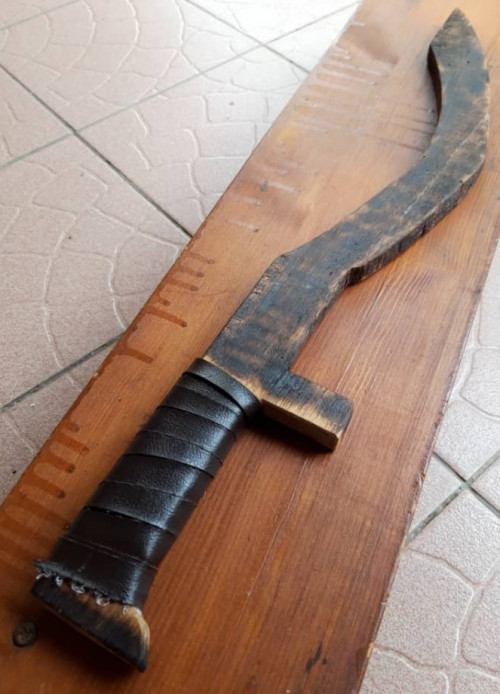
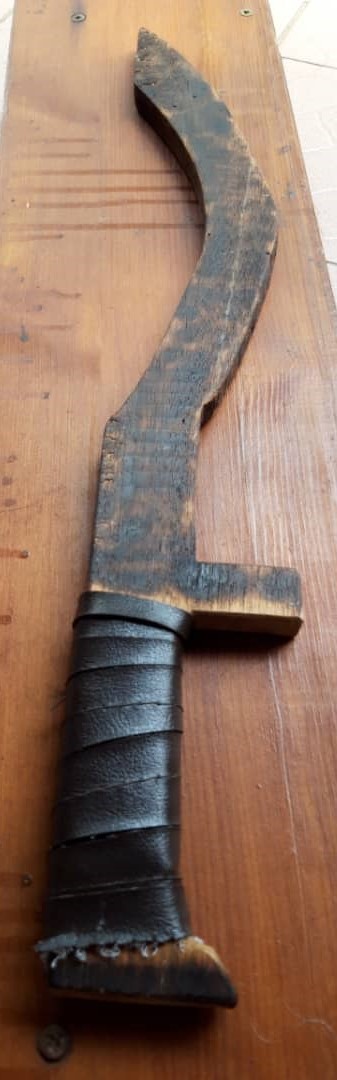
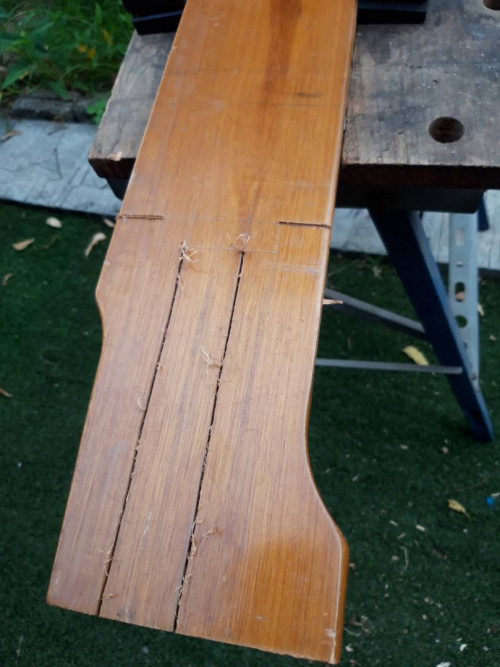
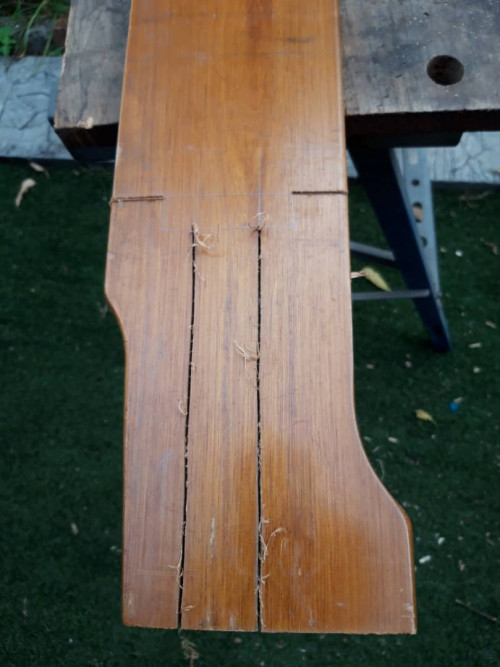
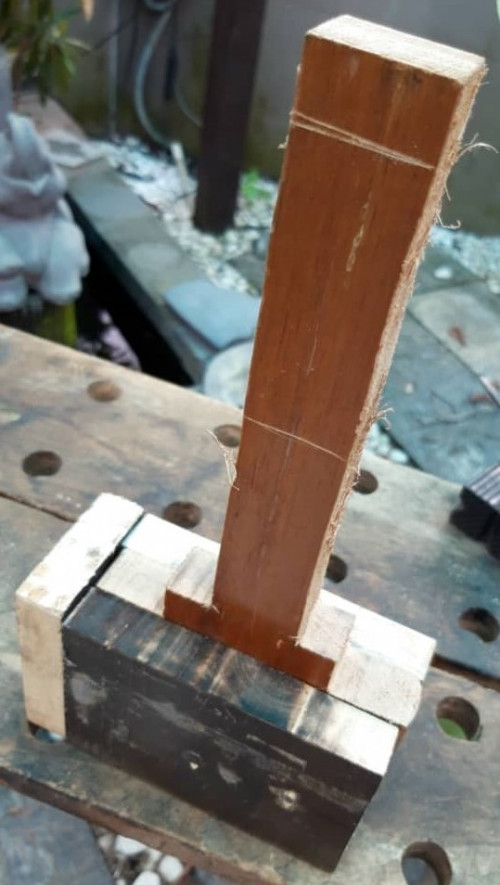
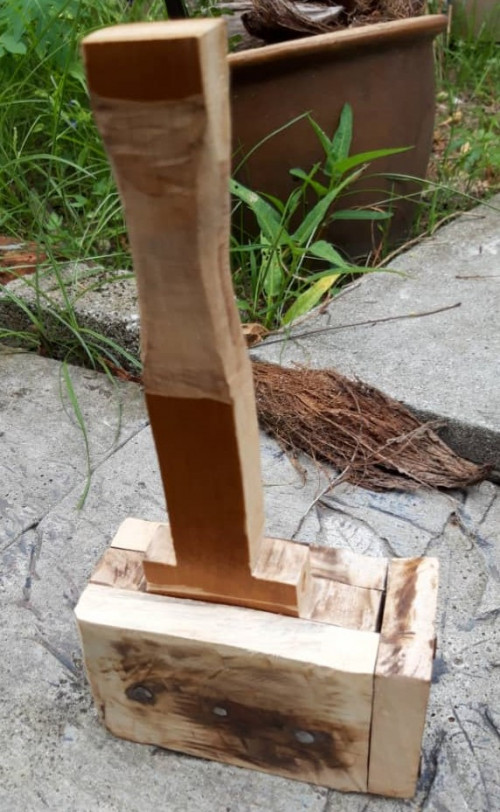
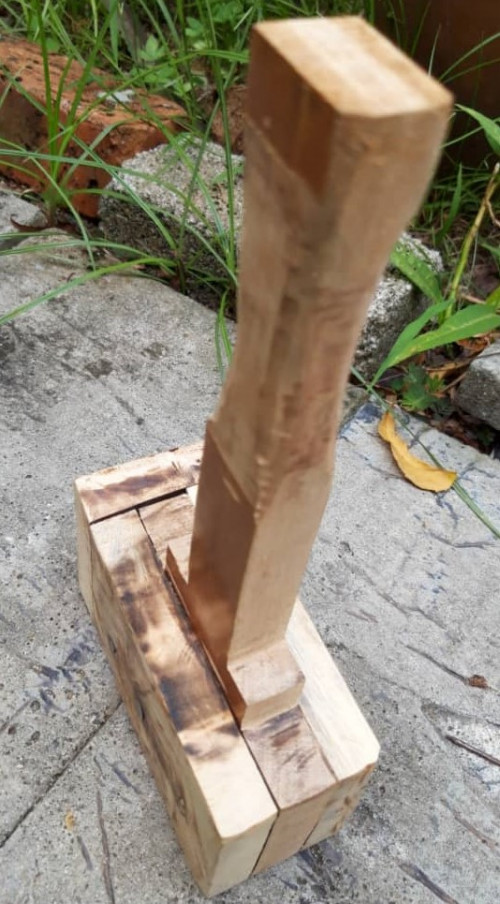
today, i gonna make the wooden khopesh as prototype for a future steel one. should be done in 40 mins. will post pix later today.
pix enclosed below. more pix 2moro if clearer skies - today too overcast for good shots.
took 7 mins to cut, 20 to planar & file down crevices & surface, 2 mins to burn treat & seal wood (also gives a richer darker colour) + 1 min to cincai pleather wrap handle. all in = 30 mins to completion.
tools used = saw, wood rasp, spokeshave, lighter.
material = scrap balsa wood from shipping crate. very lightweight
as usual, this is the rough/prelim version. i'll revisit down the line to make modifications - might thicken the handle, then rewrap wid pleather or string, as well as maybe hone the edge to a sharper point.
for those wanting to recreate what i did, here's a good video. his khopesh is more detail oriented that my rough cut version >
... & those who wanna make the genuine thing, here u go >
there are 2 main known types - classical forging & modernised forging.
most smiths, realistically, use a combination of both techniques to best effect.
i will start of with the most hard core version - forging without the use of power tools or machines. this is the most grueling of the forging arts.
while i luv & respect all things/types of forging, smiths who practice this style have my particular admiration. i hope to one day be a smith who only makes things in this style. there is something about the simplicity of it that is very peaceful & zen to me. it greatly appeals to the soul.
first video depicts the making of a bill hook... though in the broadest sense - this is not a functional bill hook. the 'bill' part is more ornamental than anything. anyway, its a scandanavian style one versus the more popular ones with actual functional cutting 'bills'... regardless its a work of beauty & is one of the most relaxing videos ever. i watch it to destress. enjoy;
... & here's another smith doing it in the same manner... fire, tongs, hammers, a file & an iron will... end result = a good and rough & tough bushcraft kukri
... of coz gotta mention the ubiquitions katana if we're talking old skool forging... prob the most reconisable type of sword.. def got a few fans here no doubt... brings back fond memories of making them.. good times
so havin met my daily post limit today, tomorrow we delve into the midlevel realm of forging styles - the meeting of modern machinery & old skool pounding of hot metal. i got plenty of fave vids on it.
Gosh! That sounds perfect, CRAFT_COACH, but as for now - unfortunately - just videos for me. But thanks for the offer and your posts anyway. I hope that in future I could join you as I've always wanted to try something like this. I made some wooden swords for my nephews in the past (fantasy-ish european ones), now I'm probably going to make a khopesh replica for our little lady who is going through Ancient Egypt (because of mummys, mostly) phase.
Subscribed to this thread, so I'll be waiting for your updates! Keep going!
thank you so much!
its greatly heartening to see these posts inspiring others
i started down this part myself decades ago after drawing inspiration from others' creations.
of coz, as life got in the way & priorities changed - this fascinating art took a back seat... but with the advent of the internet & fantastic shows like 'forged in fire'... that old itch begun anew
i'm glad its restarted your enthusiasm for crafting. hope to see your inspired creations & in turn be inspired by them. its an old saying, but a particularly true one for this subject matter; "steel sharpens steel"
lookin forward to seeing your 'beauty' posted here eventually.
am sure your little miss will be the belle of the nile with her lovingly crafted khopesh. thats great parenting ... you would have created something for her that she can proudly & fondly reminisce about many years from now.
as always - open invite. come whenever. i love to collaborate. the more the merrier. hope to see you & collaborate together in the (near) future. tc & keep crafting (& posting result pix here), dan1el86!
... & here's another smith doing it in the same manner... fire, tongs, hammers, a file & an iron will... end result = a good and rough & tough bushcraft kukri
and in my next post...
reposted above video again coz didnt appear correctly in initial post. these are the steps to make a no frills kukri knife, old skool style
... though its a shame having to waste a post redoing this, guess i can use the opportunity to talk about the kukri @ khukuri design
kukris are highly recommended for those doing lot of chopping work in confined spaces
its curved fat belly geometry makes it perfect for making precise heavy deep slices wid minimal force
think of it as a deep cutting axe in a sleek blade form. thats basically what it is
i have chopped huge swathes of trees and bamboo groves with my kukris
learnt early on that less is more wid a kukri in terms of weight & thickness
they shud be weighed to ensure can chop efficiently for a few hours, wid the least strain to shoulder & forearms
let the blades' fat belly design do the work, instead of mass & brute force
basically: lesser weight = lesser power needed to lift it up/swing it forward curving wider mid belly + tapered convex or flat grind = deeper targeted cuts & better edge retention
over time, i've experimented & learnt to play wid the belly placement to better suit it for a particular function - slicer, cutter, chopper, batoner, general purpose, etc.
all r good ... just depends how/what ur using it for
anyways, since this post is bout old skool forging, am including a bonus vid below on old skool forging of kukris done the TRADITIONAL way in nepal... might wanna mute ur volme tho >
today we venture into the midpoint of old skool forging (no power tools) meets modernised forging/smithing (very heavy reliance on power tools).
in this midpoint method, you will definitely see lots of angle grinder usage... its a heaven sent tool that cuts metal, grinds edges & sands/polishes surfaces, all in one.
if there is 1 tool i'd recommend new smiths to get first - it'd be the angle grinder. of are the more commonly known
super versatile, cheap & easy to use. go for a 100 mm disc type @ m10 thread version & get a cutting + grinding disc to start off first.
with that said, i move on to today's video that epitomises old skool forging meets new tech.
its another personal fave of mine as the master craftsman uses purely old skool methods, right up until the near end where he uses an angle grinder to bevel & edge the knife.
this knife type is known as the 'indian araval' @ indian billhooks. they vary greatly in size, shape & length.
it can be found throughout asia, latin america & parts of europe, where its also referred to as a 'brush axe'.
these billhooks also stick to the more commonly known definition of what a billhook design subjectively is; perhaps a 'hook tip thats shaped like a bird's bill'.
the smith is using a coal powered forge + a manual hand crank blower to produce 4 beautiful workhorse knives. though its not shown, he's probably using a 'burn through' method to attach the knife blade to the handle with a 'bracing collar'. i doubt he's pinning it. enjoy!
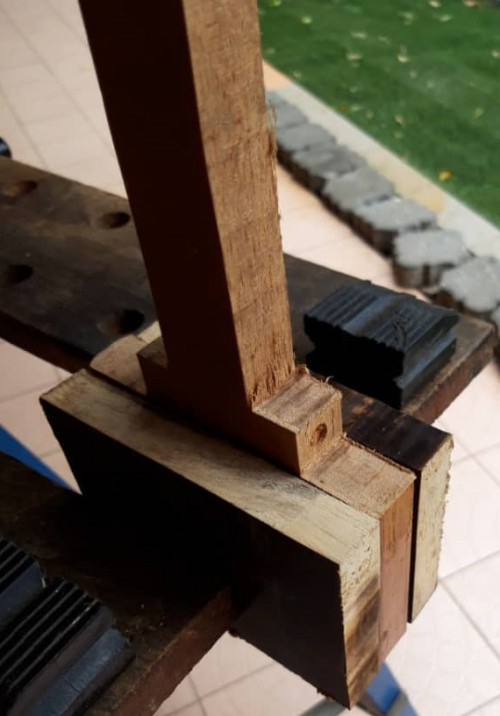
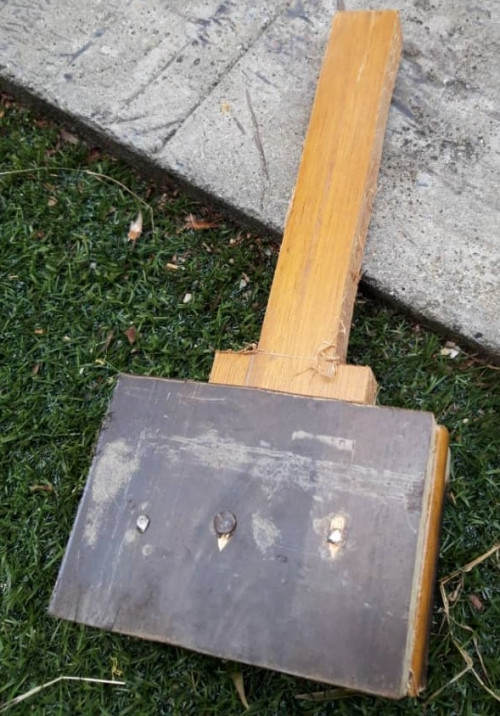
whats is a mallet for? - use it when need to knock something gently/without marring surface or finish/when need to distribute impact force over a wide area. vid below details further:
i use the many types i have usually to nudge handles into rat tail tangs, for chiseling, etc. it has MANY uses. cracking walnuts on xmas is also fun too
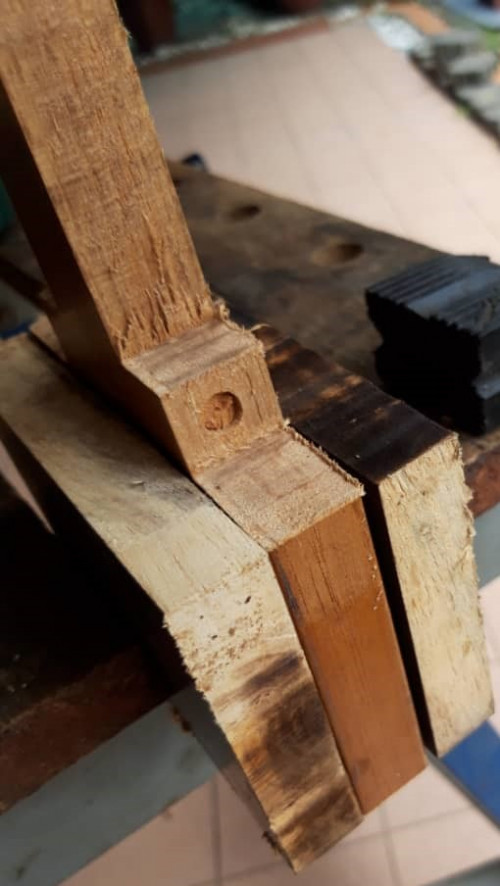
this simple diagram below is the blueprint for my mallet;
wood material: reclaimed scrap wood. the base is upcycled medium hard wood from a bedpost. the 2 attached side wood pieces are upcycled hard wood from a cupboard. all free & easily found - just walk around your neighborhood or any house undergoing construction. there will be a huge amount of abandoned wood waiting/hoping to be reclaimed & made into something beautiful.
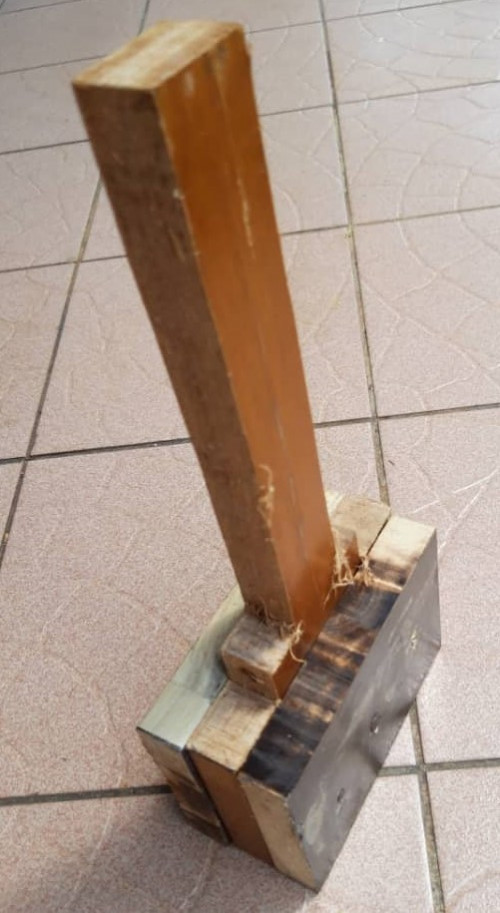
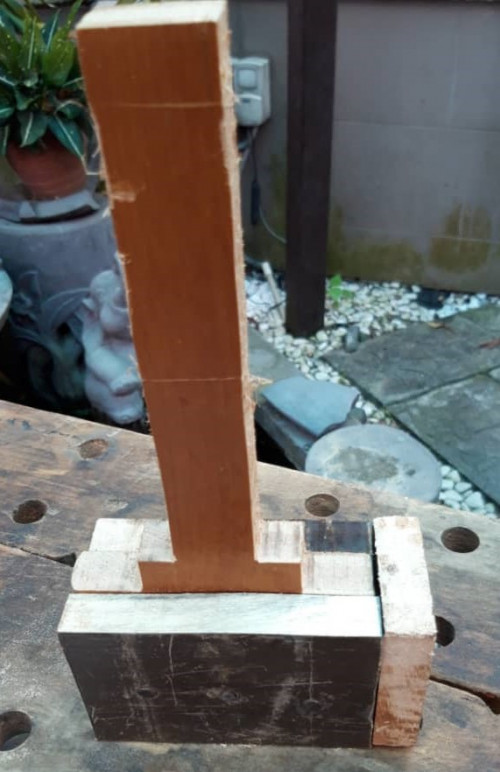
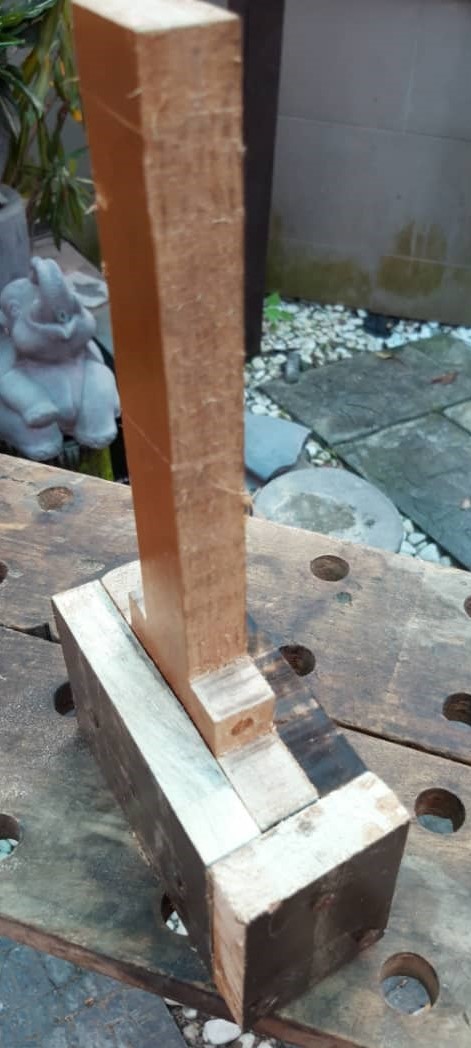
if i had to link a vid that most closely resembles my eventual mallet build, it'd have to be this;
he uses a similar 3 wood layer build like mine for the striking surface, instead of the more common 1 big chunk of wood style. both are great.
tools used for building my mallet: saw, hammer, wood rasp, sandpaper(s), 3 nails. thats all needed to recreate what i did.
i will test mine over the week & determine what other tweaks/experiments wanna do with it... regardless, its a very handy tool to have around & even safe in kids hands. so get started on ur own mjornirs, folks!
... and now, back to our continuing journey into the midpoint of where old skool forging (no power tools) meets modernised forging/smithing (very heavy reliance on power tools).
in today's video, we see another master craftsman making yet another traditional knife by fusing traditional forging methods with modern day power tools.
where the previous indian smith only used an angle grinder, this nepalese smith additionally uses a buzz saw, bench grinder and drill too to create one gorgeous kukri knife.
i bet the air intake blower for the forge is powered by electricity too.
this shows a marked increase in reliance of power tools & consequently, a more 'polished' end product.
do also note the handle material - thats buffalo horn. tough stuff.
.. and the journey continues, with today's video featuring our very own malaysian smiths!
the smiths in question are the excellent parang bidor folks.
in this video, we see all the modern tools used by the nepalese smith, in addition to the 'power hammer' - a very serious piece of equipment. it can effectively shorten 8 grueling hours of pounding metal to mere minutes!
personally, the owning of a power hammer is what differentiates a hobbyist/pro vs a serious crafter intent on mass production for me. many top level pros dont own/use a power hammer... but in my experience, those who do own a power hammer are serious experts who can mass produce huge numbers of their creations.
the show 'FORGED IN FIRE' is also a perfect example of this midpoint method of old skool forging aided by power tools. you will see them using 'big blue' (the nickname given to the inhouse power hammer), in addition to a myriad of other tools as they race to finish their creations. i will go into details on the power tools used in a much later post after covering the basics.
as an aside & to give credit where its due = the bidor parangs are truly stellar things. quality blades with good sharpness, edge retention, quick to resharpen & not too overtly brittle.
here's a bonus vid showing the making process & a bidor parang being put through a decent field test.
the only issue i ever had with them were the rough, casting made plastic handles - blisters fast & starts rattling after a few years of wear & tear. never had an issue with the blades themselves.
i'd heartily recommenced these parangs for camping needs & general household chores. you get the same performance of a rm 400 or more branded knife for a mere rm 22 - 28. talk about the deal of a century (coincidentally, the knife may well last that long with the proper tlc).
one parang bidor should easily last 8 - 20 years with very hard use or 2 - 3 generations with occasional use & basic upkeep. numbers derived based on my experience. when i do chip/break a blade - i just reprofile it & get another few decades of use from these supreme workhorse of knives.
while the bidor parangs have its own charming rough & tough aesthetics - in terms of functionality, its unsurpassed by other pricier options.
further bonus - no hesitation or guilt of putting if through the ringer as there's no beautiful surface/finish to be marred by rough use. i always grimace when having to put a beautifully finished knife through its paces - thats never an issue with bidor parangs
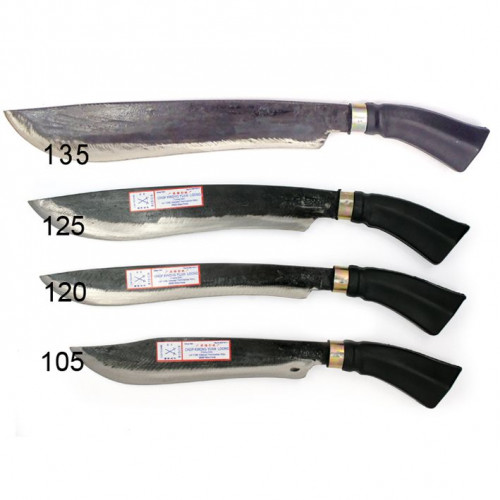
do choose a size that best fits ur needs though - i constantly wish i had brought my smaller versions when having to do close quarter work. the extra length affects the swinging angle/precision. based on ur needs - less just might be more. they rate them along '125', '135', etc classifications that denote length.
so, if you want a ridiculously cheap workhorse of a knife - get a bidor parang. available in most/all hardware shops here... thai neighbours, please get urselves aranyiks ya. another brilliant cheap & supremely functional workhorse line of knives. i will touch on the aranyik lines & others much further down the line.
today, we head to vietnam to watch a xa gac forged by utilising old skool methods aided by modern tools.
the new modern tool seen in this video is the electrical planer used to shape the handle.
it quickly turns any branch or piece of wood into a faceted handle in short time, as opposed to using a drawknife or other such manual shaping tool. i will detail further on planers, drawknifes, etc in a much later post down the line.
do also note that ingeniously modified belt sander - it even has a drill head attachment!
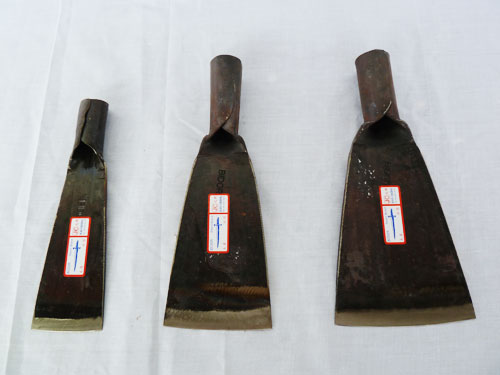
the xa gac is basically 2 hander machete thats similar in design to the malaysian oil palm chisel. the difference is that its more tapered forward to be a chopper/slasher & one of its longer side edge is sharpened, as opposed to the top tip as in a oil palm chisel.
its long pole handle allows arcing momentum to be built when swinging it. couple this with the thick heavy blade, the xa gac delivers forceful chops to clear heavy brush.
it was rather strenuous to use for long periods. great core & cardio workout though. lol
i greatly appreciate the ingenuity showed by this smith. in addition to modifying his tools, he also demonstrates some very novel techniques & showcases some rarely seen ones too. lot to learn from here for any wannabe/future smiths. repeat viewing is encouraged as his technique is stellar. enjoy!
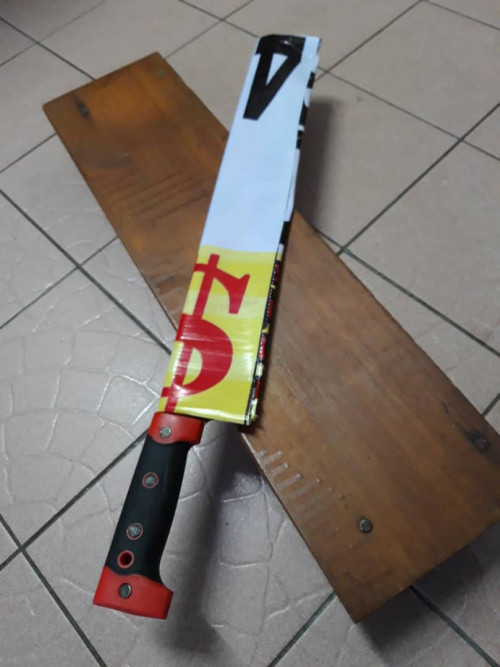
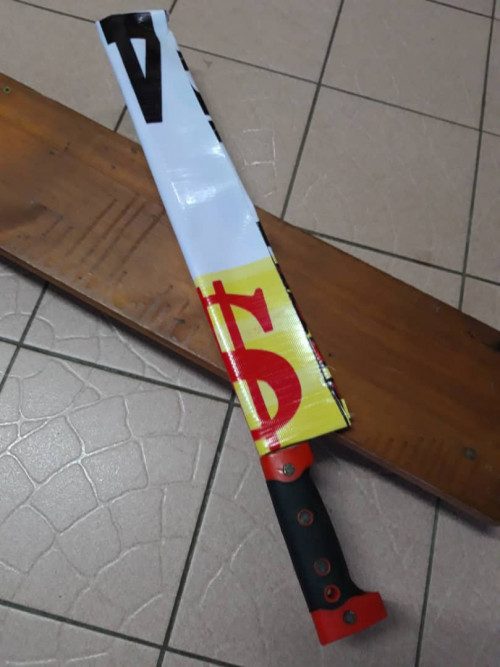
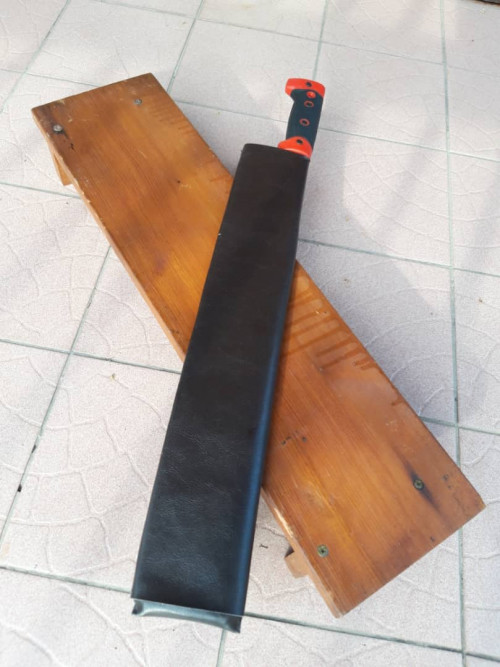
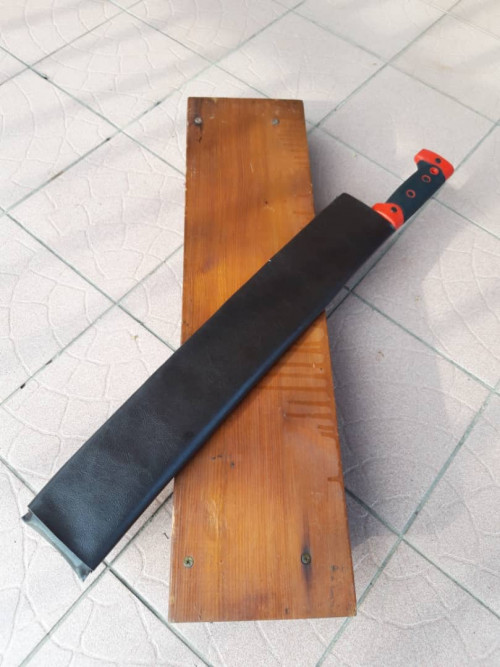
today's weekend quick project is gonna focus on making light custom leather sheaths for some of my machetes.
these will be lightweight versions designed to protect the machetes & allow them to be transported/wedged inside a belt without risk of injury to the carrier.
its a very fast project, so pix will be up very shortly, or as soon as there's decent light to shoot good pix.


 Nov 1 2019, 01:17 PM

 Quote
Quote


 >
> 

 0.0247sec
 0.52
0.52
 7 queries
 GZIP Disabled