

QUOTE(feralee @ Jun 23 2007, 05:49 PM)

ini macam tolong DIY la
or sama sama DIY la

no need belanja minum


LYN Proton Saga/Iswara Drivers' Forum! V3, TT is still going ON!PM batista_beast!
|
|
 Jun 23 2007, 05:55 PM Jun 23 2007, 05:55 PM
|
 
Senior Member
7,842 posts Joined: Sep 2004 From: Pandan Jaya,KL |
QUOTE(feralee @ Jun 23 2007, 05:49 PM) ini macam tolong DIY la or sama sama DIY la no need belanja minum |
|
|
|
|
|
Jun 23 2007, 06:06 PM
|

Senior Member
6,142 posts Joined: May 2006 From: Planet called "EARTH" |
QUOTE(icyd @ Jun 23 2007, 05:41 PM) DIY.. u have to ask catacomb shifoo cos only he show us his customize LED meterboard.DIY install ah?i will try but first i need to know where to buy those led first.thats what i was asking This post has been edited by kevinlim001: Jun 23 2007, 06:06 PM |
|
|
Jun 23 2007, 06:11 PM
|

Senior Member
727 posts Joined: Jan 2003 |
QUOTE(kevinlim001 @ Jun 23 2007, 06:06 PM) u have to ask catacomb shifoo cos only he show us his customize LED meterboard. catacomb sifoo...can shed some 'light'? |
|
|
Jun 23 2007, 06:13 PM
|

Senior Member
4,897 posts Joined: Aug 2005 |
QUOTE(singchaii @ Jun 23 2007, 05:55 PM) Good idea.. Haha.. If really wan, then no harm doing that.. Bila mau? DIY where? Hehe.. u know to DIY bovery hard one need to drill hole some more |
|
|
Jun 23 2007, 06:15 PM
|

Senior Member
1,711 posts Joined: Jan 2007 From: Damansara/Ampang |
QUOTE(kevinlim001 @ Jun 23 2007, 05:01 PM) wat 80 and 180? rm80 = non ori fanrm180=ori fan they said aircond fan dead.. |
|
|
Jun 23 2007, 06:31 PM
|
|
Senior Member
4,897 posts Joined: Aug 2005 |
c this sifu NeoSquall done it
WOO!! okay... I rate this as 3/10 difficulty.. but with limited tools... I rate this 10/10 difficulty... I got pissed and frustrated because I dun have the tools to do this... it took me three days to finish it up.. ahhaha!! so if you guys are interested... here goes.. I got this fender bars from UltraRacing... 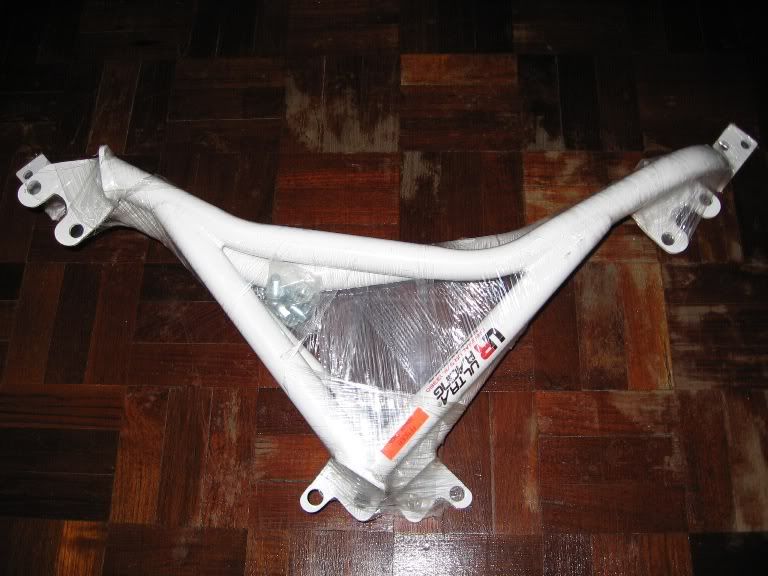 the last part of my chassis strengthening project... so since its the last part and I blew a big hole in my pocket and I dun have the money to go to a workshop to ask them to help me fix.. why not I DIY it? it seems easy enuf.. it is actually easy... just tat it is very time consuming and without the proper it can be pretty frustrating.. so lets go on to the DIY.. first to remove the fender... you can either choose to remove the bumper of your car or not.. but I suggest that you remove ur bumper larh.. much more easier to remove ur fenders because there are many hidden screws...(cannot lah skywalker.. must remove the whole bumper.. hard to reach the screw near the signal light..) so first step.. remove the bumper.. 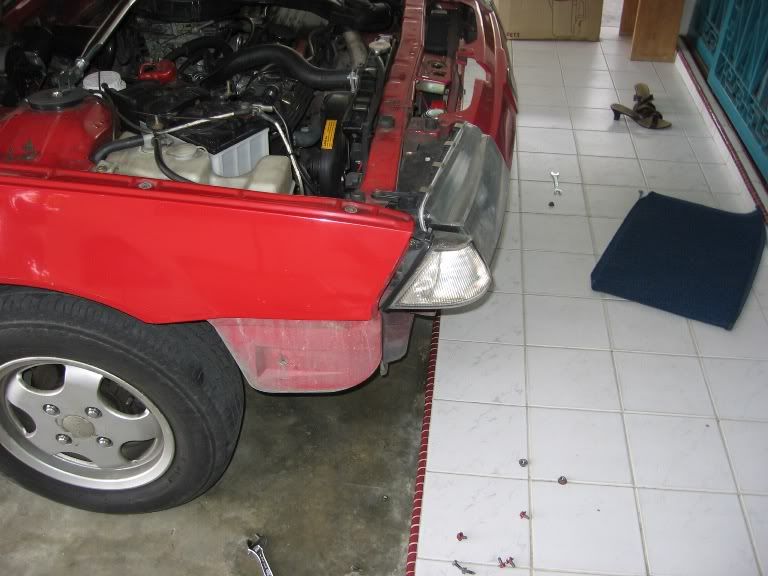 then its time for you to go on a hunt for all the screws... there are many screws... more than 12 screws... I cant remember the exact number.. there are the hidden ones and the obvious ones... so the following pics shows the screws... http://i28.photobucket.com/albums/c212/Sirbabi/IMG_1357.jpg http://i28.photobucket.com/albums/c212/Sirbabi/IMG_1358.jpg http://i28.photobucket.com/albums/c212/Sirbabi/IMG_1359.jpg this one is just below the door.. http://i28.photobucket.com/albums/c212/Sirbabi/IMG_1360.jpg http://i28.photobucket.com/albums/c212/Sirbabi/IMG_1361.jpg this one is near the signal light.. hidden screw.. http://i28.photobucket.com/albums/c212/Sirbabi/IMG_1363.jpg another hidden screw... so removing the fender... be careful here.. you dont just rip the fender off... just slowly take it out... it will be like this... very very dirty.. 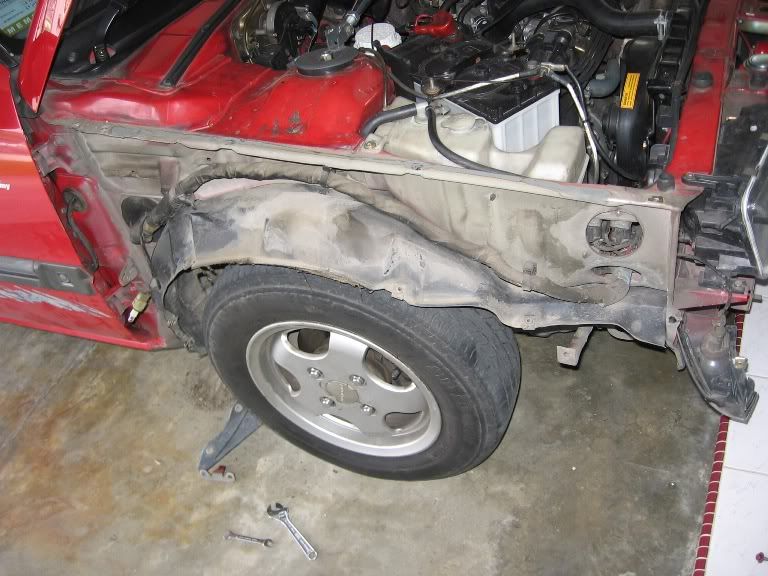 then moving on to putting the fender bars.. before you start.. you have to get this floor jack to support ur door or esle ur door alignment will be off... 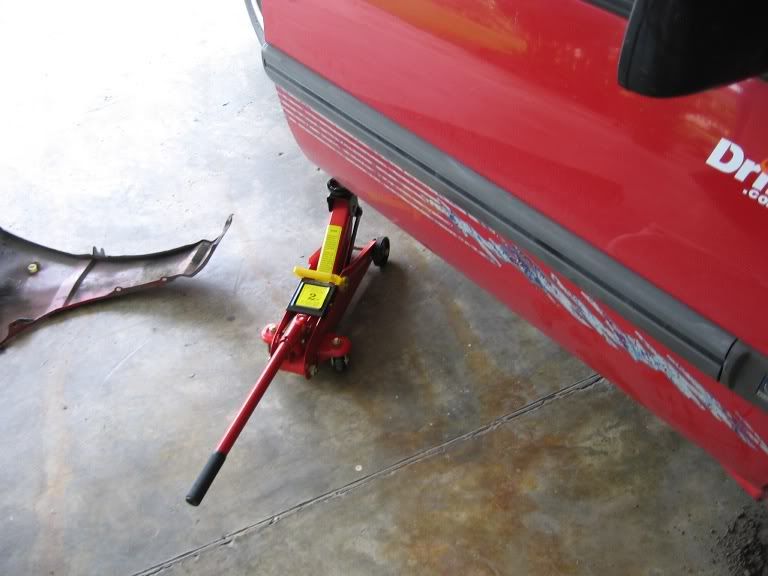 make sure you jack it up till the max you can go to let the door to stay in place.. then you start removing ur screws... the screws on the door is quite hard.. you ahve to use this round spannar... I dunno wat do they call it... instead of a normal C shape spannar... you use the round headed one to remove the screws... much more easier... the screws are screwed on very very tight.. so have fun removing them... after you put ur fender bars in place.. make you sure check ur door's alignment.. is it off or not... do adjust it if its off... when your fender bars are in place.. it will look something like this.. 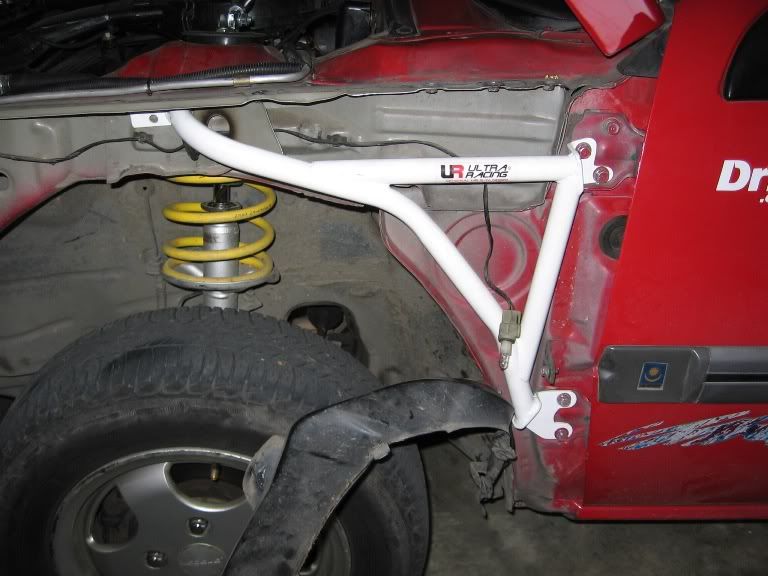 now... you have to drill.. 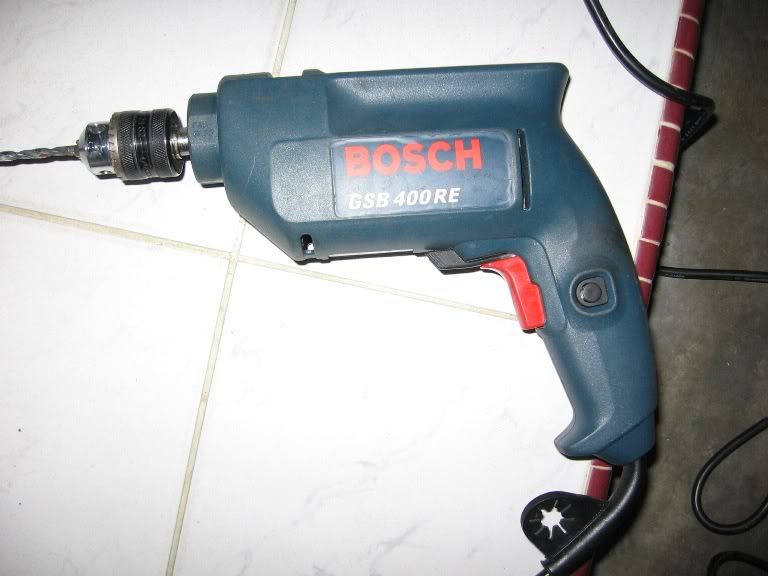 I used a 6mm drill bit to drill a hole for the M8 screws that came with the fender bars... yes.. u noticed the problem... it took me 2hrs to drill two holes to fit the M8 screws... so dont be like me... take a 8mm drill bit to drill a hole... after fixing the screws in... it will look like this... 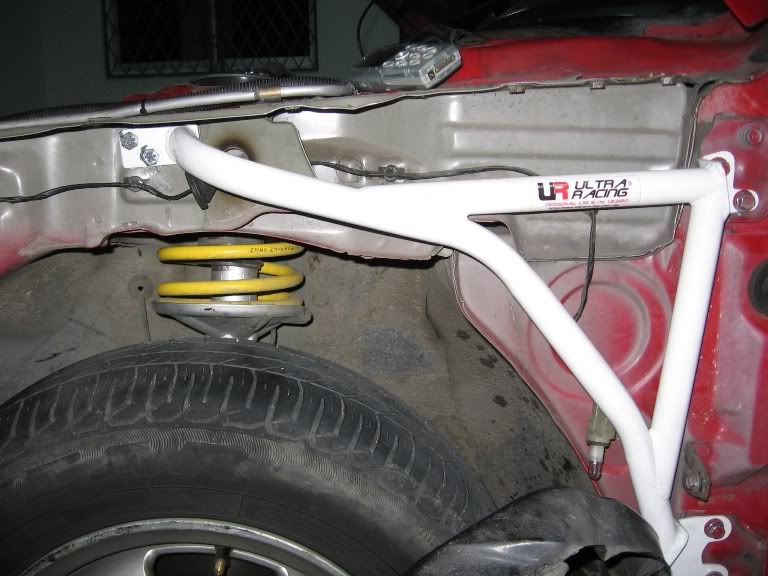 then you are done! do the same for the other side... when everything is done.. remember to put back all the screws in the original place... tighten it... you wouldnt want a flying fender when you are going at 120km/h right? put ur bumper back.. wash ur hands... and be proud of urself! DIY session ends... [/quote] |
|
|
|
|
|
Jun 23 2007, 06:45 PM
|
|
Senior Member
727 posts Joined: Jan 2003 |
of course la you got every tool then the work is easy.for me i can diy but often find trouble with the tools.i got these fender bars intsalled too.the shop fixed it for me with little charge
|
|
|
Jun 23 2007, 06:46 PM
|

All Stars
13,681 posts Joined: Mar 2006 |
 Wahhhhh ............all sifus here are pro in DIY............congratulation Wahhhhh ............all sifus here are pro in DIY............congratulationI just came back from howie shop, and found their installation fees damn cheap |
|
|
Jun 23 2007, 07:47 PM
|
|
Senior Member
10,975 posts Joined: Jan 2003 From: disini disana |
QUOTE(tester1979) i buy castrol 10W/40 semi synthetic from the authorised distributor at RM72..... where u buy??... i want i want...  QUOTE(singchaii) Muffler shot engine oil confirm makan engine jor.. My previous iswara also same.. I go workshop asked, the fella show me.. Use a board put 2 inch gap form the muffler and he rev.. I saw so many engine oil stick at the board.. I wan your weber wei.. Sell me cheap cheap.. Hehe.. ooo... makan engine oil... time to do overhaul (if parents tak mau transplant for me).... i plan to buy a cylinder head try diy port n polish.... the seller offer me to take his 4 4g15 pistons for 20bucks extra.... i ask around see rebore block to fit 1.5 piston see how much first...  weber??... hahahaha... see first la... i still playing carbie engine la... wait i play inj engine first only sell to u lar.... QUOTE(batista_beast) what brand is it? that one is SAMLUBE.... some capalang brand la.... if its my engine that makan engine oil, means the engine oil no problem one la... currenty i'm using selenia gold (rm116 for 4 litre)..the best engine oil i've used so far... QUOTE(singchaii) My new toys!!! Auto Gauge VACUUM meter.. Smoke Gauge Series.. RM105. apa saya pulak??... when i helped u??....  Why it showed 15?? I thought normal stock engine should be at 20?? DIY done in 30 minutes.. Thank Sky for guiding me pass 2 months.. Credits go to skywalker.. Hehe..  vac reading at 15 when aircond on or off??... engine warmed up adi that time??... cold start will result in lower reading... when aircond on, reading also drop... but if normal idle without aircond, reading will be 15hg.... QUOTE(feralee) something wrong with yr car setting if needle is above 20hg, means ur ignition timing is too advance.... good for pickup, but sometimes u'll experience jerk when switch off engine.... u'll notice fuel be shot up from the carburetor when it jerks....mine is around 20-22hg QUOTE(bukanmain) guys..my aircond fan kiong already.. one shop quote me rm80 for none ori and rm180 for ori part..issit reasonable?? non ori one also good enuff ma.... but if u got extra cash, buy ori one lor....QUOTE(kevinlim001) u have to ask catacomb shifoo cos only he show us his customize LED meterboard. apa saya pulak???... mine also jz plug n play only mer.... din custom any LED meterboard also...  QUOTE(icyd) catacomb sifoo...can shed some 'light'? i got torchlight.... u want me shed it on u??... QUOTE(feralee) c this sifu NeoSquall done it WOO!! okay... I rate this as 3/10 difficulty.. but with limited tools... I rate this 10/10 difficulty... I got pissed and frustrated because I dun have the tools to do this... it took me three days to finish it up.. ahhaha!! so if you guys are interested... here goes.. I got this fender bars from UltraRacing... » Click to show Spoiler - click again to hide... « the last part of my chassis strengthening project... so since its the last part and I blew a big hole in my pocket and I dun have the money to go to a workshop to ask them to help me fix.. why not I DIY it? it seems easy enuf.. it is actually easy... just tat it is very time consuming and without the proper it can be pretty frustrating.. so lets go on to the DIY.. first to remove the fender... you can either choose to remove the bumper of your car or not.. but I suggest that you remove ur bumper larh.. much more easier to remove ur fenders because there are many hidden screws...(cannot lah skywalker.. must remove the whole bumper.. hard to reach the screw near the signal light..) so first step.. remove the bumper.. » Click to show Spoiler - click again to hide... « then its time for you to go on a hunt for all the screws... there are many screws... more than 12 screws... I cant remember the exact number.. there are the hidden ones and the obvious ones... so the following pics shows the screws... http://i28.photobucket.com/albums/c212/Sirbabi/IMG_1357.jpg http://i28.photobucket.com/albums/c212/Sirbabi/IMG_1358.jpg http://i28.photobucket.com/albums/c212/Sirbabi/IMG_1359.jpg this one is just below the door.. http://i28.photobucket.com/albums/c212/Sirbabi/IMG_1360.jpg http://i28.photobucket.com/albums/c212/Sirbabi/IMG_1361.jpg this one is near the signal light.. hidden screw.. http://i28.photobucket.com/albums/c212/Sirbabi/IMG_1363.jpg another hidden screw... so removing the fender... be careful here.. you dont just rip the fender off... just slowly take it out... it will be like this... very very dirty.. » Click to show Spoiler - click again to hide... « then moving on to putting the fender bars.. before you start.. you have to get this floor jack to support ur door or esle ur door alignment will be off... » Click to show Spoiler - click again to hide... « make sure you jack it up till the max you can go to let the door to stay in place.. then you start removing ur screws... the screws on the door is quite hard.. you ahve to use this round spannar... I dunno wat do they call it... instead of a normal C shape spannar... you use the round headed one to remove the screws... much more easier... the screws are screwed on very very tight.. so have fun removing them... after you put ur fender bars in place.. make you sure check ur door's alignment.. is it off or not... do adjust it if its off... when your fender bars are in place.. it will look something like this.. » Click to show Spoiler - click again to hide... « now... you have to drill.. » Click to show Spoiler - click again to hide... « I used a 6mm drill bit to drill a hole for the M8 screws that came with the fender bars... yes.. u noticed the problem... it took me 2hrs to drill two holes to fit the M8 screws... so dont be like me... take a 8mm drill bit to drill a hole... after fixing the screws in... it will look like this... » Click to show Spoiler - click again to hide... « then you are done! do the same for the other side... when everything is done.. remember to put back all the screws in the original place... tighten it... you wouldnt want a flying fender when you are going at 120km/h right? put ur bumper back.. wash ur hands... and be proud of urself! DIY session ends... This post has been edited by the_catacombs: Jun 23 2007, 07:51 PM |
|
|
Jun 23 2007, 08:25 PM
|
|
Senior Member
727 posts Joined: Jan 2003 |
QUOTE(the_catacombs @ Jun 23 2007, 07:47 PM) apa saya pulak???... mine also jz plug n play only mer.... din custom any LED meterboard also... QUOTE(icyd) catacomb sifoo...can shed some 'light'? i got torchlight.... u want me shed it on u??... |
|
|
Jun 23 2007, 08:30 PM
|

Senior Member
2,507 posts Joined: Jan 2003 |
just went back from ETCM showroom to see the new Nissan Latio.demm comfy and spacious that car but the interior is nothing to brag about.demm it make me thinking...how many years i wanna use this faithful saga
 |
|
|
Jun 23 2007, 09:33 PM
|
|
Senior Member
7,842 posts Joined: Sep 2004 From: Pandan Jaya,KL |
QUOTE(feralee @ Jun 23 2007, 06:13 PM) u know to DIY bo Sure I know la.. Hehe.. Cause I go see khguan foto website and how to drill and how to support the door.. Hehe.. very hard one need to drill hole some more QUOTE(the_catacombs @ Jun 23 2007, 07:47 PM) that one is SAMLUBE.... some capalang brand la.... if its my engine that makan engine oil, means the engine oil no problem one la... Brother, You forget I had PM you how to install de meh? You teach me by using picture.. i asked you when you diy the vacuum that time.. if needle is above 20hg, means ur ignition timing is too advance.... good for pickup, but sometimes u'll experience jerk when switch off engine.... u'll notice fuel be shot up from the carburetor when it jerks.... apa saya pulak???... mine also jz plug n play only mer.... din custom any LED meterboard also... QUOTE(icyd) catacomb sifoo...can shed some 'light'? i got torchlight.... u want me shed it on u??... QUOTE(feralee) c this sifu NeoSquall done it WOO!! okay... I rate this as 3/10 difficulty.. but with limited tools... I rate this 10/10 difficulty... I got pissed and frustrated because I dun have the tools to do this... it took me three days to finish it up.. ahhaha!! so if you guys are interested... here goes.. I got this fender bars from UltraRacing... » Click to show Spoiler - click again to hide... « the last part of my chassis strengthening project... so since its the last part and I blew a big hole in my pocket and I dun have the money to go to a workshop to ask them to help me fix.. why not I DIY it? it seems easy enuf.. it is actually easy... just tat it is very time consuming and without the proper it can be pretty frustrating.. so lets go on to the DIY.. first to remove the fender... you can either choose to remove the bumper of your car or not.. but I suggest that you remove ur bumper larh.. much more easier to remove ur fenders because there are many hidden screws...(cannot lah skywalker.. must remove the whole bumper.. hard to reach the screw near the signal light..) so first step.. remove the bumper.. » Click to show Spoiler - click again to hide... « then its time for you to go on a hunt for all the screws... there are many screws... more than 12 screws... I cant remember the exact number.. there are the hidden ones and the obvious ones... so the following pics shows the screws... http://i28.photobucket.com/albums/c212/Sirbabi/IMG_1357.jpg http://i28.photobucket.com/albums/c212/Sirbabi/IMG_1358.jpg http://i28.photobucket.com/albums/c212/Sirbabi/IMG_1359.jpg this one is just below the door.. http://i28.photobucket.com/albums/c212/Sirbabi/IMG_1360.jpg http://i28.photobucket.com/albums/c212/Sirbabi/IMG_1361.jpg this one is near the signal light.. hidden screw.. http://i28.photobucket.com/albums/c212/Sirbabi/IMG_1363.jpg another hidden screw... so removing the fender... be careful here.. you dont just rip the fender off... just slowly take it out... it will be like this... very very dirty.. » Click to show Spoiler - click again to hide... « then moving on to putting the fender bars.. before you start.. you have to get this floor jack to support ur door or esle ur door alignment will be off... » Click to show Spoiler - click again to hide... « make sure you jack it up till the max you can go to let the door to stay in place.. then you start removing ur screws... the screws on the door is quite hard.. you ahve to use this round spannar... I dunno wat do they call it... instead of a normal C shape spannar... you use the round headed one to remove the screws... much more easier... the screws are screwed on very very tight.. so have fun removing them... after you put ur fender bars in place.. make you sure check ur door's alignment.. is it off or not... do adjust it if its off... when your fender bars are in place.. it will look something like this.. » Click to show Spoiler - click again to hide... « now... you have to drill.. » Click to show Spoiler - click again to hide... « I used a 6mm drill bit to drill a hole for the M8 screws that came with the fender bars... yes.. u noticed the problem... it took me 2hrs to drill two holes to fit the M8 screws... so dont be like me... take a 8mm drill bit to drill a hole... after fixing the screws in... it will look like this... » Click to show Spoiler - click again to hide... « then you are done! do the same for the other side... when everything is done.. remember to put back all the screws in the original place... tighten it... you wouldnt want a flying fender when you are going at 120km/h right? put ur bumper back.. wash ur hands... and be proud of urself! DIY session ends... My reading is, turn on air cond already in 15 then when off air cond is 20.. Izit normal? the engine had been warm up. |
|
|
Jun 23 2007, 10:21 PM
|
|
Senior Member
6,142 posts Joined: May 2006 From: Planet called "EARTH" |
QUOTE(the_catacombs @ Jun 23 2007, 07:47 PM) that one is SAMLUBE.... some capalang brand la.... if its my engine that makan engine oil, means the engine oil no problem one la... shifoo u try to replace ur piston ring see its help if the piston ring rosak or makan already the engine oil will go to ur combustion chamber then will burn inside so sometime got white smoke got engine oil shot out from exhaust. if needle is above 20hg, means ur ignition timing is too advance.... good for pickup, but sometimes u'll experience jerk when switch off engine.... u'll notice fuel be shot up from the carburetor when it jerks.... apa saya pulak???... mine also jz plug n play only mer.... din custom any LED meterboard also... QUOTE(icyd) catacomb sifoo...can shed some 'light'? i got torchlight.... u want me shed it on u??... QUOTE(feralee) c this sifu NeoSquall done it� � � WOO!! okay... I rate this as 3/10 difficulty.. but with limited tools... I rate this 10/10 difficulty... I got pissed and frustrated because I dun have the tools to do this... it took me three days to finish it up.. ahhaha!! so if you guys are interested... here goes.. I got this fender bars from UltraRacing... » Click to show Spoiler - click again to hide... « the last part of my chassis strengthening project... so since its the last part and I blew a big hole in my pocket and I dun have the money to go to a workshop to ask them to help me fix.. why not I DIY it? it seems easy enuf.. it is actually easy... just tat it is very time consuming and without the proper it can be pretty frustrating.. so lets go on to the DIY.. first to remove the fender... you can either choose to remove the bumper of your car or not.. but I suggest that you remove ur bumper larh.. much more easier to remove ur fenders because there are many hidden screws...(cannot lah skywalker.. must remove the whole bumper.. hard to reach the screw near the signal light..) so first step.. remove the bumper.. » Click to show Spoiler - click again to hide... « then its time for you to go on a hunt for all the screws... there are many screws... more than 12 screws... I cant remember the exact number.. there are the hidden ones and the obvious ones... so the following pics shows the screws... http://i28.photobucket.com/albums/c212/Sirbabi/IMG_1357.jpg http://i28.photobucket.com/albums/c212/Sirbabi/IMG_1358.jpg http://i28.photobucket.com/albums/c212/Sirbabi/IMG_1359.jpg this one is just below the door.. http://i28.photobucket.com/albums/c212/Sirbabi/IMG_1360.jpg http://i28.photobucket.com/albums/c212/Sirbabi/IMG_1361.jpg this one is near the signal light.. hidden screw.. http://i28.photobucket.com/albums/c212/Sirbabi/IMG_1363.jpg another hidden screw... so removing the fender... be careful here.. you dont just rip the fender off... just slowly take it out... it will be like this... very very dirty.. » Click to show Spoiler - click again to hide... « then moving on to putting the fender bars.. before you start.. you have to get this floor jack to support ur door or esle ur door alignment will be off... » Click to show Spoiler - click again to hide... « make sure you jack it up till the max you can go to let the door to stay in place.. then you start removing ur screws... the screws on the door is quite hard.. you ahve to use this round spannar... I dunno wat do they call it... instead of a normal C shape spannar... you use the round headed one to remove the screws... much more easier... the screws are screwed on very very tight.. so have fun removing them... after you put ur fender bars in place.. make you sure check ur door's alignment.. is it off or not... do adjust it if its off... when your fender bars are in place.. it will look something like this.. » Click to show Spoiler - click again to hide... « now... you have to drill.. » Click to show Spoiler - click again to hide... « I used a 6mm drill bit to drill a hole for the M8 screws that came with the fender bars... yes.. u noticed the problem... it took me 2hrs to drill two holes to fit the M8 screws... so dont be like me... take a 8mm drill bit to drill a hole... after fixing the screws in... it will look like this... » Click to show Spoiler - click again to hide... « then you are done! do the same for the other side... when everything is done.. remember to put back all the screws in the original place... tighten it... you wouldnt want a flying fender when you are going at 120km/h right? put ur bumper back.. wash ur hands... and be proud of urself! DIY session ends... |
|
|
|
|
|
Jun 23 2007, 10:24 PM
|

Senior Member
4,224 posts Joined: Apr 2007 |
im really dizzy with all this posts..huh!
 |
|
|
Jun 23 2007, 10:25 PM
|
|
Senior Member
6,142 posts Joined: May 2006 From: Planet called "EARTH" |
today when i check my engine oil i found tat my engine oil also got a bit less if compare to last week le no sign on leakage also. Sien dunno my engine ll makan minyak hitam ma tim.
Added on June 23, 2007, 10:26 pm QUOTE(Xefron @ Jun 23 2007, 08:30 PM) just went back from ETCM showroom to see the new Nissan Latio.demm comfy and spacious that car but the interior is nothing to brag about.demm it make me thinking...how many years i wanna use this faithful saga which version u saw? the hatchback or the sedan version? if u able to see the premium sedan version u sure This post has been edited by kevinlim001: Jun 23 2007, 10:26 PM |
|
|
Jun 23 2007, 10:36 PM
|
|
Senior Member
4,224 posts Joined: Apr 2007 |
go to paultan for info loh......
|
|
|
Jun 23 2007, 11:35 PM
|

Senior Member
792 posts Joined: May 2006 From: Klang, M'sia |
is it ilegal to replace the spray nozzle (the one on ur car bonet that sprays water to ur windscreen) to those with light wan? need advise..
JPJ tangkap ka? This post has been edited by zhixin: Jun 23 2007, 11:37 PM |
|
|
Jun 24 2007, 12:43 AM
|
|
Senior Member
727 posts Joined: Jan 2003 |
QUOTE(zhixin @ Jun 23 2007, 11:35 PM) is it ilegal to replace the spray nozzle (the one on ur car bonet that sprays water to ur windscreen) to those with light wan? need advise.. why would u want to do that?i dont think its illegal thoughJPJ tangkap ka? |
|
|
Jun 24 2007, 12:50 AM
|
|
Senior Member
792 posts Joined: May 2006 From: Klang, M'sia |
QUOTE(icyd @ Jun 24 2007, 12:43 AM) why would u want to do that?i dont think its illegal though got car they change the nozzle andreplace it wif those wif blue colored lights.. when u turn on ur headlight, it will be turned on too.. |
|
|
Jun 24 2007, 12:56 AM
|

Senior Member
1,317 posts Joined: Jan 2005 From: Cheras, KL |
QUOTE(the_catacombs @ Jun 23 2007, 07:47 PM) where u buy??... i want i want... bought it near at the shop that is in taman paramount pj.... BJM Auto Parts 03-78769062 i got their contact from castrol headquarters in KL because I want to make sure that I get the real and original castrol engine oil as i heard got some fakes around. anyway, since this shop sells the original and they take huge bulk......they can afford to sell at rm72 and they dun take credit card for this as they say their profit margin is very low.... I am buying another 2 bottles next week......just bought 1 bottle last week at RM72 (most of service garage sells at rm95++) since the crude oil prices kept soaring up, the engine oil price might go up next month, the shop say as they will take in new stock next month.....according to the shop, shell's engine oil price already go up a lot...... This post has been edited by tester1979: Jun 24 2007, 12:57 AM |
|
Topic ClosedOptions
|
| Change to: |  0.0207sec 0.0207sec
 0.57 0.57
 6 queries 6 queries
 GZIP Disabled GZIP Disabled
Time is now: 18th December 2025 - 05:39 AM |
 Quote
Quote