Welcome Guest ( Log In | Register )

Outline · [ Standard ] · Linear+

 Worklog: PowerMacG5 casemod, Stopped modding this: Got the REAL THING

views
     
TSMacDaNife
post Oct 7 2005, 02:13 PM, updated 20y ago

Adrenalina Italiana
******
Senior Member
1,737 posts

Joined: Jan 2003
What's better than a LianLi V series case? Silverstone? Antec? Nope - Apple.

Today I got my hands on this... thumbup.gif

user posted image

It just oozes class... Down to the latch that youhave to pull in order to remove the sidepanel...

user posted image

Some heavy duty modding will be required. I am reluctant to cut too much of the externals. Instead I will be mounting the mobo further in the case and routing cables to the corresponding ports on the case itself. Well that's the plan anyway. Less cutting, more soldering.

Here is the drive bay (where the PSU of a regular ATX PC case would reside)

user posted image

And the front optical drive bay. It has a neat bay cover that slides down like a window blind rather than the usual out like a hatch design. Note that Apple has prerouted wires for drive connectors and power. They are all black so identifying them would be another chore prior to soldering. I intend to use as much of the original equipment as I can.

user posted image

The Apple mobo connector will have to go. Note the front panel connectors are housed in thier own cage. Typical Apple design touches.

user posted image

The motherboard bay is very spacious. I plan to mount the PSUtowards the back of the case with the mobo towards the front bringing connectors from the mobo to the corresponding ports at the back of the G5 case. I will try to maintain the clean lines of the G5 Enclosure as best I can.

user posted image

Some case cutting however may be unavoidable. Well, I need to make some measurements. Should be a fun mod. Hopefully I am able to complete it... sweat.gif

This post has been edited by MacDaNife: Sep 12 2006, 10:47 PM
evilnickwong
post Oct 7 2005, 02:16 PM

- Evil by Nature -
*******
Senior Member
5,065 posts

Joined: Jan 2003
From: Taman Tun, KL


Whoa, where'd you source an empty G5 case dude? smile.gif And what did it cost lol..
eddychstu
post Oct 7 2005, 02:19 PM

Why so serious?
*******
Senior Member
2,347 posts

Joined: Jan 2003
From: in town


probably bought a real g5 and throw away the internal laugh.gif
cool stuff!
Snoy
post Oct 7 2005, 02:35 PM

~SIMPLE~
******
Senior Member
1,203 posts

Joined: Jan 2003


Very cool case .... but it will make me "sakit hati" to cut this baby... sweat.gif
TSMacDaNife
post Oct 7 2005, 02:51 PM

Adrenalina Italiana
******
Senior Member
1,737 posts

Joined: Jan 2003
Got it for FREE!

Have a good friend in the Apple support industry in Malaysia who made me an offer I (obviously) could not refuse. I agree about the sakit hati bit too. Will try not to cut this baby at all.

Actually I'm having fun just looking at it for now!
Sphenix
post Oct 7 2005, 03:00 PM

Hired........
*******
Senior Member
3,705 posts

Joined: Sep 2004
From: Malaysia


wow free....still got ar?sell it lar....
sniper on the roof
post Oct 7 2005, 03:41 PM

20k VIP Club
Group Icon
VIP
23,414 posts

Joined: Jan 2003
From: Taipei
Mac : I dun blame ya...who can resist.

Changing this thread into a worklog. Please post your progress ok. Cheers.

ps: Can I have you Lian Li? tongue.gif
ikan_semilang
post Oct 7 2005, 03:51 PM

Look at all my stars!!
*******
Senior Member
4,504 posts

Joined: Jan 2003
From: Setapak


Walao,if market selling this case near RM1k maybe more. U're lucky got it free and try to mod it. U're so lucky man. thumbup.gif


Off topic: Mac, if u want to sell ur V1000black i'm interested. sweat.gif
TSMacDaNife
post Oct 7 2005, 04:22 PM

Adrenalina Italiana
******
Senior Member
1,737 posts

Joined: Jan 2003
My darling LianLi?

I'll never part with it!
ianho
post Oct 7 2005, 04:44 PM

Cucimangkoklife
Group Icon
VIP
15,705 posts

Joined: Mar 2005
From: Tg. Rambutan
U bloody basket bola! FREE?! Daaaaaaamn. I just checked the link that Pizzaboy posted in the other G5 thread. The G5 case+USPS airmail cost USD560. OMG. How to buy $560 case for modding? I'd rather spend it on my upcoming ACD. Once again, U BASKET BOLA! So lucky. laugh.gif laugh.gif laugh.gif

This post has been edited by ianho: Oct 7 2005, 04:45 PM
aaron_lwm
post Oct 7 2005, 05:21 PM

>jedi council<
*******
Senior Member
3,277 posts

Joined: Jan 2005
From: Penang


@macdanife
OMG macdanife, I think that u probably got the most nicest rigs in this forum, anyway, this is very nice, its a nice casing.....whistling.gif, so which is this for the the FX57 or x2????

@sniper
I dun think he's gonna give away his baby ah-lian le
TSMacDaNife
post Oct 7 2005, 05:44 PM

Adrenalina Italiana
******
Senior Member
1,737 posts

Joined: Jan 2003
Actually I've been thinking about how to go about with this mod... Lots to consider. Should I go with a regualr ATX Mobo? Due to the location of the PCI slots, it would have to be mounted upside-down as with the LianLi v1000. This would help with placement of the PSU as well. I'm thinking an acrylic panel to separate the PSU from the mobo. However, I don't think I'd have sufficient space for complete separation of PSU and mobo so.... Have to make some measurements...


gmail
post Oct 7 2005, 05:54 PM

Trolling Level
*******
Senior Member
2,597 posts

Joined: Mar 2005
From: Kuala Lumpur


nice case! drool.gif

still got ar?

see also drool.gif liao!
ianho
post Oct 7 2005, 06:19 PM

Cucimangkoklife
Group Icon
VIP
15,705 posts

Joined: Mar 2005
From: Tg. Rambutan
QUOTE(MacDaNife @ Oct 7 2005, 05:44 PM)
Actually I've been thinking about how to go about with this mod... Lots to consider. Should I go with a regualr ATX Mobo? Due to the location of the PCI slots, it would have to be mounted upside-down as with the LianLi v1000. This would help with placement of the PSU as well. I'm thinking an acrylic panel to separate the PSU from the mobo. However, I don't think I'd have sufficient space for complete separation of PSU and mobo so.... Have to make some measurements...
*
Y dont u just use the method that was posted in the link that Pizzaboy posted. Like here. http://www.hardforum.com/showthread.php?t=...highlight=apple
aaron_lwm
post Oct 7 2005, 08:30 PM

>jedi council<
*******
Senior Member
3,277 posts

Joined: Jan 2005
From: Penang


@macdanife
we hope to see more pics from this monster
uglyvamp
post Oct 7 2005, 08:48 PM

blink of life
******
Senior Member
1,666 posts

Joined: Jan 2003
From: Spore/JohorBP


holy case smile.gif LianLi Vseries ?? hmmm... Apple G5 still sound better wink.gif

and look better ! biggrin.gif

mac, we need to see the hardwares inside when installed.


uglyvamp
post Oct 7 2005, 10:20 PM

blink of life
******
Senior Member
1,666 posts

Joined: Jan 2003
From: Spore/JohorBP


Mac, i found this site, he has the same G5 case as urs ...

hope it helps in ur modding venture smile.gif

watch out, even for 1mb streamyx !!!

http://forums.bit-tech.net/showthread.php?t=99239

user posted image
ianho
post Oct 8 2005, 12:29 AM

Cucimangkoklife
Group Icon
VIP
15,705 posts

Joined: Mar 2005
From: Tg. Rambutan
QUOTE(uglyvamp @ Oct 7 2005, 10:20 PM)
Mac, i found this site, he has the same G5 case as urs ...

hope it helps in ur modding venture smile.gif

watch out, even for 1mb streamyx !!!

http://forums.bit-tech.net/showthread.php?t=99239

user posted image
*
Insane man. Makes my 1mb line feel like 33Kbps line. Hahahahaha. Look at the prices the bugger got the parts for. USD14 for the G5 case. USD12.50 for the 600W Apple PSU. OMG! I wanna go China for shopping trip. Hahaha. His mod is supremely nice coz it looks exactly the same as a G5. No obvious things to tip u off that it's actually a PC. Perfect sleeper mod.


Edit: I just found out sumthin. For those of u who haf problems loading up the page that Uglyvamp posted, use Firefox to open n it loads up real quick. For sum reason it screws up with IE.

This post has been edited by ianho: Oct 8 2005, 01:00 AM
tongyam
post Oct 8 2005, 12:33 AM

perfect
****
Senior Member
686 posts

Joined: Jan 2003


he from china leh.....rock!!
uglyvamp
post Oct 8 2005, 06:08 AM

blink of life
******
Senior Member
1,666 posts

Joined: Jan 2003
From: Spore/JohorBP


I've strong doubts about the prices on the G5 & the PSU ... smile.gif
TSMacDaNife
post Oct 8 2005, 08:11 AM

Adrenalina Italiana
******
Senior Member
1,737 posts

Joined: Jan 2003
Very nice! This is what I'm thinking of at the moment....

The pics that UglyVamp put up illustrate an important point that other G5 PC casemods overlook. The original design of the case separtes the innards of the PC into zones. Hot, cold, intermediate and has fans of matched cooling power for each zone. I want to try to maintain this in the mod.

Additionally, I do not want to cut the case if I can avoid it. The mod UglyVamp posted is possible but not with a regular ATX mobo. Possibly with a Shuttle that is canniballized for parts this would be feasible. Cost factors aside, this would create problems should I want to upgrade my mobo in the future. I'd have to either redo the mod, or buy another Shuttle. With my track record, perhaps a mod that would fit a ATX case would be better for the long run. I intend to keep this case for a long time.

I've got an idea of how to do it now. It involves getting hold of a case with a removable mobo tray and using that to mount the mobo with the PCI slot connectors/mobo connectors facing DOWN. Making a third compartment below the mobo compartment which will also house the PSU (again of standard size to facilitate upgrading).

Well, that's the idea anyway...
aaron_lwm
post Oct 8 2005, 09:15 AM

>jedi council<
*******
Senior Member
3,277 posts

Joined: Jan 2005
From: Penang


Yeah, I have doubts about the pricing.....I agree with uglyvamp
bahgger
post Oct 8 2005, 09:40 AM

Casual
***
Junior Member
371 posts

Joined: Jan 2003
Good luck with your mod! Just remember to have fun and be careful smile.gif
SUSAllnGap
post Oct 8 2005, 09:59 AM

[ Modding with Passion(tm) ]
*******
Senior Member
4,561 posts

Joined: Jan 2003
From: Penangites


i love all the iMac casings, they look standard and wonderful ~~
Defort
post Oct 8 2005, 12:50 PM

Getting Started
**
Junior Member
245 posts

Joined: Jul 2005


mac try to check back my post which I posted somewhere maybe that can help you
ianho
post Oct 8 2005, 06:21 PM

Cucimangkoklife
Group Icon
VIP
15,705 posts

Joined: Mar 2005
From: Tg. Rambutan
QUOTE(uglyvamp @ Oct 8 2005, 06:08 AM)
I've strong doubts about the prices on the G5 & the PSU ...  smile.gif
*
Well, u never know, mebe it was sum Multi National company that was clearing up the office for newer n better things or just relocation to different city n decided to lelong everything off. Besides USD15 may sound like peanuts to us but for sum Chinaman it cud represent up 25% of their monthly income man.
uglyvamp
post Oct 8 2005, 10:01 PM

blink of life
******
Senior Member
1,666 posts

Joined: Jan 2003
From: Spore/JohorBP


heh, I still doubt the price ... its still not likely unless "misplaced" goods. smile.gif

for ur infos, chinamen very rich ones ... if u can see this guy playing around with such hardwares, their daddy could be a USD millionaire ...
SUSAllnGap
post Oct 8 2005, 10:15 PM

[ Modding with Passion(tm) ]
*******
Senior Member
4,561 posts

Joined: Jan 2003
From: Penangites


obviously the material used for the casing is expensive and for the finishing to be that nice, the price must be expensive........man.....600W PSU for RM 60 ??? i think it's possible, but in quantities of 10k
pilotHans
post Oct 9 2005, 04:11 AM

scuderia ferrari pit crew (" ,)
*******
Senior Member
2,525 posts

Joined: Jan 2003
From: maranello>sentul


wau.........i think ur having the coolest/most expensive mod here(if consider we guys wanna follow use that G5) thumbup.gif

hope to see the progres.....hati2 in drilling/dremel or whatever u do....dont spoil the case laugh.gif

QUOTE(ianho @ Oct 7 2005, 04:44 PM)
U bloody basket bola! FREE?!  Daaaaaaamn. I just checked the link that Pizzaboy posted in the other G5 thread. The G5 case+USPS airmail cost USD560. OMG. How to buy $560 case for modding? I'd rather spend it on my upcoming ACD. Once again, U BASKET BOLA! So lucky.  laugh.gif  laugh.gif  laugh.gif
*

3K for a case? shocking.gif

note : anyone selling a G5 original case for 1k,plz PM me rolleyes.gif
TSMacDaNife
post Oct 9 2005, 09:27 PM

Adrenalina Italiana
******
Senior Member
1,737 posts

Joined: Jan 2003
Have decided how to proceed with the mod.

Will utilize the top compartments as they are in the G5 case. Front bay for optical drive, rear bay for hard disks.

Middle compartment will house the Mobo. This will be mounted with the rear end pointing downwards. That is with the rear motherboard connectors exiting through the bottom compartment which will also house the PSU.

Compartments will be divided with Clear Acrylic. A sheet of clear acrylic will also serve as the base of the motherboard allowing me to switch mobos in the future should I wish to.

Perhaps a diagram will best illustrate the plan. Will work on this soon.

In the meantime, does anyone (AllanGap perhaps?) know where I can source clear acrylic in KL?
pizzaboy
post Oct 9 2005, 09:46 PM

Look at all my stars!!
Group Icon
VIP
9,495 posts

Joined: Dec 2004
search at jalan pasar.
i've heard them saying this place repeatedly.
sherren
post Oct 9 2005, 09:56 PM

Retired
******
Senior Member
1,298 posts

Joined: May 2005
From: Penang Island


@MacDaNife
Good Luck wit ur mod ,juz becarefull and have fun drool.gif
SUSAllnGap
post Oct 9 2005, 10:00 PM

[ Modding with Passion(tm) ]
*******
Senior Member
4,561 posts

Joined: Jan 2003
From: Penangites


acrylic can be found at advertising shop


TSMacDaNife
post Oct 9 2005, 10:00 PM

Adrenalina Italiana
******
Senior Member
1,737 posts

Joined: Jan 2003
The diagrammatic representation of what I intend. will need a clear acrylic as the base of the mobo and to seperate the mobo compartment from the PSU compartment. Note that the PSU compartment will not have ventilation above or below the PSU. Only from the front and back.

Have bought a PSU today from LYP which fulfills this criteria. Pics tomorrow! thumbup.gif


Attached thumbnail(s)
Attached Image
aaron_lwm
post Oct 9 2005, 11:36 PM

>jedi council<
*******
Senior Member
3,277 posts

Joined: Jan 2005
From: Penang


@macdanife
wun it look a lil odd with ur plugs facing down???
TSMacDaNife
post Oct 10 2005, 07:20 AM

Adrenalina Italiana
******
Senior Member
1,737 posts

Joined: Jan 2003
Ok, here we go... First, patience guys... I intend to take my time with this mod (and I do have a real job) so please excuse a lack of progress on the mod. Rest assured, progress will be documented and put up here. I'll put up the recommended retail price (RRP) for the stuff so I won't get the inevitible "How much ah?" on this thread. Please refrain from the equally inevetible "Wah, so much ah!". It irritates and adds nothing to the thread. TIA. Occasionally I may get some discounts of the RRP but I will not disclose that for obvious reasons of maintaining relations with the retailer. I work hard at building relationships with people. You should too.

So far I've got to the stage of assembling the required tools...

user posted image


Considered getting the more easily available Black and Decker RTX. This retails for RM299 (I guess the RM1 is for the parking ticket) and the B&D Flexishaft for RM200. However, on modding boards when the two are discussed, I read a lot of early failures with the RTX. I intend to use this tool for a lot more than PC Modding and would hate to have to replace out of warranty so... The Dremel is available only from Jaya DIY in Jaya Shopping Centre's thrid floor. The proprieter: a Mr Eddy Ng is a very knowledgable and friendly guy and the shop is contactable at 03-79540509. They stock a wide range of Dremel acessories too.

The kit comes with all the acessories pictured and retails for RM599 sweat.gif . The Flexishaft is another RM214. sweat.gif But I figure I'll be using this for a long time and power tools are just so sweet... wub.gif

The only other kit that I have aqquired is the PSU. I've mulled over where to place it in this case. In the G5 hard drive bay where it would traditionally sit in a standard ATX PC box? Front? Rear? Standing up? Fans reversed?

Finally I decided that I should maintain the functional design of the G5 case. To divide the case into thermal compartments. For this I will use clear acrylic. True, hiding cables will be a bit of a challenge (but more fun). It will also be easier to cut.

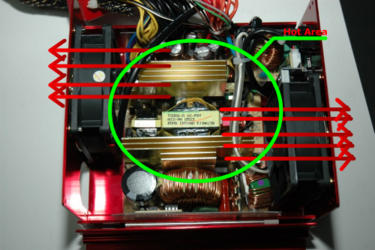
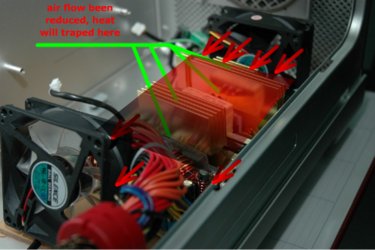
With this in mind, I'm putting the PSU at the bottom of the case. As there are no ventilation holes at the bottom my options were to either cut a hole or find a PSU with fans only at the front and rear. None at the bottom. Enter the Coolergiant...

user posted image

user posted image

user posted image

user posted image

The next question is how to fit the mobo... The Apple G5 case has mobo standoff screwholes that do not align to the traditional PC mobos. In addition, the backplate and PCI slots will not align. Most G5 PC mods that I've seen have cut the back of the case in order to fit a PC mobo. I am reluctant to do this because I don't want to ruin the design that is really very elegant. I've decided to mount mobo tray of clear acrylic which I will screw to the back of the case using the original Apple mobo standoff screws. I will then mount mobo standoffs on this acrylic plate in the regular PC position.

user posted image

Next: How to position the mobo? Rightside up? Upside down?

I'm going with a "on the side" approach. This will mean that the backplate ports and the PCI slot connectors will exit out of the bottom of the case. I will be using a number of USB cord extenders, Network wire extenders and Monitor cable gender changers to accomplish this. The cords will then be sleeved together and a large trunk exits out the rear of the rig, rather like a tail.

Personally I feel that this would neaten the cable clutter normally seen at the rear of a PC and I could put the rig on the desk without it being too unsightly. I dunno, this requires some more thought.

Finally the thermal compartments. Clear Acrylic again, cut to fit the shape of the clear acrylic moulding of the G5 case. I will then have three compartments: The bottom one with the PSU, The middle one with the Mobo/Processor/RAM/PCIe/PCI cards and the top one with the drives.

user posted image

Well, that's the plan for now. Thanks for your interest and encouragement. And I welcome suggestions/comments! Just don't get upset if I don't follow em!
SUSAllnGap
post Oct 10 2005, 08:42 AM

[ Modding with Passion(tm) ]
*******
Senior Member
4,561 posts

Joined: Jan 2003
From: Penangites


i think it's better if u can draw up an airflow diagram like this before starting, just to get the best directional airflow

n u might wanna build a proper vent to separate the PSU compartment with the the mobo to prevent hot air from the PSU to circulate around ur mobo area.

btw, you mobo's faceplate is facing downwards ? u might have a lot of trouble to actually tidy up the cables, especially the monitor cables, and u might block airflow of the PSU exhaust


user posted image

This post has been edited by AllnGap: Oct 10 2005, 08:47 AM
louyeh
post Oct 10 2005, 10:29 AM

Look at all my stars!!
*******
Senior Member
3,032 posts

Joined: Jan 2003
MacDaNife: any rotary tool will fail if its not taken care. Dremel/RTX will fail much earlier because the metal bits and dust may end in clogged in the motor.

always take short breaks to clean up the cutting area while allowing the tool to rest. clean the tool throughly after each usage so it wont have any clogged/build-up dirt/grime/dust in and around the body.

btw i think you left out other important stuff too: eye protection, ear protection, respiration mask. trust me, its more easier and accurate to work with when youve got all the protection. get a full covered goggles, i prefer slightly tinted black ones. it helps with all the sparks flying around. for the respiration mask, a single carbon filter element would do.
Tunn
post Oct 10 2005, 03:01 PM

The SadPanda
****
Senior Member
651 posts

Joined: Jul 2005


dammnn...luck guy laa..u for freee....nyway cant wait for u'r updates
aaron_lwm
post Oct 10 2005, 08:09 PM

>jedi council<
*******
Senior Member
3,277 posts

Joined: Jan 2005
From: Penang


@macdanife
I found smth that might help ya,
http://forums.bit-tech.net/showthread.php?t=99239
TSMacDaNife
post Oct 11 2005, 04:36 AM

Adrenalina Italiana
******
Senior Member
1,737 posts

Joined: Jan 2003
QUOTE(aaron_lwm @ Oct 10 2005, 08:09 PM)
@macdanife
I found smth that might help ya,
http://forums.bit-tech.net/showthread.php?t=99239
*
Thanks aaron.

This EXACTLY what I'm thinking of doing. PSU at the bottom, Compartments to seperate the internals into thermal zones. Wish he'd take more detailed shots of the rear of the mobo though. I'm not sure how he overcame the lack of PCI slots in the G5 case. Since he did not cut the rear, how did he do it? It's remarkable how he's utilized the rear USB/network slots in the G5 as well. Some nifty rewiring there... Well an example to utilize anyway. Thanks again.

I note he's used aluminum as the basis for his compartments. I'm going to try this with acrylic. I figure it will be easier to cut and fit. For me anyway. blush.gif Am going to try and source for some sheets of acrylic to work with. Hopefully today.

Yesterday was spent (in between work) sleeving the PSU. Will update with some pics later today. Will have to do some soldering in order to reutilize the stock apple wiring to the drives. Interestingly apple uses soft black wires throughout. VERY good quality but being all the same color, will have to use the voltmeter to determine which wire goes where. I've realized why Macs are so expensive. Better quality components. Definately.

AllnGap... About a airflow diagram. Not necessary as it is very simple. Horizontal compartments. In through the front, out through the back like a windtunnel. Well, be patient and all will be revealed. cool.gif


aaron_lwm
post Oct 11 2005, 07:42 AM

>jedi council<
*******
Senior Member
3,277 posts

Joined: Jan 2005
From: Penang


@macdanife
no prob bro, hope to see more progress. As for his PCI slots, I think he got a mobo that fitted nicely inside....gotta know how to do it well
TSMacDaNife
post Oct 11 2005, 09:08 AM

Adrenalina Italiana
******
Senior Member
1,737 posts

Joined: Jan 2003
Won't try to repeat UglyVamp's excellent PSU sleeving guide here but two points that he left out... How to sleeve the PCIe and Mobo power connectors and how to sleeve the SATA cables.

The PCIe and FourPin ATX mobo connector (or if you have a newer PSU the 8 pin BTX Mobo connector) have the exact same connector. They are very easy to remove if you use this method. Straighten a pair of staples and insert them on either side of the pin. The pin will then slide out quite easily. Photo below:

user posted image

The SATA cables easy if you have an Enermax PSU. This is because Enermax uses SATA connectors that are as below:

user posted image

This allows you to slide off the connector, and sleeve as you would any other PSU wire. In addition, If you are really serious about tidy cases, you can extend/shorten your wires and place the SATA connector to line up exactly with the position of your harddrive. This of course requires you to measure very exactly but hey, if you're a perfectionist, that ain't a problem now is it.... If you have a Antec PSU, you need to cut off the Antec SATA connector and use one of the connectors as pictured above. Molex to SATA adaptors generally use the connector pictured above and you can take them off one of these adaptors which are quite easily found.

I also prefer to cable tie the heatshrinks to avoid the sleeves from slipping off. I've also used small heatshrink to neaten the wire tips as shown in a thread over at BitTech.

user posted image

user posted image

The end result:

user posted image

Today I'll be rewiring the Apple PSU wires. These are a sleek black and are soft and of very good quality. They are routed through the back of the top compartment and supply the hard drives and optical drive. It's a shame to rip em out so I plan to rewire them.

user posted image

user posted image

However the fact that they are all the same color is not very friendly to the modder. I'll be using a voltmeter to identify the wires. These will then be soldered onto a regular PC Molex connector in order to use them with standard PC PSUs. I plan to make this case "upgradeable" meaning if I were to change the PSU in the future, I should be able to do so without repeating any work done previously. Here are the stuff assembled for today's rewiring:

user posted image

Well, that's all for now. Until the next update. cool.gif

Tunn
post Oct 11 2005, 12:29 PM

The SadPanda
****
Senior Member
651 posts

Joined: Jul 2005


arrgg.....posa nie.....feed.feed........feeeeeeed me more.....
mADmAN
post Oct 11 2005, 02:14 PM

10k Club
********
All Stars
10,530 posts

Joined: Nov 2004
From: Petaling Jaya & Mid Valley


dude...i think u should have put the heatshrink OVER the cable tie and shrink them...itll also act as an anchor so that the heatshrink wont slide

and it would look nicer IMHO coz thats what i do biggrin.gif
TSMacDaNife
post Oct 11 2005, 02:59 PM

Adrenalina Italiana
******
Senior Member
1,737 posts

Joined: Jan 2003
QUOTE(mADmAN @ Oct 11 2005, 02:14 PM)
dude...i think u should have put the heatshrink OVER the cable tie and shrink them...itll also act as an anchor so that the heatshrink wont slide

and it would look nicer IMHO coz thats what i do biggrin.gif
*
But it's not what they do over at PC Power and Cooling (where I wish I could buy my PSU from....) whistling.gif

user posted image
Tunn
post Oct 11 2005, 04:53 PM

The SadPanda
****
Senior Member
651 posts

Joined: Jul 2005


ikut u'r own taste
aaron_lwm
post Oct 11 2005, 06:14 PM

>jedi council<
*******
Senior Member
3,277 posts

Joined: Jan 2005
From: Penang


@macdanife
good progress
TSMacDaNife
post Oct 11 2005, 11:52 PM

Adrenalina Italiana
******
Senior Member
1,737 posts

Joined: Jan 2003
Done the rewiring of the Apple power connectors. No soldering necessary in the end. Just cut, expose wire and crimp. A crimping tool ( available from Jln Pasar and seen in the pic above) is a necessity. Can't remember how much it cost but the job would not have been possible without it.

Considered sleeving the Apple wires but with them all in black, it is not necessary. Ended up with just some heatshrink at intervals to neaten things off. More PC PSU manufacturers should follow Apple's example and produce PSUs without sleeves but with single tone wires. IMHO it looks better and much less distracting within the case. Well, that's my view anyway.

Bought a whole lot of acrylic from a Sign Maker shop in Pudu. Sorry, forgot to get the address/phone number. In any case, I'd assume these sign making shops are quite easy to find. Clear acrylic comes in various thickness. Went for a 5mm (RM25 thereabouts per square foot) and 2mm (RM20 per square foot) thickness. Will be cutting this with the Jigsaw and Dremel tomorrow. Can you smell the burning plastic yet?

Have changed my mind about the Mobo positioning. Will follow a upside down approach with the PCI slots towards the back of the case - similar to the LianLi v1000 layout. This would mean that the uppermost PCI slot will reside in the top compartment behind the drive cage. Most probably it will not be usable (unless used with a small PCI card like a WiFi card...).

The reasons for this are:

1. Neatness: no need to run extenders to the back of the case.

2. Thermal compartmenting: The GPU (SLi config) will be in the upper mobo compartment and I intend to make a acrylic divider to create a windtunnel for the SLi-ed cards.

3. The main Mobo power connector will then be closest to the PSU and wiring will be neater.

Unfortunately, this would mean part of the mobo goes into the upper compatment and part of the mobo goes into the lowest (PSU) compartment. Some creative use of acrylic will be necessary in order to make sure airflow stays within the specified compartments.

Pics to follow tomorrow. Goodnight.

exkay
post Oct 12 2005, 12:24 AM

Hired Gunman
*******
Senior Member
3,657 posts

Joined: Jan 2003
From: My Room


jerker table from Ikea ?
aaron_lwm
post Oct 12 2005, 07:53 AM

>jedi council<
*******
Senior Member
3,277 posts

Joined: Jan 2005
From: Penang


@macdanife
good idea, ur a very innovative person, respect dude notworthy.gif
TSMacDaNife
post Oct 12 2005, 01:44 PM

Adrenalina Italiana
******
Senior Member
1,737 posts

Joined: Jan 2003
Ready to fit the mobo. But first will need to have the actual mobo on hand. Tried to buy an Abit Fatality SLi AN8 yesterday at LYP but all retailers are out... Guess I'll have to go DFI. Meanwhile, in preparation for cutting the top tray, I've removed a great number (but not all) of the torq screws that hold the GP case together. I need to get to the rear of the top tray in order to cut part of it. This is to make space for the mobo as the lower compartment and PCI slot placement make it necessary for part of the mobo to jut into the upper compartment. With all of this, the harddrives may have to move... we will see...

user posted image

The back of this tray is what I'll have to cut in order to fit a standard PC mobo. Note that the G5 has only four PCI slots. This means that the topmost PCI slot will have to sit in the upper compartment

user posted image

Also removed the other odds and ends from the case in preparation for cutting and here they are:

1. Apple CD bezel. The door slides down (as opposed to opening outward like a hatch). Very neat and all shiny stainless steel inside. You don't find this kind of quality on a PC case unfortunately...

user posted image
user posted image

2. The Apple hard drive cage: Note the drive latch marked A and B in open and closed positions.

user posted image
user posted image

3. The divider between the Optical and Harddrive bays contain two fans. One grey (Delta?) fan and one turbine fan that is directed to blow behind the harddrives. Both fans have an odd four wire lead. I suspect that these are variable speed fans. There are also two circuit boards one in the top of the case and one towards the rear in the middle. I suspect that these are temperature sensor. I will try to reuse the 8cm fan. The turbine is in the way of the mobo, so will have to go. The divider of course stays though I may have to cut it so it does not get in the way of the mobo.

user posted image
user posted image

While taking all these stuff must SEEM easy but trust me, this case is built like a tank. The aluminum while thin is EXTREMELY sturdy and resistant to bending. There was also a multitude of screws to remove in order to loosen the back of the aluminum top tray from the mobo frame. Even then, it was quite impossible to remove the tray entirely for cutting. If I did not have a flexishaft for the dremel, it would be impossible to proceed with the mobo position as planned.

These are the screws that I removed in order to loosen the top plate:

user posted image

Note that almost all of these are Torx screws. Not the usual phillips or flat head. Hence if you plan to mod the G5 case, these are essential.

user posted image

TSMacDaNife
post Oct 12 2005, 01:45 PM

Adrenalina Italiana
******
Senior Member
1,737 posts

Joined: Jan 2003
Also rewired the apple wiring for the PSU. Following the SATA and Molex convention, identified the proper configuration and crimped some female molexes on. Considered sleeving the fellow. In fact started to thread the sleeve on but it actually looked better unsleeved with the wires all a standard black... So just some heatshrink to tidy things up.

user posted image

user posted image

user posted image

That's all for now. Time to get the mobo. Wanted to try the Abit Fatality but nowhere has stock. Looks like I'm destined to stick with DFI... cool.gif

SUSAllnGap
post Oct 12 2005, 05:03 PM

[ Modding with Passion(tm) ]
*******
Senior Member
4,561 posts

Joined: Jan 2003
From: Penangites


those are called blowers.

hopefully u r able to find a way to control those fans
TSMacDaNife
post Oct 12 2005, 05:57 PM

Adrenalina Italiana
******
Senior Member
1,737 posts

Joined: Jan 2003
Afternoon plans at work cancelled... More time to work on the rig! thumbup.gif

Thought of giving the Abit Fatality SLi board a try for the G5 rig. Certainly the red will match the PSU. However, after going round LYP and even trying to get Scoot to pull some strings: no go. Trotted over to get this:

user posted image

On checking my PM on return, Irenic offers to sell me his fatality. doh.gif Well, destiny is DFI...

Today's job, cutting a piece of acrylic to act as a motherboard tray. The problem with the G5 is that the mobo screws don't line up, the PCI slots don't line up. In order to overcome this, I'll be mounting the DFI mobo on to the acrylic with regular mobo standoff screws. The acrylic will then be mounted onto the preexisting Apple mobo standoffs. This is the plan if I have adequate depth to allow for proper seating of the PCI /PCIe cards. I may have to drill the acrylic in order to have the right depth. In any case - acrylic is easier to drill and work with. I'm using a 5mm sheet btw. Does not bend and will be deep enough to support the mobo standoff screws.

user posted image

user posted image

Must not forget eye protection!

user posted image

And the finished result: An exact match:

user posted image

With the mobo mounted onto the acrylic with regular mobo standoff screws, I'll mount this into the G5. I've marked the parts of the upper aluminum tray that I will have to cut. The more I look at it, the more I'm convinced that the harddrive bays will have to be moved... We will see.

user posted image

user posted image

That's all for now. Happy berbuka puasa! tongue.gif


sherren
post Oct 12 2005, 07:42 PM

Retired
******
Senior Member
1,298 posts

Joined: May 2005
From: Penang Island


Looks Good thumbup.gif
ntc3freak
post Oct 12 2005, 07:44 PM

Look at all my stars!!
*******
Senior Member
2,347 posts

Joined: Sep 2005


LOL mac 6 o'clock u want to buka puasa ah???hahaha.anyway,awesome progress and awesome mobo.good luck in ur next steps mac.
wilson88
post Oct 12 2005, 07:52 PM

Dupe Acc
******
Senior Member
1,807 posts

Joined: Jul 2005
From: World Wide Web
yeah good luck to you man . yr so called Apple G5 lol.
ckwei
post Oct 12 2005, 08:30 PM

Nacho Man(tm)
*****
Senior Member
969 posts

Joined: Jan 2003
From: nachoville

very very sweet tools you have there.. boner inducing XD

btw if u dont mind me asking, what is your job description? the work rig seems to be too powerful for any day to day work unless ur a designer or something smile.gif feel free to ignore me if you dont feel like answering happy.gif
Gamer
post Oct 12 2005, 08:38 PM

Be Original
*******
Senior Member
3,366 posts

Joined: Jan 2003
From: Sarawak, Sibu


nice job man! keep going, we wanna c more..
aaron_lwm
post Oct 12 2005, 08:39 PM

>jedi council<
*******
Senior Member
3,277 posts

Joined: Jan 2005
From: Penang


@macdanife
sweet mod mac.....good mod....wanna see more of this, cheers
TSMacDaNife
post Oct 12 2005, 09:14 PM

Adrenalina Italiana
******
Senior Member
1,737 posts

Joined: Jan 2003
QUOTE(ckwei @ Oct 12 2005, 08:30 PM)
very very sweet tools you have there.. boner inducing XD

btw if u dont mind me asking, what is your job description? the work rig seems to be too powerful for any day to day work unless ur a designer or something smile.gif feel free to ignore me if you dont feel like answering happy.gif
*
The WorkRig is so named because it resides at my office, hence at work. Truth be told, I rarely do any "real" work on it. Obviously, the power is for gaming... cool.gif . Am presently replaying FarCry which is a totally different experience @ 1920x1200 4xAA/4xAF.

Don't want to talk too much about the job. Suffice to say, there's a lot of waiting around required, so the WorkRig provides entertainment for the slow periods.
ckwei
post Oct 12 2005, 09:54 PM

Nacho Man(tm)
*****
Senior Member
969 posts

Joined: Jan 2003
From: nachoville

sorry if i missed reading some of your writings, but are u gonna build a new system from scratch or just transplant some from your other systems?
TSMacDaNife
post Oct 12 2005, 09:58 PM

Adrenalina Italiana
******
Senior Member
1,737 posts

Joined: Jan 2003
QUOTE(ckwei @ Oct 12 2005, 09:54 PM)
sorry if i missed reading some of your writings, but are u gonna build a new system from scratch or just transplant some from your other systems?
*
Haven't decided. Actually I was hoping to delay the choice of mobo to allow for the crossfire based mobos to surface but... need a mobo in order to make the backplate and see how the PCI slots line up... No Fatality available so went with another DFI. Same goes for GPU. I'll probably take one (or both) of the 7800GTXes into this rig. Or if the X1800xt cards become available... who knows...

No firm plans to components as yet. Will take things as they go along...

And post em here of course. cool.gif
GoldenHawk
post Oct 13 2005, 09:55 AM

The Forgotten
******
Senior Member
1,017 posts

Joined: Jan 2003
From: Malacca


QUOTE(MacDaNife @ Oct 12 2005, 09:58 PM)
Haven't decided. Actually I was hoping to delay the choice of mobo to allow for the crossfire based mobos to surface but... need a mobo in order to make the backplate and see how the PCI slots line up... No Fatality available so went with another DFI. Same goes for GPU. I'll probably take one (or both) of the 7800GTXes into this rig. Or if the X1800xt cards become available... who knows...

No firm plans to components as yet. Will take things as they go along...

And post em here of course. cool.gif
*
Looking for CrossFire boards? thumbup.gif
--> [BULK] ATI CrossFire Motherboard, 1st BULK

Some nice cards to consider drool.gif
--> Sapphire Radeon X800 GTO2 PCIE
-->[BULK]Pre-Order X-1000 Series GC-Full Range, Colorful Brand

...And someone doing the "combo" thing as well laugh.gif
--> [WTS] Latest Mobo & Dispaly Card~!

This post has been edited by GoldenHawk: Oct 13 2005, 09:55 AM
ckwei
post Oct 13 2005, 01:22 PM

Nacho Man(tm)
*****
Senior Member
969 posts

Joined: Jan 2003
From: nachoville

it'll be sweet to see you run some aqua computer cooling stuff in the rig man... very sleek design they have smile.gif but then again, whatever u do, i'm sure it'll be awesome with such a great casing to build upon.
TSMacDaNife
post Oct 13 2005, 02:52 PM

Adrenalina Italiana
******
Senior Member
1,737 posts

Joined: Jan 2003
QUOTE(ckwei @ Oct 13 2005, 01:22 PM)
it'll be sweet to see you run some aqua computer cooling stuff in the rig man...
*
Agreed... Water cooling this rig would be ideal (and there's the space for the hardware too..) Trouble is, hard to find the components that I would like to use, for example:

user posted image

Have cut the upper tray with the dremel. Sparks were flying today...
iZuDeeN
post Oct 13 2005, 03:26 PM

Look at all my stars!!
*******
Senior Member
3,466 posts

Joined: Jan 2003
From: PJ, Malaysia
Mac

how much $$$ are you willing to put into this machine?
TSMacDaNife
post Oct 13 2005, 04:40 PM

Adrenalina Italiana
******
Senior Member
1,737 posts

Joined: Jan 2003
QUOTE(iZuDeeN @ Oct 13 2005, 03:26 PM)
Mac

how much $$$ are you willing to put into this machine?
*
As little as possible... laugh.gif
aaron_lwm
post Oct 13 2005, 05:31 PM

>jedi council<
*******
Senior Member
3,277 posts

Joined: Jan 2005
From: Penang


@macdanife
as little as possible whistling.gif, looks like its gonna cost a alot already, Y dun u try to get a X1800XT, be the 1st to own them
lucifah
post Oct 13 2005, 05:34 PM

St. Fu
Group Icon
Staff
7,948 posts

Joined: Jan 2005
From: Soviet Sarawak


i'm typing this in so i can follow this thread easier

and so as not to let mods marah me, i'd say

great job. the G5 casing itself is a masterpiece already, and i can't wait to see ur finished project
TSMacDaNife
post Oct 14 2005, 09:14 AM

Adrenalina Italiana
******
Senior Member
1,737 posts

Joined: Jan 2003
Finally. took the dremel to metal. Cut the top tray case.

Preparation is everything. Measure many times. Mark and recheck. Cut only once.

Workplace safety: Keep the workarea neat. Isolate your working area and minimize dust contamination. Facemask, protective eye and handwear are essential. In order to keep the tray steady while cutting I supported the back with a folded towel (wrapped with a paper so won't have to clean it later). In order to keep the aluminum dust off the insides of the case, the area was isolated with a plastic sheet.

user posted image

With that done, used the dremel with the 32mm (1mm thick) cutting wheel. As the insides of the case are hard to reach, used the Dremel Flexishaft. My advice to cutting aluminum: Use a high rotation speed BUT cut shallow and use repeated bites rather than a continuous cutting action. Your hand grip is important. Use a golf grip (with both hands) as there is significant kick when you begin to cut. If the dremel goes out of the groove, an unsightly burr would result. Lots of sparks. Protect hands with gloves, protect eyes with plastic non shatter glasses.

user posted image

The end result after cutting and deburring (Used a 3.2mm Shank no.8175) was quite neat even if I say so myself...

user posted image

user posted image

TSMacDaNife
post Oct 14 2005, 09:24 AM

Adrenalina Italiana
******
Senior Member
1,737 posts

Joined: Jan 2003
With the cutting done, it was time to see if the mobo would fit. Additionally I needed to measure where the mobo would be positioned in order to mark the drill points to mount the acrylic mobo backplate.

Took the 7800GTX cards out of the workrig and marked out the mobo position required for the PCIe cards to line up correctly with the G5 case slots.

user posted image

Replaced the Apple Harddrive bay and Top bay seperator/fan holder in order to see how all the parts fit.

user posted image

Realized that part of the plastics of the drive bay and separator will get in the way of the motherboard.

user posted image

Marked these areas for cutting. Got to get the Dremel out again....

user posted image


TSMacDaNife
post Oct 14 2005, 09:58 AM

Adrenalina Italiana
******
Senior Member
1,737 posts

Joined: Jan 2003
Now a Dry Fit to see how if all the components will sit where I plan them to go.

Essentially the principle is this: Divide the case into Four Compartments.

The top compartment is already there. Here reside the drives: Optical and harddrives. Am considering mounting a floppy too, but this is not essential. This is a low heat-generating compartment so could do with a small, slow fan for cooling

The second compartment will house the 7800GTX SLi config. This is a warm compartment and will be cooled by a 12cm Fan mounted close to the cards for maximal cooling. It will be separated from the third compartment by a sheet of clear acrylic cut to shape to fit both the mobo and the Apple acrylic panel.

The third compartment will house the processor and the RAM. The processor will be cooled by a Coolermaster Aquagate Mini (Cheapest I could find: RM250 @ Cycom, LYP).

user posted image

I like this cooler. It's simplicity (no reservoir and integrated pump/heatsink) makes it an elegant cooling solution. The radiator will NOT be in this compartment.

The fourth compartment at the base of the G5 case and separated from it by another acrylic panel will house the PSU and the Aquagate mini radiator.

user posted image

The radiator has a coolermaster 8cm Aluminum fan (RM40 @ Robyncom, LYP) cooling it.

user posted image

The PSU already has fans in a push pull position and will be mounted towards the front of the case. I realize that I will be blowing hot air onto my radiator (from the PSU) but as I do not have sufficient space to place the PSU at the rear of the case (it will hit the RAM cards), I do not have much of a choice...

user posted image

So once I cut the acrylic into shape, I will have four compartments dividing the G5 Case into four thermal zones, with fans of corresponding speed to cool each compartment.

user posted image

Well, that's the plan anyways... thumbup.gif

Pictures perhaps explain things better...


b0ib0i
post Oct 14 2005, 10:19 AM

New Member
*
Junior Member
28 posts

Joined: Apr 2005
From: Petaling Jaya


wow cool biggrin.gif
ckwei
post Oct 14 2005, 10:54 AM

Nacho Man(tm)
*****
Senior Member
969 posts

Joined: Jan 2003
From: nachoville

nice progress.. do u telling us the weight of the case when u got it? looks quite heavy tongue.gif
btw i notice that u have a dinovo.. i might wanna get the kb only with the cordless desktop set and replace my old mx duo kb.. just wanna know how's gaming with the dinovo kb? it looks pretty delicate man, am afraid that they keys will jump out or get smashed with heavy use XD
Defort
post Oct 14 2005, 12:45 PM

Getting Started
**
Junior Member
245 posts

Joined: Jul 2005


so you just gonna put that psu like that?
sherren
post Oct 14 2005, 01:00 PM

Retired
******
Senior Member
1,298 posts

Joined: May 2005
From: Penang Island


Nice,anyway Good Job thumbup.gif
TSMacDaNife
post Oct 14 2005, 01:12 PM

Adrenalina Italiana
******
Senior Member
1,737 posts

Joined: Jan 2003
QUOTE(Defort @ Oct 14 2005, 12:45 PM)
so you just gonna put that psu like that?
*
It's a DRY FIT. Meaning I still have a lot of work that I have not done. I am just checking to see if the components fit where they are supposed to be. I've not done the backplate for the mobo, the backplate for the PSU, the compartment separators, the fan mounts, the list continues...

...that's why it's a worklog doh.gif
ikan_semilang
post Oct 14 2005, 02:27 PM

Look at all my stars!!
*******
Senior Member
4,504 posts

Joined: Jan 2003
From: Setapak


Nice modder and nice picture. My friend said the price for casing is around RM700-800. sweat.gif
sniper on the roof
post Oct 14 2005, 02:44 PM

20k VIP Club
Group Icon
VIP
23,414 posts

Joined: Jan 2003
From: Taipei
Mac,

Ever considered open frame psu? Take out the case since Enermax is pretty compact inside and the red looks sorta out of place like that. Ya can hide it with an acrylic or white acrylic case.
TSMacDaNife
post Oct 14 2005, 03:03 PM

Adrenalina Italiana
******
Senior Member
1,737 posts

Joined: Jan 2003
QUOTE(sniper on the roof @ Oct 14 2005, 02:44 PM)
Mac,

Ever considered open frame psu? Take out the case since Enermax is pretty compact inside and the red looks sorta out of place like that. Ya can hide it with an acrylic or white acrylic case.
*
Actually, that is a good idea , but with a custom designed acrylic PSU case which is long an flat rather than square... Will need to change out the fans with quad 6cm ones (2 inflow and 2 outflow)...

Hmmm... thumbup.gif
sniper on the roof
post Oct 14 2005, 03:07 PM

20k VIP Club
Group Icon
VIP
23,414 posts

Joined: Jan 2003
From: Taipei
QUOTE(MacDaNife @ Oct 14 2005, 03:03 PM)
Actually, that is a good idea , but with a custom designed acrylic PSU case which is long an flat rather than square... Will need to change out the fans with quad 6cm ones (2 inflow and 2 outflow)...

Hmmm... thumbup.gif
*
Or recycle that nice blower from the HDD rack.
6cm's are pretty noisy.
Haven't seen that blower so dunno how thick is it though.
iZuDeeN
post Oct 14 2005, 05:49 PM

Look at all my stars!!
*******
Senior Member
3,466 posts

Joined: Jan 2003
From: PJ, Malaysia
QUOTE(ikan_semilang @ Oct 14 2005, 02:27 PM)
Nice modder and nice picture. My friend said the price for casing is around RM700-800. sweat.gif
*
how about USD 0.99?

tongue.gif

http://cgi.ebay.com/Case-Apple-PowerMac-G5...1QQcmdZViewItem


sniper on the roof
post Oct 14 2005, 05:58 PM

20k VIP Club
Group Icon
VIP
23,414 posts

Joined: Jan 2003
From: Taipei
QUOTE(iZuDeeN @ Oct 14 2005, 05:49 PM)
Doesn't ship overseas lar.
iZuDeeN
post Oct 14 2005, 07:32 PM

Look at all my stars!!
*******
Senior Member
3,466 posts

Joined: Jan 2003
From: PJ, Malaysia
QUOTE(sniper on the roof @ Oct 14 2005, 05:58 PM)
Doesn't ship overseas lar.
*
yupe

only US address...

but considering if you ask someone to get it for you and even give him a commision, i still alot cheaper than RM1k to ship it over here...
aaron_lwm
post Oct 14 2005, 07:37 PM

>jedi council<
*******
Senior Member
3,277 posts

Joined: Jan 2005
From: Penang


@mac
what a good job done, bravo!!!
gmail
post Oct 17 2005, 11:36 AM

Trolling Level
*******
Senior Member
2,597 posts

Joined: Mar 2005
From: Kuala Lumpur


when pair this with ur Apple Cinema Display. wau looks really like a real G5!
Tunn
post Oct 18 2005, 09:20 PM

The SadPanda
****
Senior Member
651 posts

Joined: Jul 2005


QUOTE(gmail @ Oct 17 2005, 11:36 AM)
when pair this with ur Apple Cinema Display. wau looks really like a real G5!
*
hahahah....good mod here
TSMacDaNife
post Oct 18 2005, 09:34 PM

Adrenalina Italiana
******
Senior Member
1,737 posts

Joined: Jan 2003
OK, next mounted the Mobo backplate. Made out of 5mm Acrylic. Thickness is required as the backplate is held on the G5 case by the Apple Mobo standoff screws. In order to maintain the necessary depth/distance of the DFI mobo to the PCI slots, I had to drill holes in the acrylic backplate. The Apple Mobo standoffs were then trimmed to a height of 5mm in order to be flush with the acrylic backplate. The backplate was then screwed down with specially shortened screws.

A lot of dremel drillwork required hence the delay. Some pics:

user posted image

user posted image

With that done, regular PC motherboard standoff screws were postioned on the acrylic backplate in order to securely hold the DFI board

user posted image

Position fits perfectly, and as you can see in the next few photos, the PCI slots align very nicely. The uppermost PCI slot however is unusable unless I sacrifice the harddrive bays, which I do NOT want to do.

user posted image

user posted image

user posted image

This post has been edited by MacDaNife: Oct 18 2005, 09:58 PM
sooyewguan
post Oct 18 2005, 09:47 PM

Casual
***
Junior Member
427 posts

Joined: Jun 2005


What a beautiful match, really worth for wait you posting.

Cant wait to see the next upcoming how you mod the backpanel ports with G5.

Good Job.
eskimore
post Oct 18 2005, 09:49 PM

Enthusiast
*****
Senior Member
847 posts

Joined: Jan 2003


ohh.. i can't wait to see when u r finished.. sure it'll be 'cun'
TSMacDaNife
post Oct 18 2005, 09:50 PM

Adrenalina Italiana
******
Senior Member
1,737 posts

Joined: Jan 2003
Next: The PSU.

Choose a Enermax Coolergiant 600W PSU. This is for the whopping 600W and also for Enermax's excellent showing in the THG Torture Testing. However a regular PC PSU is too wide/high to fit in the base of the case where I intended it to go. It would hit the RAM and having a hot PSU against my potentially overclocked RAM is NOT a good idea...

Option is to put the PSU towards the front of the case but that would mean that it would be blowing hot air into the case. While I intend to make a acrylic divider that would isolate the lowest 'hot' compartment from the rest of the case, in reality, hot air rises. This would warm up the whole case.

As Sniper suggested, it was time for a total rethink:

And time to completely void the Enermax 5-year warranty. Oh well....

The layout of the Enermax Coolergiant 600W is very good, with a beefy heatsink and components all well laid out for maximal airflow.

user posted image

user posted image

However, it can be improved...

The plan is to make the PSU long rather than wide, with the on off switch at the top to facilitate switching on and off from within the case (I want to avoid cutting the G5 back if I can). The fan control knob will also be mounted at the top.

THIS is how I want the PSU to sit within the case...

user posted image

And to do this, I'll need to make a custom acrylic enclosure:

user posted image

user posted image

user posted image

Since I've already voided the warranty, might as well cut off the unnecessary wires too...

user posted image

Have not decided how to put the acrylic together... Glue? Screws? I've got the glue ready, SuperGlue is NOT a good idea as it will discolor the acrylic at the point of contact. Have tested the Selleys MultiGrip Contact Adhesive and while it takes longer to set, it provides a strong bond and will not discolor the acrylic.


sherren
post Oct 18 2005, 10:03 PM

Retired
******
Senior Member
1,298 posts

Joined: May 2005
From: Penang Island


Good Work As always macdanife
about the psu arcylic cover if u wanna open the acrylic case next time better use a screw or if you dont wanna open it then use a glue.but screw is better will look neater thumbup.gif but is up to you
mADmAN
post Oct 18 2005, 10:35 PM

10k Club
********
All Stars
10,530 posts

Joined: Nov 2004
From: Petaling Jaya & Mid Valley


yeah i agree on the screw part for the PSUs acrylic case... and since you're making a custom case for it..... instead of cutting out the unnecessary cables and making them go to waste, why not make a mod for it and make it a modular PSU? using normal molex's might do the trick, but i would suggest something with a clip for better connectivity...mebbe something like the 4 pin atx mobo connector.

at least ull have the option of fitting them in in the future in case u need more connectors

EDIT: oh yeah.....y not change the PSU fans to something with a lil more 'bling'?

This post has been edited by mADmAN: Oct 18 2005, 10:38 PM
sukhoi37
post Oct 18 2005, 10:52 PM

Into Computer Since 2002
*******
Senior Member
4,810 posts

Joined: Jan 2003


mac, you still wanna use SLI for this casing?
i think the would be bad for upper card as the soundcard will block the airflow from the GTX.
Evogenix
post Oct 18 2005, 11:41 PM

I Missed LYN Grey Skin T_T
******
Senior Member
1,809 posts

Joined: Jan 2003


// MacDaNife :
nice mod-ing you hving there, want to share some my opinions biggrin.gif,

from the original Enermax psu, the airflow are great thumbup.gif thumbup.gif ,
user posted image

IMHO, from the custom acrylic enclosure you made, the air flow will be blocked due the height of the heatsink. The heat will traped in between those heatsink, and it will shorten the lifespan of the psu if the temp is high loaded for a long run system. Its a serious problem, xpecially when the warrenty of the psu was voided sweat.gif sweat.gif .
user posted image

hope you get my idea, biggrin.gif biggrin.gif
Evogenix
iZuDeeN
post Oct 19 2005, 12:01 AM

Look at all my stars!!
*******
Senior Member
3,466 posts

Joined: Jan 2003
From: PJ, Malaysia
mac to glue the acrylic, you better use those proper glue

you might want to read this article

http://www.tech-mods.net/forums/showthread...p=1922#post1922
TSMacDaNife
post Oct 19 2005, 05:00 AM

Adrenalina Italiana
******
Senior Member
1,737 posts

Joined: Jan 2003
QUOTE(mADmAN @ Oct 18 2005, 10:35 PM)

EDIT: oh yeah.....y not change the PSU fans to something with a lil more 'bling'?
*
... cos I've developed an allergy to 'bling'....
TSMacDaNife
post Oct 19 2005, 05:01 AM

Adrenalina Italiana
******
Senior Member
1,737 posts

Joined: Jan 2003
QUOTE(iZuDeeN @ Oct 19 2005, 12:01 AM)
mac to glue the acrylic, you better use those proper glue

you might want to read this article

http://www.tech-mods.net/forums/showthread...p=1922#post1922
*
Great link! Very informative. Thanks.
TSMacDaNife
post Oct 19 2005, 05:04 AM

Adrenalina Italiana
******
Senior Member
1,737 posts

Joined: Jan 2003
QUOTE(Evogenix @ Oct 18 2005, 11:41 PM)
// MacDaNife :

IMHO, from the custom acrylic enclosure you made, the air flow will be blocked due the height of the heatsink. The heat will traped in between those heatsink, and it will shorten the lifespan of the psu if the temp is high loaded for a long run system. Its a serious problem, xpecially when the warrenty of the psu was voided
*
I get what you mean. I've considered this even prior to your well illustrated post. It's a very valid point.

Don't have much of a choice as I need the PSU to be long rather than wide and that means changing the orientation of the board. It's the whole point of the acrylic enclosure.

I am making it a little taller to account for this. Will it be enough? Time will tell...
ivandj
post Oct 19 2005, 06:30 AM

On my way
****
Senior Member
578 posts

Joined: Jan 2005


Add another fan for Exhaust on the TOP where the heat is , The other 2 fans use for intake . Would it be better ?
ianho
post Oct 19 2005, 06:49 AM

Cucimangkoklife
Group Icon
VIP
15,705 posts

Joined: Mar 2005
From: Tg. Rambutan
QUOTE(MacDaNife @ Oct 18 2005, 09:50 PM)


Have not decided how to put the acrylic together... Glue? Screws? I've got the glue ready, SuperGlue is NOT a good idea as it will discolor the acrylic at the point of contact. Have tested the Selleys MultiGrip Contact Adhesive and while it takes longer to set, it provides a strong bond and will not discolor the acrylic.
*
U shud haf bent the sides around using a hot airgun instead of chopping them off. But since u've chopped them off, u can get chloroform glue from hardware stores to glue it. They're commonly used to bond PVC pipe joints.
TSMacDaNife
post Oct 19 2005, 07:01 AM

Adrenalina Italiana
******
Senior Member
1,737 posts

Joined: Jan 2003
QUOTE(ianho @ Oct 19 2005, 06:49 AM)
U shud haf bent the sides around using a hot airgun instead of chopping them off. But since u've chopped them off, u can get chloroform glue from hardware stores to glue it. They're commonly used to bond PVC pipe joints.
*
Actually, I've not yet fabricated the top and sides of the PSU acrylic case... Have been considering the heat/bend technique but descriptions on the web (have obviously not done this before myself) make it seem rather difficult....

Also it needs two people: One to apply heat with the gun, another to bend and as a solo modder... this may prove to be a little difficult. Can't trust my sons with either the gun (they are likely to burn me instead) nor with the bending...

So I guess the bottom line will be: screw it. laugh.gif
GoldenHawk
post Oct 19 2005, 11:13 AM

The Forgotten
******
Senior Member
1,017 posts

Joined: Jan 2003
From: Malacca


Ever considered using really small fans (40mm or so) to drain the heatspots OFF the hot air. Don't use them as primary exhaust vents, just as an alternative way suck the hot air out.

Not good with graphics, so I hope you get my idea. "Bend" the airflow by creating negative preassure at the heat-spots sweat.gif
sooyewguan
post Oct 19 2005, 12:28 PM

Casual
***
Junior Member
427 posts

Joined: Jun 2005


Why not using the exhaust fan to sux the heat sink hot air out.

Attached Image


May be can change to rear fan into 60mm, then could be a perfect match ?Attached Image


Just my 2 cents, i think Mac should have his idea how to solve his prob.

mADmAN
post Oct 19 2005, 12:39 PM

10k Club
********
All Stars
10,530 posts

Joined: Nov 2004
From: Petaling Jaya & Mid Valley


^ this is actually a very good idea.... especially since u have an extra blower right?

myself i was thingking of something alone the line of goldenhawks idea.

putting a 40mm fan between the heatsinks and place it at the bottom to help push the hot air up.

This post has been edited by mADmAN: Oct 19 2005, 12:40 PM
GoldenHawk
post Oct 19 2005, 02:13 PM

The Forgotten
******
Senior Member
1,017 posts

Joined: Jan 2003
From: Malacca


Here's another idea that just popped into my head...
Blue line denotes the airflow...

Sorry for the bad graphics sweat.gif

Attached Image
aaron_lwm
post Oct 19 2005, 05:54 PM

>jedi council<
*******
Senior Member
3,277 posts

Joined: Jan 2005
From: Penang


@macdanife
OMG, warranty void, but its gonna be alright, good progress, cheers thumbup.gif
Gamer
post Oct 19 2005, 06:56 PM

Be Original
*******
Senior Member
3,366 posts

Joined: Jan 2003
From: Sarawak, Sibu


I think is better put the 80mm fan on top of those heatsink and blow down then another fan at back suck hot air out.
sniper on the roof
post Oct 19 2005, 10:53 PM

20k VIP Club
Group Icon
VIP
23,414 posts

Joined: Jan 2003
From: Taipei
QUOTE(GoldenHawk @ Oct 19 2005, 02:13 PM)
Here's another idea that just popped into my head...
Blue line denotes the airflow...

Sorry for the bad graphics sweat.gif

Attached Image
*
Huh? Can turn a smooth S meh?

Don't get it dood.
pizzaboy
post Oct 19 2005, 11:23 PM

Look at all my stars!!
Group Icon
VIP
9,495 posts

Joined: Dec 2004
QUOTE(sniper on the roof @ Oct 19 2005, 10:53 PM)
Huh? Can turn a smooth S meh?

Don't get it dood.
*
i think he's suggesting like, two fans, one suck, one blow.
Then in such a shape, it' should theoritically move in a S motion and remove heat better.

Theories rock, practical......
TSMacDaNife
post Oct 20 2005, 06:04 AM

Adrenalina Italiana
******
Senior Member
1,737 posts

Joined: Jan 2003
QUOTE(GoldenHawk @ Oct 19 2005, 02:13 PM)
Here's another idea that just popped into my head...
Blue line denotes the airflow...

Sorry for the bad graphics sweat.gif

Attached Image
*
Looks more restrictive to me...
GoldenHawk
post Oct 20 2005, 09:06 AM

The Forgotten
******
Senior Member
1,017 posts

Joined: Jan 2003
From: Malacca


QUOTE(sniper on the roof @ Oct 19 2005, 10:53 PM)
Huh? Can turn a smooth S meh?

Don't get it dood.
*
Well, it IS a theory...
The idea is to get the air to flow in a certain direction so that it hits the heatsink BUT doesn't get stuck in a hot-air whirlpool. At one end, the fan pushes the air in & the other, the fan pushes the air out. Sorry for not drawing the fans out sweat.gif I warned you guys that my graphics SUCK sweat.gif

It would REALL help if there were holes througgt the heatsink. This way, you'ld get a constant cooling draft going THROUGH the heatsink, which not only helps cooling, but provides some amount of unrestricted airflow...
iZuDeeN
post Oct 20 2005, 10:11 AM

Look at all my stars!!
*******
Senior Member
3,466 posts

Joined: Jan 2003
From: PJ, Malaysia
QUOTE(GoldenHawk @ Oct 20 2005, 09:06 AM)
Well, it IS a theory...
The idea is to get the air to flow in a certain direction so that it hits the heatsink BUT doesn't get stuck in a hot-air whirlpool. At one end, the fan pushes the air in & the other, the fan pushes the air out. Sorry for not drawing the fans out sweat.gif I warned you guys that my graphics SUCK sweat.gif

It would REALL help if there were holes througgt the heatsink. This way, you'ld get a constant cooling draft going THROUGH the heatsink, which not only helps cooling, but provides some amount of unrestricted airflow...
*
it will create more resistance since there is a heatsink obstructing its path...

air is not like water where it will take shape of the surrounding...

no doubt that there will be air going out through the exhaust but there will still be a whirpool in there due to the resistance...
GoldenHawk
post Oct 20 2005, 01:22 PM

The Forgotten
******
Senior Member
1,017 posts

Joined: Jan 2003
From: Malacca


QUOTE(iZuDeeN @ Oct 20 2005, 10:11 AM)
it will create more resistance since there is a heatsink obstructing its path...

air is not like water where it will take shape of the surrounding...

no doubt that there will be air going out through the exhaust but there will still be a whirpool in there due to the resistance...
*
This is why I recommended putting holes through the heatsink.... get my point? unsure.gif
junkieG
post Oct 22 2005, 09:23 AM

DIGITAL ERA
*******
Senior Member
2,687 posts

Joined: Jan 2003
From: Sue Bunk Jai Yaa!


drilling through the fins can be pain in the arse wink.gif
TSMacDaNife
post Oct 22 2005, 11:01 AM

Adrenalina Italiana
******
Senior Member
1,737 posts

Joined: Jan 2003
Ain't no way I'm drilling through any fins. Anyways, completed the PSU mod the way I want it. thanks for the suggestions guys but if you were to see this in person, you will realize that airflow is really quite good. The wires had to be carefully folded out of the way in order not to block the intake fan.

Note that I've place the fan control rheostat and the on/off switch at the TOP of the PSU. This is intentional as I do not intend to cut the back of the case for the PSU switches. The layout of the
G5 will be such that the side of the case would be most accessible so this placement suits the case just fine...

Without further ado, here are the pics... Now to find some nice small (but longish) screws....

user posted image

user posted image

user posted image

user posted image
sherren
post Oct 22 2005, 11:57 AM

Retired
******
Senior Member
1,298 posts

Joined: May 2005
From: Penang Island


@Macdanife
Good Work thumbup.gif cant wait to see for more updates
ckwei
post Oct 22 2005, 12:27 PM

Nacho Man(tm)
*****
Senior Member
969 posts

Joined: Jan 2003
From: nachoville

nice work.. question is, isnt the acrylic that ur using too thin to screw through? a thicker piece would've been easier to work with tongue.gif
TSMacDaNife
post Oct 22 2005, 02:31 PM

Adrenalina Italiana
******
Senior Member
1,737 posts

Joined: Jan 2003
QUOTE(ckwei @ Oct 22 2005, 12:27 PM)
nice work.. question is, isnt the acrylic that ur using too thin to screw through? a thicker piece would've been easier to work with tongue.gif
*
Got the screws, will see if it's too thin tomorrow... Actually, the base, front and rear sides are 5mm acrylic. The top and sides are 2mm acrylic. Thinner acrylic is easier to cut. Will be screwing through the thin acrylic to anchor it to thick acrylic so should be theoretically a secure fit.


We will see...
ianho
post Oct 24 2005, 08:55 AM

Cucimangkoklife
Group Icon
VIP
15,705 posts

Joined: Mar 2005
From: Tg. Rambutan
QUOTE(MacDaNife @ Oct 22 2005, 11:01 AM)
Ain't no way I'm drilling through any fins. Anyways, completed the PSU mod the way I want it. thanks for the suggestions guys but if you were to see this in person, you will realize that airflow is really quite good. The wires had to be carefully folded out of the way in order not to block the intake fan.

Note that I've place the fan control rheostat and the on/off switch at the TOP of the PSU. This is intentional as I do not intend to cut the back of the case for the PSU switches. The layout of the
G5 will be such that the side of the case would be most accessible so this placement suits the case just fine...

Without further ado, here are the pics... Now to find some nice small (but longish) screws....

*
Dude, if I were u, I'd just use the plumber's glue to glue it together seeing as nobody opens up a PSU anyway. I doubt u'll b opening it up again once everything is nicely in place right?
TSMacDaNife
post Oct 24 2005, 09:03 AM

Adrenalina Italiana
******
Senior Member
1,737 posts

Joined: Jan 2003
QUOTE(ianho @ Oct 24 2005, 08:55 AM)
Dude, if I were u, I'd just use the plumber's glue to glue it together seeing as nobody opens up a PSU anyway. I doubt u'll b opening it up again once everything is nicely in place right?
*
Ian, you must be psychic...

I've already glued the fellow. Tried the screws, too problematic. Will only be using screws for the top lid. Need to get access to the innards to clean/change fans if necessary. Gluing the rest of it though.

Pics will follow...


ianho
post Oct 24 2005, 09:15 AM

Cucimangkoklife
Group Icon
VIP
15,705 posts

Joined: Mar 2005
From: Tg. Rambutan
QUOTE(MacDaNife @ Oct 24 2005, 09:03 AM)
Ian, you must be psychic...

I've already glued the fellow. Tried the screws, too problematic. Will only be using screws for the top lid. Need to get access to the innards to clean/change fans if necessary. Gluing the rest of it though.

Pics will follow...
*
Hahaha. Yes I am. Mebe I shud get sum side income from my "psychicness". BTW, ure Enermax looks gooooooooood in that perspex man. Pray that u dont need to RMA though. Coz mine has failed twice. After that, Vertex gave me a whole new unit.
TSMacDaNife
post Oct 25 2005, 03:58 PM

Adrenalina Italiana
******
Senior Member
1,737 posts

Joined: Jan 2003
Completed the PSU mod.

Figured that in order to gain access to the innards of the PSU, I really need only place screws at the TOP of the PSU. The other sides can be glued and this was duly done with Selley's Multigrip Adhesive (About RM5 from Ace Hardware). Screwed the top acrylic down with six small screws and the result looked pretty neat.

user posted image

user posted image

user posted image

user posted image

Now I began to worry....

What if I screwed up the PSU somehow... Better do a test run. So I connected the fellow up to the WorkRig...

user posted image

Works fine. VERY quiet, and good airflow through to the back fan. Did not do any extended testing though... Perhaps a temp probe might be a good idea. Actually if I ever go the full watercooling route, this PSU would be an ideal candidate for a watercooled PSU.... biggrin.gif

And here's how it would sit in the G5 Case...

user posted image

user posted image

user posted image

sherren
post Oct 25 2005, 04:16 PM

Retired
******
Senior Member
1,298 posts

Joined: May 2005
From: Penang Island


Nice work macdanife perhaps u should fix a temp sensor in your PSU,like Alln gap's LCd temperature thumbup.gif,anyway where did u buy the arcylic can u state the location,do u know where to get Plexiglass?
TSMacDaNife
post Oct 25 2005, 04:20 PM

Adrenalina Italiana
******
Senior Member
1,737 posts

Joined: Jan 2003
Bought the acrylic from a sign making shop along Jln Pudu. Not sure the exact location but it was about midway between the Pudu/Imbi intersection and the turnoff to Jln Pasar. Actually - all sign making shops sell the stuff. They come in various thickness and are sold per square foot.

If you have the exact dimensions of your window that would be best as they will have the tools (a bandsaw) to make a neat cut (better than I'm able to do with my Dremel anyway).


iZuDeeN
post Oct 25 2005, 04:21 PM

Look at all my stars!!
*******
Senior Member
3,466 posts

Joined: Jan 2003
From: PJ, Malaysia
I bet you forget one thing...

EMI inteferance...

There is a reason why you don't see any manufacturer producing PSU out of acrylic/plastic...


However you can counter this if your mobo support "Spread Spectrum". You can set it to enable.

But the downside is, you will not be able to overclock, or else your cpu might just lock down.


ianho
post Oct 25 2005, 04:34 PM

Cucimangkoklife
Group Icon
VIP
15,705 posts

Joined: Mar 2005
From: Tg. Rambutan
QUOTE(iZuDeeN @ Oct 25 2005, 04:21 PM)
I bet you forget one thing...

EMI inteferance...

There is a reason why you don't see any manufacturer producing PSU out of acrylic/plastic...
However you can counter this if your mobo support "Spread Spectrum". You can set it to enable.

But the downside is, you will not be able to overclock, or else your cpu might just lock down.
*
Harlow? Haf u seen an Enermax Red b4? There's a biga$$ EMI ring there on the output wires man. I'm sure that's more than enuf.
TSMacDaNife
post Oct 25 2005, 05:40 PM

Adrenalina Italiana
******
Senior Member
1,737 posts

Joined: Jan 2003
Mounting the CoolerMaster Aquagate Mini Radiator.

Rather than drill into the case, I will mount the radiator onto the Apple G5 fangrille. Actually the grille is made of plastic but painted a dark aluminum color:

user posted image

As with everything in this case, the grille is held on with multiple screws. In this case a total of nine fine screws. Once removed, the grille looks like this:

user posted image

Flipping it over, the inside of the grille looks like this:

user posted image

Note the foam vibration dampener on the grille edges. This case is full of neat details like this. With my trusty Dremel, I drilled some holes and mounted the radiator to the grille:

user posted image

And a side view:

user posted image

Also took the opportunity to take the DFI NB fan off (being very careful this time not to remove the square foam backing as this provides support for the DFI heatsink - the NB core being raised from the surrounding PCB), cleaned off the yellow gunk that DFI regards as thermal tranfer paste to apply some nice ArcticSilver5. Also found the time to apply some nice shiny heatshrink to the fan wires...

user posted image

user posted image

user posted image

user posted image

As a side note: I got a honking big FedEx box today. Inside was a NVidia SLi poster and this: Sticker, Case badge, 8cm Fan Grille and a wristband. Apparently the benefits of joining Club SLi. All the way from the USA. Not bad nVidia!

user posted image

This post has been edited by MacDaNife: Oct 25 2005, 06:16 PM
ianho
post Oct 26 2005, 12:10 PM

Cucimangkoklife
Group Icon
VIP
15,705 posts

Joined: Mar 2005
From: Tg. Rambutan
Maaaaaaan. Ure a cruel bast@rd. I wish I cud get my hands on a G5 case too. BTW, the Aquagate looks really puny. Is it the 80mm version? Enuf to cool ure X2?

This post has been edited by ianho: Oct 26 2005, 12:11 PM
TSMacDaNife
post Oct 26 2005, 08:06 PM

Adrenalina Italiana
******
Senior Member
1,737 posts

Joined: Jan 2003
Some updates...

Decided to go without the stock 8cm fan for now.... Will need to test out what the four wires do. Don't want to burn the fan and need to get the Apple Tech Docs for the G5 to find out the voltages for each wire. So for the meantime, put a nice Aluminum CoolerMaster Fan in the bay provided. Nice rubber fan mounts btw. which fit perfectly.

user posted image

And here's how it looks installed in the G5 case. I've sleeved the wires and run it down to hide behind the Mobo tray. I will be installing modding a Sunveam 4 Fan controller. The stock one is supposed to fit in a 5 in bay, I will be making a custom acrylic mount. Gosh now I'm getting adept at cutting acrylic I'm finding all sorts of uses for the stuff...

user posted image

Here are how the cables run from the harddrive bay, The optical drive bay, The top compartment fan. Note that I've made a side branch floppy connector off the power cable that goes to the optical drive. This is to supply the floppy connector on the DFI mobo. This way I'll avoid having a cable crossing the front of the mobo, it will now pass unobtrusively from the back of the mobo near the bottom PCI slot.

user posted image

And with the Mobo in place, the wires pass behind it to connect to headers coming off the PSU.

user posted image

With the PSU at the bottom, the wires pass around the front (to avoid blocking the intake fan) and connect below the PSU. I've removed the unnecessary connectors from the PSU in order to maintain neatness. I'm planning to make an aluminum baseplate so the wires will then all go below the aluminum plate with the PSU above. All wires/connectors will then be invisible. I've not however identified where to buy an Aluminum plate. If I don't find one, I might need to sacrifice my LianLi (non window) sidepanel (that I replaced with the windowed one in my v1000b).

user posted image

user posted image

This post has been edited by MacDaNife: Oct 26 2005, 09:08 PM
TSMacDaNife
post Oct 26 2005, 08:14 PM

Adrenalina Italiana
******
Senior Member
1,737 posts

Joined: Jan 2003
The next step: Cutting the back of the case to fit the backpanel connectors.

The advantage of the DFI LanParty NF4 SLi-D board is that all of the frequently used connectors are concentrated in one position so I won't have to cut that much of the back of the case. Of course, if I change mobos, I might have to get the dremel out again. For now however, this is how it looks with the CoolerMaster Aquagate Mini in position. I've pencilled out where I will be cutting...

user posted image

user posted image

user posted image

SUSAllnGap
post Oct 26 2005, 08:54 PM

[ Modding with Passion(tm) ]
*******
Senior Member
4,561 posts

Joined: Jan 2003
From: Penangites


i really pity ur PSU, not even a single month and u stripped it and put it in acrylic casing..

just keep up the good work man !!!
aaron_lwm
post Oct 26 2005, 08:56 PM

>jedi council<
*******
Senior Member
3,277 posts

Joined: Jan 2005
From: Penang


@mac
nice work bro, really see great ability in you...cheers
sherren
post Oct 26 2005, 09:19 PM

Retired
******
Senior Member
1,298 posts

Joined: May 2005
From: Penang Island


Wa awesome job cant wait to see the final product drool.gif drool.gif,still waitin for my RTX haihz yawn.gif flex.gif
ianho
post Oct 27 2005, 12:08 AM

Cucimangkoklife
Group Icon
VIP
15,705 posts

Joined: Mar 2005
From: Tg. Rambutan
QUOTE(MacDaNife @ Oct 26 2005, 08:14 PM)
The next step: Cutting the back of the case to fit the backpanel connectors.

The advantage of the DFI LanParty NF4 SLi-D board is that all of the frequently used connectors are concentrated in one position so I won't have to cut that much of the back of the case. Of course, if I change mobos, I might have to get the dremel out again. For now however, this is how it looks with the CoolerMaster Aquagate Mini in position. I've pencilled out where I will be cutting...

*
Dude, don't cut the back lar. Y don't u just pass all the wires through the lowest hole n just plug into the mobo. Or else u can use USB extension wires n connect the male plug to the mobo on 1 end then the female end hot glue to the G5 case USB ports? The same thing can be done for the stereo mini jacks on the sound card. The only thing that can't b done that way is the CAT 5 wire. Then u can maintain the original look of the case's back.
iZuDeeN
post Oct 27 2005, 12:28 AM

Look at all my stars!!
*******
Senior Member
3,466 posts

Joined: Jan 2003
From: PJ, Malaysia
Mac,

You might want to tie those cables together using tie clip or heatshrink. Looks neater.

Attached Image


junkieG
post Oct 27 2005, 07:39 AM

DIGITAL ERA
*******
Senior Member
2,687 posts

Joined: Jan 2003
From: Sue Bunk Jai Yaa!


i like all ur mod however the psu + arcylics giving cheapo feeling...i think u should go for alu material

just my 2 cent wink.gif
TSMacDaNife
post Oct 27 2005, 11:00 PM

Adrenalina Italiana
******
Senior Member
1,737 posts

Joined: Jan 2003
QUOTE(ianho @ Oct 27 2005, 12:08 AM)
Dude, don't cut the back lar. Y don't u just pass all the wires through the lowest hole n just plug into the mobo. Or else u can use USB extension wires n connect the male plug to the mobo on 1 end then the female end hot glue to the G5 case USB ports? The same thing can be done for the stereo mini jacks on the sound card. The only thing that can't b done that way is the CAT 5 wire. Then u can maintain the original look of the case's back.
*
Three problems with this:

1. It's a lot of work
2. The G5 only has two USB ports. The DFI board has six. I need all six.
3. It's a lot of work

QUOTE(iZuDeeN @ Oct 27 2005, 12:28 AM)
Mac,

You might want to tie those cables together using tie clip or heatshrink. Looks neater.

Attached Image
*
It's NOT finished yet lah kawan.... doh.gif . As I said in the post, I'll be making a floor for the case so the wires will be COMPLETELY hidden. Patience please...

QUOTE(junkieG @ Oct 27 2005, 07:39 AM)
i like all ur mod however the psu + arcylics giving cheapo feeling...i think u should go for alu material

just my 2 cent wink.gif
*
Acrylic cheapo? If I could I'd go with a titanium finish. whistling.gif Plus gold plated connectors too. Unfortunately there are two major limitations:

1. Cost
2. Ability/skill at modding

A modder must confine himself not only to the materials at hand but also to that which he is able to do. Suggestions are fine, but please at least try to confine them to what is possible (unless you are skilled at working with Aluminum - then if you wanna help me fabricate a case I'd be grateful!)
ianho
post Oct 27 2005, 11:06 PM

Cucimangkoklife
Group Icon
VIP
15,705 posts

Joined: Mar 2005
From: Tg. Rambutan
QUOTE(MacDaNife @ Oct 27 2005, 11:00 PM)
Three problems with this:

1. It's a lot of work
2. The G5 only has two USB ports. The DFI board has six. I need all six.
3. It's a lot of work
*
Oh well. I suppose it's gonna b hidden at the back anyways. Lookin good so far.
Xrossfire
post Oct 28 2005, 02:55 AM

Ten Hut!
Group Icon
Elite
1,161 posts

Joined: Jan 2003
From: SF Snakeplain
this thread looks smashing!
great mod u got there, Mac. thumbup.gif
hey if u need help fabricating acrylics or aluminium, let me know.
i got aluminium sheets available smile.gif

ugh, im sooo wanna molest ur G5 tongue.gif tongue.gif blush.gif
TSMacDaNife
post Oct 28 2005, 03:43 PM

Adrenalina Italiana
******
Senior Member
1,737 posts

Joined: Jan 2003
Thanks for the support CrossFire. It is much appreciated.

Today, worked on thermal zones and case cooling.

The fans in the original G5 are thermally controlled. There were two circuit boards that come with the case. Presumably these are the temperature monitoring circuits that Apple builds into the G5 case. While I would LOVE to utilize them, sadly, I am no electronics genius and so will have to go low-tech:

user posted image

Sunbeam Rheobus Easy Fan Controller. Nice cos it is able to switch off the fan entirely. Now obviously the G5 case has no 5in bays to speak off. So I'll have to mod this too...

user posted image

Happily the Dials just slide off. Removing some nuts and screws leave me with the naked PCB and Rheobus. Interestingly, Sunbeam saw it fit to include some heatsinks too...

user posted image

That much done it was time to cut some acrylic in order to fabricate the shelves that would divide the G5 into separate thermal zones. These were done after careful measurement and cut 5mm acrylic with my trusty Dremel into the following three pieces:

user posted image

The lowest shelf goes right at the bottom of the case. Note the slot for PSU wires to enter and here is where the cable clutter goes... I may paint this silver in the future but so far, it looks quite neat to be able to see the cables and yet know that they do not interfere with airflow at all.

user posted image

user posted image

The next shelf has the Fan Controller built into it:

user posted image

user posted image

user posted image


TSMacDaNife
post Oct 28 2005, 03:50 PM

Adrenalina Italiana
******
Senior Member
1,737 posts

Joined: Jan 2003
Finally the third shelf will separate the PSU compartment from the PCIe Graphics Cards. This is why I chose the Aquagate Mini 8cm version. The 12cm version simply will not fit in the narrow space that is available. No matter. The X2 runs very cool anyways...

user posted image

user posted image

And with the Apple sidepanel back on, it all comes together...

user posted image

user posted image

Well, that's it for now... Further updates may be a little delayed thanks to the presence of some new distractions... Namely these two beauties. A double punch of the best games this year!

user posted image
bahgger
post Oct 28 2005, 03:56 PM

Casual
***
Junior Member
371 posts

Joined: Jan 2003
Very nice looking mod MacDaNife smile.gif Don't forget that acrylic edges should be filed, then sanded dry, sanded wet, and finally allowed some brasso polishing to look as good as the flat surfaces. For your additional work you might find that when you do the above process before gluing two pieces together (perhaps using Tensol 12 rather than your current adhesive) you'll attain a much cleaner looking edge smile.gif Hope that helps! Good luck fellow modder!
ckwei
post Oct 28 2005, 10:49 PM

Nacho Man(tm)
*****
Senior Member
969 posts

Joined: Jan 2003
From: nachoville

the lower compartment looks pretty tight.. will there be enuff clearance for your rams?
TSMacDaNife
post Oct 28 2005, 10:53 PM

Adrenalina Italiana
******
Senior Member
1,737 posts

Joined: Jan 2003
QUOTE(ckwei @ Oct 28 2005, 10:49 PM)
the lower compartment looks pretty tight.. will there be enuff clearance for your rams?
*
Tested OK with Corsair ProSeries (the tall ones with the LED lights).

Have to take out the PSU first though...
evilnickwong
post Oct 29 2005, 01:33 AM

- Evil by Nature -
*******
Senior Member
5,065 posts

Joined: Jan 2003
From: Taman Tun, KL


Those shelves look fekking sweet, not to mention your usual excellent cable management and good integration of the rheobus. That last knob on the right isn't pushed down all the way tho, wink.gif. Lol, I can see you're getting real handy with acrylic eh. laugh.gif

Your photos seem to give alot of interesting hints at the tidbits in your room. diNovo, Copperhead+Exactmat, Eclipse...
ckwei
post Oct 29 2005, 01:18 PM

Nacho Man(tm)
*****
Senior Member
969 posts

Joined: Jan 2003
From: nachoville

pardon me mac but i browsed thru every page but i still couldn't find anything about how you attached the mobo to the acrylic tray. maybe i missed. mind sharing how you actually did that? what kinda stand-offs are you using? and how do you attach them to the acrylic? thanks smile.gif

ps. sweeeet swweet mod thus far smile.gif
LittleLinnet
post Oct 29 2005, 01:31 PM

Iophobia
*******
Senior Member
3,593 posts

Joined: Feb 2005
From: ***Penang***
ckwei,i belive there are those pics at few pages before
TSMacDaNife
post Oct 29 2005, 02:06 PM

Adrenalina Italiana
******
Senior Member
1,737 posts

Joined: Jan 2003
QUOTE(ckwei @ Oct 29 2005, 01:18 PM)
pardon me mac but i browsed thru every page but i still couldn't find anything about how you attached the mobo to the acrylic tray. maybe i missed. mind sharing how you actually did that? what kinda stand-offs are you using? and how do you attach them to the acrylic? thanks smile.gif

ps. sweeeet swweet mod thus far smile.gif
*
It's in page 5.
ckwei
post Oct 29 2005, 05:28 PM

Nacho Man(tm)
*****
Senior Member
969 posts

Joined: Jan 2003
From: nachoville

crap how could i miss that >.<
ok, so what you did was drill holes into the board and just insert the mobo standoffs rite? will the arcylic crack if you screw it in by force after drilling? interested to know cos might try to build a case from scratch nxt yr tongue.gif thanks again smile.gif
sooyewguan
post Oct 29 2005, 05:41 PM

Casual
***
Junior Member
427 posts

Joined: Jun 2005


Hi Mac, why not you cut a hole for the bottom acryic for the PSU to fit inside it. In that way the cable out from the PSU will be under the sheet.

Attached Image

Just my 2cents. Keep up the good work.

This post has been edited by sooyewguan: Oct 29 2005, 05:42 PM
m|ng
post Oct 29 2005, 06:17 PM

U want a piece of me?!
******
Senior Member
1,863 posts

Joined: Jan 2003
From: Penang, Land of Laksa and Char Koay Teow


Great!
Looks just great! biggrin.gif
So are you going to imitate the 'G5' cover above your CPU?
Coz your aerogate cooler's (i think) pipe is kinda like obstructing the view.. smile.gif

gmail
post Oct 29 2005, 09:59 PM

Trolling Level
*******
Senior Member
2,597 posts

Joined: Mar 2005
From: Kuala Lumpur


well done mac, really looks nice and tidy!
valiant13
post Oct 29 2005, 10:04 PM

Getting Started
**
Junior Member
84 posts

Joined: Oct 2005


excellent job!! by the way where did u get an apple casing?
iZuDeeN
post Oct 29 2005, 10:28 PM

Look at all my stars!!
*******
Senior Member
3,466 posts

Joined: Jan 2003
From: PJ, Malaysia
im pretty sure by the time you finish with this project, it will become 20+ pages. I suggest later you open a thread here or elsewhere (blog), detailing on how you do it from Step 1.

It is hard to read all your post with all comments in between (mine included)...


TSMacDaNife
post Oct 29 2005, 10:30 PM

Adrenalina Italiana
******
Senior Member
1,737 posts

Joined: Jan 2003
QUOTE(ckwei @ Oct 29 2005, 05:28 PM)
crap how could i miss that >.<
ok, so what you did was drill holes into the board and just insert the mobo standoffs rite? will the arcylic crack if you screw it in by force after drilling? interested to know cos might try to build a case from scratch nxt yr tongue.gif thanks again smile.gif
*
You will have to use a rotary tool (I used a Dremel Multipro) to drill holes that correspond to the size of the standoff screws that you intend to use. The size must be exact or your acrylic will crack.

QUOTE(sooyewguan @ Oct 29 2005, 05:41 PM)
Hi Mac, why not you cut a hole for the bottom acryic for the PSU to fit inside it. In that way the cable out from the PSU will be under the sheet.

Attached Image

Just my 2cents. Keep up the good work.
*
Problem with this was that the fan would then be blowing amongst the wires, which is exactly what I want to avoid. The point is the completely free the airflow from obstructing wires.

QUOTE(m|ng @ Oct 29 2005, 06:17 PM)
Great!
Looks just great!  biggrin.gif
So are you going to imitate the 'G5' cover above your CPU?
Coz your aerogate cooler's (i think) pipe is kinda like obstructing the view..  smile.gif
*
Not sure yet. A cover will block airflow to the radiator. A nice AMD X2 logo would be nice though. I have a nice nVidia SLi sticker too....

QUOTE(gmail @ Oct 29 2005, 09:59 PM)
well done mac, really looks nice and tidy!
*
Thanks!

QUOTE(valiant13 @ Oct 29 2005, 10:04 PM)
excellent job!! by the way where did u get an apple casing?
*
I've a buddy who is the boss/co-owner of a Apple Service Center... I was in his shop to purchase an extension of my .Mac account. I saw the bare case and asked how much it would cost to buy and he offered it to me for free... whistling.gif
ALIAS.JG
post Oct 30 2005, 12:36 AM

Regular
******
Senior Member
1,940 posts

Joined: Feb 2005


QUOTE(MacDaNife @ Oct 28 2005, 03:50 PM)

user posted image
*
is that a saitek gaming k/board i see there notworthy.gif
valiant13
post Oct 30 2005, 12:41 AM

Getting Started
**
Junior Member
84 posts

Joined: Oct 2005


oh well... does ur buddy have anymore of it? haha...

but it's a real good job that u did with modding..

Kudos
TSMacDaNife
post Oct 30 2005, 07:18 AM

Adrenalina Italiana
******
Senior Member
1,737 posts

Joined: Jan 2003
QUOTE(iZuDeeN @ Oct 29 2005, 10:28 PM)
im pretty sure by the time you finish with this project, it will become 20+ pages. I suggest later you open a thread here or elsewhere (blog), detailing on how you do it from Step 1.

It is hard to read all your post with all comments in between (mine included)...
*
Well, there's always my homepage... That's what I use to host my pics anyways...

(link in the sig...)
exkay
post Oct 30 2005, 08:00 AM

Hired Gunman
*******
Senior Member
3,657 posts

Joined: Jan 2003
From: My Room


well, why not remove the top cover of your PSU, then make the shelves ( the one which u attach your sunbeam on ) part of your CPU cover as well ? cuz i find the PSU switch and fan speed dial is kinda spoiling the view..

if not why not make the switch ( on off) at the side facing the G5 case window and the dial right beside the fan, then the whole shelve could rest on the PSU which will look better ...

just a sugesstion tho...

ps: if the sunbeam fan controller is too tall, then why not redo the PSU case and add some height into it maybe?

This post has been edited by exkay: Oct 30 2005, 08:03 AM
TSMacDaNife
post Oct 30 2005, 10:36 AM

Adrenalina Italiana
******
Senior Member
1,737 posts

Joined: Jan 2003
QUOTE(exkay @ Oct 30 2005, 08:00 AM)
well, why not remove the top cover of your PSU, then make the shelves ( the one which u attach your sunbeam on ) part of your CPU cover as well ?  cuz i find the PSU switch and fan speed dial is kinda spoiling the view..

if not why not make the switch ( on off) at the side facing the G5 case window and the dial right beside the fan, then the whole shelve could rest on the PSU which will look better ...

just a sugesstion tho...

ps: if the sunbeam fan controller is too tall, then why not redo the PSU case and add some height into it maybe?
*
I fully agree with you on this. It would much simplify the shelves. Will have to make a "slot" in the lowest shelf to accomodate the fan controller. Added advantage would be that the fan and power wires will be hidden in the lowest "wiring" compartment.
donkeydoink
post Nov 5 2005, 07:58 AM

Casual
***
Junior Member
325 posts

Joined: Jan 2003


weee, i got 1 word for u.. RESPECT!!

keep up the good work dude..
TSMacDaNife
post Nov 9 2005, 09:33 AM

Adrenalina Italiana
******
Senior Member
1,737 posts

Joined: Jan 2003
Sorry bout the lack of updates. The Raya break and all....

Have been making some modifications to the overall plan. Am switching mobos to this:

user posted image

The DFI Lanparty SLi-DR Expert.

The reasons are this:

1. The positions of the PCI/PCIe slots will give me access to ALL the PCI slots with no loss of performance. I will be using my 7800GTX in SLi mode, and therefore, can leave the lower PCIe card withing the case. I only need to access the DVI connector of the upper card. This configuration will not allow me to run with multiple monitors, but since I'm using a 23" ACD display, I don't need to run multiple monitors anyway. Major advantage: Can now use my XFi AND a PCI wireless card and still leave a heathy distance from the SLi array.

2. Four sticks, 2GB RAM at 1T. (hopefully)

3. RAM will be cooled by the fan on the Aquagate radiator.

4. Four phase power to the CPU, Cooler mosfets.

Unfortunately, this means that my Mobo backplate will have to be retooled. It is presently positioned to align with the lower PCIe slot. I'll have to make another backplate to align with the upper PCIe slot. Need to drill some more holes.

Have also recut the acrylic for the PSU. It being my first attempt at cutting acrylic, the results were not ideal. Have now realized how to use the jigsaw to cut straight and curves on 5mm acrylic and have recut all the pieces again. Bottom, front, back and sides have been recut and this time all in 5mm acrylic (the sides were formally 2mm acrylic). No top, now that the second shelf will act as the top of the PSU.

Have also got hold of another 12cm CoolerMaster Aluminum fan to act as a intake fan for the SLi compartment. Have not decided how I'm going to mount it but given my affinity to 5mm acrylic - I think I'll make a vertical plate with slots to mount the shelves. Am still thinking about this one.

Pics to follow. At present, busy sanding the cut edges of the shelves to a smooth sheen.
exkay
post Nov 9 2005, 11:47 PM

Hired Gunman
*******
Senior Member
3,657 posts

Joined: Jan 2003
From: My Room


cant wait to see the pics!!
gmail
post Nov 10 2005, 12:49 PM

Trolling Level
*******
Senior Member
2,597 posts

Joined: Mar 2005
From: Kuala Lumpur


wah SLI-DR Expert drool.gif
pcmoddingmy
post Nov 12 2005, 01:44 AM

Casual
***
Junior Member
498 posts

Joined: Jan 2003
From: Ipoh, Perak
Bro MacDaNife,
I think you need to have some vent holes on the acrylic for the PSU. Since both fans are on exhaust setup, there will be little air inside the PSU which will cause the fans to spin faster. If you look at the original PSU, it has some vents on it so that fresh air can get into the PSU.

Just my 2cents...
Good luck with your mod! wink.gif
TSMacDaNife
post Nov 12 2005, 09:45 AM

Adrenalina Italiana
******
Senior Member
1,737 posts

Joined: Jan 2003
QUOTE(pcmoddingmy @ Nov 12 2005, 01:44 AM)
Bro MacDaNife,
I think you need to have some vent holes on the acrylic for the PSU. Since both fans are on exhaust setup, there will be little air inside the PSU which will cause the fans to spin faster. If you look at the original PSU, it has some vents on it so that fresh air can get into the PSU.

Just my 2cents...
Good luck with your mod! wink.gif
*

I've not got it as a dual exhaust. It's in a push-pull configuration. The front is an intake, the rear an exhaust. At the moment it's running with the stock fans which while quiet, are of rather low flow. May need to change this out with a faster (but noisier ) fan if required. Don't want to put vents as that would quite ruin the idea of heat isolated compartments.

Have completely redone the acrylic work for the PSU. It is now all with 5mm Acrylic. Am using chloroform to join the edges. This forms a very neat bond but requires the surfaces to be a perfect angle.

Yes I know, I owe pics!

Thanks for the input btw.


AthlorneXT
post Nov 12 2005, 08:49 PM

Getting Started
**
Junior Member
84 posts

Joined: Jun 2005
From: Petaling Jaya =D


Great mod..looking good thumbup.gif
TSMacDaNife
post Nov 14 2005, 10:12 PM

Adrenalina Italiana
******
Senior Member
1,737 posts

Joined: Jan 2003
An update... (sorry still no pics. Keep forgeting to bring the camera to work).

COMPLETELY redid the shelves and the PSU. The previous shelves/PSU acrylic was cut with a dremel. This not only took an awfully long time but also it was very difficult to get a 90 degree angle on the cut surface. Why is this important? Becos if you use chloroform to join the edges (as opposed to glue) you need an absoulutely flush edge in order for the bond to form. As you will see from the yet-to-be-taken-pics, the newly cut shelves/PSU have perfect 90 degree cut surfaces.

The way to do this is to use a jigsaw with a metal cutting blade. Use it at the minimum speed in order to avoid melting the acrylic (you MUST have a variable speed jig saw - I use the Bosch one). Advancing at just the right speed is critical. Too fast and the cut tends to run off the chosen line. Too slow and the acrylic will buck and shatter. Experience is needed. Cut some spare pieces for practice first.

Initially I tried using a guide to cut a straight line. Even used clamps to hold the acrylic in position. Eventually I learnt to stabilize the acrylic with my left hand while the right held the jigsaw. With a steady hand (which *cough* I have) you can do away with the guide and even circles and curves are cut easily.

Have completed the mods required to assemble the G5. Only thing is: DFI Expert board still not available...
TSMacDaNife
post Nov 15 2005, 08:04 AM

Adrenalina Italiana
******
Senior Member
1,737 posts

Joined: Jan 2003
Shelves are done (redone actually)....

In order to provide for structural integrity, Have integrated the fan mounts into the structure of the acrylic shelves. In essence, it is almost a case within a case. The fan mounts are 5mm acrylic and will be bonded to another 5mm acrylic base and top. I will be drilling screw holes into the base and top which will be then screwed to the shelf above and below the fan mounts.

Rather like a house of cards. But with the rigidity of 5mm acrylic and the integrity of screw/bolts to hold it rigid and minimize vibration/noise.

This plan will also obviate the need to drill holes into the G5 case itself. The aquagate radiator will also be mounted to the acrylic frame as you can see in these photos. Other than the screwholes, all other drilling/cutting is ready.

Only the mobo awaits...

user posted image

user posted image


pizzaboy
post Nov 15 2005, 09:06 AM

Look at all my stars!!
Group Icon
VIP
9,495 posts

Joined: Dec 2004
I'm in need of new eyes. I don't really understand how that's entering the casing.
But, awaiting more piccies biggrin.gif

Oh yeah, and 9 pages later, I've never said this yet, but "Nice mod log." Especially for a local. Ever thought of submitting your work to Acryan?

TSMacDaNife
post Nov 15 2005, 02:48 PM

Adrenalina Italiana
******
Senior Member
1,737 posts

Joined: Jan 2003
Pizzaboy... I guess pictures are better at describing what I've done than words.... Essentially am using the fan mounts to provide structural strenghth to the acrylic shelves.

Bear in mind I have NO fan mounts on this case. None that I can use anyways... And nowhere to secure the shelves that are required to divide the case into thermally separate compartments.

The building blocks...

user posted image

The lowest shelf. Note slots for PSU wires and for fan wire/ power molex. There will therefore be NO cable clutter other than beneath the lowest shelf.

user posted image

The PSU sits on the lowest shelf. Note the fan rheostat and on/off switch have been moved to the front leaving the top free. Need to find another CM Alu 8cm Fan...

user posted image

Middle shelf containg the fan controller. Note that the fan connectors and power molex for the fan controller is directly opposite a slot in the lowest shelf. The acrylic frame for the casefans act to support the frame above and below. Screw holes in the bottom and top of the frame hold it securely to the shelf.

user posted image

user posted image

Top shelf holds the 12cm CM Alu Fan to cool the SLi array. Nothing else in this compartment.

user posted image

user posted image

user posted image
evilnickwong
post Nov 15 2005, 02:55 PM

- Evil by Nature -
*******
Senior Member
5,065 posts

Joined: Jan 2003
From: Taman Tun, KL


That's some great looking cuts dude. Keep up the good work! wink.gif Nice planning for cable management as always haha.
sherren
post Nov 15 2005, 03:17 PM

Retired
******
Senior Member
1,298 posts

Joined: May 2005
From: Penang Island


Keep up the good work!! one thing what do u use to cut those 80mm ,120mm holes on the arcylic?,also the arcylic ? rolleyes.gif
TSMacDaNife
post Nov 15 2005, 03:30 PM

Adrenalina Italiana
******
Senior Member
1,737 posts

Joined: Jan 2003
QUOTE(sherren @ Nov 15 2005, 03:17 PM)
Keep up the good work!! one thing what do u use to cut those 80mm ,120mm holes on the arcylic?,also the arcylic ? rolleyes.gif
*
This...

user posted image

But also needed the dremel for the screw holes, Assorted files of different shapes for finishing touches... and a sanding block to get the cut edges smooth and at the right 90 degree angle.

This post has been edited by MacDaNife: Nov 15 2005, 03:32 PM
SiLv3R
post Nov 15 2005, 05:51 PM

Casual
***
Junior Member
440 posts

Joined: May 2005


thumbup.gif

Cant wait for more updates and pics drool.gif drool.gif
AthlorneXT
post Nov 15 2005, 05:58 PM

Getting Started
**
Junior Member
84 posts

Joined: Jun 2005
From: Petaling Jaya =D


shocking.gif

holy....

notworthy.gif
ikan_semilang
post Nov 15 2005, 06:28 PM

Look at all my stars!!
*******
Senior Member
4,504 posts

Joined: Jan 2003
From: Setapak


I'm already see this case and what can i say it's superb.Got time cut the acrylic. Maybe one day i want to join mod my CM5 blush.gif I will give to you full support and keep it nice job. thumbup.gif

This post has been edited by ikan_semilang: Nov 15 2005, 06:29 PM
TSMacDaNife
post Nov 15 2005, 06:30 PM

Adrenalina Italiana
******
Senior Member
1,737 posts

Joined: Jan 2003
Moved the acrylic array into the G5 case. Everything fits perfectly.

Now if only I could get hold of a DFI NF4 SLiDR-Expert.... This rig would be complete!

Well, still have to do the backpanel plate, and the front USB/Firewire/On-Off switch....

So guess it's still a work in progress. BUT it would be the primary rig while work continues... Praps I'll stick with the SLi-D board after all... hmmm...

user posted image

user posted image

user posted image

user posted image

user posted image

user posted image

user posted image
SkyD
post Nov 15 2005, 08:04 PM

..l..(^o^)..l..
*****
Senior Member
964 posts

Joined: Jan 2003
From: KL


thumbup.gif hu yo... nice nice....
waiting for ur completion set...
~\G.O.D/~
post Nov 16 2005, 01:10 AM

♪♬♪~\GooD/~♪♬♪〖&#
******
Senior Member
1,924 posts

Joined: Jan 2003


nice work ....keng
~\G.O.D/~
post Nov 16 2005, 01:14 AM

♪♬♪~\GooD/~♪♬♪〖&#
******
Senior Member
1,924 posts

Joined: Jan 2003


nice cut for those round hole....btw how u cut it so nice and smooth one ?
TSMacDaNife
post Nov 16 2005, 07:09 AM

Adrenalina Italiana
******
Senior Member
1,737 posts

Joined: Jan 2003
QUOTE(~\G.O.D/~ @ Nov 16 2005, 01:14 AM)
nice cut for those round hole....btw how u cut it so nice and smooth one ?
*
With a jigsaw and a metal cutting blade...

First draw your planned hole with pencil onto the acrylic. Then drill a hole within the circle but NOT on the line of the circle enough to enable the blade of the jigsaw in. Then cut along the circle that you've drawn.

The trick is the speed of the cut. Not too fast, not too slow and a low speed on the jigsaw blade reciprocation. Takes some experience though... (as with everything in life).
iZuDeeN
post Nov 16 2005, 11:01 AM

Look at all my stars!!
*******
Senior Member
3,466 posts

Joined: Jan 2003
From: PJ, Malaysia
QUOTE(MacDaNife @ Nov 15 2005, 06:30 PM)
Moved the acrylic array into the G5 case. Everything fits perfectly.

Now if only I could get hold of a DFI NF4 SLiDR-Expert.... This rig would be complete!

Well, still have to do the backpanel plate, and the front USB/Firewire/On-Off switch....

So guess it's still a work in progress. BUT it would be the primary rig while work continues... [b]Praps I'll stick with the SLi-D board after all... hmmm...
and I thought you have sold it off? isnt it a waste selling so cheap but ended up getting the same thing again...

you be better to pre-order the expert board from the shop or get it delivered via overseas (if you want it fast)...

http://www.monarchcomputer.com/Merchant2/m...uct_Code=110372

i think they ship internationally


TSMacDaNife
post Nov 16 2005, 11:07 AM

Adrenalina Italiana
******
Senior Member
1,737 posts

Joined: Jan 2003
QUOTE(iZuDeeN @ Nov 16 2005, 11:01 AM)
and I thought you have sold it off? isnt it a waste selling so cheap but ended up getting the same thing again...

you be better to pre-order the expert board from the shop or get it delivered via overseas (if you want it fast)...

http://www.monarchcomputer.com/Merchant2/m...uct_Code=110372

i think they ship internationally
*
Still have one DFI-SLiD in the WorkRig....

Won't have to buy another... laugh.gif
LittleGhost
post Nov 16 2005, 02:03 PM

臭小鬼
*******
Senior Member
4,234 posts

Joined: Nov 2004


QUOTE(iZuDeeN @ Nov 16 2005, 11:01 AM)
and I thought you have sold it off? isnt it a waste selling so cheap but ended up getting the same thing again...

you be better to pre-order the expert board from the shop or get it delivered via overseas (if you want it fast)...

http://www.monarchcomputer.com/Merchant2/m...uct_Code=110372

i think they ship internationally
*
hey izudeen

are u sure monarchcomputer ships internationally?

i might consider them as my last option if i cant get any rare products in KL or Penang
pizzaboy
post Nov 16 2005, 06:50 PM

Look at all my stars!!
Group Icon
VIP
9,495 posts

Joined: Dec 2004
Uh-huh, i'm pretty sure they ship internationally.
Email them, if you're unsure.
They sell the Opetron 165 pretty cheap compared to other sellers. Only RM1060 after conversion, but no delivery yet.
I'll ask my uncle to bring it back to m'sia though.

ALIAS.JG
post Nov 16 2005, 07:21 PM

Regular
******
Senior Member
1,940 posts

Joined: Feb 2005


when this is all over, tell us how much everything costs biggrin.gif

keep up the excellent work
LittleGhost
post Nov 16 2005, 09:34 PM

臭小鬼
*******
Senior Member
4,234 posts

Joined: Nov 2004


QUOTE(pizzaboy @ Nov 16 2005, 06:50 PM)
Uh-huh, i'm pretty sure they ship internationally.
Email them, if you're unsure.
They sell the Opetron 165 pretty cheap compared to other sellers. Only RM1060 after conversion, but no delivery yet.
I'll ask my uncle to bring it back to m'sia though.
*
wow, RM1060 is pretty neat

i wonder if they're quality is as good as newegg's

i might get a few rare products for next year's upgrade
~\G.O.D/~
post Nov 16 2005, 10:03 PM

♪♬♪~\GooD/~♪♬♪〖&#
******
Senior Member
1,924 posts

Joined: Jan 2003


QUOTE(MacDaNife @ Nov 16 2005, 07:09 AM)
With a jigsaw and a metal cutting blade...

First draw your planned hole with pencil onto the acrylic. Then drill a hole within the circle but NOT on the line of the circle enough to enable the blade of the jigsaw in. Then cut along the circle that you've drawn.

The trick is the speed of the cut. Not too fast, not too slow and a low speed on the jigsaw blade reciprocation. Takes some experience though... (as with everything in life).
*
thumbup.gif thanks......u really an expert
iZuDeeN
post Nov 16 2005, 11:29 PM

Look at all my stars!!
*******
Senior Member
3,466 posts

Joined: Jan 2003
From: PJ, Malaysia
QUOTE(LittleGhost @ Nov 16 2005, 02:03 PM)
hey izudeen

are u sure monarchcomputer ships internationally?

i might consider them as my last option if i cant get any rare products in KL or Penang
*
never buy from them...

I got their price from online comparison...

seems they offering the cheapest among many online vendors...

so far they deliver to america continent (include canada) but not sure about asia... u be better email them.. they have dedicated pre-sales team...

they might even can give you the intertnational shipping rate...
PowerSlide
post Nov 17 2005, 03:28 AM

----------
*******
Senior Member
6,035 posts

Joined: Jan 2003
From: Penang


a similar mod..woohoo darn cool

lets see urs mr mac thumbup.gif

http://www.xtremesystems.org/forums/showthread.php?t=80083

This post has been edited by PowerSlide: Nov 17 2005, 03:29 AM
TSMacDaNife
post Nov 17 2005, 07:16 AM

Adrenalina Italiana
******
Senior Member
1,737 posts

Joined: Jan 2003
QUOTE(PowerSlide @ Nov 17 2005, 03:28 AM)
a similar mod..woohoo darn cool

lets see urs mr mac  thumbup.gif

http://www.xtremesystems.org/forums/showthread.php?t=80083
*
There are lots of em out there...

But what I want to do is preserve the IDEA of the case. Which is the seperation of the components of the rig into separate thermal compartments. thumbup.gif
TSMacDaNife
post Nov 17 2005, 08:38 PM

Adrenalina Italiana
******
Senior Member
1,737 posts

Joined: Jan 2003
QUOTE(iZuDeeN @ Nov 16 2005, 11:29 PM)
never buy from them...

I got their price from online comparison...

seems they offering the cheapest among many online vendors...

so far they deliver to america continent (include canada) but not sure about asia... u be better email them.. they have dedicated pre-sales team...

they might even can give you the intertnational shipping rate...
*
Guess this will have to be filed as another "not so useful" suggestion then... doh.gif
SUSAllnGap
post Nov 17 2005, 09:33 PM

[ Modding with Passion(tm) ]
*******
Senior Member
4,561 posts

Joined: Jan 2003
From: Penangites


really detail work u have there......i dunt have the time for all these detail modding.......sad
ianho
post Nov 17 2005, 10:51 PM

Cucimangkoklife
Group Icon
VIP
15,705 posts

Joined: Mar 2005
From: Tg. Rambutan
QUOTE(MacDaNife @ Nov 14 2005, 10:12 PM)
The way to do this is to use a jigsaw with a metal cutting blade. Use it at the minimum speed in order to avoid melting the acrylic (you MUST have a variable speed jig saw - I use the Bosch one). Advancing at just the right speed is critical. Too fast and the cut tends to run off the chosen line. Too slow and the acrylic will buck and shatter. Experience is needed. Cut some spare pieces for practice first.

*
Dude, there is a specific blade for acrylic. I'm using that on a fixed speed jigsaw n it's been really good. No probs with melting n shattering. It's by Bosch too. The one I'm using is HCS 100-1 blade. Mebe u can get sum for the next time u need to cut so u dont hafta worry about melting n shattering. How I wish they sell those 12cm circular saws for the 12cm fan holes man. Make life a lot easier. Haha. Just an interesting note that shud help others too. Did anybody realise that a CD ROM is exactly 12cm? That's what I use when I cut 12cm holes.
TSMacDaNife
post Nov 17 2005, 11:09 PM

Adrenalina Italiana
******
Senior Member
1,737 posts

Joined: Jan 2003
QUOTE(ianho @ Nov 17 2005, 10:51 PM)
Dude, there is a specific blade for acrylic. I'm using that on a fixed speed jigsaw n it's been really good. No probs with melting n shattering.  It's by Bosch too. The one I'm using is HCS 100-1 blade.  Mebe u can get sum for the next time u need to cut so u dont hafta worry about melting n shattering. How I wish they sell those 12cm circular saws for the 12cm fan holes man. Make life a lot easier. Haha. Just an interesting note that shud help others too. Did anybody realise that a CD ROM is exactly 12cm? That's what I use when I cut 12cm holes.
*
Really?

I bought my jigsaw blades as a set from Ace Hardware. Tried with the wood blade at first. Lots of juddering. Switched to a metal blade and it cuts very smooth. I suspect the metal and acrylic blades are similar - thicker and rather inflexible.

I'll look for the HCS 100-1 blade the next time I'm at Jaya DIY. Thanks for the heads up! All my acrylic cutting is done though. Just waiting for the mobo.

May go with the Asus Dual x16 PCI-e board instead of the DFI... Nice benchies on SLi reported on this baby. Plus it has a neat heatpipe cooler on the NF4 NorthBridge...
MetalZone
post Nov 18 2005, 03:06 AM

Look at all my stars!!
*******
Senior Member
2,515 posts

Joined: Jan 2003
From: Ipoh/KL


QUOTE(MacDaNife @ Nov 17 2005, 11:09 PM)
Really?

I bought my jigsaw blades as a set from Ace Hardware. Tried with the wood blade at first. Lots of juddering. Switched to a metal blade and it cuts very smooth. I suspect the metal and acrylic blades are similar - thicker and rather inflexible.

I'll look for the HCS 100-1 blade the next time I'm at Jaya DIY. Thanks for the heads up! All my acrylic cutting is done though. Just waiting for the mobo.

May go with the Asus Dual x16 PCI-e board instead of the DFI... Nice benchies on SLi reported on this baby. Plus it has a neat heatpipe cooler on the NF4 NorthBridge...
*
most importantly u need to use blades with zero offset. wood blades almost always has offset. guess some metal blades dont have.

ianho... thanks for the tip... i'll check that out.

This post has been edited by MetalZone: Nov 18 2005, 03:11 AM
TSMacDaNife
post Nov 18 2005, 08:30 PM

Adrenalina Italiana
******
Senior Member
1,737 posts

Joined: Jan 2003
An update before the weekend...

Still waiting for the mobo. Leaning more towards the Asus board now... Benchies look good for SLi-ed rigs....

Worked on the back of the rig today... The G5 has two rear fans which attach to the case via a plate with two fan grilles. Thing is, between the fan grilles is a plate which would block airflow of any fans which are placed anywhere but directly opposite the grilles. Try as I might, I could not arrange the fans for the Aquagate Mini nor the PSU to align to these grilles.. So it was time to get the Dremel out again...

Before:

user posted image

Half-cut:

user posted image

All cut:

user posted image

Also cut out the case where the backplate connectors will be. I'll be making a custom backplate for the connectors (probably from 2mm acrylic) in order to maintain neatness.

Before cutting:

user posted image

After cutting:

user posted image

user posted image

Even redid the mobo acrylic backplate.... Still waiting for the mobo...

user posted image
aromana2
post Nov 19 2005, 12:19 AM

New Member
*
Junior Member
20 posts

Joined: Oct 2005
QUOTE(iZuDeeN @ Nov 16 2005, 11:29 PM)
never buy from them...

I got their price from online comparison...

seems they offering the cheapest among many online vendors...

so far they deliver to america continent (include canada) but not sure about asia... u be better email them.. they have dedicated pre-sales team...

they might even can give you the intertnational shipping rate...
*
off topic reply but they DO NOT ship internationally.
ianho
post Nov 19 2005, 04:45 AM

Cucimangkoklife
Group Icon
VIP
15,705 posts

Joined: Mar 2005
From: Tg. Rambutan
I just checked my jigsaw blades today. It's not Bosch as I sed. They're by Black N Decker. Sry for the wrong info guys.
MetalZone
post Nov 19 2005, 07:04 AM

Look at all my stars!!
*******
Senior Member
2,515 posts

Joined: Jan 2003
From: Ipoh/KL


QUOTE(ianho @ Nov 19 2005, 04:45 AM)
I just checked my jigsaw blades today. It's not Bosch as I sed. They're by Black N Decker. Sry for the wrong info guys.
*
aiks... mind to mention what model are those?
ianho
post Nov 19 2005, 07:18 AM

Cucimangkoklife
Group Icon
VIP
15,705 posts

Joined: Mar 2005
From: Tg. Rambutan
QUOTE(MetalZone @ Nov 19 2005, 07:04 AM)
aiks... mind to mention what model are those?
*
Black n Decker HCS 100-1
sniper on the roof
post Nov 21 2005, 01:05 PM

20k VIP Club
Group Icon
VIP
23,414 posts

Joined: Jan 2003
From: Taipei
Mac,

Surgical precision as usual but when can we expect to see the finished rig? The anticipation's a killa.
TSMacDaNife
post Nov 21 2005, 08:42 PM

Adrenalina Italiana
******
Senior Member
1,737 posts

Joined: Jan 2003
QUOTE(sniper on the roof @ Nov 21 2005, 01:05 PM)
Mac,

Surgical precision as usual but when can we expect to see the finished rig? The anticipation's a killa.
*
Been busy at work. But work on the rig goes on, in between getting the real "work" done. I find it is an excellent stress reliever. So much so I've even gone at bought a proper workbench.... The Black and Decker one is around RM300. This made in china knock-off is RM69 and works every bit as well... wub.gif

user posted image

ALMOST completed the transition of hardware to the G5. Only thing is need some medium sized screws to hold the shelves together. At present the screws I'm using are to small, hence why the fans look a little tilted.

user posted image

user posted image

user posted image

user posted image

user posted image

This post has been edited by MacDaNife: Nov 21 2005, 08:44 PM
ikan_semilang
post Nov 21 2005, 09:04 PM

Look at all my stars!!
*******
Senior Member
4,504 posts

Joined: Jan 2003
From: Setapak


Mac: Already found DFI Expert? sweat.gif
TSMacDaNife
post Nov 21 2005, 09:24 PM

Adrenalina Italiana
******
Senior Member
1,737 posts

Joined: Jan 2003
QUOTE(ikan_semilang @ Nov 21 2005, 09:04 PM)
Mac: Already found DFI Expert? sweat.gif
*
No.

Transferred the SLI-D from the WorkRig.

Am planning a CrossFire rig early next year... whistling.gif

Expert: on hold for now.
exergy
post Nov 21 2005, 10:19 PM

Look at all my stars!!
*******
Senior Member
6,079 posts

Joined: Jan 2003
From: Ipoh


Mac, just a question: are u planning to leave those arcylic as they are? have you ever thought of painting them silver or something? perhaps this will make the internals look neater? just a thought...
LittleLinnet
post Nov 22 2005, 12:13 AM

Iophobia
*******
Senior Member
3,593 posts

Joined: Feb 2005
From: ***Penang***
not going to have LEDs for those arcylic also ?
TSMacDaNife
post Nov 22 2005, 01:40 AM

Adrenalina Italiana
******
Senior Member
1,737 posts

Joined: Jan 2003
QUOTE(Silon @ Nov 21 2005, 10:19 PM)
Mac, just a question: are u planning to leave those arcylic as they are? have you ever thought of painting them silver or something? perhaps this will make the internals look neater? just a thought...
*
Maybe...

Something to consider once everything is all done up...
TSMacDaNife
post Nov 22 2005, 01:41 AM

Adrenalina Italiana
******
Senior Member
1,737 posts

Joined: Jan 2003
QUOTE(LittleLinnet @ Nov 22 2005, 12:13 AM)
not going to have LEDs for those arcylic also ?
*
Definately no bliing-bliing for me!
lucifah
post Nov 22 2005, 08:29 AM

St. Fu
Group Icon
Staff
7,948 posts

Joined: Jan 2005
From: Soviet Sarawak


QUOTE(MacDaNife @ Nov 14 2005, 10:12 PM)

Initially I tried using a guide to cut a straight line. Even used clamps to hold the acrylic in position. Eventually I learnt to stabilize the acrylic with my left hand while the right held the jigsaw. With a steady hand (which *cough* I have) you can do away with the guide and even circles and curves are cut easily.

*
your sentence makes me think: are u by anyway work as a surgeon in real life?

i mean, only surgeons have *steady* hands.

not to intimidate you, but i think u might be a surgeon, coz u got all the money, and knows how to use tools excellently (nice cuts) in very short time.
evilnickwong
post Nov 22 2005, 09:37 AM

- Evil by Nature -
*******
Senior Member
5,065 posts

Joined: Jan 2003
From: Taman Tun, KL


I wonder if surgeons are allowed to use noisy power tools in their office. laugh.gif Or for that matter, what job allows you that liberty? biggrin.gif
Mavik
post Nov 22 2005, 09:52 AM

Patience is a virtue
Group Icon
Elite
7,826 posts

Joined: Jan 2003


Hey those drilling tools that surgeons use to saw off bones are not exactly quiet you know haha tongue.gif
TSMacDaNife
post Nov 22 2005, 10:10 AM

Adrenalina Italiana
******
Senior Member
1,737 posts

Joined: Jan 2003
Almost done....

user posted image

user posted image
gmail
post Nov 22 2005, 11:53 AM

Trolling Level
*******
Senior Member
2,597 posts

Joined: Mar 2005
From: Kuala Lumpur


drool.gif drool.gif drool.gif G5 + ACD notworthy.gif notworthy.gif notworthy.gif
-vip3rleon9-
post Nov 22 2005, 12:28 PM

.:νιρэяıэои9:.
*******
Senior Member
7,516 posts

Joined: Jun 2005
From: Petaling Jaya


wow... all i can say is : Mac, ur da man!!! notworthy.gif notworthy.gif thumbup.gif thumbup.gif
Jenn77
post Nov 22 2005, 11:38 PM

Look Ma' Im Flyin! Gee~
*******
Senior Member
3,121 posts

Joined: Jan 2003
From: SA.KD.SA.KD


Mac, with great patience comes great success.. Very neat work u have there, I meet contractors everyday in my work and they deal with tools like ur using everyday, dare to say, not many have steady hands like urs.. notworthy.gif
sniper on the roof
post Nov 22 2005, 11:59 PM

20k VIP Club
Group Icon
VIP
23,414 posts

Joined: Jan 2003
From: Taipei
QUOTE(Jenn77 @ Nov 22 2005, 11:38 PM)
Mac, with great patience comes great success.. Very neat work u have there, I meet contractors everyday in my work and they deal with tools like ur using everyday, dare to say, not many have steady hands like urs..  notworthy.gif
*
Ur comparing contractors with da knife?

doh.gif doh.gif doh.gif
Jenn77
post Nov 23 2005, 12:13 AM

Look Ma' Im Flyin! Gee~
*******
Senior Member
3,121 posts

Joined: Jan 2003
From: SA.KD.SA.KD


QUOTE(sniper on the roof @ Nov 22 2005, 11:59 PM)
Ur comparing contractors with da knife?

doh.gif  doh.gif  doh.gif
*
Why not.. look how every single piece of acrylics are being cut neatly edge to edge.. and the contractors I dealt with, fuh.. Neway I was referring to the skillls Mac has.
TSMacDaNife
post Nov 23 2005, 07:16 AM

Adrenalina Italiana
******
Senior Member
1,737 posts

Joined: Jan 2003
Hey, thanks guys... blush.gif


You really are TOO kind....


A few problems though... While the RAM has sufficient clearance, I'm a little concerned that it gets too little airflow being stuck behind the PSU. The expert board will solve this due to the vertical placement of the RAM but... no expert board!

Am considering re-doing the PSU. Perhaps a vertical placement. Unfortunately that would mean re-doing the middle shelf too.... Hmmmm.
ianho
post Nov 23 2005, 04:44 PM

Cucimangkoklife
Group Icon
VIP
15,705 posts

Joined: Mar 2005
From: Tg. Rambutan
QUOTE(MacDaNife @ Nov 23 2005, 07:16 AM)
Hey, thanks guys... blush.gif
You really are TOO kind....
A few problems though... While the RAM has sufficient clearance, I'm a little concerned that it gets too little airflow being stuck behind the PSU. The expert board will solve this due to the vertical placement of the RAM but... no expert board!

Am considering re-doing the PSU. Perhaps a vertical placement. Unfortunately that would mean re-doing the middle shelf too.... Hmmmm.
*
A suggestion for the RAM cooling. I looked back at the pics on pg11 to see the RAM area. Looks like there's sum space in the PSU next to the RAM. Y not just put a couple of 40mm fans either on the outer wall of the PSU or inner wall. Then it'll suck the air from the RAM area into the PSU n get exhausted thru the PSU at the back. Easy job. Nonid to refabricate everything all over again.
pizzaboy
post Nov 23 2005, 06:55 PM

Look at all my stars!!
Group Icon
VIP
9,495 posts

Joined: Dec 2004
Nice, nice.
Just screw that coolermaster fan and make it look steadier and you'er all set!
Jenn77
post Nov 23 2005, 11:25 PM

Look Ma' Im Flyin! Gee~
*******
Senior Member
3,121 posts

Joined: Jan 2003
From: SA.KD.SA.KD


Mac one thing to take note, I have my old chapalang PSU side window replaced with piece of acrylic. complete with small ventilation holes. After using it around 6 months, I notice some very weird pattern on the surface of the acrylic. I suspect is the heat that is causing this to happen. Anybody having the same problem? sweat.gif
TSMacDaNife
post Nov 26 2005, 07:42 AM

Adrenalina Italiana
******
Senior Member
1,737 posts

Joined: Jan 2003
Have decided to suspend work on this for the moment. While everything works as planned... a few considerations.

Have finally gotten my grubby hands on a DFI SLi-DR Expert board. Now this is one nice mobo. RAM placement, 8 phase power, excellent board layout, mucho options on BIOS... Will shift attention from modding to overclocking for the moment.

Why not the expert board in the G5?

1. The layout of the PCI-e slots mean that it is spread WIDE. Meaning it needs all 7 *gasp* PCI slots which the G5 case will NOT be able to do. Not without some serious backplate cutting which I am extremely reluctant to do. This got me thinking... CrossFire uses a completely different method of linking the two PCIe GPU's via a crosslink cable. I will utilize this to bypass the need to cut the back of the case.

2. The vertical RAM slots placed to the rear of the mobo will benefit from having an exhaust fan next to it for overclocks. In the LianLi v1000 (with my Aquagate Mini) this means a very large (and very quiet) CoolerMaster Aluminum fan will be ideally placed to cool it....

3. The additional SATA ports of the DFI SLiDR Expert will mean an ability to utilize more than two SATA harddrives. The LianLi v1000 has six bays... Advantage: LianLi.


So there you have it. Am putting the G5 in storage until I build my CrossFire rig.... Will then update this thread.
gmail
post Nov 28 2005, 08:54 PM

Trolling Level
*******
Senior Member
2,597 posts

Joined: Mar 2005
From: Kuala Lumpur


oh. will miss ur work! cry.gif
sniper on the roof
post Dec 13 2005, 10:37 AM

20k VIP Club
Group Icon
VIP
23,414 posts

Joined: Jan 2003
From: Taipei
QUOTE(MacDaNife @ Nov 26 2005, 07:42 AM)

So there you have it. Am putting the G5 in storage until I build my CrossFire rig.... Will then update this thread.
*
Crossfire board's out...apparently the X1800 master cards should be out as well. So what are we waiting for? brows.gif

Can't wait for the end-product.
SUSAllnGap
post Dec 13 2005, 04:08 PM

[ Modding with Passion(tm) ]
*******
Senior Member
4,561 posts

Joined: Jan 2003
From: Penangites


walao, he's got UMS ( unlimited money supply )
TSMacDaNife
post Dec 13 2005, 05:11 PM

Adrenalina Italiana
******
Senior Member
1,737 posts

Joined: Jan 2003
Well I certainly don't have UMS.....

But I am interested in Crossfire/X1800 mastercards.... Will have to wait for the user opinions on the setups though.

In any case I'm at present swamped down with work. Modding will continue after christmas though! Ho! Ho! Ho!
ianho
post Dec 14 2005, 12:46 AM

Cucimangkoklife
Group Icon
VIP
15,705 posts

Joined: Mar 2005
From: Tg. Rambutan
QUOTE(MacDaNife @ Dec 13 2005, 05:11 PM)
Well I certainly don't have UMS.....

But I am interested in Crossfire/X1800 mastercards.... Will have to wait for the user opinions on the setups though.

In any case I'm at present swamped down with work. Modding will continue after christmas though! Ho! Ho! Ho!
*
U called? laugh.gif laugh.gif laugh.gif laugh.gif laugh.gif
irenic
post Dec 18 2005, 02:51 AM

extr3me n3wbie
*******
Senior Member
7,338 posts

Joined: Jan 2003
From: Cybercity of Cyberjaya


wow just finished reading all the pages.. nice err or should i say great job!!

really respect ur work smile.gif


p/s - later when u dont want that casing consider pm me 1st! haha
tatayoung
post Dec 18 2005, 02:08 PM

I'm the boss of me...
*****
Senior Member
950 posts

Joined: Sep 2004


Fantastic man,class and refinement at it's very best.........
tatayoung
post Dec 18 2005, 02:08 PM

I'm the boss of me...
*****
Senior Member
950 posts

Joined: Sep 2004


Fantastic man,class and refinement at it's very best.........
ianho
post Feb 19 2006, 02:26 AM

Cucimangkoklife
Group Icon
VIP
15,705 posts

Joined: Mar 2005
From: Tg. Rambutan
Mac, when u gonna start back on this project man. Xfire is out oredi. Gogogo. We need more inspirational stuff like this.
SUSAcey
post Feb 19 2006, 03:10 AM

หมัด เท้า เข่า ศอก
*******
Senior Member
3,622 posts

Joined: Jan 2003


aihhh... why i kenot see pix one?
gmail
post Feb 19 2006, 11:29 AM

Trolling Level
*******
Senior Member
2,597 posts

Joined: Mar 2005
From: Kuala Lumpur


mac, sudah ada banyak xfire board at market loh! y not yet start back 1?
Noyze
post Feb 19 2006, 12:30 PM

Auratus Nottiness
******
Senior Member
1,088 posts

Joined: Aug 2005
From: Frostmourne For the Alliance!!


DAMN LOVE ur work dude!! ad ur ideas!! they're PHAT man!!!
SiLv3R
post Feb 22 2006, 07:58 PM

Casual
***
Junior Member
440 posts

Joined: May 2005


drool.gif Miss ur work
TSMacDaNife
post Feb 23 2006, 07:03 AM

Adrenalina Italiana
******
Senior Member
1,737 posts

Joined: Jan 2003
Truth be told bro, I've just got too much work on my plate right now...

No time for hobbies at the moment.

Will continue on the G5 soon... I hope...
SUSAcey
post Feb 23 2006, 10:41 AM

หมัด เท้า เข่า ศอก
*******
Senior Member
3,622 posts

Joined: Jan 2003


guess we will be waiting for ur updates patiently
ianho
post Apr 1 2006, 07:03 PM

Cucimangkoklife
Group Icon
VIP
15,705 posts

Joined: Mar 2005
From: Tg. Rambutan
All Worklogs bumped to the top for easy reference by all.
uglyvamp
post Jul 11 2006, 02:09 AM

blink of life
******
Senior Member
1,666 posts

Joined: Jan 2003
From: Spore/JohorBP


1 bump from me to mc ..
gmail
post Jul 11 2006, 06:11 PM

Trolling Level
*******
Senior Member
2,597 posts

Joined: Mar 2005
From: Kuala Lumpur


mac, still no update yet??
lucifah
post Jul 11 2006, 06:17 PM

St. Fu
Group Icon
Staff
7,948 posts

Joined: Jan 2005
From: Soviet Sarawak


come to think of it, i just noticed this long-gone thread. so, mc, u bz flying or still waiting for the xfire? why not settle for just 7950GX?
ianho
post Jul 11 2006, 06:37 PM

Cucimangkoklife
Group Icon
VIP
15,705 posts

Joined: Mar 2005
From: Tg. Rambutan
QUOTE(lucifah @ Jul 11 2006, 06:17 PM)
come to think of it, i just noticed this long-gone thread. so, mc, u bz flying or still waiting for the xfire? why not settle for just 7950GX?
*
He oredi got the 7950GX2. laugh.gif laugh.gif laugh.gif laugh.gif
sidewinderz
post Jul 11 2006, 06:39 PM

Long Live UV!!!
*******
Senior Member
3,966 posts

Joined: Jan 2003
From: Kuala Lumpur


7950GX2 x 2.... tongue.gif make it quad SLI... drool.gif
DaRkSyThE
post Jul 11 2006, 07:22 PM

Look at all my stars!!
Group Icon
VIP
4,809 posts

Joined: Jan 2005


QUOTE(ianho @ Jul 11 2006, 06:37 PM)
He oredi got the 7950GX2.  laugh.gif  laugh.gif  laugh.gif  laugh.gif
*
nothing new tongue.gif
first he wanted to go for crossfire, then now this..
haha biggrin.gif
cloudwan
post Jul 11 2006, 08:38 PM

- Knob -
*******
Senior Member
8,525 posts

Joined: Jan 2003
From: The Jungle Of Pahang


Mac no new pics? How's the project man? Haihhhhh drooling for more...
TSMacDaNife
post Jul 12 2006, 08:19 AM

Adrenalina Italiana
******
Senior Member
1,737 posts

Joined: Jan 2003
Sorry bout the lack of updates guys.... Sadly the G5 casemod is on ice for the moment.

Just moved house and whilst that does give me more room to mod at home, there are other more pressing responsibilities to take care of first.

I don't think I'll be going down the XFire way though. nVidia looks like the much better solution. Quad SLi? Perhaps, but ONLY if there is a game that requires the additional GPU horsepower. The 7950GX2 handles present gaming better than the 7800GTX SLi so no need for an upgrade at present.

AM2 Mobo, DualCore FX processor would probably be the basis for the G5 casemod hardware.
ikan_semilang
post Jul 12 2006, 08:21 AM

Look at all my stars!!
*******
Senior Member
4,504 posts

Joined: Jan 2003
From: Setapak


QUOTE(MacDaNife @ Jul 12 2006, 08:19 AM)
Sorry bout the lack of updates guys.... Sadly the G5 casemod is on ice for the moment.

Just moved house and whilst that does give me more room to mod at home, there are other more pressing responsibilities to take care of first.

I don't think I'll be going down the XFire way though. nVidia looks like the much better solution. Quad SLi? Perhaps, but ONLY if there is a game that requires the additional GPU horsepower. The 7950GX2 handles present gaming better than the 7800GTX SLi so no need for an upgrade at present.

AM2 Mobo, DualCore FX processor would probably be the basis for the G5 casemod hardware.
*
Nice. Hope can see ur mod next time with a new 1337 hardware. biggrin.gif
DaRkSyThE
post Jul 12 2006, 04:22 PM

Look at all my stars!!
Group Icon
VIP
4,809 posts

Joined: Jan 2005


lolx looks lke were gonna have a l337 rig coming up from mac.
looking foward to it man
lolhalol
post Jul 12 2006, 05:54 PM

Showroom Skateboarding
******
Senior Member
1,823 posts

Joined: Mar 2006
From: Kuala Lumpur


dude this should be internationaly known...man..i mean u should post this on mre forums like hard ocp ,bit techs...man some sweet stuff...home to see updates soon...
TSMacDaNife
post Sep 12 2006, 10:57 PM

Adrenalina Italiana
******
Senior Member
1,737 posts

Joined: Jan 2003
Since I've got the MacPro; have decided to stop modding the G5 case. Seems pointless now.

I'd like to point out a few things that Apple has done with the new MacPro case though. Whilst it is the exact same dimensions as the previous G5 tower, the internal changes are impressive. Interestingly, Apple has added 12cm intake fans in the same position as my G5 casemod. Synchronicity?

user posted image


I've added additional hard drives to the Mac Pro

user posted image

And an additional DVD burner

user posted image

And while I was at it: I thought you guys over at the casemodding section would appreciate a look at PSU design and wiring, Apple style. Note the 12cm intake fan and the modular flat-black wiring coming from the PSU. Quality-wise, Apple has no equal.

user posted image

Well, that's all for this WorkLog for the moment. Would be pleased to answer any queries about the MacPro from a casing design standpoint though.... smile.gif

ikan_semilang
post Sep 12 2006, 11:00 PM

Look at all my stars!!
*******
Senior Member
4,504 posts

Joined: Jan 2003
From: Setapak


Now very pity casing G5 lying in ur room without any hardware at inside. But i have see ur work and respect it. biggrin.gif

This post has been edited by ikan_semilang: Sep 12 2006, 11:00 PM
TSMacDaNife
post Sep 12 2006, 11:08 PM

Adrenalina Italiana
******
Senior Member
1,737 posts

Joined: Jan 2003
QUOTE(ikan_semilang @ Sep 12 2006, 11:00 PM)
Now very pity casing G5 lying in ur room without any hardware at inside. But i have see ur work and respect it. biggrin.gif
*
Thanks ikan...

And for those of you who are interested in this kinda thing (pics of computer internals that is) you're welcome to head over to my dotMac website: HERE.
Bliz
post Sep 13 2006, 01:20 AM

Look at all my stars!!
*******
Senior Member
2,734 posts

Joined: Jan 2003
From: Melaka


Somehow those Mac are build like those super exotic car with super attention to detail, u can't even see this kind of build quality on any pc vendor.
SUSAcey
post Sep 13 2006, 03:54 PM

หมัด เท้า เข่า ศอก
*******
Senior Member
3,622 posts

Joined: Jan 2003


Noooooooooooooo~~~~~~~~~~~ The Longest Mod have stopped.... sob sob... was waiting to see how the belly of ur G5 looks like sad.gif
DaRkSyThE
post Sep 13 2006, 04:39 PM

Look at all my stars!!
Group Icon
VIP
4,809 posts

Joined: Jan 2005


dude, ar eu gonna sell of the case?
if u are, please do PM me yeah
kind of like a pity, such a great mod.
ALIAS.JG
post Sep 13 2006, 07:16 PM

Regular
******
Senior Member
1,940 posts

Joined: Feb 2005


do u have the overall shot of the g5 interior ?


btw, now that apple have begun using intel, isit possible to install xp and dump mac osx ??

just a technical question
TSMacDaNife
post Sep 13 2006, 08:36 PM

Adrenalina Italiana
******
Senior Member
1,737 posts

Joined: Jan 2003
QUOTE(ALIAS.JG @ Sep 13 2006, 07:16 PM)
do u have the overall shot of the g5 interior ?
btw, now that apple have begun using intel, isit possible to install xp and dump mac osx ??

just a technical question
*
Lots of shots of the G5 interior earlier in the thread...

Any whilst it is possible to run only xp with the MacPro, why would anyone want to do that? WinXP is clearly the inferior OS.... cool.gif
ianho
post Jun 11 2007, 06:06 AM

Cucimangkoklife
Group Icon
VIP
15,705 posts

Joined: Mar 2005
From: Tg. Rambutan
All finished or active worklogs bumped to avoid deletion.


Change to:
| Lo-Fi Version
0.0745sec    0.87    6 queries    GZIP Disabled
Time is now: 17th December 2025 - 02:07 AM