Welcome Guest ( Log In | Register )

5 Pages  1 2 3 > » Bottom

Outline · [ Standard ] · Linear+

 Nice Mod add-on : LCD Module on your desktop, Character 4x20 LCD Module

views
     
TSstan001
post Oct 2 2010, 01:33 AM, updated 14y ago

On my way
****
Senior Member
623 posts

Joined: Jan 2003
From: Kuala Lumpur


I was always curious on how HTPC makers put in Character LCD Module on the front of the chassis..

I did some searches and found this cool software called "LCD Smartie" and there are lots of cool videos on this topic in Youtube..

http://www.youtube.com/watch?v=zkW8VzkgtlI

I find it pretty cool to output the winamp spectrum analyzer to the LCD module and you can also output stuff like upload/download speed, CPU, memory, hard disk space and other PC stats to the LCD...

This is very good when playing games or watching movies so that you know how much the CPU & memory is used up while in the game/movie...

Best on Parallel port ( but not all modern desktop have it ) or go the USB method using either Arduino microcontroller or USB LCD ( still doing research on this one, if you know how to , pls share... )


Initially after getting an Arduino microcontroller, I did this setup using a USB/Serial connection to the LCD Module..
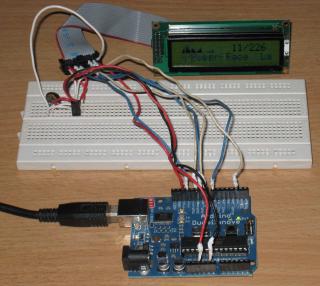
Attached Image

Later I was being more adventurous and got 2 version of the LCD Module, 2x16 and 4 x 20 ( line x columns )...and made this below ..
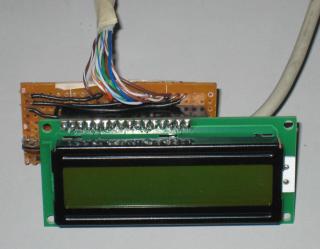
Attached Image

Board with LCD Module removed...

Attached Image

There are 10 cables connected to the parallel port and I am using UTP cables ( 4 pairs plus another 1 pairs, total 10 wires ). The other cable is the USB cable with one end cut off for the 5V power supply taken from USB hub or directly from the USB port...

Later upgraded to a 4x20 LCD Module...

Attached Image

and put everything into a black cardboard box on top of my desktop just below the LCD monitor...
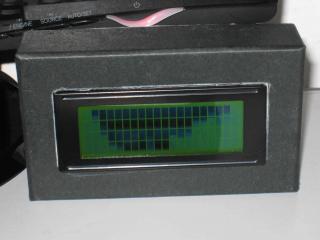
Attached Image


Parallel LCD wiring, credits goto the webpage below.. I just follow his wiring and did some modifications..
http://www.icehw.net/article.php?id=104

Feel free to ask any questions ...


Parts used ( all obtain locally in Jalan Pasar ) :-

2x16 or 4x20 LCD modules purchased from Jalan Pasar
1 x trimpot 10K resistors to control the contrast
Cat 5 UTP cables ( needed 10 wires - as long as you needed to connect from the parallel port to the desktop )
1 x USB cables with one end cut off for the 5V power
1 perf board
1 x 16 pin male header soldered to the LCD Module
1 x 16 pin female headrr on the perf board


A LYN forumer selling the 20x4 USB LCD product. The WTS link is here

This post has been edited by stan001: Feb 24 2012, 02:01 PM
supernothing
post Oct 2 2010, 02:48 AM

super ☆
******
Senior Member
1,343 posts

Joined: Jun 2006
From: Wangsa Maju/TTDI/Ampang


cool project, how much did you spend for all the stuffs? very interested in making one myself. what about the softwares? are they easily available for download?
lun1986
post Oct 2 2010, 10:58 AM

Enthusiast
*****
Senior Member
939 posts

Joined: Jan 2007
the LCD Module got backlight anot?
how much u spend on it ??

This post has been edited by lun1986: Oct 2 2010, 11:00 AM
TSstan001
post Oct 2 2010, 01:29 PM

On my way
****
Senior Member
623 posts

Joined: Jan 2003
From: Kuala Lumpur


The cost of everything is less than RM50 ... the LCD module is around RM40..

The software is LCD Smartie

The rest of the stuff like perf board, trimpot, perf board, pins and headers are all around RM1-2 only.. wires ( 10 pcs according to your own length ) ...

Forgot 1 parts : DB25 male + cover

http://www.bizchip-components.com/shop/ind...?productID=7528

Can solder directly from the DB25 male port ( parallel port ) to the LCD module and bypass the additional parts like perf board and header pins.. I made mine more portable as I can switch between 2x16 and 4x20 module..

There are a few online sellers if u r not located at Klang Valley..search for "LCD Module" on lelong.com.my

There are backlight on pin 15 & 16 but when I took the pic with flash, cannot "see" the backlight in the picture..


lun1986
post Oct 2 2010, 03:44 PM

Enthusiast
*****
Senior Member
939 posts

Joined: Jan 2007
the wires u use not Parallel cable ?
LCD module is around RM40.. <-- tis is 4 X 20 ??

TSstan001
post Oct 2 2010, 04:27 PM

On my way
****
Senior Member
623 posts

Joined: Jan 2003
From: Kuala Lumpur


Yes, RM40 for the 4x20 , the 2x16 is cheaper around RM20 only but less lines so less stuff can be displayed...

No, I did not use the parallel cables cos I have a lot of long Cat5 UTP cables around, I just strip off the rubber cover and took 10 wires...

The USB version ( for most ppl without Parallel port ) instruction is below if you can find the FTDI USB/Serial module locally...

http://forums.lcdsmartie.org/viewtopic.php?f=11&t=1540


supernothing
post Oct 3 2010, 02:38 PM

super ☆
******
Senior Member
1,343 posts

Joined: Jun 2006
From: Wangsa Maju/TTDI/Ampang


woahhh, i prefer the usb version. can do one for me?
mengsuan
post Oct 3 2010, 09:34 PM

9W2NNS
Group Icon
Staff
10,459 posts

Joined: Sep 2005
From: Puchong

I have two 4x20 blue backlight parallel LCD from my academic project. I wanted to interface to my computer but nowadays even x58 boards may not have parallel port anymore.

I don't do Arduino but only PIC microcontroller. I wonder if I can route serial data to a PIC microcontroller. Or does LCD smartie support demultiplexers directly from serial port?
TSstan001
post Oct 3 2010, 11:17 PM

On my way
****
Senior Member
623 posts

Joined: Jan 2003
From: Kuala Lumpur


I'm not sure what you mean by deMUX... the PIC controller should do the following functions like an Arduino :-

- Act as Serial USB to the computer
- Once the drivers are installed for the USB Serial adapter, LCD Smartie software should be able to talk to the Serial port directly using MatrixOrbital plugins ( Matrix Orbital makes serial LCDs )...

From their forum, they are using FTDI chipsets/module to wireup the Serial/USB LCD... the wiring looks pretty simply...

http://forums.lcdsmartie.org/viewtopic.php?f=11&t=1540

This module can be found locally (FTDI BASIC BREAKOUT 3.3/5V) but I have not tested if it is supported by LCD Smartie software or plugins..

http://www.myduino.com/index.php?route=pro...5&product_id=91


Added on October 8, 2010, 11:10 amUpdates :-

You can have LCD shield on an Arduino powered by a USB with 5 buttons for those that do not know how to do soldering or DIY stuff...

http://www.nuelectronics.com/estore/index....ject_lcdsmartie

or

http://www.instructables.com/id/Arduino-wi...artie-over-USB/


Found that there is current a bulk orders for the Arduino board and the LCD Shield..

http://forum.lowyat.net/index.php?showtopi...&#entry36288604

This post has been edited by stan001: Oct 8 2010, 11:12 AM
RonModz
post Oct 11 2010, 03:24 PM

Getting Started
**
Junior Member
199 posts

Joined: Apr 2010
From: Batu Caves


You can get the USB board here - http://www.cytron.com.my/viewProduct.php?p...33;!!A=
supernothing
post Oct 11 2010, 07:43 PM

super ☆
******
Senior Member
1,343 posts

Joined: Jun 2006
From: Wangsa Maju/TTDI/Ampang


further search led me to this.

http://www.lcdmodkit.com/index.html

you can buy ready made ldc kit with 5.25" bay cover, or buy by parts and DIY. your pick, price is pretty cheap and shipping is free brows.gif
m32t8103
post Oct 12 2010, 01:21 AM

New Member
*
Junior Member
15 posts

Joined: Dec 2009


=D well i have some question, do you think possible that Arduino LCD (the one with the keypad), could you make the software that work with the kepad? or using the kepad to control the software
TSstan001
post Oct 12 2010, 10:58 AM

On my way
****
Senior Member
623 posts

Joined: Jan 2003
From: Kuala Lumpur


YES it can control the LCD Smartie s/w according to the URL and the codes supplied ( since it is open source ), they did modified the LCD library to support the 5 buttons located on the LCD Shield. ( Arduino add-ons )

QUOTE
http://www.nuelectronics.com/estore/index....ject_lcdsmartie

3.2 Interrupt driven Keypad scanning routine
An interrupt driven Keypad scanning routine is used to capture key press from the Joystick keypad inputs. Timer2 is used to generate interrupt at 4ms interval. The interrupt routine records the key press by reading AD0 value and comparing with keypad value stored in an array. A debounce mechnism is also implemented. The interrupt routine then transfer the key press to LCD Smartie software running on the PC. The key press is useful for controlling PC applications, such as Winamp Player.
haris
post Oct 17 2010, 09:23 AM

Getting Started
**
Junior Member
172 posts

Joined: Dec 2005
From: KL


Hello Stanley,

Thanks for linking to my bulk thread.

Your USB FTDI Breakout Board is on the way (sometime next week). So you can plan to extend your circuit to include that.

Pardon me for putting advertisement here wink.gif

Arduino Duemilanove and Uno (the latest) are available from my web site shop>> H&T Shop

For those who want fast result without soldering and etching PCB. LCD Keypad Shield is also available for RM63. There is another type of display called LCD Graphic Shield. This is for graphical stuff and even have some connectors on top of it for sensors. Gonna blog about this soon!

I have one FTDI breakout board coming together with Stanley shipment. Since this is an extra you guys can have it form RM38 brows.gif.

For those in KL or nearby and interested to see a demo or stuff in action. I usually held some kind of demo and COD session in my Condo in 2 1/2 mile Jalan Ipoh (address and map refer to >> H&T Contact). PM me if you are interested to join in and I will let the first few people to know when. We are just starting so cannot accommodate more than 10 people at the moment.

Stanley, great article and I have read your Blog. Excellent stuff. As you already know (and pre registered for). I am trying to establish Malaysian Arduino homebrewing community at www.arduino-malaysia.com. If you are insterested, I can invite you and you can have your own www.arduino-malaysia.com/YourName blog there.

---
Disclaimer: H&T or www.homebrew-tech.com is Malaysia official distributor for Arduino. We are also appointed distributor for DFRobot product. Not just some trader. And as such obviously have commercial interest in all of the above listed item wink.gif


*Edit to add disclaimer

This post has been edited by haris: Oct 17 2010, 09:53 AM
azmax100
post Oct 20 2010, 12:19 PM

Getting Started
**
Junior Member
205 posts

Joined: Dec 2006


Thanks Stanley for the link.

Get your Arduino here http://myduino.com

Arduino Uno starter kit RM149.90 only. rclxms.gif

This post has been edited by azmax100: Oct 20 2010, 12:22 PM
TSstan001
post Oct 28 2010, 05:00 PM

On my way
****
Senior Member
623 posts

Joined: Jan 2003
From: Kuala Lumpur


Updates..

I've finally made a USB version of the LCD Module for LCD Smartie in bit-bang mode...

Attached Image
k3lvinng007
post Oct 28 2010, 05:29 PM

Casual
***
Junior Member
311 posts

Joined: Mar 2009


QUOTE(stan001 @ Oct 28 2010, 05:00 PM)
Updates..

I've finally made a USB version of the LCD Module for LCD Smartie in bit-bang mode...

Attached Image
*
video pls... rclxms.gif
btw for USB version how much it cost u?
TSstan001
post Oct 29 2010, 09:45 AM

On my way
****
Senior Member
623 posts

Joined: Jan 2003
From: Kuala Lumpur


Updated photos with nicer wiring...

LCD module is 4x20

Attached Image

Note - Backlight is on but the flash have covered the light..


lun1986
post Oct 29 2010, 10:36 AM

Enthusiast
*****
Senior Member
939 posts

Joined: Jan 2007
nice try, all the part u buy from jln pasar ?
TSstan001
post Oct 29 2010, 10:48 AM

On my way
****
Senior Member
623 posts

Joined: Jan 2003
From: Kuala Lumpur


Most parts except for the FTDI board...

Can you make something like this with Arcylic like the Youtube below...

Dunno what materials they use ...
http://www.youtube.com/watch?v=pJ9y3uAZlYo


5 Pages  1 2 3 > » Top
 

Change to:
| Lo-Fi Version
0.0250sec    1.12    6 queries    GZIP Disabled
Time is now: 26th November 2025 - 09:13 AM