

 Mar 1 2009, 09:01 PM, updated 17y ago

When buying a new PC, everyone are faced with the choice between a branded and an assembled one. Those who don't want to go through the daunting task of shopping for components and assembling the PC themselves, often choose an easy way out by opting for a branded PC. There are very few adventurous ones who upgrade or build their own PC.
There are more drawbacks than advantages in buying a branded pre-built or a customized PC. No doubt that you won't have to worry about the maintenance. However, you'll be stranded if the company technician doesn't turn up on time. Also, you cannot tinker with the hardware or resort to your tech-savvy friends or some technician in case of emergency. Finally, service and upgrades burn a hole into your pocket. With an assembled PC, the biggest advantage is that you can pick the components of your choice to suit your budget and requirements.
So, how about assembling your own PC ? sound interesting, doesn't it ? Even if you're a first timer, you'll still be able to assemble a PC unerringly by reading this lucid step-by-step guide. This guide can not only be used to build a new PC but also be referred to if you are planning to upgrade a few components such as the processor, memory or graphic card.
Finally, this guild assumes that you know how to install the operating system. If you don't know, you can seek help of a technician or a friend who is willing to spend a couple of hours installing the operating system.
So, Are you ready !?? lets roll up your sleeves, grab a screwdrivers and let's get started !
SOME MOTHERBOARD INFORMATION :

1. The Ingredients

Just like you need certain ingredients to prepare a dishes !, you need the following components to build a PC-processor, motherboard, memory(RAM) modules,graphic card(if the motherboard doesn't included integrated graphic card or you're a GamerS)optical drive,PC case, power supply unit,monitor,speakers, mouse & keyboard. Likewise, you need a power supply unit only if your PC case doesn't come fitted with one. Most entry-level PCs case come fitted with a power supply unit. However, such power supply units are only suitable for entry-level PCs. Therefore we would suggest you invest in a good power supply unit if you want to build a power PC. Lastly, you also need a Philips screwdriver and some cable ties.
2. Preparing for take off
On unpacking the PC case, you will come across a packet that contains screws and mounting nuts. Empty the contents in a small tray. If the bundled power supply unit didn't come fitted to the PC case, keep it inside, you'll need it . To begin with, unpack the motherboard except the essential ports and connectors so that dust doesn't creep into the case. The back plate should fit into the slot provided on the rear panel of the case. If you find that the slot is sealed by a metal plate, then you need to extract it using a pair of pliers. While you are fitting the back plate, you must ensure that the opening correspond to the ports and connectors on the motherboard's rear panel. This is very important because none of the essential ports and connectors should be blocked by the back plate.
3. Installing the motherboard

In order to fit the motherboard into the case, you first have to fit the mounting nuts in the holes provided on the case's motherboard panel. While you are placing the motherboard on the motherboard panel aligned th to back plate you just fitted, note the spots where you need to fit mounting nuts. You can locate these easily by looking through the screw holes that are provided on the motherboard. After fastening the mounting nuts with a pair pliers, fit the motherboard into the case using screw that match the screw threading on top of the mounting nuts- note that using wrong screw may result in the screw jamming into the mounting nut. Completely tightening the screw might result in unwanted stress by the graphic card or other add-on card. Therefore, do not tighten the screws completely. Also, ensure that the screws are used in the right places.
4. Install the processor
Depending on which processor you have purchased, follow the relevant step :
INTEL PROCESSOR:

You have to release the lever of the CPU socket and then lift the socket cover that opens up from the opposite side. You will find a golden triangle on one of the top corners of the processor. Align the triangle with a similar golden triangle CPU socket and then fit the processor into the socket. Now, close the socket cover and fasten it with the lever. Note that you will find the lever is offering some resistance now.
AMD PROCESSOR: With AMD processor, you have to release the lever of the CPU socket. you'll find a golden triangle on one of the top corners of the processor. Align the triangle with a similar golden triangle on the CPU socket and then fit the processor into the socket. The processor should gently slide into the socket. Push down the lever into its place.
5. Install the CPU cooler
If you purchased an AMD processor, fitting the CPU cooler will be a cakewalk for you. You simply have to place it on the processor with the lever towards the center if the motherboard. Then fit the clips and carefully push down the lever. Finally, you have to connect the fan connector to the CPU fan header on the motherboard.
Fitting an Intel CPU cooler s a tricky affair. Place the CPU cooler on the processor with the fasteners on the corners aligned to the holes surrounding the CPU socket. Push down each fastener while holding the CPU cooler in place. You should hear a click! when the fasteners clamp to the motherboard. After ensuring that the fasteners are in place, connect the fan to the motherboard's CPU fan header. The CPU fan header is usually labeled and placed quite close to the CPU socket.
6. Install the optical drive

To install an optical drive, you'll have to first remove the 5.25-inch bay cover where you wish to fit the optical drive from the front of the PC case. There is chance that you'll find a metal plate behind the bay cover. You'll have to remove that cover also. Now, Insert the optical drive from the front and push it back until the front panel of the drive is in level with the front surface of the case. Fasten the drive with screws from both sides to keep it stable. You can follow the same steps to fit an additional optical drive or a floppy drive or a 3.5-inch internal card reader. To finish the installation, you have to connect the drives to the motherboard with the bundled IDE and floppy drive cables. If you have two optical drives fit them in altenate bays in order to ensure proper air circulation within the case.
7. Install the hard drive

You have to be careful while handling hard drives because they are delicate and could be easily damaged. Therefore, make sure that they don;t receive any shock during installation. To ensure its safety, hold the hard drive with circuitry facing down and gently slide it into the lowermost concealed 3.5-inch bay. Note that you don't open a cover push the hard disk inside, but you fix it inside the case itself. Hard drives are delicate, so ensure that you don't jerk it too hard while sliding it into the bay. Fasten it with screws on both the sides to prevent imbalance and hold it into the bay. Fasten it with screws on both sides to prevent imbalance and hold it firmly in place. Note that screws used for fastening hard driver and optical drives are different-screw meant for hard drives are thicker than those meant for optical drives and floppy drives. Now connect one end of the SATA/IDE cable to a port behind the drive and the other end to the SATA/IDE port on the motherboard.
8. Install the memory

Because most motherboards support DDR2 memory, there's only one way to install memory modules. If you closely observe the side on which contacts are present, you'll have notice a cut that divides that side into 2 different lengths. The memory slot is designed accordingly. Hence, memory modules fit into the slot only in one direction. To install the memory module. first release the plastic levers, align the memory modules to the slot, and push it down gently until the levers click and lock the module. If you have 2 similar memory modules, install them into the similar colored slots like BLUE pair with BLUE not BLUE pair WITH RED! so they can run in dual-channel like couple larhh . So, installing memory modules are Cakewalk because it's quite straighfoward.
9. Install the add-on cards

There are plenty of add-on cards available in the market for extending the versatility of the PC. These add-on cards include graphic cards, LAN card(usually nowdays PC got LAN slot already), TV tuner cards, Wi-Fi PCI cards and sooooo on(but not Pokemon cards la haha ). If you have any of these cards, install them now. First, break open the slot cover on the rear panel of the case covering the slot that will be occupied by the card. Next, slide the card into appropriate slot by gently rocking it back and forth so as to ease in into the slot. After fitting the card into the slot, fasten it with a screws to hold it in place. After you have fitted all the cards, tighten all the screws holding the motherboards which were left loose(while fitting the motherboard, screw were not tightened completely. If you are in doubt, refer to step 3 where fitting the motherboard is explained.)
10. Front panel header and front USB headers

For the power reset buttons, internal beeper, and the power and hard rive activity light to function, you'll need to connect the respective connectors within the case to the front panel header on the motherboard. To connect the labeled connectors to the right pins, you'll have to refer to motherboard board also to locate the front USB headers and connect to the front USB connector or wires. IF your PC case has audio jacks on the front panel, you can enable it by connecting its wires to the front panel audio header on the motherboard. WARNING: Don't try out any connections without referring to the motherboard manual. Read the manual carefully as you could damage the motherboard beyond repair to the wrong connections.
11. Install the PSU and plug in the power connectors
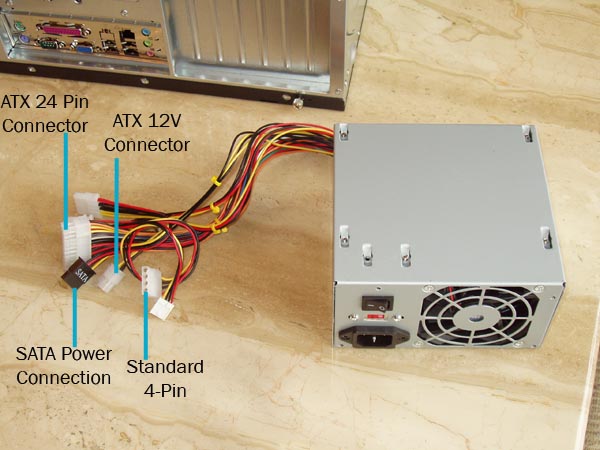
If the power supply didn't come installed within the case or you've purchased it separately, install it in the bay at the top rear corner of the case. When done, connect the power connectors in the following order -20/24- pin main, 4/8-pin 12v, graphic card, optical drive, floppy disk drive, hard drive, and case fans. plugging in the power connectors should not be a problem as they fit only in one direction. When done, tie up all excess and loosely hanging power cables with cables ties. This will facilities air circulation within the case and prevent excessive heat building up within the case. Proper air circulation and cooling of PC components is very important because overheating can potentially damage critical components such as processor, memory and the graphic cards. That completes the main assembly. Now, close the case and get ready for the action !
source CHIP PC magazine
Type by hakimz
This post has been edited by hakimz: Mar 2 2009, 01:52 PM
 Quote
Quote


 .so this is a good 1,newbies are in luck here


 0.0181sec
 0.61
0.61
 5 queries
 GZIP Disabled