Welcome Guest ( Log In | Register )

Bump Topic Topic Closed RSS Feed
126 Pages « < 116 117 118 119 120 > » Bottom

Outline · [ Standard ] · Linear+

Collectibles Japanese Vinyl and Figures V3!, Goodies from the land of the rising sun!

views
     
Wolf516
post Jun 18 2008, 11:25 PM

On my way
****
Senior Member
589 posts

Joined: Jul 2007
From: The Reality Known As Hell


QUOTE(raptor_cZn @ Jun 18 2008, 11:05 PM)
Putting the tracing paper directly on the light doesn't work? Mine is quite thick. What if you place 2 layers or move the light source further away?

Btw valho, what colour temp for bulbs are best for taking pictures of figures against a white bg? I have a 6500K bulb which looks very white / abit bluish and another 4000K lamp which is a bit warmer and yellowish.


Added on June 18, 2008, 11:10 pmAnother thing I wanted to add is that won't the pictures be grainy if you over expose them?

user posted image

Like this picture here. If I want an even bg, I need to overexpose it right?
This one has a higher exposure but the hair looks a bit to bright. The colour also seems abit off since it is white-ish.

user posted image
*
nod.gif mine is same case with you.... uneven temp bulbs make it yellowish on 1 side....
raptor_cZn
post Jun 18 2008, 11:33 PM

Regular
******
Senior Member
1,404 posts

Joined: Feb 2006
From: KL


Erm... that pic I was using an incandescent light bulb which was the really yellow one before I got another work lamp where I attached a 4000K bulb to it ^^

From the pic I posted, the yellow tone is really obvious there.


Added on June 18, 2008, 11:34 pmHave yet to take a few pictures with my new bulbs to test out as I am too busy rclxub.gif

This post has been edited by raptor_cZn: Jun 18 2008, 11:34 PM
valho
post Jun 18 2008, 11:36 PM

Look at all my stars!!
*******
Senior Member
4,967 posts

Joined: Jan 2003
From: somewhere, far far away


QUOTE(raptor_cZn @ Jun 18 2008, 11:05 PM)
Putting the tracing paper directly on the light doesn't work? Mine is quite thick. What if you place 2 layers or move the light source further away?

Btw valho, what colour temp for bulbs are best for taking pictures of figures against a white bg? I have a 6500K bulb which looks very white / abit bluish and another 4000K lamp which is a bit warmer and yellowish.


Added on June 18, 2008, 11:10 pmAnother thing I wanted to add is that won't the pictures be grainy if you over expose them?

user posted image

Like this picture here. If I want an even bg, I need to overexpose it right?
This one has a higher exposure but the hair looks a bit to bright. The colour also seems abit off since it is white-ish.

user posted image
*
It works this way, the thicker layer the diffuse the more less light will hit the figure and the further the light also less light will hit the figure, I found it best to use 1 layer and and use a box so that the light doesn't leak out.

both the one i am using is 6500k, daylight lamp is the best but I can't find the exact color temp at shops here, i think it's below 6000k. to get perfect white bg you need to over by at least +1 EV, but this doesn't mean you'll get a perfectly balance white though, this is due to our camera always meter at 18% grey, so if it's white and you shoot without adjusting EV u get grey instead. Samething with black. What you can do is to pull the top light further from the bg, this will increase the light spread making the area that's in you frame more balance white, or get another a third lamp to light the bg.

grain appear when under expose and you try to adjust it back to the correct exposure, but usually not very visible unless you are using high ISO or the photo underexpose a lot.

both pic is slightly underexpose actually, the second have a whiter bg probably due to the light hitting that part of the bg more. The hair looks bright probably because the light is not soft enough.
for the first shot, more light is needed to light up her face, so you can tilt a white cardboard infront of her face to bounce the top light back to her.
for the second shot you should place the light to the front left of the figure.
the color is off is due to white balance, it happens even to me haha, you usually can adjust it back in photoshop smile.gif

btw light placement and the amount of light u use is not fix, so play around with it, experiment until you are satisfied witht he result smile.gif
raptor_cZn
post Jun 18 2008, 11:41 PM

Regular
******
Senior Member
1,404 posts

Joined: Feb 2006
From: KL


Ok... Will try things out. Thx for the tip valho =)
Wolf516
post Jun 19 2008, 12:24 AM

On my way
****
Senior Member
589 posts

Joined: Jul 2007
From: The Reality Known As Hell


QUOTE(valho @ Jun 18 2008, 11:36 PM)
It works this way, the thicker layer the diffuse the more less light will hit the figure and the further the light also less light will hit the figure, I found it best to use 1 layer and and use a box so that the light doesn't leak out.

both the one i am using is 6500k, daylight lamp is the best but I can't find the exact color temp at shops here, i think it's below 6000k. to get perfect white bg you need to over by at least +1 EV, but this doesn't mean you'll get a perfectly balance white though, this is due to our camera always meter at 18% grey, so if it's white and you shoot without adjusting EV u get grey instead. Samething with black. What you can do is to pull the top light further from the bg, this will increase the light spread making the area that's in you frame more balance white, or get another a third lamp to light the bg.

grain appear when under expose and you try to adjust it back to the correct exposure, but usually not very visible unless you are using high ISO or the photo underexpose a lot.

both pic is slightly underexpose actually, the second have a whiter bg probably due to the light hitting that part of the bg more. The hair looks bright probably because the light is not soft enough.
for the first shot, more light is needed to light up her face, so you can tilt a white cardboard infront of her face to bounce the top light back to her.
for the second shot you should place the light to the front left of the figure.
the color is off is due to white balance, it happens even to me haha, you usually can adjust it back in photoshop smile.gif

btw light placement and the amount of light u use is not fix, so play around with it, experiment until you are satisfied witht he result smile.gif
*
rclxms.gif great tips

btw what ISO you recommend using? I tried to use the lowest possible but it seems to catch less details sad.gif
LilKeV84
post Jun 19 2008, 12:25 AM

New Member
*
Junior Member
9 posts

Joined: Jan 2003
From: Subang Jaya!! ^_^


QUOTE(Wolf516 @ Jun 19 2008, 12:24 AM)
rclxms.gif  great tips

btw what ISO you recommend using? I tried to use the lowest possible but it seems to catch less details sad.gif
*
the lower the better laugh.gif u get sharper images
if catch less details...too low light maybe?
Wolf516
post Jun 19 2008, 12:49 AM

On my way
****
Senior Member
589 posts

Joined: Jul 2007
From: The Reality Known As Hell


Here's some shots I made

with the settings

WB : Daylight
Iso : 80-100
Micro Mode
7M
EV +1


hmm.gif how did it turned out?


Attached thumbnail(s)
Attached Image
Exiled_Gundam
post Jun 19 2008, 12:54 AM

On my way
****
Senior Member
550 posts

Joined: Jan 2007


@wolf
Quite OK lah
LilKeV84
post Jun 19 2008, 12:55 AM

New Member
*
Junior Member
9 posts

Joined: Jan 2003
From: Subang Jaya!! ^_^


QUOTE(Wolf516 @ Jun 19 2008, 12:49 AM)
Here's some shots I made

with the settings

WB : Daylight
Iso : 80-100
Micro Mode
7M
EV +1
hmm.gif  how did it turned out?
*
feels a lil dark on the left, did u put a reflector there?
Wolf516
post Jun 19 2008, 02:14 AM

On my way
****
Senior Member
589 posts

Joined: Jul 2007
From: The Reality Known As Hell


QUOTE(LilKeV84 @ Jun 19 2008, 12:55 AM)
feels a lil dark on the left, did u put a reflector there?
*
tongue.gif I forgot... ok here is another one...


Attached thumbnail(s)
Attached Image Attached Image
richard0304
post Jun 19 2008, 07:57 AM

Getting Started
**
Junior Member
193 posts

Joined: Aug 2007
From: 鸟不生蛋的地方


QUOTE(Wolf516 @ Jun 19 2008, 12:49 AM)
Here's some shots I made

with the settings

WB : Daylight
Iso : 80-100
Micro Mode
7M
EV +1
hmm.gif  how did it turned out?
*
her skin colour looks pale...
sai
post Jun 19 2008, 09:18 AM

囲碁の神
****
Senior Member
529 posts

Joined: Jan 2003
From: Kuala Lumpur
damn, i wan a new camera, my old digicam spoiled d...got my alter FATE from PA yesterday~~~
cant take pic, no camera cry.gif

the box super big, juz nearly fit into the PA box only, abit dented d...haizz...anyway, very satisfied with the figure.. laugh.gif

parcel arrived on 9June at Pos Besar, 18June only deliver to me...=.="
valho
post Jun 19 2008, 09:52 AM

Look at all my stars!!
*******
Senior Member
4,967 posts

Joined: Jan 2003
From: somewhere, far far away


QUOTE(Wolf516 @ Jun 19 2008, 12:49 AM)
Here's some shots I made

with the settings

WB : Daylight
Iso : 80-100
Micro Mode
7M
EV +1
hmm.gif  how did it turned out?
*
QUOTE(Wolf516 @ Jun 19 2008, 02:14 AM)
tongue.gif  I forgot... ok here is another one...
*
quite ok, need a reflector on the opposite side to soften shadow. Hmmm if you camera have vivid color mode then use it, might look nicer. Figure color need to pop a bit in the photo, it'll look nicer smile.gif. Even Pns also can get photo like below, shot using my Ixus 850IS last time before i got my DSLR, decide to post Alter Fate photo since sai mention her tongue.gif

user posted image
Wolf516
post Jun 19 2008, 11:54 AM

On my way
****
Senior Member
589 posts

Joined: Jul 2007
From: The Reality Known As Hell


QUOTE(valho @ Jun 19 2008, 09:52 AM)
quite ok, need a reflector on the opposite side to soften shadow. Hmmm if you camera have vivid color mode then use it, might look nicer. Figure color need to pop a bit in the photo, it'll look nicer smile.gif. Even Pns also can get photo like below, shot using my Ixus 850IS last time before i got my DSLR, decide to post Alter Fate photo since sai mention her tongue.gif

user posted image
*
rclxms.gif nice close-up shot you got there,

Ok here is another with the vivid settings, I think it turned out a little bit better, I still can't get the background to have even lighting, will have some dark
areas in the picture

& Should I add more the contrast or just let it stay as it is?

This post has been edited by Wolf516: Jun 19 2008, 11:56 AM


Attached thumbnail(s)
Attached Image
valho
post Jun 19 2008, 12:00 PM

Look at all my stars!!
*******
Senior Member
4,967 posts

Joined: Jan 2003
From: somewhere, far far away


QUOTE(Wolf516 @ Jun 19 2008, 11:54 AM)
rclxms.gif  nice close-up shot you got there,

Ok here is another with the vivid settings, I think it turned out a little bit better, I still can't get the background to have even lighting, will have some dark
areas in the picture

& Should I add more the contrast or just let it stay as it is?
*
now this one looks good, but hmm slight blurry though, not using tripod and timer?
I think the color is good with this new shot. Its quite hard to get an even white background unless you use extra light to shine at the bg.
sai
post Jun 19 2008, 12:15 PM

囲碁の神
****
Senior Member
529 posts

Joined: Jan 2003
From: Kuala Lumpur
QUOTE(valho @ Jun 19 2008, 09:52 AM)
quite ok, need a reflector on the opposite side to soften shadow. Hmmm if you camera have vivid color mode then use it, might look nicer. Figure color need to pop a bit in the photo, it'll look nicer smile.gif. Even Pns also can get photo like below, shot using my Ixus 850IS last time before i got my DSLR, decide to post Alter Fate photo since sai mention her tongue.gif

user posted image
*
nice~~
tats the fate tat poisoned me...XD
Wolf516
post Jun 19 2008, 12:36 PM

On my way
****
Senior Member
589 posts

Joined: Jul 2007
From: The Reality Known As Hell


QUOTE(valho @ Jun 19 2008, 12:00 PM)
now this one looks good, but hmm slight blurry though, not using tripod and timer?
I think the color is good with this new shot. Its quite hard to get an even white background unless you use extra light to shine at the bg.
*
Alright, Second take to adjust the sharpness.

This time I used tripod + Timer + 2 reflectors to spread out the lights


Attached thumbnail(s)
Attached Image
valho
post Jun 19 2008, 12:57 PM

Look at all my stars!!
*******
Senior Member
4,967 posts

Joined: Jan 2003
From: somewhere, far far away


QUOTE(Wolf516 @ Jun 19 2008, 12:36 PM)
Alright, Second take to adjust the sharpness.

This time I used tripod + Timer + 2 reflectors to spread out the lights
*
this one looks ok, maybe just soften the light a bit, otherwise its a nice shot

Alter Yagami Hayate up for PO, for a whoooping 9310yen

Attached Image

and look what she comes with
» Click to show Spoiler - click again to hide... «

Wolf516
post Jun 19 2008, 01:04 PM

On my way
****
Senior Member
589 posts

Joined: Jul 2007
From: The Reality Known As Hell


QUOTE(valho @ Jun 19 2008, 12:57 PM)
this one looks ok, maybe just soften the light a bit, otherwise its a nice shot

Alter Yagami Hayate up for PO, for a whoooping 9310yen

Attached Image

and look what she comes with
» Click to show Spoiler - click again to hide... «

*
wuahhh drool.gif 
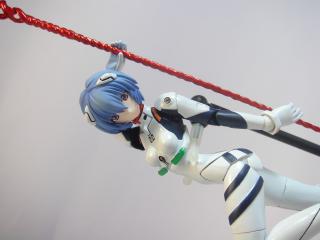
nice........., cost almost 100USD$ omg.....


shocking.gif how they made the magic book stay in mid-air..... magic?
temptation1314
post Jun 19 2008, 01:07 PM

Specials : 1,000,000 Spam Post Attack
*******
Senior Member
2,287 posts

Joined: Jun 2007
From: Anno Domini Time Ultra: 1,000,000 Trans Am Attack!
My one worst, turn out bought wrong lamp... ORANGISH!!.. doh.gif

Please scold. TQ tongue.gif

user posted image

user posted image
This one edited with the temperature option..

126 Pages « < 116 117 118 119 120 > » Top
Topic ClosedOptions
 

Change to:
| Lo-Fi Version
0.0271sec    1.76    6 queries    GZIP Disabled
Time is now: 24th December 2025 - 02:15 PM