Welcome Guest ( Log In | Register )

8 Pages < 1 2 3 4 5 > » Bottom

Outline · [ Standard ] · Linear+

 Repurposing Wood Boards, Breathing new life into old wood boards

views
     
TSbigred
post Dec 20 2017, 10:48 AM

Getting Started
**
Junior Member
210 posts

Joined: Jun 2008
QUOTE(ozak @ Dec 20 2017, 09:11 AM)
Nice project there.

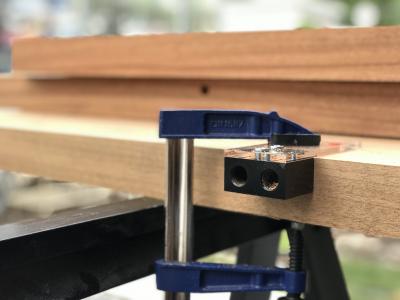
Pallet wood not a rough wood ? Very hard to smooth it out.

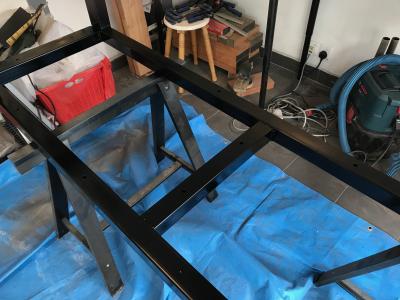
Becarefull with the table slide that use in the flat way. It cannot hold the weight even actual spec is higher. It have to be install in side way.
*
Not really. Used a grit P60, then followed by P120. Any finer and the wood grain would have been lost.

Yup, the top cover part weights around 3kg. Would just hold a night light and couple of book. Maybe later, will think of adding electrical sockets inside so can charge mobile phone.
lifeseries
post Dec 20 2017, 11:47 AM

Getting Started
**
Junior Member
216 posts

Joined: Nov 2012
QUOTE(bigred @ Nov 21 2017, 12:15 AM)
Project Barndoor for Toilet 

What the final completed project looks like.  Pretty happy with the final output.

[attachmentid=9358005]

[attachmentid=9358006]

[attachmentid=9358007]
How the project actually started, from the very beginning working backwards ....

... managed to source pinewood planks (16' feet) from a dealer.  Got him to cut to 7' in length.

[attachmentid=9358022]

[attachmentid=9358018]
The job of constructing the barndoors was beyond what I had in skills and tools, hence got a local workshop to provide the labour.  Glad I did as it took them 1 day to complete the job.

[attachmentid=9358024]

[attachmentid=9358025]
Got them to sand it down to provide a smooth surface and remove possible wood splinters

[attachmentid=9358031]

Treated the wood myself using stains as well as applying a layer using wax paste (to provide a layer of protection from the splash of water).  The right side - the darker side is the treated section.
[attachmentid=9358035]

Treated and just waiting to be mounted on the railings ....

[attachmentid=9358099]

[attachmentid=9358102]

And finally completed!
[attachmentid=9358103]
*
Is the shop provide sanding service for existing dining table?
TSbigred
post Dec 20 2017, 12:20 PM

Getting Started
**
Junior Member
210 posts

Joined: Jun 2008
QUOTE(lifeseries @ Dec 20 2017, 11:47 AM)
Is the shop provide sanding service for existing dining table?
*
I am sure there. Some can come over to do the sanding at your place (they bring their equipment along), but not sure if you want dust around. Otherwise, you might have to transport your table to and fro to the workshop.

Also depends on where the location of your house ; best to find a workshop near your place of residence.
lifeseries
post Dec 20 2017, 01:30 PM

Getting Started
**
Junior Member
216 posts

Joined: Nov 2012
QUOTE(bigred @ Dec 20 2017, 12:20 PM)
I am sure there.  Some can come over to do the sanding at your place (they bring their equipment along), but not sure if you want dust around.  Otherwise, you might have to transport your table to and fro to the workshop.

Also depends on where the location of your house ; best to find a workshop near your place of residence.
*
can i know where is the shop?
TSbigred
post Dec 20 2017, 01:56 PM

Getting Started
**
Junior Member
210 posts

Joined: Jun 2008
QUOTE(lifeseries @ Dec 20 2017, 01:30 PM)
can i know where is the shop?
*
Those that I know are located along Jalan Sungai Buloh - same stretch as all the nurseries. 100 metres before the Kota Damansara traffic lights (if coming from Subang Skypark Airport)
lifeseries
post Dec 20 2017, 02:01 PM

Getting Started
**
Junior Member
216 posts

Joined: Nov 2012
QUOTE(bigred @ Dec 20 2017, 01:56 PM)
Those that I know are located along Jalan Sungai Buloh - same stretch as all the nurseries.  100 metres before the Kota Damansara traffic lights (if coming from Subang Skypark Airport)
*
Okay TQ
Reubs
post Dec 21 2017, 10:49 AM

Getting Started
**
Junior Member
257 posts

Joined: Feb 2010


Nice builds @bigred. Recently bought the sliding barn door hardware on AliExpress. Gonna start working on the door this weekend.

Mind if I share some of my DIY work on your thread?
TSbigred
post Dec 21 2017, 11:06 AM

Getting Started
**
Junior Member
210 posts

Joined: Jun 2008
QUOTE(Reubs @ Dec 21 2017, 10:49 AM)
Nice builds @bigred. Recently bought the sliding barn door hardware on AliExpress. Gonna start working on the door this weekend.

Mind if I share some of my DIY work on your thread?
*
Please do! Feel free to share or ask questions - only way we can learn from each other.
Reubs
post Dec 21 2017, 07:14 PM

Getting Started
**
Junior Member
257 posts

Joined: Feb 2010


Thanks @bigred

In the midst of making an industrial dining table. 90 percent complete I would say.

Here's the process:

1. Cutting steel hollow sections for the legs.

Attached Image

2. Welding the legs together.

Attached Image

3. Filling putty on the joints.

Attached Image

4. Grinding the weld joints to a smooth finish.

Attached Image

5. Priming

Attached Image

6. Painting (Matte Black)

Attached Image

7. Making dowel holes before clamping the wood pieces together.

Attached Image

8. Clamping 4/6 pieces of wood together.

Attached Image

9. Sanding. (80 grit > 120 grit & 220 grit)

Attached Image

10. First coat of finish (Polyurethane)

Attached Image

11. Final coat of finish. Will leave it for 72 hours before buffing.

Attached Image
TSbigred
post Dec 21 2017, 11:41 PM

Getting Started
**
Junior Member
210 posts

Joined: Jun 2008
That's impressive. This was done at your frontyard? What type wood did you use? It looks pretty thick ... at least an inch in thickness.
Reubs
post Dec 22 2017, 01:55 AM

Getting Started
**
Junior Member
257 posts

Joined: Feb 2010


QUOTE(bigred @ Dec 21 2017, 11:41 PM)
That's impressive.  This was done at your frontyard?  What type wood did you use?  It looks pretty thick ... at least an inch in thickness.
*
Thanks! Yeah it was done in my porch. Just had a renovation so it’s in a mess.

Wood is called Melunak, solid wood. Bought it from a factory in Ampang. It’s 2 inches thick.
TSbigred
post Dec 22 2017, 02:34 PM

Getting Started
**
Junior Member
210 posts

Joined: Jun 2008
Post a final pic of the table when it is completed.

Did you have a welder or did you get someone to do the welding of the table joints?
Reubs
post Dec 22 2017, 05:50 PM

Getting Started
**
Junior Member
257 posts

Joined: Feb 2010


QUOTE(bigred @ Dec 22 2017, 02:34 PM)
Post a final pic of the table when it is completed.

Did you have a welder or did you get someone to do the welding of the table joints?
*
Will do!

I have a small 160amp arc welding machine. Welds definitely need improvement. Hence why I had to fill up some holes using the putty.

Just finished attaching the legs to the the wood top using 4 inch screws.

Attached Image
TSbigred
post Dec 23 2017, 01:16 PM

Getting Started
**
Junior Member
210 posts

Joined: Jun 2008
Don't mind me asking, what was the total build cost (material)?
Reubs
post Dec 23 2017, 11:18 PM

Getting Started
**
Junior Member
257 posts

Joined: Feb 2010


Here’s the breakdown:

6” x 2” Melunak wood (Total size around 7’ x 3’) - RM336
Steel hollow section - RM100 +/-
Paint, Primer, Wood Glue, Finishing, etc - RM 150 +/-

Close to RM600

ar188
post Dec 23 2017, 11:53 PM

Look at all my stars!!
*******
Senior Member
9,206 posts

Joined: Jun 2006
QUOTE(Reubs @ Dec 22 2017, 01:55 AM)
Thanks! Yeah it was done in my porch. Just had a renovation so it’s in a mess.

Wood is called Melunak, solid wood. Bought it from a factory in Ampang. It’s 2 inches thick.
*
nice edge to joint. did you get the factory to surface them too?


This post has been edited by ar188: Dec 23 2017, 11:55 PM
Reubs
post Dec 24 2017, 12:05 AM

Getting Started
**
Junior Member
257 posts

Joined: Feb 2010


QUOTE(ar188 @ Dec 23 2017, 11:53 PM)
nice edge to joint. did you get the factory to surface them too?
*
Thanks! It comes planed, but I had to do quite a bit of sanding to get it all evened out.
ar188
post Dec 24 2017, 12:16 AM

Look at all my stars!!
*******
Senior Member
9,206 posts

Joined: Jun 2006
QUOTE(Reubs @ Dec 24 2017, 12:05 AM)
Thanks! It comes planed, but I had to do quite a bit of sanding to get it all evened out.
*
cool, of coz. cos you glued the joints right? gotta be really smooth on both sides to have maximum contacts. rclxms.gif

6” x 2” Melunak wood (Total size around 7’ x 3’) - RM336
means you used how many 7feet planks to make 7x3 feet table? exactly 6 planks? rm8/feet is reasonable for 2x6 size .. i assume its outdoor hard woods as i have not much info on that kind of wood.

This post has been edited by ar188: Dec 24 2017, 12:26 AM
Reubs
post Dec 24 2017, 12:29 AM

Getting Started
**
Junior Member
257 posts

Joined: Feb 2010


QUOTE(ar188 @ Dec 24 2017, 12:16 AM)
cool, of coz. cos you glued the joints right? gotta be really smooth on both sides to have maximum contacts. rclxms.gif

6” x 2” Melunak wood (Total size around 7’ x 3’) - RM336
means you used how many 7feet planks to make 7x3 table? exactly 6 planks? rm8/feet is reasonable for 2x6 size .. i assume its hard woods as i have not much info on that kind of wood.
*
Yeah I used 6 planks. Yup sold at rm8 per foot. And yes it’s hard word.


8 Pages < 1 2 3 4 5 > » Top
 

Change to:
| Lo-Fi Version
0.0236sec    0.93    6 queries    GZIP Disabled
Time is now: 27th November 2025 - 08:37 AM