Welcome Guest ( Log In | Register )

8 Pages  1 2 3 > » Bottom

Outline · [ Standard ] · Linear+

 Repurposing Wood Boards, Breathing new life into old wood boards

views
     
TSbigred
post Aug 24 2017, 12:17 AM, updated 7y ago

Getting Started
**
Junior Member
210 posts

Joined: Jun 2008
I had old wood boards that I used as shelves before. It was stained into a darker colour (it was the "in" thing a couple of years ago to have dark wood shelves) but it look dated currently. Hence decided that it was time to breath new "life" into the shelves.


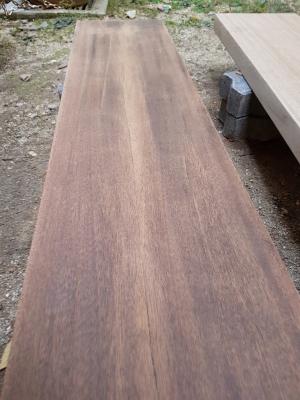
As can be seen, the wood stain used previously was very dark - almost brown black. Even under direct sunlight, the wood plank is quite dark.

Attached Image

Attached Image


Used an orbital sander and started to sand the surface of the wood using 60 Grit paper, stripping the stained surface of the wood.

Attached Image

Attached Image

Found by mistake that by partially stripping the stain, it gave the wood a "distressed" look which looked pretty good. Compare the left (original stain) and right side (after sanding).

Attached Image

Attached Image


Comparing the before and after pictures....

Attached Image


... and completion of phase 1 of the project. Time for a nice cool glass of coke.

Attached Image

Next step is to clean the planks of the residue wood dust and to give it a nice coat of oil to protect it.

Spot23
post Aug 24 2017, 12:40 AM

New Member
*
Junior Member
31 posts

Joined: Jan 2012
Nice. You avid DIYer?

TSbigred
post Aug 24 2017, 01:02 AM

Getting Started
**
Junior Member
210 posts

Joined: Jun 2008
Amateur DIY. Can't make a living out of it, hence have to experiment at home first.

biggrin.gif
TSbigred
post Aug 27 2017, 10:31 AM

Getting Started
**
Junior Member
210 posts

Joined: Jun 2008
Part 2 - Protective oil on wood plannks

Target to apply a layer of protective oil - to protect it against the elements and provide a layer of water protection to the wood.

Raw form of the wood after sanding. Can see the wood grains visible giving it texture

Attached Image

Applying a coat of wood oil on the wood planks. The wood darkens slightly on the application of the oil. Application of the oil was very fast - took less than 15 minutes to complete.

Attached Image

Attached Image

The wood grains can still be seen after the application of the oil. Can see the contrast oil and non-oil application areas.

Attached Image

Attached Image

Took around 2 hours for the wood to be fully cured with the oil. And the final product looks like ....

Attached Image

Attached Image

Attached Image

Realised don't really need to spend much money to re-use existing stuff around the house to breath new life into the items.


Reubs
post Aug 27 2017, 12:54 PM

Getting Started
**
Junior Member
257 posts

Joined: Feb 2010


What type of wood oil did you use?
TSbigred
post Aug 27 2017, 07:46 PM

Getting Started
**
Junior Member
210 posts

Joined: Jun 2008
QUOTE(Reubs @ Aug 27 2017, 12:54 PM)
What type of wood oil did you use?
*
Watco Teak Oil. Got it from Ace Hardware - very easy to use and doesn't stain the hands.
TSbigred
post Sep 10 2017, 09:11 AM

Getting Started
**
Junior Member
210 posts

Joined: Jun 2008
Had an excess piece of wood - approximately 5 feet in length - from my existing woods which I am turning into a bench (to be posted later).

At the same time, needed a clock for the bedroom so decided to re-use the excess wood to make into a standing floor clock. To make the wood piece stand, I used L-brackets as the "legs".

Had a set of wall clock which was not used and decided to stick it direclty on the wood.

Attached Image


Results? A vertical 5 feet floor standing clock combining wood and black metal. No wastage of materials and looks great.

Attached Image

Attached Image

This post has been edited by bigred: Sep 10 2017, 09:13 AM
2387581
post Sep 11 2017, 12:53 AM

Enthusiast
*****
Senior Member
755 posts

Joined: Dec 2016
Nice piece of wood you have it here.

The L angle at the bottom of the clock kills me a little...perhaps you can replace it with two pieces of wood.
ozak
post Sep 11 2017, 08:45 AM

10k Club
********
All Stars
17,014 posts

Joined: Jan 2005


QUOTE(2387581 @ Sep 11 2017, 12:53 AM)
Nice piece of wood you have it here.

The L angle at the bottom of the clock kills me a little...perhaps you can replace it with two pieces of wood.
*
It would be nice if cut it more than half and hang it on the wall.
weikee
post Sep 11 2017, 09:43 AM

10k Club
********
All Stars
12,019 posts

Joined: Jan 2003
Nice craft and workmanship.

TSbigred
post Sep 12 2017, 12:18 AM

Getting Started
**
Junior Member
210 posts

Joined: Jun 2008
QUOTE(2387581 @ Sep 11 2017, 12:53 AM)
Nice piece of wood you have it here.

The L angle at the bottom of the clock kills me a little...perhaps you can replace it with two pieces of wood.
*
The difficult part is the joining of another 2 pieces of wood at the bottom. That would mean either to screw right thru the back to the front (wood thickness is around 1.5") and trying to do another screw from front to back - I actually broke the screwhead while trying to do this (the wood is really hard).

I opted for the black metal L-angle as it gives is a nice contrast to the wood. All woody was too much for me.
iamoracle
post Sep 12 2017, 07:29 AM

On my way
****
Senior Member
614 posts

Joined: Nov 2011


QUOTE(bigred @ Sep 10 2017, 09:11 AM)
Had an excess piece of wood - approximately 5 feet in length - from my existing woods which I am turning into a bench (to be posted later). 

At the same time, needed a clock for the bedroom so decided to re-use the excess wood to make into a standing floor clock. To make the wood piece stand, I used L-brackets as the "legs".

Had a set of wall clock which was not used and decided to stick it direclty on the wood.

Attached Image
Results? A vertical 5 feet floor standing clock combining wood and black metal. No wastage of materials and looks great.

Attached Image

Attached Image
*
I don't mean to sound offensive and disrespectful. This design reminds me of something else which is related to departed human being.

IMHO, you should cut the plank into half rather than using the full length. A bit unbalanced.

Apologies if you feel offended. Just my frank feedback.

TSbigred
post Sep 12 2017, 06:25 PM

Getting Started
**
Junior Member
210 posts

Joined: Jun 2008
Good feedback. Never see it that way.

The plank is 5' in length - can almost be a clothes rack. Too large to be the item you are referring to unless it belongs to giant. 😁
yushin
post Sep 12 2017, 11:16 PM

Look at all my stars!!
*******
Senior Member
3,327 posts

Joined: Jan 2003
From: Selangor


Nice crafting skill with limited tools.

hahaha, I had did some souvenir that my colleague ask me to redo it because the initial design looked like tombstone.
ar188
post Sep 13 2017, 07:00 PM

Look at all my stars!!
*******
Senior Member
9,206 posts

Joined: Jun 2006
QUOTE(bigred @ Sep 12 2017, 12:18 AM)
- I actually broke the screwhead while trying to do this (the wood is really hard). 
predrill, before driving in the screw
Richard
post Sep 13 2017, 09:21 PM

Regular
******
Senior Member
1,083 posts

Joined: Jan 2003
From: Kota Kinabalu


QUOTE(iamoracle @ Sep 12 2017, 07:29 AM)
I don't mean to sound offensive and disrespectful. This design reminds me of something else which is related to departed human being.

IMHO, you should cut the plank into half rather than using the full length. A bit unbalanced.

Apologies if you feel offended. Just my frank feedback.
*
blink.gif blink.gif blink.gif

laugh.gif laugh.gif laugh.gif laugh.gif
TSbigred
post Sep 23 2017, 02:07 AM

Getting Started
**
Junior Member
210 posts

Joined: Jun 2008
Had another wood ready and prep to be made into a 5' bench.

Attached Image

Managed to find a metalworks guy to make a frame using mild steel for me. When the bench was delivered, found that there were rust stains and the metal had a lot of black dust on it - probably not finished properly as I wanted it completed fast.

Attached Image
Noticed that the rust stains can be seen on the legs and the side part of the frame.


Decided had to use some elbow grease to remove the dirt and rusted stains - can't bear to live with rust stains inside the house (figured no fun getting tetanus from moving the bench around the house). Hence had to separate the wood plank from the bench frame - and started to strip and clean the frame using vinegar and a steel wool. Vinegar was surprisingly effective in cleaning out the built-up rust.

Problem was after leaving it out to dry from the washing of the rust and dirt stains - within a couple of hours, some faint rust can be seen building up again. Oxidation was happening very fast. Had to wipe out the rust stain and apply a coat of acrylic clearcoat to provide a protective layer.

Attached Image

Attached Image

So far looking good, the metal frame has the raw industrial look. Currently waiting for the frame to full dry before merging the wood plank and metal frame back.

Hope to get it done by tomorrow!

weikee
post Sep 23 2017, 08:04 AM

10k Club
********
All Stars
12,019 posts

Joined: Jan 2003
Nice loft table. Where did you get the wood, I always wanted one of these. But end up using ikea wood top smile.gif

How much the steel work cost you?
TSbigred
post Sep 23 2017, 09:32 AM

Getting Started
**
Junior Member
210 posts

Joined: Jun 2008
QUOTE(weikee @ Sep 23 2017, 08:04 AM)
Nice loft table. Where did you get the wood, I always wanted one of these. But end up using ikea wood top smile.gif

How much the steel work cost you?
*
It's actually a bench rather than a table. 5' L x 14" W x 22" H. If it was higher and wider, it could be turned into a table.

I had the wood for nearly 10 years, previously used it as a book shelf. Decided to re-purpose it and it "grew" up and became a bench 😆.

Got the wood from a Klang wood factory, forgot where as more than 10 years ago. There is a wood shop at Damansara Uptown, it's the same row as Wondermilk, can try to source from there.

The steel works cost me RM200 (minus my own labour cost to clean it 😁). Would estimate that the bench cost me approx RM500.
weikee
post Sep 23 2017, 09:44 AM

10k Club
********
All Stars
12,019 posts

Joined: Jan 2003
QUOTE(bigred @ Sep 23 2017, 09:32 AM)
It's actually a bench rather than a table. 5' L x 14" W x 22" H. If it was higher and wider, it could be turned into a table.

I had the wood for nearly 10 years, previously used it as a book shelf. Decided to re-purpose it and it "grew" up and became a bench 😆.

Got the wood from a Klang wood factory, forgot where as more than 10 years ago. There is a wood shop at Damansara Uptown, it's the same row as Wondermilk, can try to source from there.

The steel works cost me RM200 (minus my own labour cost to clean it 😁).  Would estimate that the bench cost me approx RM500.
*
I know that damansara place, they sell mostly wooden door and windows.

Thinking to buy a big wood from china, maybe later when budget allow.

8 Pages  1 2 3 > » Top
 

Change to:
| Lo-Fi Version
0.0287sec    0.58    6 queries    GZIP Disabled
Time is now: 27th November 2025 - 03:41 PM