Welcome Guest ( Log In | Register )

8 Pages < 1 2 3 4 > » Bottom

Outline · [ Standard ] · Linear+

 Repurposing Wood Boards, Breathing new life into old wood boards

views
     
ozak
post Sep 23 2017, 09:50 AM

10k Club
********
All Stars
17,013 posts

Joined: Jan 2005


QUOTE(bigred @ Sep 23 2017, 02:07 AM)
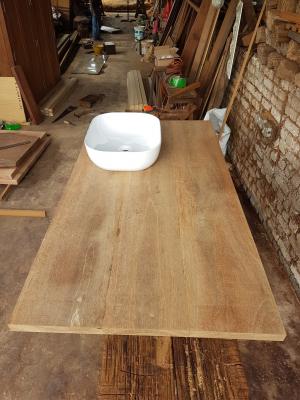
Had another wood ready and prep to be made into a 5' bench.

[attachmentid=9165894]

Managed to find a metalworks guy to make a frame using mild steel for me.  When the bench was delivered, found that there were rust stains and the metal had a lot of black dust on it - probably not finished properly as I wanted it completed fast. 

[attachmentid=9165902]
Noticed that the rust stains can be seen on the legs and the side part of the frame.


Decided had to use some elbow grease to remove the dirt and rusted stains - can't bear to live with rust stains inside the house (figured no fun getting tetanus from moving the bench around the house).  Hence had to separate the wood plank from the bench frame - and started to strip and clean the frame using vinegar and a steel wool.  Vinegar was surprisingly effective in cleaning out the built-up rust. 

Problem was after leaving it out to dry from the washing of the rust and dirt stains - within a couple of hours, some faint rust can be seen building up again.  Oxidation was happening very fast.  Had to wipe out the rust stain and apply a coat of acrylic clearcoat to provide a protective layer.

[attachmentid=9165908]

[attachmentid=9165910]

So far looking good, the metal frame has the raw industrial look.  Currently waiting for the frame to full dry before merging the wood plank and metal frame back.

Hope to get it done by tomorrow!
*
The mild steel have to be paint. Otherswise it will rust again. If you want to look like raw, paint a clear liquar to seal off the metal from air.

Can the metal stand support the person weight? It won't sway? Cause I see the joint on top is abit weak.
TSbigred
post Sep 23 2017, 03:52 PM

Getting Started
**
Junior Member
210 posts

Joined: Jun 2008
Metal frame is quite stable, with the mild steel legs it provides a good weight at the bottom. With the wood plank sitting inside the frame, it provides additional weight - estimate the entire bench is around 15 - 20kg in weight.

Final results ....

Attached Image

Attached Image

Close up view of the metal after cleaning + acrylic clearcoat spray.

Attached Image
Can see the wood grains running along the plank

Attached Image

Bench ready to be used.


TSbigred
post Sep 23 2017, 04:17 PM

Getting Started
**
Junior Member
210 posts

Joined: Jun 2008
QUOTE(weikee @ Sep 23 2017, 09:44 AM)
I know that damansara place, they sell mostly wooden door and windows. 

Thinking to buy a big wood from china, maybe later when budget allow.
*
You can try Jungle Fever located along Jalan Sungai Buloh (Near the traffic light to the Kwasa Sentral LRT station or 50 meters from Delima Tani (M) Sdn. Bhd - Google it). I got from them a joined Balau wood countertop - 5' Length x 32' Width x 1.5" Thickness. The cost was RM1,100. Still hardwood just not a single piece.

Attached Image

Attached Image

The balau wood countertop.

Single piece wood has a premium priced to it.

weikee
post Sep 23 2017, 04:24 PM

10k Club
********
All Stars
12,019 posts

Joined: Jan 2003
QUOTE(bigred @ Sep 23 2017, 04:17 PM)
You can try Jungle Fever located along Jalan Sungai Buloh (Near the traffic light to the Kwasa Sentral LRT station or 50 meters from Delima Tani (M) Sdn. Bhd - Google it).  I got from them a joined Balau wood countertop - 5' Length x 32' Width x 1.5" Thickness.  The cost was RM1,100.  Still hardwood just not a single piece. 

Attached Image

Attached Image

The balau wood countertop.

Single piece wood has a premium priced to it.
*
That is nice price. Thanks will go survey
yushin
post Sep 25 2017, 09:45 AM

Look at all my stars!!
*******
Senior Member
3,327 posts

Joined: Jan 2003
From: Selangor


wood is soooo expensive nowadays...
My favorite source of wood for small projects still has to be pallets from office.
TSbigred
post Sep 25 2017, 01:16 PM

Getting Started
**
Junior Member
210 posts

Joined: Jun 2008
Yup, pallets has pretty decent woods as well. I prefer the wood pallets from Europe / US - has nicer grain and lighter wood colour. Looks "nicer".

Downside is the wood type might not cater well to our weather (humidity) and the wood (pine?) feels lighter (less dense).
Reubs
post Sep 25 2017, 02:04 PM

Getting Started
**
Junior Member
257 posts

Joined: Feb 2010


QUOTE(bigred @ Sep 25 2017, 01:16 PM)
Yup, pallets has pretty decent woods as well.  I prefer the wood pallets from Europe / US - has nicer grain and lighter wood colour.  Looks "nicer".

Downside is the wood type might not cater well to our weather (humidity) and the wood (pine?) feels lighter (less dense).
*
Yeah pine is softwood. Would have to be careful with repurposing pine wood for home furniture. Some are chemically treated which can be hazardous.
TSbigred
post Sep 25 2017, 04:38 PM

Getting Started
**
Junior Member
210 posts

Joined: Jun 2008
Do you know if the wood is treated entirely or only on the surface of the wood?
TSbigred
post Sep 25 2017, 07:20 PM

Getting Started
**
Junior Member
210 posts

Joined: Jun 2008
Ok found the answer.

How To Tell If A Wood Pallet Is Safe For Reuse?


Pallet wood safe to use!

Attached Image

This post has been edited by bigred: Sep 25 2017, 07:21 PM
yushin
post Sep 25 2017, 09:05 PM

Look at all my stars!!
*******
Senior Member
3,327 posts

Joined: Jan 2003
From: Selangor


The wood from pallet are rough and usually not straight and flat like those wood we buy from shop.
It will take some effort to square 4 side and smooth-en the surface for furniture work.
TSbigred
post Sep 25 2017, 09:39 PM

Getting Started
**
Junior Member
210 posts

Joined: Jun 2008
Can use a random orbital sander to smoothen the planks.

For it not being straight and flat, can use this woods as cladding or maybe wood filler to fill the space. Just have to design and figure it out.
Reubs
post Sep 25 2017, 11:34 PM

Getting Started
**
Junior Member
257 posts

Joined: Feb 2010


QUOTE(bigred @ Sep 25 2017, 09:39 PM)
Can use a random orbital sander to smoothen the planks. 

For it not being straight and flat, can use this woods as cladding or maybe wood filler to fill the space.  Just have to design and figure it out.
*
Or a hand planer.
yushin
post Sep 26 2017, 09:01 AM

Look at all my stars!!
*******
Senior Member
3,327 posts

Joined: Jan 2003
From: Selangor


Using traditional hand planer is a good exercise, but I use electric hand planer more.
No5 jack plane can be more expensive than electric hand plane.

My current electric plane costs RM190 only.
TSbigred
post Nov 20 2017, 11:11 PM

Getting Started
**
Junior Member
210 posts

Joined: Jun 2008
QUOTE(bigred @ Sep 23 2017, 04:17 PM)
You can try Jungle Fever located along Jalan Sungai Buloh (Near the traffic light to the Kwasa Sentral LRT station or 50 meters from Delima Tani (M) Sdn. Bhd - Google it).  I got from them a joined Balau wood countertop - 5' Length x 32' Width x 1.5" Thickness.  The cost was RM1,100.  Still hardwood just not a single piece. 

Attached Image

Attached Image

The balau wood countertop.

Single piece wood has a premium priced to it.
*
Follow-up from this post, updated photos of the wood countertop.

Attached Image

Attached Image
TSbigred
post Nov 21 2017, 12:15 AM

Getting Started
**
Junior Member
210 posts

Joined: Jun 2008
Project Barndoor for Toilet

What the final completed project looks like. Pretty happy with the final output.

Attached Image

Attached Image

Attached Image


How the project actually started, from the very beginning working backwards ....

... managed to source pinewood planks (16' feet) from a dealer. Got him to cut to 7' in length.

Attached Image

Attached Image


The job of constructing the barndoors was beyond what I had in skills and tools, hence got a local workshop to provide the labour. Glad I did as it took them 1 day to complete the job.

Attached Image

Attached Image


Got them to sand it down to provide a smooth surface and remove possible wood splinters

Attached Image

Treated the wood myself using stains as well as applying a layer using wax paste (to provide a layer of protection from the splash of water). The right side - the darker side is the treated section.
Attached Image

Treated and just waiting to be mounted on the railings ....

Attached Image

Attached Image

And finally completed!
Attached Image


ar188
post Nov 21 2017, 12:29 AM

Look at all my stars!!
*******
Senior Member
9,206 posts

Joined: Jun 2006
creative thumbup.gif
rx330
post Nov 21 2017, 10:49 AM

10k Club
********
All Stars
11,808 posts

Joined: Jun 2006
wahh nice....
DIY somemore
TSbigred
post Dec 20 2017, 12:29 AM

Getting Started
**
Junior Member
210 posts

Joined: Jun 2008
New project - Project Pallet Wood Side Table

Found pallet wood (good stuff) lying around.

First had to make sure the wood was safe to use ... "HT" (Heat Treament). Checked. Safe to use (none of the nasty "MB" stuff)

Attached Image

Next had to disassemble the planks from the pallets.

Attached Image

Attached Image

Plenty of nails to remove. Alot of elbow power and brute force needed for this. Had to make sure the planks were not damaged or split in the middle when separated from each other.

Attached Image

Attached Image

Once the nails have been removed, time to sand the planks down to "smoothen" it, remove any scratches and dirt as well as sharp splinters. Had to measure to make sure I had all the planks in the correct "sizes" for the build. Good part is wood pallets comes in standard sizes hence just need to pick the correct pallet planks.

Attached Image

Comparison of sanded plank vs raw plank. The sanded plank is the one at the bottom. The raw wood pallets initially look dirty and had dirt smears. After sanding it down, the wood grain can be seen and the wood is "cleaner" as the dirty section has been sanded off.

Attached Image

Had to make sure to hose down the planks with water to wash off the dusty parts from the sanding process.

Time for assembly .... basically used a nice wood pallet as the "base" and added height using planks to the sides.

Attached Image

Attached Image

Time for the next phase. Got a couple of Hafele drawer slides and measured to make sure they fit.
Attached Image

Attached Image

Attached Image

Looking good. Time to screw everything in place (made a couple of trips to the hardware shop to make sure I got the correct screw sizes)

Final result!

Attached Image

Pallet side table with sliding top

Attached Image

Attached Image

Has good depth to put books and stuff inside.

Attached Image

Another project completed. Total cost? RM35 (Hafele drawer slides + screws + nails)


ozak
post Dec 20 2017, 09:11 AM

10k Club
********
All Stars
17,013 posts

Joined: Jan 2005


Nice project there.

Pallet wood not a rough wood ? Very hard to smooth it out.

Becarefull with the table slide that use in the flat way. It cannot hold the weight even actual spec is higher. It have to be install in side way.
salimbest83
post Dec 20 2017, 09:31 AM

♥PMS on certain day♥
*******
Senior Member
8,633 posts

Joined: Feb 2006
From: Jelutong Penang


QUOTE(bigred @ Sep 12 2017, 12:18 AM)
The difficult part is the joining of another 2 pieces of wood at the bottom.  That would mean either to screw right thru the back to the front (wood thickness is around 1.5") and trying to do another screw from front to back - I actually broke the screwhead while trying to do this (the wood is really hard). 

I opted for the black metal L-angle as it gives is a nice contrast to the wood.  All woody was too much for me.
*
oh yeah. my old time teknik.
drill small bit hole first for that screw.
always work.

8 Pages < 1 2 3 4 > » Top
 

Change to:
| Lo-Fi Version
0.0299sec    0.60    6 queries    GZIP Disabled
Time is now: 26th November 2025 - 11:54 AM