Welcome Guest ( Log In | Register )

4 Pages < 1 2 3 4 >Bottom

Outline · [ Standard ] · Linear+

 Smart Home, Let's discuss

views
     
eagle7
post Sep 20 2024, 07:29 PM

Getting Started
**
Junior Member
88 posts

Joined: Jul 2006
QUOTE(alucard89 @ Sep 20 2024, 06:20 PM)
Not really useful if you’re sleeping/lying down in the room and PIR needs some motion to trigger it.
Just got FP1E now and tested it with z2m. Works as expected except for ceiling fan. Need to grab aqara hub to test it with that ai spatial feature
*
You make a valid point; my solution may not work in your specific situation, like in the bedroom.

However, it works well for me in the kitchen. As soon as someone enters the kitchen area, the light automatically turns on, followed by the fan. When the person finishes cooking, washing, or other tasks, and leaves, my home automation system turns off both the light and the fan.
eagle7
post Sep 21 2024, 04:35 PM

Getting Started
**
Junior Member
88 posts

Joined: Jul 2006
The mmWave presence sensor is highly effective at detecting micro-movements instantly, while the PIR sensor works well for identifying moving objects that generate heat.

By combining these two sensors, the mmWave sensor turns on the light when it detects micro-movements, while the PIR sensor observes the area and activates the fan. It then remains on standby until it no longer detects the heat-emitting object or when it becomes stationary, at which point it turns off both the light and fan.

This cycle continues to repeat.

Thus, we need both sensors and not one of them for places with moving/spining fan.
eagle7
post Oct 17 2024, 12:15 PM

Getting Started
**
Junior Member
88 posts

Joined: Jul 2006
QUOTE(Dweller @ Oct 16 2024, 05:15 PM)
I saw you are using 3 gang Moes smart switches from the pic. I am currently using the same unit but I have problem where LED light will flicker whenever I adjust the fan speed (old school rotary knob regulator). When I use inductive device (i.e., drill, blender) it will also cause flickering to all LED light that uses this smart switches even light at the other room rclxub.gif Since you are using 14 switches, is this happening to you? This behaviour is happening in 2 different houses (one with neutral connected, one without)
*
I think your problem is not with the smart switch but with the AC (Alternative Current) noise from your inductive load.

You either change the LED light to one with better handling of EMI or install EMI filter.

Like this, which is more effective but may post a challenge to you.

Other option will be Ferrite core like this one .

It will suppress any AC noise to certain degree.
eagle7
post Oct 17 2024, 04:29 PM

Getting Started
**
Junior Member
88 posts

Joined: Jul 2006
QUOTE(Dweller @ Oct 17 2024, 12:52 PM)
Thanks. But LED light will only flicker if it is in off state. If it was on, it will not flicker. I have tried adding capacitor in parallel with the LED but to no avail. I suspect the noise from the load is enough to pass through the switch and activate it for a short burst. Seeing my switch is solid state instead of relay based, it won't take much to trigger it.
*
If you're noticing that the LED light flickers when it's turned off and your wall smart switch uses a solid-state relay instead of a mechanical one, I suspect that the solid-state relay's optocoupler is sensitive to the incoming AC noise. To reduce this noise, you could try replacing the electrolytic capacitor on the secondary side with a solid-state capacitor , which offers better ESR (Equivalent Series Resistance) and improved noise suppression.
eagle7
post Nov 1 2024, 12:12 PM

Getting Started
**
Junior Member
88 posts

Joined: Jul 2006
QUOTE(Dweller @ Oct 31 2024, 09:35 PM)
I just had another incident with 3 of my smart switches. One 2 gang and the other were 3 gangs switches. MOES Zigbee smart switch.
1. The 2 gang gave out a black smoke and both devices are in OFF state upon failure
2. The 3 gangs both have blown caps and devices that are being controlled remained in ON state after despite blue LED is off (live in leaked into live out) rclxub.gifrclxub.gifrclxub.gif

user posted image

Now comes the question, is there any sirim certified smart switch available? If we purchase house insurance, will they check the switches we use (sirim/ce certified...)?
*
Based on the image you shared showing a burned-out or broken PCB track, this damage is likely due to a high voltage surge, such as one caused by a lightning strike.

To prevent this from recurring, replace the damaged wall switch with a new one from a reliable brand of your choice. Additionally, add a MOV/Varistor (10K431K) between the incoming Live and Neutral wires. This applies if you're using a smart switch with a neutral wire setup. If you're using a bypass capacitor, however, the MOV may not function as effectively.

user posted image

The MOV (Metal Oxide Varistor) will help protect your sensitive electronic devices by absorbing excessive voltage before it reaches them.

Be sure to select a 10D431K specifically, as other values may not provide the same level of protection.

NOTE: Those staying in condo or high-rise building may not require such a protection as the building management already installed some kind of protection to prevent the voltage surge to its tenants.
eagle7
post Nov 2 2024, 01:09 PM

Getting Started
**
Junior Member
88 posts

Joined: Jul 2006
QUOTE(lucaswjk @ Nov 1 2024, 04:16 PM)
good one.

any way for landed users to protect the power surge from db box?
i think mine using very high sensitivity at rccb 100mA or lower,
not sure if this will helps or not
*
QUOTE(Kiding @ Nov 1 2024, 05:15 PM)
Install Surge Protection Device (SPD) such as hager, abb brand. I have ABB OVR T2 SPD to protect whole house.
*
An RCCB is not designed to suppress high incoming voltage spikes; rather, it detects any imbalance in the current passing through it—such as when some of the supplied current leaks to the earth wire via an appliance—before cutting off the power supply to protect the appliance.

For comprehensive protection of the entire house, a Surge Protection Device (SPD) is more effective. The ABB OVR T2 protection begins at 275Vrms, similar to the 10K431K MOV.
eagle7
post Jan 21 2025, 10:43 PM

Getting Started
**
Junior Member
88 posts

Joined: Jul 2006
QUOTE(Moogle Stiltzkin @ Jan 20 2025, 09:26 PM)
how to install reolink doorbell?

got it mounted and everything.

added the 2 wires to connect to the front reolink doorbell.
problem was with the box.

i'm not an electrician so donno is it a transformer or doorchime.
instructions are here
https://support.reolink.com/hc/en-us/articl...oorbell-Wiring/

https://reolink.com/blog/doorbell-transformer/

https://reolink.com/blog/how-to-install-a-doorbell/

https://reolink.com/blog/doorbell-voltage/
it simply says, if got doorchime box, use the bypass.

if no doorchime box, only transformer, then just leave it connected as is.
the handyman didn't know what to do for the box. all he said, the front has no power, because he wasn't sure what to do with the box despite the instruction provided.

any tips or who to ask who knows how to install this x-x;
found this old thread
https://forum.lowyat.net/topic/4365517/all

the box looks like this.
The box i have looks like this

https://shopee.com.my/DOOR-BELL-240VAC-Buil...873.16074374415
so how do you set the box for the reolink? i ask the handyman he don't know  sweat.gif
user posted image

user posted image
*not sure if this is the same situation, but that box is a chime with integrated transformer if not mistaken

https://www.reddit.com/r/reolinkcam/comment...ransformerbell/

hmm.gif
*
I checked my old mechanical doorbell and it can only can supply up to 12Vdc. Based on the Reolink doorbell requirement, it need 24Vdc and 12W. Thus, you cannot depend on the supplied voltage coming from this mechanical doorbell.

user posted image

If I were you, I will remove the content of this doorbell and replace it with all-in-one power supply module.

I will pick HLK-20M24 which can supply 24Vdc and up to 20W.

You need a handyman for the job with soldering iron, some wires, wire connectors, insolation tape, double-sided tape and digital/analogue voltmeter.

user posted image


eagle7
post Jan 24 2025, 04:01 PM

Getting Started
**
Junior Member
88 posts

Joined: Jul 2006
QUOTE(Moogle Stiltzkin @ Jan 24 2025, 06:53 AM)
i'm ok with that idea, but not sure if that white box is used for anything else other than a chime.

hmm.gif

so any idea what doorbell box works?
actually eagle7's idea is already a good one, but what about the box enclosure for it, what to buy for this? and what to do with existing one with all those other wires already there to existing chime?  confused.gif

user posted image

also i'm assuming this black box thing only downsteps. it still needs to be connected to a transformer ya? guess i'll try ask seller about this

sweat.gif
*update
in my pic at the very top got the 2 wire.
user posted image
is that where i put the blue bypass wire?
user posted image
but even if do that it's not the correct voltage?  sweat.gif


hmm.gif
*
I suggest to you to forget about recycling the old Chime box's power supply for your new Reolink Doorbell. There are too many unknowns such as output voltage, power rating, when the capacitor's electrolyte going to dry up and their ESR (Internal resistant of the capacitor, if any).

I have upgraded version for you. Buy a large enough wall mount WIFI enclosure that can house a power extension, chime, doorbell's power adopter etc. Do share with us the look before and after the upgrade.

user posted image
eagle7
post Feb 12 2025, 09:25 PM

Getting Started
**
Junior Member
88 posts

Joined: Jul 2006
QUOTE(Moogle Stiltzkin @ Feb 12 2025, 07:09 PM)
the item arrived, but how to install this? it has pins at the back?  hmm.gif

user posted image

where to mount these pins to? and how to get the 2 wires hooked to it?  confused.gif
*
To wire up the Voltage Regulator (20M24) to your existing chime doorbell wiring, it needs a soldering iron, some loose wires and wire connector.

Do ask your electrician whether he have the soldering iron and loose wires for the jobs.

user posted image
eagle7
post Feb 14 2025, 11:44 PM

Getting Started
**
Junior Member
88 posts

Joined: Jul 2006
QUOTE(Moogle Stiltzkin @ Feb 14 2025, 07:55 AM)
o..ic.

so those 4 pins you just soldered directly onto the chime? you didn't sit it in some sort of casing to mount first? I'll inform the electrician see what he says  hmm.gif
But question though. Was i suppose to also get a pcb to house this hilink item onto, since it is going to be soldered?

Or no need? just solder the points to the chime, somehow?  hmm.gif
Found this

https://www.instructables.com/Build-a-Cloud...-WiFi-Doorbell/

Like in this example they did it like that. They soldered onto a pcb board, next they also had a 3d printed plastic casing to house it, and it had mounting screws to attach to something. but for me i don't have that.

So i'm assuming just using tape of sort to stick it into the white chimebox, and just solder the 4 pins sticking out is enough?

user posted image

has the golden colored circle holes to solder stuff onto a pcb board
user posted image
anyway will see what the electrician says  sweat.gif
PS: looking at the pic, is it the white clip on the left, is attached to the THICK white cable bottom right?  And the other end with the thin wire, is what is soldered to the hilink i assume?

user posted image
my chimebox like this though, dont think there is room to fit it inside  sweat.gif

user posted image
*
This is typically how I ensure the connection between the Power Supply module's pin (A) and the wire (B). First, apply soldering lead to both the pin (A) and the wire (B) separately. Then, solder the pin (A) and wire (B) together to form connection C.

If the total height of the module and soldered wire ( C ) exceeds the space in the doorbell chime box, bend pin (A) before making the connection.

Once both pins are soldered (for both the input and output voltage pins), your electrician can use 3M double-sided tape to secure it inside the emptied doorbell chime box and connect the wires to your existing doorbell wiring, via wire connector D.

No need to worry too much—let the electrician handles the process of emptying the chime box and installing the module inside for you.

user posted image

In case anyone want to DIY this project but limited by basic tools, you can buy this Power Supply Module. Note, due to its size, it may not fit into your existing chimebox. So, buy a suitable size of wall mount Wifi enclosure box or something similar to cover it up. If possible, get an electrician help to install for you.
eagle7
post Apr 8 2025, 07:52 PM

Getting Started
**
Junior Member
88 posts

Joined: Jul 2006
QUOTE(Moogle Stiltzkin @ Mar 27 2025, 10:16 AM)
may i ask what wires are these to buy on shopee? i doubt the electrician has them  sweat.gif

he said he has the solder device however.
*
Any loose wires will do, and I believe your electrician will have some spare/loose wires, just need to inform him first.

QUOTE(hasyimibhar @ Apr 4 2025, 12:45 AM)
Has anyone installed Shelly Pro 3EM to monitor energy load and solar export to grid? I already have solar panels installed with Hoymiles microinverters and a DTU, and I'm interested to track how much energy my house use, and how much end up being exported to TNB. Also can I just hire any electrician to install this for me?
*
If you want to monitor the electricity generated by each micro-inverter or even by the individual MPPTs of each micro-inverter, you can install the Hoymiles Wi-Fi integration in your Home Assistant app.

By combining data from the Hoymiles Micro-Inverter and the Bidirectional Energy Monitor, you can populate the Energy Card (Home Assistant Energy Dashboard) for a clearer view of your energy distribution.


eagle7
post May 15 2025, 12:07 AM

Getting Started
**
Junior Member
88 posts

Joined: Jul 2006
QUOTE(DragonReine @ May 8 2025, 02:39 PM)
I have super newbie questions 🙇‍♂️ would like to ask:

1) Are smart switches able to wire for 2 way, specifically smart switch for water heater? One of the smart switch vendors I spoke to suggested that I use app scene/automation function to mimic 2 way switch function instead, I'm not sure if this is recommended...

2) From my understanding, most smart switches are not compatible with DC fans. Would like to ask anyone's experience, do IR/RF blasters work well with remote controlled KDK fans?
*
For high-power appliances like water heaters or air conditioners, I prefer using heavy-duty relays rather than standard or miniature ones. Regular relays aren't suitable for high current loads. For example, if you run your washing machine on hot water mode, you'll notice that the 3-pin plug gets hot and in the worst case, it can even melt the plug and socket.

Consider using a 30A relay module that supports Tuya (Wi-Fi/Zigbee) and 433MHz. It can pair with up to 8x 433MHz wall switches (1-gang).

You can install the relay module inside the water heater casing, hardwiring the existing switch wiring. Then, replace the original water heater wall switch with a 433MHz wall switch, placing one at each bathroom entrance for convenience.
eagle7
post Jun 30 2025, 09:25 PM

Getting Started
**
Junior Member
88 posts

Joined: Jul 2006
QUOTE(voncrane @ Jun 29 2025, 11:13 PM)
I understand Aqara devices are recommended. However, could anyone please recommend some Tuya/HA compatible Smart wall switches & sockets? Ideally really affordable ones and reliable. Trying to keep every under Home Assistant. Pondering to get the HA Green setup. Links & advice appreciated. Thanks
*
If you want to use Tuya with WiFi and avoid intermittent connection drops, make sure your current WiFi router supports static IP assignments for each device. If you plan to upgrade your router, consider a GL.iNet router, which comes preloaded with OpenWRT and receives long-term firmware, security, and feature (AdGuardHome/TailScale etc) updates.

Also, avoid using the native Tuya add-on in Home Assistant. Instead, use "Tuya Local" (not "Local Tuya").

With Tuya Local and a static IP for each Tuya device, you'll no longer rely on Tuya’s cloud service, which can disconnect frequently and often requires a "trick" to restore the native integration when the connection is lost.

As for smart wall switches, buy just one unit first to test it out. Replace your existing switch and check if it physically fits in your wall switch box, as this wall smart switches can sometimes be too bulky to fit. If it doesn't fit, you may need to explore alternative options.
eagle7
post Jul 7 2025, 10:11 PM

Getting Started
**
Junior Member
88 posts

Joined: Jul 2006
QUOTE(Alert_RaZO @ Jul 6 2025, 12:41 AM)
Hi guys,

Can I install 2 gang smart switch for ceiling fan with regulator , another one is light
[attachmentid=11515677]
*
It should be totally fine to replace your current switch with a 2-gang smart wall switch. Just make sure to get one that doesn’t need a neutral wire (No Neutral), since your setup doesn’t have one.

Once you’ve got the smart switch up and running, you might also want to upgrade your fan regulator to a Universal Ceiling Fan Remote Controller, makes things a lot more convenient!
eagle7
post Jul 8 2025, 10:56 PM

Getting Started
**
Junior Member
88 posts

Joined: Jul 2006
QUOTE(lucaswjk @ Jul 8 2025, 01:59 PM)
old AC fans waste alot of energy.
newer dc fan can save electricity at least 50%

moreover new dc fan cost around rm150 onward (cheap) and more silent.
i recently change 2 of them, DIY from youtube.
*
DC ceiling fans are getting cheaper these days — definitely worth upgrading. Same goes for those universal ceiling fan remote controllers, now selling for under RM20. Not bad for occasional use or if you’re still using modern/classical looks AC fan.

@lucaswjk, after you’ve upgraded to DC fans, have you considered integrating it into your Home Assistant setup?
eagle7
post Jul 10 2025, 12:31 AM

Getting Started
**
Junior Member
88 posts

Joined: Jul 2006
QUOTE(lucaswjk @ Jul 9 2025, 04:43 PM)
i controlled it via my Sonoff/Tasmots.
but what i use most is the 433 RF remote 😁
*
If you want to control your fan (on/off, speed, lights) from Home Assistant, you can try using the Sonoff RF Bridge R2.

With a bit of tweaking, you can flash it with ESPHome and make it work with most RF remotes.

It’s super handy, lets you control stuff like HA managed fans or lights from RF remote, without needing to open the HA app every time thumbsup.gif .
eagle7
post Jul 14 2025, 12:38 PM

Getting Started
**
Junior Member
88 posts

Joined: Jul 2006
QUOTE(steventan85 @ Jul 10 2025, 04:11 PM)
is Schneider avataron worth the money ?

doing house reno and wish to change some of my light switch to smart switch . so that i can open my downlight before i reach home , especially the porch one
*
Smart switches typically have a bulky back section, often around 1 inch deep, which makes it difficult to fit them into standard wall housings. It's best to purchase a sample unit of the smart switch and give it to the construction worker in advance, so they can create a deep enough mounting box to accommodate both the switch and the wiring. Additionally, make sure to request that a neutral wire is pulled to the switch location as well.

Regarding your second request about turning on the downlight before arriving home, while there might be simpler methods, I personally use Home Assistant (HA) and Node-RED to handle this task.

When I’m about 50 meters from home, I check my HA dashboard’s CCTV feed to see if the gate is already open or in use. If it’s not, I press the autogate button on the dashboard. This action opens the gate and, if it’s nighttime, also turns on the car porch light and fan. Additionally, it switches on one of the hall lights to alert anyone inside that the gate has been opened, a useful reminder, especially since I’ve had instances where someone exited the car porch and forgot to close the gate.

QUOTE(lucaswjk @ Jul 11 2025, 12:37 AM)
sonoff tx have rf module buildin, no need extra configuration.

i also have broadlink for other rf devices
*
Are you using the Broadlink app as a standalone smart control app, or have you integrated it into a centralized smart home platform?
eagle7
post Sep 14 2025, 11:16 PM

Getting Started
**
Junior Member
88 posts

Joined: Jul 2006
QUOTE(lucaswjk @ Sep 14 2025, 08:53 AM)
dont buy high amp switch.
if anything went wrong, u want the switch to break first, not the breaker.

anyway, it is your choice for getting electrocuted during your shower.
*
There’s no problem using a switch with a higher amp rating for a water heater or air conditioner. The only drawback is that it might be a bit more expensive or unnecessary (“overkill”).

On the other hand, using a switch with a lower amp rating can be risky because it may cause the switch to overheat or wear out faster.

Remember, a switch’s job is only to turn the power ON or OFF. The real protection comes from your distribution box:
- Circuit Breaker (CB) protects against overcurrent/overload.
- RCCB protects against current leakage (to prevent electric shocks).


QUOTE(blibala @ Sep 14 2025, 09:56 PM)
Hi. Any recommendation for smart switch for 1hp and 2.5hp aircond? Is those 20A seitch sufficient?
*
Before buying a 40A (or 20A) smart switch, make sure its physical size can fit into your existing switch box. Keep in mind that the Live and Neutral wires inside your current switch box may already be taking up about half of the available space. You can stack up spacer (smart switch wall spacer socket) to increase the volume size of your existing switch box. Technically 20Amp switch is sufficient for 2.5HP AC for both Conventional or Inverter type.
eagle7
post Sep 19 2025, 09:48 PM

Getting Started
**
Junior Member
88 posts

Joined: Jul 2006
QUOTE(K4iz3n @ Sep 17 2025, 05:43 PM)
I am renovating my house and planning to change all my switches to smart switch. I was informed that the smart switches I want requires neutral wire. I am wandering whether I need a neutral wire for each switch regardless of gang or each gang requires a neutral wire.
My electrician is charging me RM200 for each neutral wire installation. Is this reasonable?
*
Since you’re already engaging an electrician to install electrical wiring, you might want to consider adding the following:
- SPD (Surge Protection Device) in the DB box to protect your smart gadgets from lightning strikes and electrical surges.
- Smart RCCB (to replace your existing RCCB) with auto-reclosing function, real-time power usage display, and current leakage monitoring.

I recently installed one in the upstairs DB box after my old RCCB kept tripping occasionally. Using the real-time readings on the unit (and on my smartphone), I was able to identify two leaking devices:
- An old laptop power adapter leaking about 10mA.
- A water heater leaking 20–30mA.

To prevent further issues, I’ve turned off the circuit breaker for the water heater.

The auto-reclosing feature is especially useful, it automatically turns the Smart RCCB back on if it trips unexpectedly (e.g., due to lightning). However, if the RCCB keeps tripping after several attempts, it will stay off until someone manually resets it or checks the wiring for faults.

If you’re planning to install a solar system in the future and want to monitor both import and export power, consider getting a bidirectional RCCB.
eagle7
post Sep 24 2025, 11:05 PM

Getting Started
**
Junior Member
88 posts

Joined: Jul 2006
QUOTE(dudester @ Sep 22 2025, 09:17 AM)
Hi,
I like to this for my renovation. Intend to install Solar system. Could you provide some links for the SPD and Bidirectional RCCB.
*
Here the link for Three phases

Here the link for Single Phases


For the SPD, there are many to choose from online store.

QUOTE(Dweller @ Sep 24 2025, 07:06 PM)
Two more of my MOES Zigbee smart switch kaput after just 3 years of use (failed just shy of 4 months of each other). sad.gif This time it was installed at a different house. I guess no more MOES switch for me. Any suggestion on safer SIRIM/St approved Zigbee smart switch?

user posted image
user posted image
*
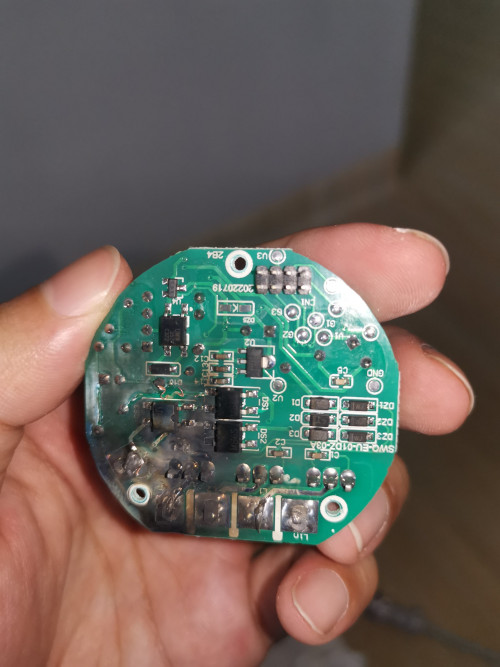
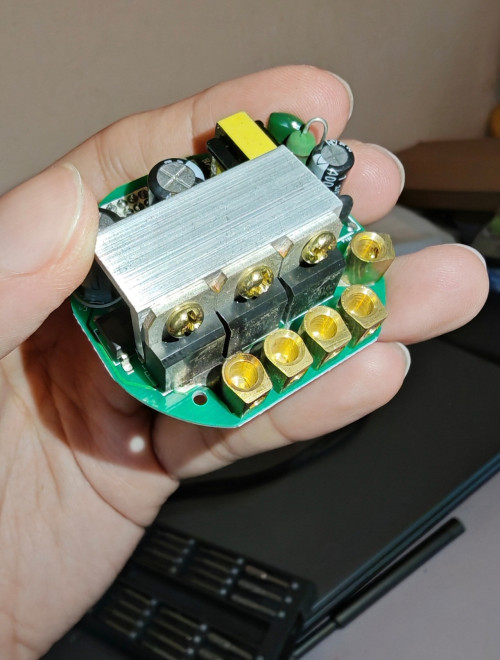
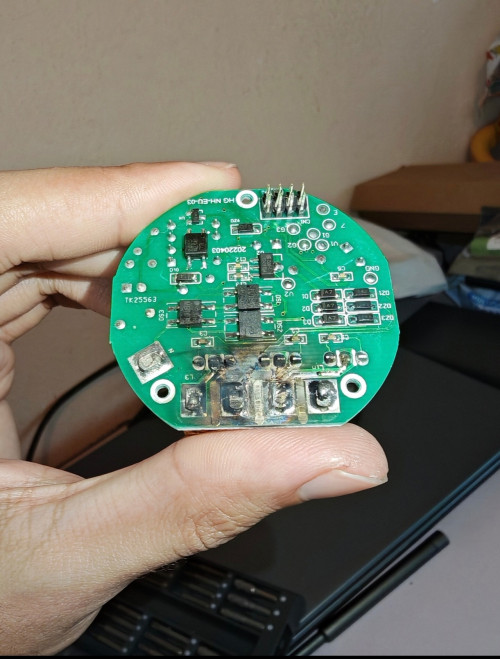
The burn mark is not due to product quality issues but external factor such as lightning strike in your area. Installing SPD will protect your electronic gadgets. The purpose of SPD is to trim the incoming excessive voltage spike not more than ~275Vac.


4 Pages < 1 2 3 4 >Top
 

Change to:
| Lo-Fi Version
0.0408sec    0.71    7 queries    GZIP Disabled
Time is now: 25th November 2025 - 11:39 PM