


Oredi seeing dust on the GTX680 cooling fins..

Here is a picture that was, since before CNY 2015


Have to move quick before the onset of grease.... and throw everything down the drain

Project Final-Mod (Ex-Project Anti-Establisment), Start Jan 2011, End Jan 2016.... tbc..
|
|
 Apr 16 2015, 11:29 AM Apr 16 2015, 11:29 AM
Return to original view | Post
#41
|
 
Senior Member
3,902 posts Joined: Jul 2005 From: Sin Lor, B'worth,Pg. |
some current system picture to tide you guys over
Oredi seeing dust on the GTX680 cooling fins.. Here is a picture that was, since before CNY 2015 Have to move quick before the onset of grease.... and throw everything down the drain |
|
|
|
|
|
May 7 2015, 02:13 PM
Return to original view | Post
#42
|
|
Senior Member
3,902 posts Joined: Jul 2005 From: Sin Lor, B'worth,Pg. |
QUOTE(y4ng @ May 4 2015, 11:24 PM) i wanna ask...where u got the switches from? what switch? |
|
|
May 8 2015, 01:11 PM
Return to original view | Post
#43
|
|
Senior Member
3,902 posts Joined: Jul 2005 From: Sin Lor, B'worth,Pg. |
QUOTE(y4ng @ May 8 2015, 10:58 AM) power / reset switch =) oth that is vandal resistant switch i bought back 2 years agofrom a lowyat forumer as well limhongwan or something |
|
|
Jun 3 2015, 03:17 PM
Return to original view | Post
#44
|
|
Senior Member
3,902 posts Joined: Jul 2005 From: Sin Lor, B'worth,Pg. |
slow slow slow day
weehheelllllll, what do we have here...?  Sand paper in sink????!!! Super simple setup for "super simple" job  The best sandpaper block i can find   Sanded down the corner to a smother surface  as compared to previous   it seems i lost some of the picture of the whole case sand down.... now all unit is sanded down and readied for Painting... Now where to buy spray primer...  |
|
|
Oct 4 2015, 06:23 PM
Return to original view | Post
#45
|
|
Senior Member
3,902 posts Joined: Jul 2005 From: Sin Lor, B'worth,Pg. |
After a hiatus
I AM BACK!!!!!!!!! Lets see, what would be my excuse(s) 1. GTX 680 Lightning? 2. CG:GO at RM 15.50? 3. Workload? 4. Life crumbling around me 5. Just lazy 6. All above?? Well installed GTX680 (finally  ) and just started to play a slew of games my old 9600GT cannot handled ) and just started to play a slew of games my old 9600GT cannot handledThen CS:GO happened, and this is from Mar till now.. almost 5 month and chalked up almost 600hrs gameplay  also coupled with work load from my life-paying job and just a sudden bout of laziness, apathy really, and my life equipment sort of strat to break down around me (my phone DIY wireless charging is a NG, GPS unit acting up, car start to sputters, line shaft cover broken....  ) )things just sort of slowed down well I did get to go to Germany for a week, all expense paid... https://forum.lowyat.net/index.php?showtopic=3682120&hl= just recently fixed my GPS unit and this Case mod feeling is coming back, BABEH! before anything lets see the setup as it is now.. My Components: Processor : Intel Core i7 2600k @ Stock CPU Cooler : DIY Mod from Gigabyte 4 Heatpipes Cooler + Freaking Loud Delta Fan RAM : 16GB DDR3 Corsair Vengeance Light Blue Heatspreader GPU : MSI GTX 680 Lightning @ Stock Display : Dell U2414h FHD LCD PSU : Seasonic S12D 750W Storage : ---> 2X 256GB SSD (Plextor M6S and Liteon L9s) in Raid-0, Mod BIOS for Trim Support **NEW** ---> 3X 2TB HDD (2X Samsung HD204UI, 1X WD Red ) ---> 1X 320GB Seagate ---> 2X 80GB WD Black Peripheral : ---> El-cheapo Keyboard, ---> Gigabyte G402 Mouse **NEW**, ---> REAL Carbon Fiber Mouse Mat ---> Sony In-ear headphones, very nice for CSGO (bundled with Xperia Z) etc etc... well enough chit chat, you all here for the pictures, right? a disaster waiting to happened, perhaps?  A disaster you say? well you're in the right place! a 5 months open air setup and the system is hocked full of dust!!!! this is the Graphics and mobo, with fins filled with dust!  then this is above it, all HDD/SSD with the PSU Active air will kill your system guys...  the back of the system, filled with hanging wires and co... Any hoo, my road back to finishing this project starts... on the next post  This post has been edited by mcchin: Oct 9 2015, 09:33 AM |
|
|
Oct 4 2015, 06:35 PM
Return to original view | Post
#46
|
|
Senior Member
3,902 posts Joined: Jul 2005 From: Sin Lor, B'worth,Pg. |
Here is the start
have to take a Leave on Friday to get self motivated to start  a simple setup, with lots of cellophane tape to bind those newspaper together  closeup,  Parts to spray Base Coat  Self Etching basecoat for steel parts   Sprayed Main Body case with white colour base coat  Some plastic parts test spray  metal top is base coat, plastic parts is white colour can you all guess what colour I am going for here?  After some time, lets start the Spray paint process! TBC next post This post has been edited by mcchin: Oct 9 2015, 09:32 AM |
|
|
|
|
|
Oct 4 2015, 07:00 PM
Return to original view | Post
#47
|
|
Senior Member
3,902 posts Joined: Jul 2005 From: Sin Lor, B'worth,Pg. |
  HUHU~~...  Spray 4 coats of white, and need only one mistake.... have to add more layers again to cover up the mistakes  Another 3-4 layers of paint and the defect is barely able to be covered up night comes and 1st round of painting is finished  the main body, painted white as snow....  a few layers of paints and the colour is solid  parts solid colour  Front panel  Still some imperfection, might fill up with something for next round of spray TBC next post This post has been edited by mcchin: Oct 9 2015, 09:31 AM |
|
|
Oct 4 2015, 07:31 PM
Return to original view | Post
#48
|
|
Senior Member
3,902 posts Joined: Jul 2005 From: Sin Lor, B'worth,Pg. |
Another day, another zzzzz
 Hazy as FK! Not much happen today, just laze around but heres something interesting  its a Firewire External DVD player writer from Acer Ferarri from here  company have this laptop, and after much abused the unit finally breath it last breath last year and now the company going to scrap the asset and I swoop in to get this rarely used gem  the firewire plug, luckily my mobo have such port at the back and the mobo header as well So Got me self some couple of them mobo headers   Something unused for so long, dunno whether this is grime or just the Soft-touch layer breaking down... so some methanol and some elbow grease walla!  nice and clean, not so much for the methanol tissue laden with the gunk  This is a slot based drive  Max pic achieved so TBC next post for the conclusion....... of this week updates This post has been edited by mcchin: Oct 9 2015, 09:35 AM |
|
|
Oct 4 2015, 07:45 PM
Return to original view | Post
#49
|
|
Senior Member
3,902 posts Joined: Jul 2005 From: Sin Lor, B'worth,Pg. |
and it fits the ODD bottom slot just nice on the front panel
  Wadaya know  then there is this..   Here's the thing top Picture is the normal spray on 1 side the bottom picture is spray with a clear coat on the other side It seems that this clear coat gives a yellow tint to the white... this won't do... this won't do one bit So my conclusion for this week and more planning to be had 1. First round of Paint done, Parts are touched up on rough sprays area with Wet sandpaper, so another round of spray paint is needed 2. HDD cage need to be dismantle from current system to be spray paint ----> 2a. More Base coat spray needed ----> 2b. More paint require ----> 2c. What colour for the front panel ? ----> 2d. Clear Coat for all??? 3. Clean System 4. Remove the Heatspreader from ram, Spray paint perhaps? 5. Buy Noctua U14s or D15 6. GET FANS FANSSS FANSSSSSSS!!!, also some Fine Fan Filter 7. Clean up the fking ROOM! This post has been edited by mcchin: Oct 9 2015, 09:28 AM |
|
|
Oct 5 2015, 08:56 AM
Return to original view | Post
#50
|
|
Senior Member
3,902 posts Joined: Jul 2005 From: Sin Lor, B'worth,Pg. |
QUOTE(ntw @ Oct 5 2015, 01:19 AM) bro i think you forgot to set your pictures as public... cant see them laaa oh...  Thanks for the heads up... old rant » Click to show Spoiler - click again to hide... « btw... if anyone have issue with the picture formating my apologies while I fine a more permanent solutions  This post has been edited by mcchin: Oct 5 2015, 10:17 AM |
|
|
Oct 9 2015, 09:24 AM
Return to original view | Post
#51
|
|
Senior Member
3,902 posts Joined: Jul 2005 From: Sin Lor, B'worth,Pg. |
some weekdays updates:
the bane of my system :  The RAM... Bought this back in 2009???, 16GB babeh... but sadly the colour clashes with the mobo and the height makes it impossible to use a dual stack heatsink such as Noctua NH-D15 or Phantek TC14PE with the fans for-sho overhangs the ram slot and what not... so IT HAS TO BE DONE!    RIP THEM APART!!!   And some of this  and with the trusty ol' elbow grease, and two hours sitting on the floor  and the RAM now is happy with all the gunk cleaned off and currently back to running the system  and the heat spreaders?  lets see shall we? and thats all for some weekdays updates  |
|
|
Oct 9 2015, 07:29 PM
Return to original view | Post
#52
|
|
Senior Member
3,902 posts Joined: Jul 2005 From: Sin Lor, B'worth,Pg. |
Phriday's here and I'm stuck at my work
luckily sneak some time to do some stuff   these is all the sticker to the ram heat spreader remove slowly to retain structure, shape (will it be reused? Dunno...)  here is the stripped Heat spreader if you look closely, there is a two tone to the anodized layer covered layer is bluer than the exposed  then the Thermal tape remove and left with the double sided tape off we go to the Chemical Lab  Today we have two choice Both is very capable to clean off gluiee stuff  Top is un-touch bottom is dip in MEK for ~5 sec and wiped off a bit  Hand with the chem, so no pictures until finished and wash with soap and water Clean as a whistle  TBC next post on the reason of this job This post has been edited by mcchin: Oct 9 2015, 07:29 PM |
|
|
Oct 9 2015, 07:54 PM
Return to original view | Post
#53
|
|
Senior Member
3,902 posts Joined: Jul 2005 From: Sin Lor, B'worth,Pg. |
Now why I go to the length to Do this RAM thingy
well Noctua NH-D14/15 or Phantek TC14PE I could go the way of Noctua NH-U14, but let see how I have been visualizing stuff only in my head so it can be a bit daunting to get things right but a video in youtube subscription by Linus gave me a great idea www.sketchup.com <-- nice beginner 3D program So apparently Linus did a project build by 1st making a 3D sketch (when I say Linus did, the 3D is done by Taran) and he found out that there is quite a lot of available 3D sketch of PC Component already done and on the internet/web So.....  Got a precise mobo as reference Not my model, but it will do  This Noctua NH-D14 seems good  Then my current ram, with the ridiculous Heat spreader  The Heat sink just fit in nicely So lets add the ram  WTF!!!!!! So.. the two item, mobo and HS is spot on to real life scale the Ram not so, with measurement made in Meters  So with some self adjustment, Walla!  So you see where the problem starts already, right?  Not only the Fans will have issue, the inner two Ram slot will interferes with the Heat Sink as well Problem can be alleviated with the Use of Noctua D15 but the fan, in push config would still be the same The recommendation by Noctua to push the fan up higher would spell a problem to the top clearance within the case So Now the most logical choice to move forward is to cut down the Ram Heat spreader height and while at it, spray to a more thematic colour That 2nd part of colour changing to anodized part gives tonnes of problem in it self A check on the net, say anodized part not gonna hold well with spray paint and it is better to remove this layer before spray painting... more work more problem.... |
|
|
|
|
|
Nov 16 2015, 12:22 AM
Return to original view | Post
#54
|
|
Senior Member
3,902 posts Joined: Jul 2005 From: Sin Lor, B'worth,Pg. |
QUOTE(NewbieTech @ Oct 29 2015, 09:49 PM) Hi and good day sir To be Honest, I cant wait for TS to finish the blardy project. It like TS doesn't care at all....Cant wait ur modding hardwork to be continued... oh wai... work work work stationed to indo for two weeks threw a spanner in the works Need to help setup Indo plant...  The hostel I am staying in   well on 30th Oct I AM BACK!!!!!! (pic of Indo airport) Lets see... Just yesterday done something.... hmm... dunno whether to share or not.... awwww what the heck Some things done before I went to Indonesia tried painting over the Ram Heat spreader  Not good... not good at all  Direct paint would not really adhere well  Well off with the paint  The idea now is to put a light coat of white base before spraying the wanted colour which is...  Red, Candy Red to be precise.... Those were test colour on matte spray paint good enuff for me So on Saturday did this   and dangnamit!! Who would have guess... 1 can of spray paint is not enuff so try to get sum more paint and the shop is closed for sunday..... This post has been edited by mcchin: Nov 16 2015, 12:23 AM |
|
|
Nov 17 2015, 11:56 PM
Return to original view | Post
#55
|
|
Senior Member
3,902 posts Joined: Jul 2005 From: Sin Lor, B'worth,Pg. |
project get moving along again...
 more coats of the paint  same goes with main body (sorry for the crap pic)  as usual, close-up   This is for Today maybe another 1-2 coats of paint before calling it |
|
|
Nov 23 2015, 10:29 AM
Return to original view | Post
#56
|
|
Senior Member
3,902 posts Joined: Jul 2005 From: Sin Lor, B'worth,Pg. |
Remember this one?
  and latest iteration Cause it been on the system all this while It have finally been dismantled for prep  washing all the dirt and grime  nice and shiny so while prepping the HDD cage Found out I missed one crucial part  yup, the front panel, DOH'!    Learned to be patient Spray lightly each coat to enable quicker drying time between coats and no sagging happening  But by golly the orange peel... Should I go with the textured feel? |
|
|
Dec 5 2015, 11:09 PM
Return to original view | Post
#57
|
|
Senior Member
3,902 posts Joined: Jul 2005 From: Sin Lor, B'worth,Pg. |
Alright alright....
it is now officially 1 month before the 2016 be upon us |
|
|
Dec 5 2015, 11:30 PM
Return to original view | Post
#58
|
|
Senior Member
3,902 posts Joined: Jul 2005 From: Sin Lor, B'worth,Pg. |
Alright alright....
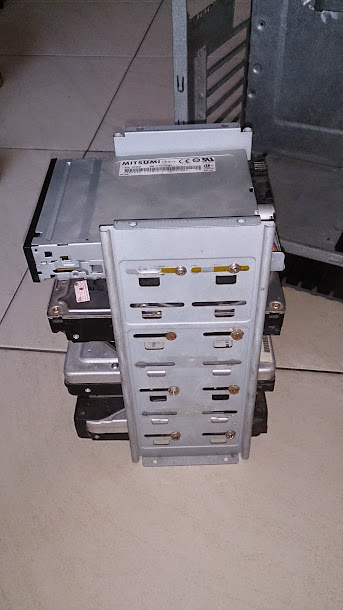
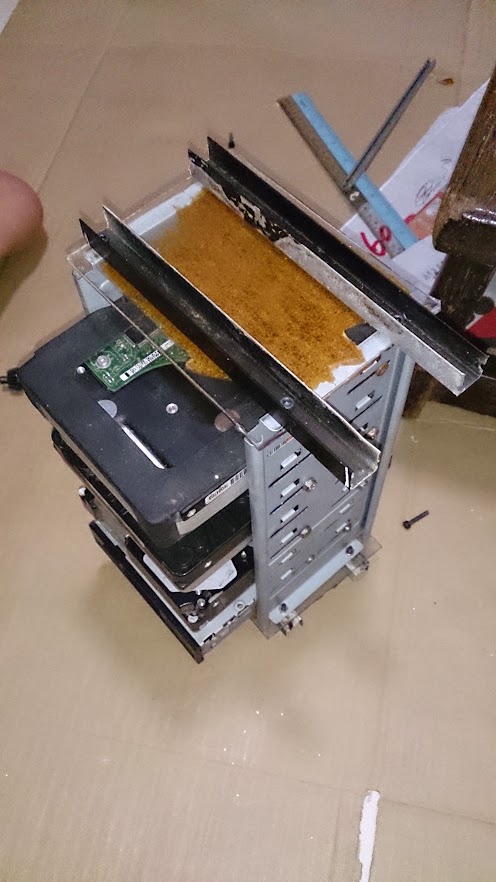
it is now officially 1 month before the 2016 be upon us And I'll be damned if this project bleeds to the new year  Now, to be clear,I really have another couple of weeks to work on it since I am shipped off to Indonesia for 10 days in mid Dec so My target finish Date : Before CNY 2016 now where was I...  This is the last of the major Paint, which takes up like 2 + month?  nothing much, lazing around waiting for the paint to dry Now the above was done on Nov End For Dec, this is it   The HDD cage, The Gold Tape is Kapton tape, used here to prevent paint scratch Yes I know it is leaning, nothing wrong with my *New Z5 Premium*  phone camera phone camera» Click to show Spoiler - click again to hide... «  Install some unused HDD as place holder to get the sizing right, then tighten Then we move on to the main *Dish*   The aluminium frame is slowly install back and riveted I had to look back my own post to see which part goes where  speaking of rivets next post would be some tips to rivets mod This post has been edited by mcchin: Dec 5 2015, 11:32 PM |
|
|
Dec 5 2015, 11:53 PM
Return to original view | Post
#59
|
|
Senior Member
3,902 posts Joined: Jul 2005 From: Sin Lor, B'worth,Pg. |
Now the tips on modding rivets
I dunno about you but precise rivets is hard to come by in my place (more like, lazy to go to search it out) So here's a tip  you have here is a typical rivet, correct diameter, but a tad too long   now you knock out the mid pin, very easy to be done  now find an used broken pin and inserted into the middle  use a plier, or cutter, with sharp cutting edge and pinch the rivet the pin in the middle to prevent the collapse of the soft and hollow alluminium rivet used pin is to ensure the original pin is is unharmed  now you have this and remove the mid pin from the rivet  you get this  knock back the ori mid-pin to the rivet, use the rivet plier to do it  and there you go, custom sized rivet, precisely what you need normal program will resume after this |
|
|
Dec 6 2015, 12:02 AM
Return to original view | Post
#60
|
|
Senior Member
3,902 posts Joined: Jul 2005 From: Sin Lor, B'worth,Pg. |
cont'
here's the look of the build so far  Side view  front view  Back side view  back view *pardon the pants, old cloths used as safety layer between build so that's it so far |
| Change to: |  0.0276sec 0.0276sec
 0.69 0.69
 6 queries 6 queries
 GZIP Disabled GZIP Disabled
Time is now: 20th December 2025 - 10:35 PM |
 Quote
Quote