I found some keycaps set and even a bamboo handrest that I no longer gonna use.
Damn I need to get rid off these items.
[V24] Lowyat.Net Mechanical Keyboard Club, So much GB, yet money not much.
|
|
 Jun 15 2014, 03:06 AM Jun 15 2014, 03:06 AM
Return to original view | Post
#1
|
 
Senior Member
4,234 posts Joined: Sep 2006 |
So much
I found some keycaps set and even a bamboo handrest that I no longer gonna use. Damn I need to get rid off these items. |
|
|
|
|
|
Jun 16 2014, 10:32 PM
Return to original view | Post
#2
|
|
Senior Member
4,234 posts Joined: Sep 2006 |
QUOTE(dadudeneverabides @ Jun 16 2014, 10:29 PM) Wooohoooo... sourcing for our MKB plates right now Plate apa? 1800? Poker? or the one you book, ANSI 1.5x? |
|
|
Jun 17 2014, 11:25 PM
Return to original view | Post
#3
|
|
Senior Member
4,234 posts Joined: Sep 2006 |
My picture of the night
 » Click to show Spoiler - click again to hide... « |
|
|
Jun 19 2014, 05:56 PM
Return to original view | Post
#4
|
|
Senior Member
4,234 posts Joined: Sep 2006 |
QUOTE(quovadis123 @ Jun 19 2014, 05:06 PM) Wow... Alu top. Legends use all aluminum keyboard A must keyboard for those Legends. |
|
|
Jun 23 2014, 11:47 PM
Return to original view | Post
#5
|
|
Senior Member
4,234 posts Joined: Sep 2006 |
Easier to just get Taobao PCB fabs to make for you.
Just supply the necesary files. Printing your own PCB isn't hard especially with UV. Beats the ferric chloride method. But good luck drilling those holes. You would have to deal with a few drill bit sizes, and alignment might be an issue. It's not your everyday undergraduate electronics project. Just pay the money and get the China people to do for you. @faridr What's your problem with the spec sheet again? Reading spec sheet I do that a lot. Writing firmwares...maybe not. This post has been edited by kaiserreich: Jun 23 2014, 11:53 PM |
|
|
Jun 24 2014, 09:58 AM
Return to original view | Post
#6
|
|
Senior Member
4,234 posts Joined: Sep 2006 |
QUOTE(faridr @ Jun 24 2014, 01:32 AM) Here is the spec sheet. The rest are just biasing Pins.As far as I understand. - UVCC, UGND , D+, D- is for usb pin - Port B C D E F is the available pin, and port F seems to be analog. No idea for the rest of the pin, and I have no idea if the atmega32u alone will work, or requires other component too. Firmware should be similar with teensy firmware since its the same controller. Just see what others are doing and straight copy. Like XTAL/RESET etc. Not sure whether you are using ADC in your firmware. My feel is that you don't use it. In that case, just bias it so that ADC is disabled. That means AVCC is connected to VCC. AREF should be left to be floating, or high , or low. Not sure..need to see what others are doing. XTAL1 & XTAL2 to the crystal RESET to an external reset circuit, preferably a push button. |
|
|
|
|
|
Jun 24 2014, 10:58 AM
Return to original view | Post
#7
|
|
Senior Member
4,234 posts Joined: Sep 2006 |
QUOTE(zennasyndroxx @ Jun 24 2014, 10:41 AM) yeah I've to admit the drilling ain't gonna be hard. but well let's see what can we do from here first. and i'll check up the faps in taobao and see what's their price. Also, in your opinion do you think we can achieve something like QFR-I with teensy 3.1? since it has more on board memory to store stuff. the hard part is obviously trying to control the leds individually. some more no EE background is a pain in the ass. Got EE background also no use. also, bro set is live now. 90usd owai for full full full set. These kind of things, if you don't do it, you don't know. You can ask many EE, they gonna stare blank if you ask them how to control Leds individually. Myself included. I'm not sure whether you can do a QFR-I. My advice is to start small. Or you can use Proteus to simulate. |
|
|
Jun 24 2014, 10:32 PM
Return to original view | Post
#8
|
|
Senior Member
4,234 posts Joined: Sep 2006 |
QUOTE(faridr @ Jun 24 2014, 03:25 PM) Aaah, got it, reset will be useful. Can the atmega32u take 5v power from usb or need resistor to drive the power down? Searching for atmega32u kit with solder hole, hopefully there is one so I can test it out. SMD is impossible for me to work on Just take the power from the USB. I have EE background during diploma, and still need kaiserreich to read the spec sheet  95% of EE student dont even know what they are learning You want a through hole Atmega? Just use SMD la. Practice makes perfect. It helps if you have proper equipment as well. I don't have problem going down to 0402. But if you want to start, 0805 or 0603 is fine. For the pin pitch of the SMD ATMEGA, just get a big and powerful solder iron with a very wide tip, and don't forget tons of flux. It's gonna be very easy. Lainlah if you use RM15 iron. |
|
|
Jun 25 2014, 10:46 AM
Return to original view | Post
#9
|
|
Senior Member
4,234 posts Joined: Sep 2006 |
QUOTE(faridr @ Jun 24 2014, 11:12 PM) Wanted to try on breadboard by soldering atmega to perf board. But with my skill, cheap equipment and size of atmega, impossible. Just get an atmega breakout board. One of those TQFP to DIP converters. You can even practice your soldering skills on them. The Key is get tons of flux 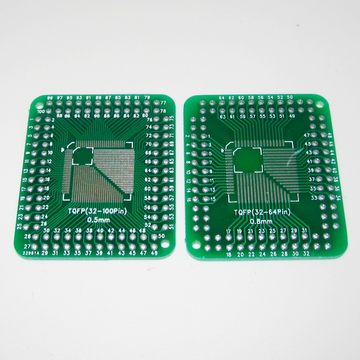 Taobao Link For Perf board, i absolutely despise that thing. They are horrible. Get a good quality breadboard and you should be fine. Teensy is fine for prototyping, but man....it is pricey. Can buy a lot of Atmega already Or you know, just get the Arduino clones from Taobao, and flash the AVR bootloader on it and you should be good to go for prototyping. This post has been edited by kaiserreich: Jun 25 2014, 10:49 AM |
|
|
Jun 26 2014, 11:07 PM
Return to original view | Post
#10
|
|
Senior Member
4,234 posts Joined: Sep 2006 |
QUOTE(ntw @ Jun 26 2014, 08:03 PM) thats lighter than u normally used for vintage black. but damn pcb mounted goodness plate mounted win>allboring pcb mounted |
|
|
Jun 27 2014, 12:04 AM
Return to original view | Post
#11
|
|
Senior Member
4,234 posts Joined: Sep 2006 |
QUOTE(dadudeneverabides @ Jun 26 2014, 12:07 PM) IMO, RM140 is a decent price to charge for all that. It'll take 2-3 hours for an experienced electrician to solder that many switches and test them all out. Not cheap. Solder stuff need rm140 The commands for camera look has changed somewhat. I can't remember the exact commands anymore, gotta go home see my autoexec file. Tambah lubing dunno how much d. My super experienced soldering technician/guru don't even make that much per hour. This post has been edited by kaiserreich: Jun 27 2014, 12:06 AM |
|
|
Jun 29 2014, 12:27 AM
Return to original view | Post
#12
|
|
Senior Member
4,234 posts Joined: Sep 2006 |
Long time didn't build keyboard.
Come here to show this Desolder Blue switch, that comes with stupid build in diode and PCB mount switches. Pain in the behind to desolder, and to solder back, and to change Steps: Desolder Blue switch Open all, put in clear stem and diode. Place black sticker. Solder 10 hours of hard labour » Click to show Spoiler - click again to hide... « This post has been edited by kaiserreich: Jun 29 2014, 12:41 AM |
|
|
Jun 29 2014, 12:42 AM
Return to original view | Post
#13
|
|
Senior Member
4,234 posts Joined: Sep 2006 |
QUOTE(yukihatsu @ Jun 29 2014, 12:32 AM) Ergo clears? Syiok or not to type on? These are non lubed 62g clears. Build for friend. 62g unlubed is my favourite, as it is very tactile. Pretty much the only custom switch that I would use. |
|
|
|
|
|
Jun 29 2014, 01:39 AM
Return to original view | Post
#14
|
|
Senior Member
4,234 posts Joined: Sep 2006 |
QUOTE(quovadis123 @ Jun 29 2014, 01:00 AM) 1 question. In terms of tactility, unlubed 62g.If compare 62g unlubed clear with 45g topre and 55g topre, which switch you rate the best in terms of tactility? Clear 62g for days when i feel like cherry, with mid actuation point. HHKB when i miss the pop and thock. 55g when i want more force. 45g when i get tired. Though, 55g is what i am using mostly these days. This post has been edited by kaiserreich: Jun 29 2014, 01:40 AM |
|
|
Jun 29 2014, 11:23 AM
Return to original view | Post
#15
|
|
Senior Member
4,234 posts Joined: Sep 2006 |
QUOTE(Y.J.S @ Jun 29 2014, 10:23 AM) Not bad, but you do all these beside the monitor?? I feel pity to it Sambil change stem, add diode, sambil watch show la.10 hours bro. |
|
|
Jun 29 2014, 11:06 PM
Return to original view | Post
#16
|
|
Senior Member
4,234 posts Joined: Sep 2006 |
QUOTE(yukihatsu @ Jun 29 2014, 11:01 PM) Yea, that's why I'm reconsidering the idea of changing to mx clears/ergo clears. After typing on browns for awhile now I can't even type on blues without feeling tired very quickly. Now I have the same fatigue problem with browns, so I'm looking for something lighter. Your fingers are very weak. You need more workout with the fingers.Red and brown not 45g?  If you think that browns are light, you need to consider Topre 30g, or Custom switch with 45g Korean spring. Red and Brown are not 45g springs. They just actuate at 45g The koreans have a different way of measuring the compression weight of the springs than what Cherry did with their actuation point method. |
|
|
Jul 2 2014, 11:18 PM
Return to original view | Post
#17
|
|
Senior Member
4,234 posts Joined: Sep 2006 |
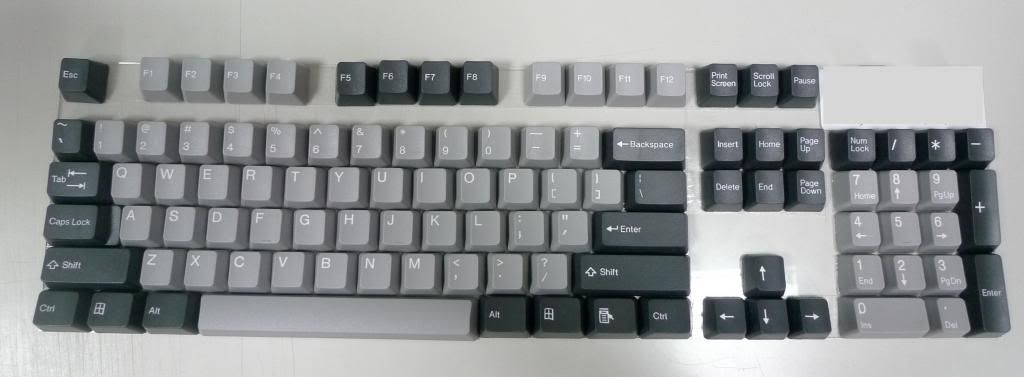
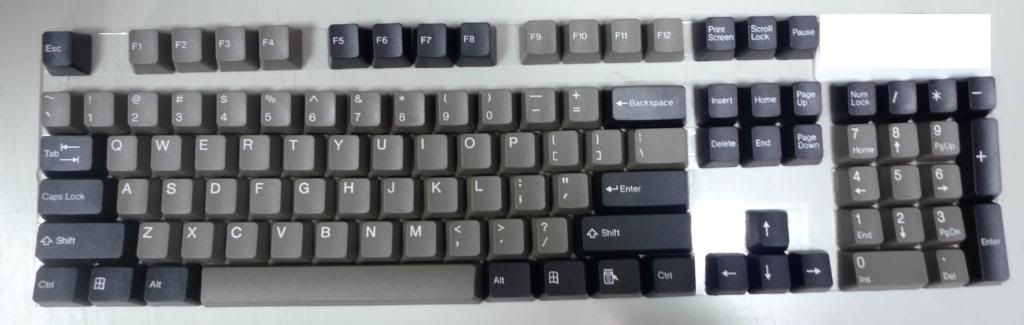
It's called the half plate.
Some people think that it is special. I think that it is just some ideas the koreans have that is just poorly executed. Because it introduces flex on the PCB, making you type like pressing on pillow. You want a Blue switch keyboard that clicks badly, here's your favourite plate to use. This post has been edited by kaiserreich: Jul 2 2014, 11:19 PM |
|
|
Jul 3 2014, 08:33 AM
Return to original view | Post
#18
|
|
Senior Member
4,234 posts Joined: Sep 2006 |
QUOTE(yuktsi14 @ Jul 3 2014, 12:03 AM) kaiserreich any tips on how to solder smd resistor? Rinse and repeatYeah, i learn from youtube as well, but not from WFD. General video http://www.youtube.com/watch?v=Jpj3tilIaik video with all the fancy terms (this size is what i usually solder) http://www.youtube.com/watch?v=Jpj3tilIaik Make sure you use a chisel tip. Not those conical tips for smd resistor soldering. This post has been edited by kaiserreich: Jul 3 2014, 08:34 AM |
|
|
Jul 5 2014, 01:33 PM
Return to original view | Post
#19
|
|
Senior Member
4,234 posts Joined: Sep 2006 |
QUOTE(quovadis123 @ Jul 5 2014, 09:10 AM) I searched their website only understand what is "retro" keycaps. Retro is the black on beige color scheme. That is the color scheme you think of when someone tells you they have an old/retro keyboard.Yup. They announced "retro" at RM129. For those curious, "retro" = taihao dolch, granite, olivette. Originally, what I expect the color scheme.. » Click to show Spoiler - click again to hide... « What I get from the search..  "retro" "retro"» Click to show Spoiler - click again to hide... « The dsa retro on the other hand, while being a retro scheme, is only well known among these crazy mkb people/collectors because someone decide to organize a well managed group buy. |
|
|
Jul 7 2014, 11:20 AM
Return to original view | Post
#20
|
|
Senior Member
4,234 posts Joined: Sep 2006 |
QUOTE(dadudeneverabides @ Jul 7 2014, 11:00 AM) Buy first, maggi later. QUOTE(SetsunaFSeiei Exia00 @ Jul 7 2014, 11:02 AM) Not because of money at that time. I kinda forgot about those keycaps and found out about it after the gb is done. Missed out on Red Alert 1.0. The one organized by sixty and sourced from Korea. Lagi it was just RM250 for the whole thing Stupid me. Stupid me.I know, right!!!  |
|
Topic ClosedOptions
|
| Change to: |  0.0472sec 0.0472sec
 0.51 0.51
 7 queries 7 queries
 GZIP Disabled GZIP Disabled
Time is now: 1st December 2025 - 10:34 AM |
 Quote
Quote