Military Modeling - Plamo set & Completed set, Open for "ALL SCALE"
|
|
 Sep 12 2014, 09:55 PM Sep 12 2014, 09:55 PM
Return to original view | Post
#41
|
 
Junior Member
16 posts Joined: Dec 2011 From: Perak |
I more looking forward to this but damn almost RM 500 but it 1/32 so let screw the wallet.
|
|
|
|
|
|
Sep 14 2014, 12:06 AM
Return to original view | Post
#42
|
|
Junior Member
16 posts Joined: Dec 2011 From: Perak |
QUOTE(nazrul90 @ Sep 13 2014, 11:21 PM) where? got online shop? Well they have only mudah.my page: http://www.mudah.my/li?ca=11_s&id=37252 but they do offer postage but i haven't try it yet. |
|
|
Sep 16 2014, 02:20 AM
Return to original view | Post
#43
|
|
Junior Member
16 posts Joined: Dec 2011 From: Perak |
Almost there!
   Now to paint the pilot which i pay more than i admit...  |
|
|
Sep 17 2014, 12:38 AM
Return to original view | Post
#44
|
|
Junior Member
16 posts Joined: Dec 2011 From: Perak |
QUOTE(Tiger I @ Sep 17 2014, 12:01 AM) [attachmentid=4136321] Here the basic tips i use long ago when starting building scale kits:it has been aeons since i bravely testing on colouring kits last time i tried doing hand painting for my 1/72 kit, which turns out horrendous  any links on how to do model a 1/72 properly? should i paint part by part, of cement all and mask some parts any help would be appreciated  http://www.stormthecastle.com/diorama/Plas...-techniques.htm Personally for me it better to assemble the major/ big parts first since they usually will be painted in one color and other small detail can be handbrushed or paint prior to assemble but need to read the instruction carefully so that it don't conflict with other parts later on. |
|
|
Sep 17 2014, 11:54 PM
Return to original view | Post
#45
|
|
Junior Member
16 posts Joined: Dec 2011 From: Perak |
QUOTE(limfreelance @ Sep 17 2014, 09:50 AM) nice sharing. You so fast complete kit while i barely finish one. just finish to build my Lav 3. The wheel alignment run off when i stick the upper body & lower body together. Casing problem.  » Click to show Spoiler - click again to hide... « QUOTE(limfreelance @ Sep 17 2014, 03:39 PM) i found this. 1/35 Finished product. M1128. Around RM 240, cheap tou. From what brand ?I bought the AFV kit for RM 140 included postage...still belum datang. » Click to show Spoiler - click again to hide... « |
|
|
Sep 18 2014, 10:38 PM
Return to original view | Post
#46
|
|
Junior Member
16 posts Joined: Dec 2011 From: Perak |
I think i done with the waters, just need nendo Kaga to arrive.
 |
|
|
|
|
|
Sep 18 2014, 11:19 PM
Return to original view | Post
#47
|
|
Junior Member
16 posts Joined: Dec 2011 From: Perak |
QUOTE(Tiger I @ Sep 18 2014, 10:49 PM) whoa lawa With psycho brush of course! man, the Italeri 1/72 Wespe is an old mold from ECSI, hence the crude detailing of it tried to mod what i can with it, but wow, this experience truly made me thankful of the diecast kit in 1/72 i wonder how you guys do all the detailing on small scales  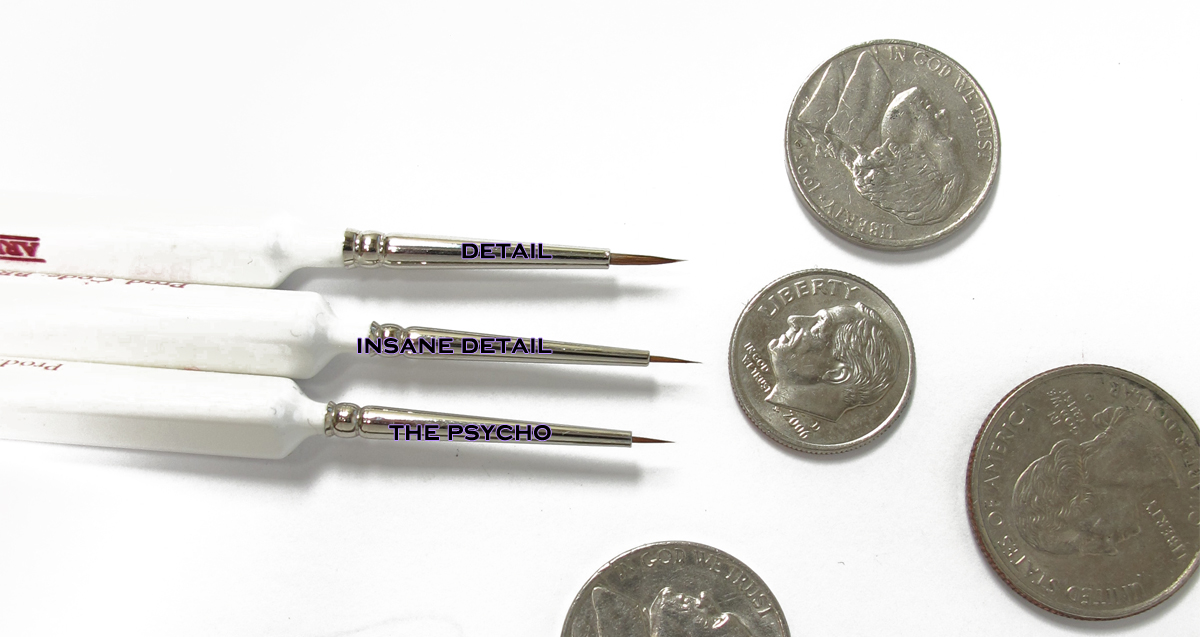 Actually you need a few small brushes like O, OO, OOO, a sharp eye ( or with magnify glass) and a very steady hand. |
|
|
Sep 19 2014, 04:21 AM
Return to original view | Post
#48
|
|
Junior Member
16 posts Joined: Dec 2011 From: Perak |
QUOTE(Tiger I @ Sep 19 2014, 12:52 AM) might spray can this one, and do the minute details with brush. results of mine sure will be horrendous Well Wespe is pretty small to begin with which why most people choose 1/35 instead unless for some big kits like the Topol missile truck.  even worse, i could just hand paint this entire kit and be done with it http://www.network54.com/Forum/47210/threa...ich+kit+to+get- sangat kecik woo (at least for me) as you can see, details are very crude, and i am not incline in spending upgrade kit for something i am just recently trying my hands on (it has been a long time already i did try military kit), and i don't really fancy doing major corrections on this one probably will do it slowly when mood kicks in Also another kit almost done   |
|
|
Sep 19 2014, 04:48 PM
Return to original view | Post
#49
|
|
Junior Member
16 posts Joined: Dec 2011 From: Perak |
QUOTE(Tiger I @ Sep 19 2014, 08:40 AM) yeah, that's why i guess why modelers are mostly tackling 1/35 for armor i guess Not that hard really, since the pilot don't have much complicated detail aside the head because of it smallness. That sure take a lot of eye strain i reckon painting that pilot A question, since the armor for the gun, front, side and back of Wespe seems a bit too thick, and I don't have the option of placard (malas mau cari ), can any plastic (eg say, the transparent plastic used to keep that CTC casing in place) be used as safe for spray paint? They seems to be of somewhat the correct thickness (from eye observation, or at least closer to it)But then again, when the mood strikes-lah. The radio compartment looks off place on the kit compared to the actual ones I pretty sure those plastic are okay but still when in doubt test paint first if you have the mood. QUOTE(limfreelance @ Sep 19 2014, 10:18 AM) wooo, nice build, cant wait for my akagi. Btw, where did u get the based?? For Akagi/ Kaga, i just use Corkboard from Daiso and paint it up while the Shinden is just a round tupperware cover with sandpaper as the base for the plane to sit. from Photo frame??? how much?? btw, it take 3 weeks to arrival....sad....got crack line.  [attachmentid=4139120]  And pretty severe crackline at that and i doubt you can even fix it unless you paint over it. This post has been edited by Khai62: Sep 19 2014, 04:49 PM |
|
|
Sep 20 2014, 08:35 PM
Return to original view | Post
#50
|
|
Junior Member
16 posts Joined: Dec 2011 From: Perak |
Now i consider this done, my post about it can be find here: http://khaigunplars.wordpress.com/2014/09/...w4-shinden-kai/
 » Click to show Spoiler - click again to hide... « |
|
|
Sep 23 2014, 08:01 PM
Return to original view | Post
#51
|
|
Junior Member
16 posts Joined: Dec 2011 From: Perak |
Well he have to buy a small house for it tho.
|
|
|
Sep 24 2014, 02:53 AM
Return to original view | Post
#52
|
|
Junior Member
16 posts Joined: Dec 2011 From: Perak |
Some random video i find.
 |
|
|
Sep 25 2014, 05:38 AM
Return to original view | Post
#53
|
|
Junior Member
16 posts Joined: Dec 2011 From: Perak |
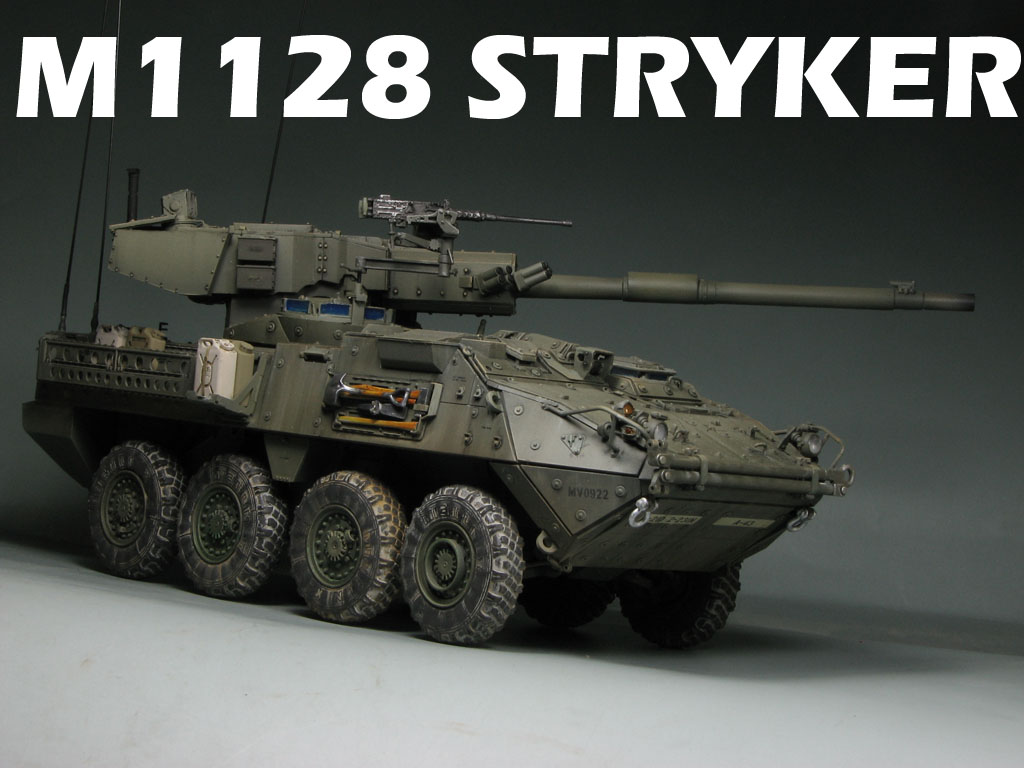
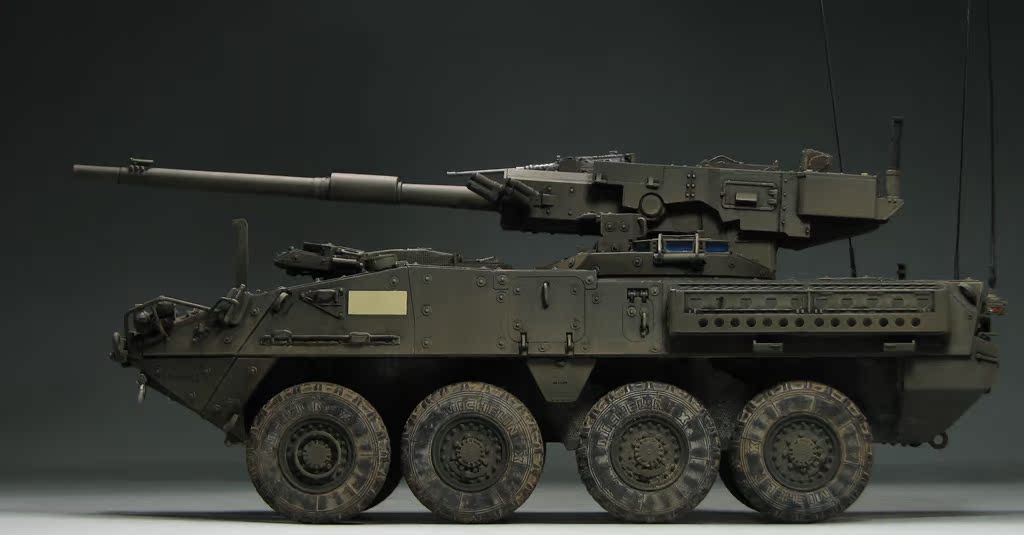
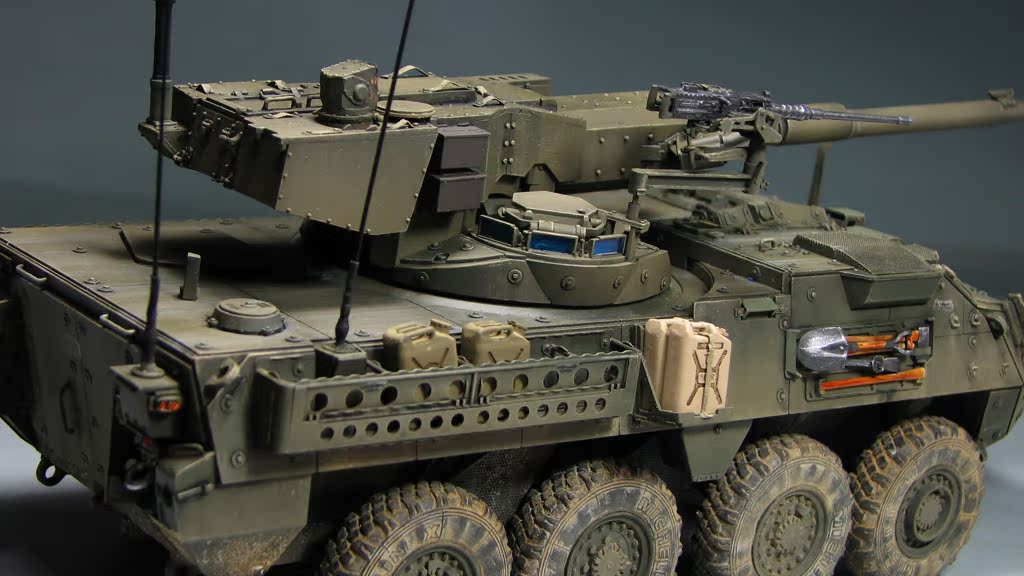
This the legit "light" tank.
 |
|
|
|
|
|
Oct 4 2014, 11:25 PM
Return to original view | Post
#54
|
|
Junior Member
16 posts Joined: Dec 2011 From: Perak |
Now i can call it done! More fluff here: https://khaigunplars.wordpress.com/2014/10/...i-kaga-diorama/
 » Click to show Spoiler - click again to hide... « |
|
|
Oct 7 2014, 06:21 PM
Return to original view | Post
#55
|
|
Junior Member
16 posts Joined: Dec 2011 From: Perak |
QUOTE(limfreelance @ Oct 7 2014, 08:27 AM) nice build, if u can share the closeup photo, it will be more better. I probably do that later, and for that metal bar is exactly what you thinking to give that weighty feel just like handling diecast stuff. i wondering my hasegawa akagi got a metal bar call "water seam line". what is this?? to install inside the ship & make it more weight??  btw, Just finish Hobby boss ZTD-05. Trumpeter always have the problem of wheel alignment.  Somewhat on topic, who want shell pillow  http://www.amiami.com/top/detail/detail?gc...0%24pagecnt%3D1 |
|
|
Oct 9 2014, 12:10 AM
Return to original view | Post
#56
|
|
Junior Member
16 posts Joined: Dec 2011 From: Perak |
For those interested on joining in to promote modeling in Teluk Intan
http://z12.invisionfree.com/ScaleModelsMal...&#entry22018254 |
|
|
Oct 25 2014, 11:57 AM
Return to original view | Post
#57
|
|
Junior Member
16 posts Joined: Dec 2011 From: Perak |
Well this has to cost a ton.
This post has been edited by Khai62: Oct 25 2014, 11:59 AM |
|
|
Nov 8 2014, 09:23 PM
Return to original view | Post
#58
|
|
Junior Member
16 posts Joined: Dec 2011 From: Perak |
Finally get around to get this..
 |
|
|
Nov 10 2014, 12:58 PM
Return to original view | Post
#59
|
|
Junior Member
16 posts Joined: Dec 2011 From: Perak |
QUOTE(strikermac @ Nov 10 2014, 07:00 AM) Model kits rite? Nice. Yep and it do look like raptor somewhat.  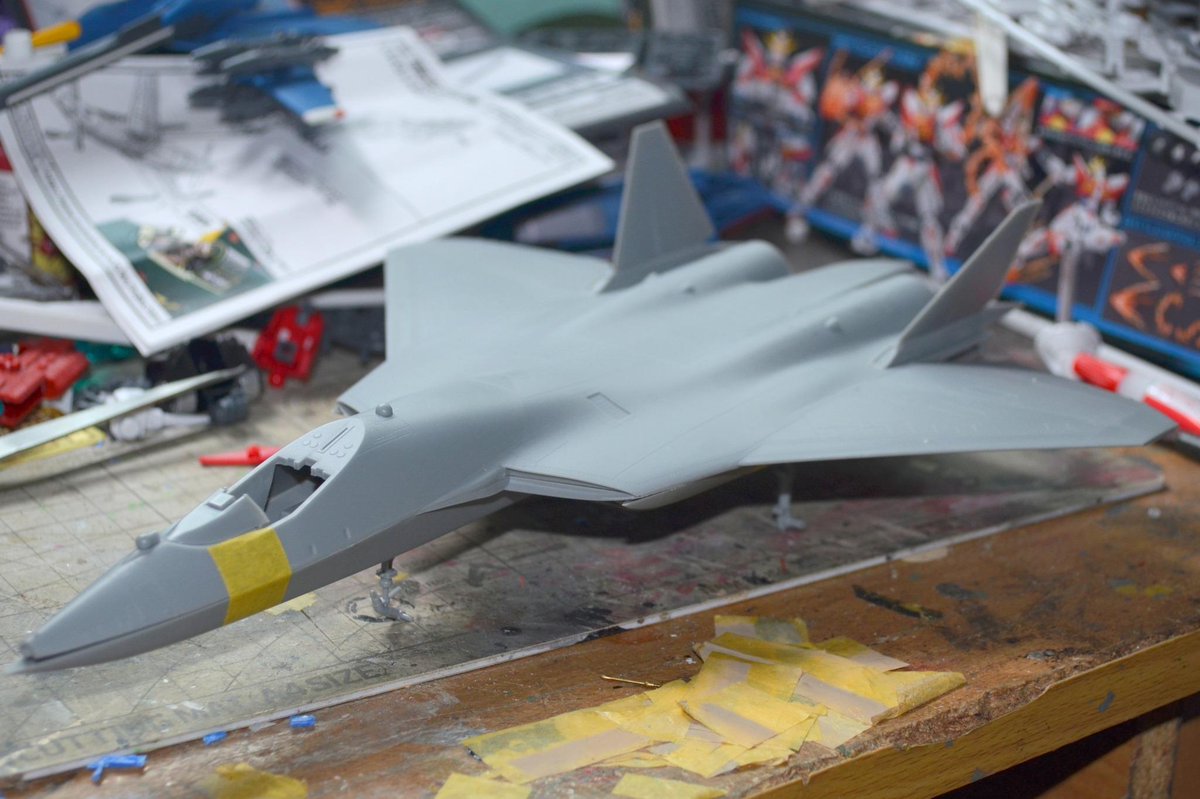 |
|
|
Nov 10 2014, 03:43 PM
Return to original view | Post
#60
|
|
Junior Member
16 posts Joined: Dec 2011 From: Perak |
QUOTE(limfreelance @ Nov 10 2014, 01:20 PM) hobby boss t-50 look easy to assembly. nice kit Yes it certainly easy since most of the part are inside the plane with top bottom fuselage assembly instead of side assemble that most use. Don't have the plane at hand right now but i guessing around 25-30cm long.btw, how length the kit?? This post has been edited by Khai62: Nov 10 2014, 03:44 PM |
| Change to: |  0.4549sec 0.4549sec
 0.87 0.87
 7 queries 7 queries
 GZIP Disabled GZIP Disabled
Time is now: 27th November 2025 - 12:00 PM |
 Quote
Quote