

QUOTE(Saton666 @ Jul 23 2013, 01:02 AM)
Drawing for local authority = RM 2,300

KL area.
Lazyman Lazyhouse, Road to the Lazyland
|
|
 Sep 19 2013, 01:49 AM Sep 19 2013, 01:49 AM
|

Junior Member
117 posts Joined: Jan 2012 |
QUOTE(Saton666 @ Jul 23 2013, 01:02 AM) Drawing for local authority = RM 2,300 KL area. |
|
|
|
|
|
Sep 19 2013, 10:09 AM
|

Senior Member
1,616 posts Joined: Mar 2006 |
Didn't notice that. Thank you. Can't wait to c yrs complete. Probably we're having the same type of reno.
 |
|
|
Sep 19 2013, 10:38 AM
|
|
Senior Member
736 posts Joined: Jun 2012 |
QUOTE(Saton666 @ Sep 19 2013, 01:49 AM) This. ( All in from drawing to approval) is't include deposit for waste bin? why so cheap.. KL area. for bathroom n kitchen appliance, any thought to get those equipments (thousands again, didn't see in your budget list or i might miss it) from Singapore? based on what i read, much more cheaper than in msia. |
|
|
Sep 19 2013, 11:35 PM
|
|
Junior Member
117 posts Joined: Jan 2012 |
QUOTE(Yamma @ Sep 19 2013, 10:38 AM) is't include deposit for waste bin? why so cheap.. RM 2,300 is only for drawing floor plan for the renovation + submission to local authority for approval.for bathroom n kitchen appliance, any thought to get those equipments (thousands again, didn't see in your budget list or i might miss it) from Singapore? based on what i read, much more cheaper than in msia. Anyway the waste bin deposit can collect back after the renovation completed. not interested in getting anything from Singapore. |
|
|
Sep 21 2013, 08:23 AM
|
|
Junior Member
18 posts Joined: Feb 2013 |
If you looking for light supplier then please contact me.. any down light we also got supplier in klang valley area.
|
|
|
Sep 30 2013, 12:00 AM
|
|
Junior Member
117 posts Joined: Jan 2012 |
Week 5 - Day 34th
Upper floor Rc roof completed. extension done. most structural done. pending 1) rendering. 2) door + casement window budget overshoot a lot due to areas that been overlook from the beginning. no eye see 
|
|
|
|
|
|
Oct 6 2013, 11:16 PM
|
|
Junior Member
117 posts Joined: Jan 2012 |
Week 5 - Day 40th (or was it 41st)


Cement rendering done, window frame installed. Next week will put on the "make up" after casement window arrive. Most wetwork should be completed by end October including toilet tiling. The sliding window looks disproportionate, or was it the viewing angle. Cincau2. |
|
|
Oct 6 2013, 11:35 PM
|

Junior Member
392 posts Joined: Sep 2004 From: Klang |
QUOTE(Saton666 @ Sep 30 2013, 12:00 AM) Week 5 - Day 34th Just wondering, which parts of your budget overlooked? Need to prepare myself too...Upper floor Rc roof completed. extension done. most structural done. pending 1) rendering. 2) door + casement window budget overshoot a lot due to areas that been overlook from the beginning. no eye see
|
|
|
Oct 7 2013, 12:08 AM
|
|
Junior Member
117 posts Joined: Jan 2012 |
1. Piping work. Initially only prepare to spend 3k on it, but the bill easily close to 8k-9k now. mainly due to
- Construct a new water gutter that previously sharing with the neighbour = 450 - Repair a stuck WC = 850 - Repair leaking pipe at dining area = 450 - Replacing all cold water piping for 2 WC & 2 Basin + 6 new stopcock = approx 1200 (old piping leak is common these day) - Conceal water pipe from meter to water tank = 850 (for cosmetic reason...) - Conceal & relocate piping work at wet kitchen= 600 (for cosmetic...) - Relocate water meter to give way for 16Ft folding gate = 600 2. Wiring work. Initially only budget 2-3k for new power point + light point. might end up spending additional few k on - relocating TNB meter + conceal wiring due to front extension = 1500 (not aware it is so costly) - relocating MCB box = 700 (contemplating to spend on this. otherwise the box will sit on top of TV Cabinet...) 3. Removing existing tile on kitchen table top and install new tile. (big mistake. it cost a bomb. might as well hack & construct new table top @ RM 160 per feet long. - it should cost around 4-5k in total inclusive of new tile. will only know when the final bill comes. (i got 20ft+ of table top in total) There are also other items that i conveniently omit since the price tag was enormous  A word of advise, give it a pinch of salt when someone quote you something 20-30% cheaper on renovation works. i think within klang valley there is a market price for anything from A-Z. might end up penny wise dollar fool if engage a CONtractor due to very cheap pricing. if the guy is relative or close friend then different story. |
|
|
Oct 7 2013, 02:37 PM
|
|
Senior Member
3,334 posts Joined: Mar 2011 |
the whole house look different from neighbour
do you need neighbour consent before start? |
|
|
Oct 10 2013, 02:08 AM
|
|
Junior Member
392 posts Joined: Sep 2004 From: Klang |
QUOTE(Saton666 @ Oct 7 2013, 12:08 AM) 1. Piping work. Initially only prepare to spend 3k on it, but the bill easily close to 8k-9k now. mainly due to For plumbing, are you going with poly pipe or PVC? Just make sure no GI for the whole system, and ask for stainless steel for all the elbows. More solid and rust free...- Construct a new water gutter that previously sharing with the neighbour = 450 - Repair a stuck WC = 850 - Repair leaking pipe at dining area = 450 - Replacing all cold water piping for 2 WC & 2 Basin + 6 new stopcock = approx 1200 (old piping leak is common these day) - Conceal water pipe from meter to water tank = 850 (for cosmetic reason...) - Conceal & relocate piping work at wet kitchen= 600 (for cosmetic...) - Relocate water meter to give way for 16Ft folding gate = 600 2. Wiring work. Initially only budget 2-3k for new power point + light point. might end up spending additional few k on - relocating TNB meter + conceal wiring due to front extension = 1500 (not aware it is so costly) - relocating MCB box = 700 (contemplating to spend on this. otherwise the box will sit on top of TV Cabinet...) 3. Removing existing tile on kitchen table top and install new tile. (big mistake. it cost a bomb. might as well hack & construct new table top @ RM 160 per feet long. - it should cost around 4-5k in total inclusive of new tile. will only know when the final bill comes. (i got 20ft+ of table top in total) There are also other items that i conveniently omit since the price tag was enormous A word of advise, give it a pinch of salt when someone quote you something 20-30% cheaper on renovation works. i think within klang valley there is a market price for anything from A-Z. might end up penny wise dollar fool if engage a CONtractor due to very cheap pricing. if the guy is relative or close friend then different story. On DB box, you may ask for metal box instead of plastic one. Better look and solid, but cost slightly more... Just build a new table top, you can have your desired design and size with that much of money. QUOTE(Glcotan @ Oct 7 2013, 02:37 PM) the whole house look different from neighbour Need to get consent from immediate left and right neighbors, it is required in permit application.do you need neighbour consent before start? |
|
|
Oct 20 2013, 05:27 PM
|
|
Junior Member
117 posts Joined: Jan 2012 |
Week 6 - Day xx
Week 7 - Day 54th 

Most electrical & piping work at final stage. Tiling work start this week, target completion by end Oct. Hope they can finish the wet work soon so that i can start painting external. Take almost 2.5 hr to apply Nippon 5170 for an area of 140SF, consuming approx 2.5L. Anyway wrong application since it is meant for non-covered area. Acrylic based is difficult & messy to handle. After it dries, it only takes 1hr to paint the same area (140sf) using ICI Maxilite Plus, consuming only 500ml-600ml. At a price of RM 65/18Litre, it makes perfect sense why most contractor quoted their paint job using Maxilite. Cheap & user friendly. Contemplating to paint it with Nippon Weatherbond Solar Reflect, decide to reserve the 5L for upper floor. The price tag of RM 138/5 litre is a bit stiff on budget. This post has been edited by Saton666: Oct 20 2013, 05:41 PM |
|
|
Oct 20 2013, 08:58 PM
|

Senior Member
2,772 posts Joined: Feb 2012 |
Wow...can start to see the transformation. Look forward to completion. Great job!
|
|
|
|
|
|
Nov 26 2013, 04:57 PM
|
|
Senior Member
736 posts Joined: Jun 2012 |
please update. eager to see the completed version
 |
|
|
Nov 27 2013, 08:58 AM
|

Senior Member
1,836 posts Joined: Sep 2007 |
Nice one. Show the insides lah.
|
|
|
Dec 14 2013, 12:15 AM
|
|
Junior Member
117 posts Joined: Jan 2012 |
Lazyman style is like that...
Will post some photo once everything settle down. Now interior is still a war zone. |
|
|
Dec 14 2013, 12:26 AM
|
|
Junior Member
117 posts Joined: Jan 2012 |
Another Half cut DIY project for 2" x 8" brick wall:
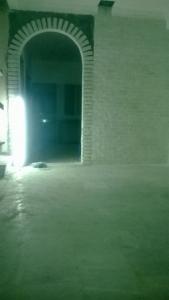

- Material = KG brand Premix plaster powder (Simen Putih) + Sika tile adhesive (Susu gum kuning tong) - 20KG Premix Plaster = RM 15, Sika tile adhesive 20L = RM 65. - 2" x 8" BRICK tiles = RM 104/Box. (Each box contain 96 pcs) - On average 1kg Premix plaster can apply 15-18 pcs of brick, depending on the coating weight per brick Steps: 0. The wall must be rendered with rough surface cement first. The rougher the better. 1. Mix the plaster with Sika adhesive, start with small volume of adhesive first, add adhesive and stir it until it gave a texture of porridge (not teow chew porridge ya). 2. Start from the floor level first. Ensure the floor is flat using Level ruler. 3. Punch two nail on each end of the wall and tie a string there as guide line for the first row of brick. 4. Apply 4-5mm of the mixture on rough surface of the brick. 5. Install brick tile on the wall, press it on the wall kuat2. 6. 10mm gap between each brick, use your index finger as reference. 7. After the installation is completed. Apply the mixture to feel all the gap, use finger to remove excessive filler to deliver a more distinctive 3D looks. Preferably the thickness of filler is less than 3mm. Total damage so far RM 400 Indon wages for installation on 42SF wall )+ RM 416 (brick tile) + RM 90 (adhesive) = RM 906 Still work in progress though. |
|
|
Dec 14 2013, 01:05 AM
|
|
Junior Member
47 posts Joined: Oct 2007 |
one question, will the tile fall off ar?
|
|
|
Dec 14 2013, 06:17 AM
|
|
Junior Member
117 posts Joined: Jan 2012 |
lets say you bang your head on this wall, your head will pecah first before the tile start falling off.
|
|
|
Dec 29 2013, 07:45 PM
|
|
Junior Member
392 posts Joined: Sep 2004 From: Klang |
QUOTE(Saton666 @ Dec 14 2013, 12:26 AM) Another Half cut DIY project for 2" x 8" brick wall: Nice one you got here.
- Material = KG brand Premix plaster powder (Simen Putih) + Sika tile adhesive (Susu gum kuning tong) - 20KG Premix Plaster = RM 15, Sika tile adhesive 20L = RM 65. - 2" x 8" BRICK tiles = RM 104/Box. (Each box contain 96 pcs) - On average 1kg Premix plaster can apply 15-18 pcs of brick, depending on the coating weight per brick Steps: 0. The wall must be rendered with rough surface cement first. The rougher the better. 1. Mix the plaster with Sika adhesive, start with small volume of adhesive first, add adhesive and stir it until it gave a texture of porridge (not teow chew porridge ya). 2. Start from the floor level first. Ensure the floor is flat using Level ruler. 3. Punch two nail on each end of the wall and tie a string there as guide line for the first row of brick. 4. Apply 4-5mm of the mixture on rough surface of the brick. 5. Install brick tile on the wall, press it on the wall kuat2. 6. 10mm gap between each brick, use your index finger as reference. 7. After the installation is completed. Apply the mixture to feel all the gap, use finger to remove excessive filler to deliver a more distinctive 3D looks. Preferably the thickness of filler is less than 3mm. Total damage so far RM 400 Indon wages for installation on 42SF wall )+ RM 416 (brick tile) + RM 90 (adhesive) = RM 906 Still work in progress though. Any update??? |
| Change to: |  0.0248sec 0.0248sec
 1.27 1.27
 6 queries 6 queries
 GZIP Disabled GZIP Disabled
Time is now: 16th December 2025 - 11:13 PM |
 Quote
Quote