

 Dec 7 2010, 10:11 AM, updated 15y ago

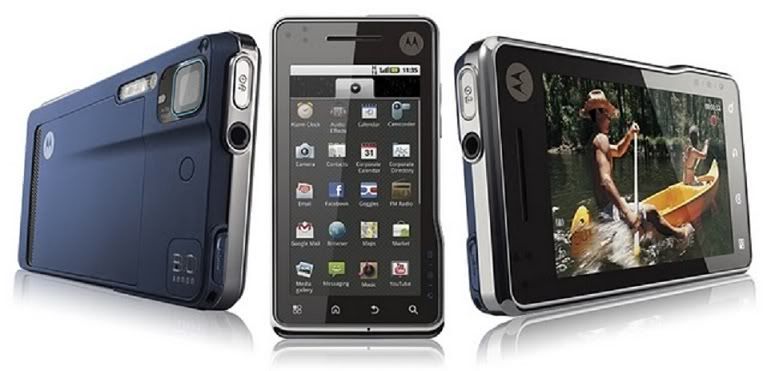
MOTOROLA MILESTONE XT720 V3
Previous thread
Official Site
Overview specifications
» Click to show Spoiler - click again to hide... «
Product features and functions at a glance
3.7”, 16:9 WVGA display
Gorilla glass screen (Scratch resistant)
Dimension: 60.9×115.95×10.9mm/ Weight:139g
HD video capture at 720p, HDMI to HDTV
854 X 480 ultra-large high-resolution with pinch & zoom and double tap
8 megapixel digital camera with professional xenon flash and 1280 x 720 high-resolution video camera function
Support for Bluetooth® stereo headset and data transmission2
3.5 mm jack for the widest choices of headsets for music enjoyment
FM Radio
8GB Micro SD expandable to 32GB
CrystalTalk™ professional noise cancellation technology, recognized throughout the industry for its clear, uninterrupted voice calls in high-noise environments.
3.5G HSPA 10.2Mbps/5.2 and Wi-Fi 802.11b/g for high-speed internet access
Newest Motorola handwriting recognition technology to enable quick input and accurate recognition of cursive styles and simplified forms of Chinese
Built-in gravity sensor, infrared proximity sensor, and ambient light sensor mode
Powerful Cortex™ A8 processor with 3D accelerator built in for smooth and easy multitasking
Concurrent processing of multiple email accounts and separation of work email and personal email inboxes
Five Chinese input methods including phonetic notation, handwriting, Cangjie, pinyin, and Chinese strokes
Other applications and functions
Google™ Maps3: User location identification, direct direction guide, and as satellite photos and street views provided during map browsing
Gmail™: Integration of, and support to, multiple email accounts
YouTube™: Single-touch play on the home screen or applications
Google Talk™: Communications service provided by Google
Google™ contacts: Online synchronization of contacts
On-screen proximity sensor that automatically locks up when the ear is close to the handset to enable uninterrupted phoning
Touch-control GPS for quick, accurate, and easy identification of shorts
Full Reviews:
XT720 Full Flashes
» Click to show Spoiler - click again to hide... «
Proper flashes include rom for Asia, Central Europe, UK, France, Arabia, Italy, Russia, and USA. The instructions for flashing as followed :
1) Search somewhere along the lines of "RSDLite - download here"
2) Go inside first link, download the file that's named somewhere along the lines of RSD Lite 4.5.3
3) Install it.
4) Go to http://and-developers.com/sbf:xt720
5) Download the Full Flash rom, the one where the provider is "USA Cincinnati Bell"
6) Unzip that file, you now have a .sbf folder (not file)
7) Put that .sbf folder in C:\Users\Admin\My Documents
8) Shut down phone, take out battery
9) Hold Power + Volume Down + Camera buttons all at once
10) Put in the battery while holding those buttons
11) Phone is now in bootloader mode (screen looks like a command prompt)
12) Release the buttons, and plug USB to computer and phone
13) Open RSD Lite, your phone should be detected as connected (Device name was like "S OMAP 3440" or some BS like that)
14) Click "..." to browse for the .sbf file in C:\Users\Admin\My Documents
15) In RSD Lite, click to highlight your connected XT720, and then click "Start". The first column beside the connected phone should now have a green icon thing, and the ROM is being flashed.
16) DO NOT TOUCH YOUR PHONE, THE CABLE, OR THE COMPUTER! (I went and took a dump)
17) When the "Status" column in RSD Lite says "Please manually power up this phone", so shut it down and power it again. Note: The status stays in "Checksum Group 37" for a verrrrryyyy long time before saying "Rebooting". I thought it got stuck there, but it ended up ok.
18) Your XT720 is now reflashed to stock.
19) You can now close RSD Lite. It will complain saying you will damage the attached device, but I pulled it out wayyyy before this (I unhooked it when it told me to reboot manually) and my XT720 is not dead. You may choose to close RSD Lite before unhooking your XT720.
20) Post your results in this thread and confirm or reject my procedure. *Quote from xda-developer forum*
P/s : Above instruction is for USA Cincinnati Bell. You can do any of the flash rom available, although recommended flash is still USA
IMPORTANT
*Those that want to use USA flash rom, you'll need to apply the apn setting manually.
For Maxis/Hotlink
Name = Maxis(3G)
APN = unet
Proxy = 202.75.133.49
Port = 80
Username = maxis
password = wap
MMSC = http://172.16.74.100:10021/mmsc
MMS proxy = 202.75.133.49
MMS port = 80
APN type = default,mms
For Celcom
Celcom 3g internet setting :
Name : Celcom 3G Internet
APN : celcom3g
MCC : 502
MNC : 19
APN type : default
Celcom 3g MMS setting :
Name : Celcom 3G MMS
APN : celcom3g
MMSC : http://mms.celcom.net.my
MMS proxy : 10.128.1.242
MMS port : 8080
MCC : 502
MNC : 19
APN type : mms
Celcom 2g internet setting :
Name : Celcom 2G Internet
APN : celcom.net.my
MCC : 502
MNC : 19
APN type : default
Celcom 2g MMS setting :
Name : Celcom 2G MMS
APN : mms.celcom.net.my
MMSC : http://mms.celcom.net.my
MMS proxy : 10.128.1.242
MMS port : 8080
MCC : 502
MNC : 19
APN type : mms
For U Mobile
Internet Settings
APN: my3g
Username:
Password:
MMS Settings
APN: my3g
Username:
Password:
MMSC: http://10.30.3.11/servlets/mms
MMS Proxy: 10.30.5.11:8080
For DIGI
DIGI WAP - Internet/Data
APN: digiwap
Proxy: 203.092.128.188
Port: 80
username: digi
password: digi
server:
mmsc:
mms proxy:
mms port:
MCC: 502
MNC: 16
Authentication type: PAP
APN Type: internet
DIGI MMS (WAP 2.0)
APN: digimms
Proxy:
Port:
username: mms
password: mms
server:
mmsc: http://mms.digi.com.my/servlets/mms
mms proxy: 203.092.128.160
mms port: 80
MCC: 502
MNC: 16
Authentication type: PAP
APN Type: mms
Digi internet
APN : diginet
APN type : default
The rest of the fields : *leave it blank*
Root for Apps2sd, JIT, and Nextheme/Genesis
» Click to show Spoiler - click again to hide... «
First of all, get the android sdk files HERE. Then, open the exe file and install all the necessary packages, especially the USB Driver for windows. Rename the sdk folder to android and put it into your drive c:/
Download the necessary files (Depending on which flash rom you choose)
European - STR_U2_01.1E.0
Italian - STR_U2_02.1E.0
Russian - STR_U2_03.20.1
US CBW - STR_U2_04.1E.1 - Megaupload link
*Update 8/29/2010 - Script has been updated to let you chose which options to install and a modified version of the NexTheme with LauncherPro has been added
If you have already run the script just run it again and say "n" to installing APPS2SD and JIT in order to get the NexTheme installed
Credit for the 2.2 JIT compiler goes to antibyte for the Frozen Eclair project
Credit for the original apps2sd instructions/script go to jakelights for finding the script and whomsoever wrote the script (not referenced in forum post)
I TAKE NO RESPONSIBILITY IF YOU DAMAGE YOUR PHONE!
THESE INSTRUCTIONS ARE PROVIDED AS-IS AND BY APPLING THESE TO YOUR HANDSET YOU TAKE FULL RESPONSIBILITY FOR THE CONSEQUENCES!
Step One: Create an ext3 partition on your MicroSD card
This step is tricky, and the only reliable way I have found is to use gparted under linux with your microSD inserted into a card reader. THIS LINK will provide instructions for use a gparted live CD so you do not have to install linux on your computer.
1. First create a fat32 partition at the beginning of the drive leaving about 1GB of empty space (more or less depending on how much space you want for installing apps)
2. In the empty space create a linux ext3 partition
3. Flag the fat32 partition as boot
4. Apply changes
Step Two: Copy files to the microSD card
This presumes you have already placed the microSD card back in the phone.
* Unrar the attached file to the root of your microSD card. It's critical to running the script later that the path to the apps2sd directory be /sdcard/apps2sd
Step Three: Install the necessary applications
Make sure you are already signed into a Google account so you can access the market!
* In the Market download an app called Estrongs File Manager
* In the Market download an app called BusyBox
* In the Market download an app called Milestone Overclock
* Open Estrongs File Manager (listed as ES File Explorer in your app drawer) and you should, by default, be seeing the files/directories on the sdcard
* Tap on UniversalAndroot.apk and use the Package Installer to install the application
* Ignore the Milestone Overclock APK included and instead use the latest version in the market!
Step Four: ROOT!
* Run the Universal Androot application and tap on Root :-) (wait for it to finish before going back to home screen)
* Run the BusyBox application, tap on Install, then tap on OK when the Superuser Permissions dialogue box pops up.
Step Five: Run the script
In order to run the script from your handset you would need a terminal application installed and the script will try to move the application while running ... NOT RECOMMENDED! (see post #3) Please only run this script using ADB access from your computer. I've uploaded another guide I wrote on setting up ADB access on a Windows computer and attached to this post.
Next, simply connect the XT720 to your computer.
Ensure it is "Charge Only" for USB connection and USB Debugging mode for USB is turned on under Settings > Applications > Development.
Once you have the above checked, go ahead to launch a command prompt and perform the following:
Type: cd c:\android\tools
Type: adb devices
* Once you have a device showing under adb devices type in adb shell
* Make SURE your screen is unlocked then type in su, hit enter, and tap on OK for the Superuser Permissions box that will pop-up on the handset
* The command prompt should change from $ to # indicating you now have root access to the file system
* Run the following command: cd /sdcard/apps2sd
* Run the following command: sh install.sh and enter a y when asked if you want to proceed (assuming you do)
* Enter a y when prompted to reboot
IT WILL TAKE 5 - 10 MINUTES TO REBOOT - THIS IS PERFECTLY NORMAL - TIME VARIES DEPENDING ON AMOUNT OF APPLICATIONS MOVED AND SPEED OF YOUR MICROSD CARD
Once your phone boots up apps2sd should be working, JIT should be enabled, and you are good to go! Use the Milestone Overclock application if you want to see some extreme performance boosts!
*Qoute from droidforum site*
All-in-one step for applying Apps2sd *Recommended method*
» Click to show Spoiler - click again to hide... «
THIS APPS2SD IS ONLY APPLICABLE FOR USA CINCINNATI BELL SBF ROM
First of all, get the android sdk files HERE. Then, open the exe file and install all the necessary packages, especially the USB Driver for windows. Rename the sdk folder to android and put it into your drive c:/
steps to prepare micro sd:
# format ur micro sd on ur phone to 64kb cluster
# then shrink the volume for 1g to ext2 partition and linux swap (128 m)...( im using gparte ubuntu).
# format the ext2 partion using ubuntu disk utilty .U need to ensure the check box with 'Take Ownership of the File System' is unchecked for the partition before you create it otherwise the partition is created and it has superuser permissions only.
#done
Steps to prepare for installation:
# download all-in-one app2sd here
# Unzip the downloaded file
# Move this folder to root directory of MicroSD
Next, simply connect the XT720 to your computer.
Ensure it is "Charge Only" for USB connection and USB Debugging mode for USB is turned on under Settings > Applications > Development.
Download SuperOneClick Root from Here
and root your phone.
Once you have the above checked, go ahead to launch a command prompt and perform the following:
Type: cd c:\android\tools (to get to the folder of the Android SDK which i mentioned earlier)
Type: adb devices (you should see your Milestone serial number showing up. If you do not see serial number, it means there is no connection to your Milestone)
Type: adb shell
Type: su (make sure you do not see a prompt window on your Milestone. If you do, grant permission for it to access)
Type: cd /sdcard/apps2sd
Type: sh install.sh (trigger installation of App2SD)
Type: y (for every steps until the end)
Below should be shown for every steps that has been applied successfully
**********************************************"
echo "* Milestone XT720 Optimizer&Themes V10 *"
echo "* All XT720 sbf version *"
echo "* Coded by:Khalpowers *"
echo "**********************************************"
echo ""
echo "The following scripts will attempt to install:"
echo "1. New Busybox"
echo "2. APPS2SD"
echo "3. Change Bootanimation and Fonts"
echo "4. Optimized build.prop"
echo "5. JIT from FroYo (Frozen Eclair Project)"
echo "6. Cleanup stock app"
echo "7. Apply mod theme eclair and froyo"
echo "8. Master APNS.conf"
echo "9. Milestone OverClock v1.42"
echo "0. EXIT SCRIPT"
If you do it right, go to Setting > Sd card & phone storage. If your internal memory is between 164mb - 168mb. Then your apps2sd has been applied with much success! Cheers
Video tutorial
by khalpowers
Open Recovery mode
» Click to show Spoiler - click again to hide... «
Download the OpenRecovery files from HERE
Follow all the steps from the link below. Make sure to follow the steps under XT720 instructions.
http://tinyurl.com/379drfj
Credit to Skrilax_CZ from modmymobile.com
Follow all the steps from the link below. Make sure to follow the steps under XT720 instructions.
http://tinyurl.com/379drfj
Credit to Skrilax_CZ from modmymobile.com
Ways to make your phone become more responsive on homescreen
» Click to show Spoiler - click again to hide... «
If you're using custom homescreen launcher such as launcherpro or adwlauncher, try the command below for speedy and responsive homescreen toggling. Use command prompt method to do this:
adb shell
su
echo ro.HOME_APP_ADJ=1 >> /data/local.prop
enter.
then reboot.
now evaluate whether or not this fixes your lag....If u want to undo what this command does, simply remove that toggle from: /data/local.prop
actually this can reduce redraw with launcher pro/ ADW
credit to samsonite801 from droidforums.net and khalpowers for sharing
Brief step by step for the most stable experiences on your XT
» Click to show Spoiler - click again to hide... «
Step by step for the most stable and smoothest experiences with your xt720:
1. Apply USA cincinnati bell sbf full flash
2. Reformat sdcard to 64kb cluster
3. Create partition 1gb ext2
4. Create linux-swap 64mb or 128mb
5. Use terminal to apply apps2sd with alternate way
6. Apply JIT
7. Apply this latest build.prop either through adb or root explorer (Only applicable for usa rom)
8. Apply smooth homescreen code using terminal
Steps to flash to Froyo
» Click to show Spoiler - click again to hide... «
First of all you can format your SDcard to fat32 64 bit and create another partition of 1ghz EXT3
and 32mb swap
if you already have the earlier setup of fat32 ext2 and linux swap no need to reformat the sdcard.
you can keep it the way it is.
then download dexter froyo release (browse a few post behind you should find it )
and khal galaxyfroyo1.1 release
Install instructions (based on us sbf):
1. Freshly flash your phone ( optional but recomended )
2. root the phone ( I use Universal Androot or u can use superoneclick root provided by dexter)
3a. install OpenRecovery , use included apk.
3b. reboot phone once
4. copy the folder "nandroid" to root directory of your sdcard then copy "galaxyfroyo1.1" folder
to sdcard/nandroid/openrecovery folder ( you can remove stock22 folder if you want)
5. Make sure sdcard is not attached to pc using "mass storage share" to pc.
6. Run OpenRecovery app and "install Recovery".
7. Press Recovery boot
7.a go to nandroid/restore/galaxyfroyo1.1/restore all
8. go back to main menu
9. wipe data/ factory reset in OpenRecovery
9. reboot system
work like charm to me
credit goes to
Dexter
Visit http://dext3r.komodin.org/ for more details and future updates.
Khalpower for surplus of knowledge & update
ITvince for regular update
Progenx for manual suggestion
by bigO'lord
Several custom themes for your enjoyment
» Click to show Spoiler - click again to hide... «
Easiest way to apply these themes is to extract the zip contents and replace the app and framework folders with the ones inside optimizer theme. Assuming you've applied the optimizer rev2 from above, you'll need to replace the ones inside the optimizer either Nextheme or Genesis. Once you've replace the folders, just apply the theme through adb method mentioned from previous spoiler.
Black n bold theme http://dl.dropbox.com/u/9404058/themeblacknbold.rar
Sample black n bold here
Ignito white theme http://dl.dropbox.com/u/9404058/themeignito.rar
Sample ignito here
Kalagas theme http://dl.dropbox.com/u/9404058/themekalagas.rar
Sample kalagas here
Droid x theme http://dl.dropbox.com/u/9404058/themedroidx.rar
Sample droid x here
Steel theme http://dl.dropbox.com/u/9404058/themesteelbeast.rar
Sample steel beast here
Cold fusion, Green metal glass, htc, luna, miui, sense white, and silver themes
http://dl.dropbox.com/u/9404058/themesforxt.rar
Bronzd beast theme http://dl.dropbox.com/u/9404058/themebronzdxt720.rar
Sample bronzd beast here
Alternate black theme http://dl.dropbox.com/u/9404058/themealternatedarkxt720.rar
Sample alternate black here
Credit to khalpowers for all the themes
*FAQs Section*
Is my XT720 runs on 550mhz or 720mhz?
» Click to show Spoiler - click again to hide... «
A lot of people have been asking the same thing which is whether their xt720 is 550mhz or 720mhz. Well, the processor itself is 720mhz but if your phone is from anywhere within Asia region, then it is underclock at 550mhz. Fear not as latest update from Motorola confirmed that it runs on 720mhz now. So, make sure to update your xt  For more info please visit this site http://www.gsmarena.com/firmware_update_clocks_motorola_xt720_cpu_to_proper_720mhz-news-1942.php
For more info please visit this site http://www.gsmarena.com/firmware_update_clocks_motorola_xt720_cpu_to_proper_720mhz-news-1942.phpHow to use hdmi through hd tv?
» Click to show Spoiler - click again to hide... «
to play video on HD tv through hdmi..
plug ur hdmi cable from tv to phone..
then go to gallery.. play a video.. then press menu.. then u can see the "two windows" icon... and u can see the video on tv.. and ur phone will display a "video controller"...
then usually.. when the video finished already.. ur phone will still show the "video controller".. and u can only see gallery on ur TV..
what u need to do.. press back button on ur phone.. and u can see on ur TV.. it will quit from gallery.. then find ur games.. and then you can play smile.gif
disadvantage.. on ur phone will keep displaying the "video controller"... u need to act like u can see the game on ur phone coz u need to touch it on ur phone and view on ur TV hehe..
by gajahwhite
Can I add my own mp3 or ringtone to the text message notification?
» Click to show Spoiler - click again to hide... «
Sure you can. First, create a folder in your root sdcard and name it as media. Inside media folder, create another folder and name it as audio. Inside the audio folder, create two more folders and name it as notifications and ringtones. Now here's the CRUCIAL STEP. Inside the notifications folder, copy the mp3 that you want and change the mp3 extension to mid. In the ringtones folder, change your mp3 extension to wav. Easy as that  Now you can have your own ringtone for both notification and incoming text message
Or you can look here for more refined details http://forum.lowyat.net/topic/1213449
Or you can look here for more refined details http://forum.lowyat.net/topic/1213449
Can I turn off the camera shutter button sound?
» Click to show Spoiler - click again to hide... «
There is no known option for turning off the shutter sound but you can still off it with rooted
.
hey guys...
my xt720 now can mute the shutter sound on camera n video ....yehaaa
but u need to be a superuser...hehe
just want to share ...
go to adb shell...
su
mount -o remount,rw /dev/block/mtdblock4 /system
mv /system/media/audio/ui/camera_click.ogg /system/media/audio/ui/camera_click.ogg.old
mv /system/media/audio/ui/VideoRecord.ogg /system/media/audio/ui/VideoRecord.ogg.old
exit
done...so eazy ...huh!
ps no need the the rubbish app...xt720 cannot be mute by app or silent button..
by khalpowers
How to enter recovery mode and bootloader mode
» Click to show Spoiler - click again to hide... «
Recovery mode
Turn Off Phone Press Power Key + Camera Mode Key To Power On The Phone And Bring Up The Recovery Screen Press Volume Up + Camera Key To Show The Recovery Menu Use Volume UpDown Key To Hilight And Camera Mode Key To Select
Bootloader mode
Turn off your phone. Pull out the battery. Now, press on/off button + volumn down button + camera button, and hold it while putting back in the battery. The bootloader mode should appear. It can also be done without pulling out the battery, after turning off then press all 3 buttons to boot up.
Alternate way : Use application available from the market such as Quick Boot
How to completely turn off the data connection?
» Click to show Spoiler - click again to hide... «
until now i know 3 ways to turn off data completely.
1. call *#*#4636#*#*-->select phone information-->press menu(the 1st touch key at the bottom)-->select more-->disable/enable data connection.
2. use app/widget that change the APN name.
3. use switcher pro to turn on/off.
by choonwai11
If you want to make sure no data connection at all, go to
Settings > Wireless and network > tick box for Control Background data
Settings > Wireless and network > Mobile networks > uncheck box for Data roaming
In this way, the gprs will only activated when you open internet browser
How smoothly can this phone run?
» Click to show Spoiler - click again to hide... «
See this video captured by our very own xt720 user, khalpowers and judge for yourself
Can I use chinese input with this phone?
» Click to show Spoiler - click again to hide... «
Try this
Not perfect but it gets the job done
Not perfect but it gets the job done
Help! My camera shutter suddenly closed up and can't open anymore. Is this normal or my phone is screwed?
» Click to show Spoiler - click again to hide... «
This is a known issue for xt720. Not all of them though but quite a number have experienced it already where the shutter just completely shut. There's nothing much can be done other than sending it back for warranty... OR you can try this trick. Get a magnet and put its South field close to the shutter. Apparently it will open up. Not sure how true is this but yea.... better than dismantle the whole phone just to find out you really screw the phone up for good...
XT720 price ranges
» Click to show Spoiler - click again to hide... «
Malaysia original set : RM17xx - RM18xx
Singapore ap set : Rm12xx - Rm15xx
Singapore ap set : Rm12xx - Rm15xx
Promotional videos
Unboxing and full review videos
Gorilla Glass Scratch Resistant Test by khalpowers
HD video recording samples by fellow xt720 users
» Click to show Spoiler - click again to hide... «
lingch video sample
khalpowers video sample
rhythmjhan video sample
*let me know if you would like me to add your video sample here*
khalpowers video sample
rhythmjhan video sample
*let me know if you would like me to add your video sample here*
Owners List :
» Click to show Spoiler - click again to hide... «
lingch (Jumped to Motorola Defy)
khalpowers
rhythmjhan (Jumped to BB torch 9800)
gajahwhite
sanosizo (Jumped to Motorola Defy)
Aishiteru^Suki (Jumped to Motorola Defy)
~~5ive~~
secret_tidus
whistleon (Jumped to Milestone 2)
fees_88
0163119779
steventsc
ninehneh
Mr.Docter
darren_soh86
bigO'lord
Ayam
tom398
progenx
m|ng
ltwvince
pswin09 ((Jumped to Droid 2 global)
spermatogenesis
hadimac
fairos_ips (Silently jumped to BB torch 9800)
ZooK
krekrekoke
s3iryu
boontien
Calex
waynekoowy
alpha_mid
ranggie4
levilau
mynameistop
chris_90
hanifw
myboo_1988
traize
-storm-
yanu
lowstate
holocauster
stuc87
monyetgila
teamloks
*IT'S ONE H3LL OF A MACHINE *
*This post has been edited by lingch: Mar 30 2011, 07:34 AM
 Quote
Quote


 I applied back the original build.prop then can receive again. Phew....
 sms behavior of the east
  0.0474sec
 0.42
0.42
 7 queries
 GZIP Disabled