

 Jul 5 2010, 02:31 AM, updated 16y ago

Added on July 5, 2010, 2:32 amAdv:
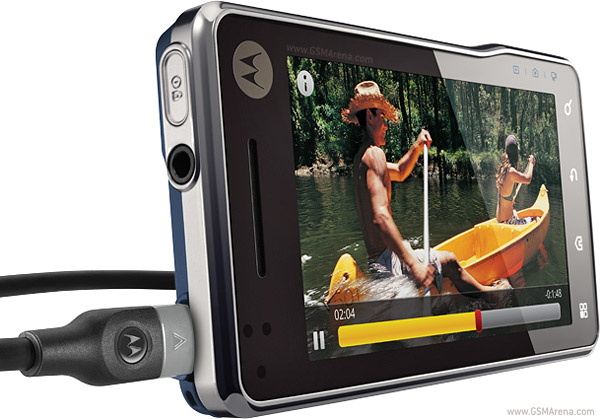
HD video (720p) playback over built-in HDMI slot
I think this is the 1st phone using HDMI.

Added on July 5, 2010, 2:36 amgraphic accerator
Product features and functions at a glance
3.7”, 16:9 WVGA display
Dimension: 60.9×115.95×10.9mm/ Weight:139g
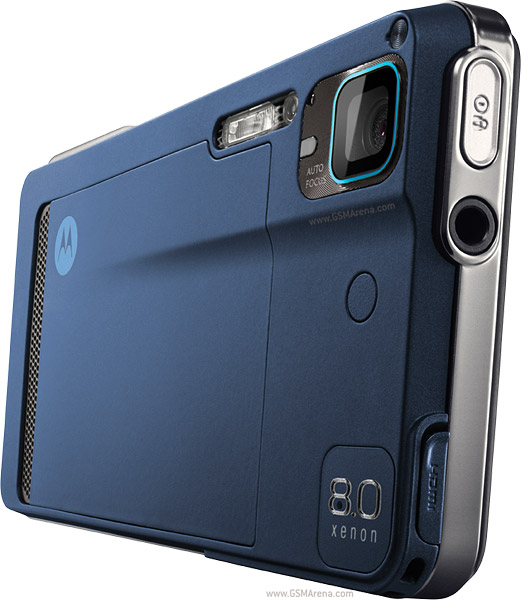
HD video capture at 720p, HDMI to HDTV
854 X 480 ultra-large high-resolution with pinch & zoom and double tap
8 megapixel digital camera with professional xenon flash and 1280 x 720 high-resolution video camera function
Support for Bluetooth® stereo headset and data transmission2
3.5 mm jack for the widest choices of headsets for music enjoyment
FM Radio
8GB Micro SD expandable to 32GB
CrystalTalk™ professional noise cancellation technology, recognized throughout the industry for its clear, uninterrupted voice calls in high-noise environments.
3.5G HSPA 10.2Mbps/5.2 and Wi-Fi 802.11b/g for high-speed internet access
Newest Motorola handwriting recognition technology to enable quick input and accurate recognition of cursive styles and simplified forms of Chinese
Built-in gravity sensor, infrared proximity sensor, and ambient light sensor mode
Powerful Cortex™ A8 processor with 3D accelerator built in for smooth and easy multitasking
Concurrent processing of multiple email accounts and separation of work email and personal email inboxes
Five Chinese input methods including phonetic notation, handwriting, Cangjie, pinyin, and Chinese strokes
Other applications and functions
Google™ Maps3: User location identification, direct direction guide, and as satellite photos and street views provided during map browsing
Gmail™: Integration of, and support to, multiple email accounts
YouTube™: Single-touch play on the home screen or applications
Google Talk™: Communications service provided by Google
Google™ contacts: Online synchronization of contacts
On-screen proximity sensor that automatically locks up when the ear is close to the handset to enable uninterrupted phoning
Touch-control GPS for quick, accurate, and easy identification of shorts
power by =khalpowers
hi guys...
just want to share with xt720 user how to install app2sd.
but im using ubuntu to do all this..
steps to prepare micro sd:
# format ur micro sd on ur phone..
# then shrink the volume for 1g to ext3 partition and linux swap (128 m)...( im using gparte ubuntu).
# format the ext3 partion using ubuntu disk utilty .U need to ensure the check box with 'Take Ownership of the File System' is unchecked for the partition before you create it otherwise the partition is created and it has superuser permissions only.
#done
Steps to prepare for installation:
# download app2sd version 2 here
# Unzip the downloaded file and you should see a folder "APP2SD Package".
# Rename "APP2SD Package" folder to "app2sd" and move this folder to MicroSD. (place it in the root: MicroSD card/)
Next, simply connect the XT720 to your computer.
Ensure it is "Charge Only" for USB connection and USB Debugging mode for USB is turned on under Settings > Applications > Development.
Once you have the above checked, go ahead to launch a command prompt and perform the following:
Type: cd/ (to get to the root of your C: drive)
Type: cd /android/tools (to get to the folder of the Android SDK which i mentioned earlier)
Type: adb devices (you should see your Milestone serial number showing up. If you do not see serial number, it means there is no connection to your Milestone)
Type: adb shell
Type: su (make sure you do not see a prompt window on your Milestone. If you do, grant permission for it to access)
Type: cd /sdcard/app2sd
Type: sh install_use_busybox.sh (trigger installation of App2SD)
Type: y (to confirm that you want to install)
wait for the prompt to show you that App2SD is complete and a reboot is needed for it to take effect.
Type: y (to confirm reboot. You might notice that Milestone do not reboot by self which is normal)
Type: reboot (if you find Milestone do not reboot after you enter y as above mentioned)
Enjoy after the reboot... this works yes:D
How to check app2sd working or not?
If u see /data/app1,/data/dalvik-cache1,/data/app-private1 on ur mobile thats mean this work..
Then u need open up terminal emulator and type them one at a time:
su
rm -r /data/app1
rm -r /data/dalvik-cache1
rm -r /data/app-private1
or if you have root explorer you can go to
/data, you'll see those folders there and you can delete them if you want
I'd suggest doing it through terminal emulator just cause thats how i did it
hope that helps, good luck guys!

This post has been edited by KannaSai1: Aug 30 2010, 08:26 PM
 Quote
Quote


 0.0260sec
 0.56
0.56
 6 queries
 GZIP Disabled