Most of the PSP owners don't know about modding. it is divided by two categories *softmod = things related to the software section.. such as custom themes, custom firmware, homebrews and etc.
*hardmod= things related to modifying the physical looks and performance of you PSP. such as adding Led's, speakers, creating an internal memory, internal camera, internal mic in psp2000 and many more.
this thread will be organize by several people that have a decent knowledge in their field of expertise hardmod= wetfusion, penmarker, cheewin88. softmod= playboy21
*will add new members when the thread grows
HARD MODDING There are many types of hard modding in psp. so let me start with the basic,
***please say a simple 'thanks' if any of the info in this thread helped you***
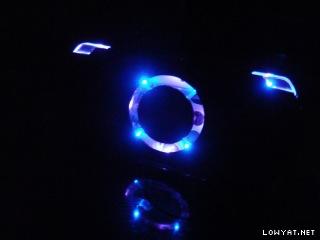
SOUND REACTIVE LED'S
» Click to show Spoiler - click again to hide... «
HOW TO MAKE IT most tutorial are in acidmods.com forums. but it will not be open for public viewing, you have to register 1st before you can view all the tutorial. and i'll refer to lordnico's sound reactive led tutorial. *ALL PICTURES ARE PROPERTIES OF ACIDMODS.COM*
1ST STEP *make a sound cip here are the diagram from acidmods.com *mono sound mod
*stereo sound mod
*pic how to solder it +i am using 181K and 10K to get the 191K
2ND STEP learn how to open your psp faceplate well, there are many video on youtube showing how to open your psp faceplate. +please take note, that this step seems easy... but honestly for me this is the most hardest step of all.. you don't want to scrath your faceplate, you don't want to crack your LCD's, n most of the short circuit stuff happen here. so please pay full attention on what you are doing. even jassica alba is trying to flirt with you, ignore her!..
3RD STEP soldering the MOD Chip to psp motherboard.(pic drawn by penmarker) *thanks for the pic penmarker.
4TH STEP drill a hole in L and R button. put in the led's in the hole that you have drill.. reassemble the stuff... and enjoy your led mod.
UMD DOOR MOD
» Click to show Spoiler - click again to hide... «
Since wathcing are much easier then reading.. here is the link to 4dP umd door mod tutorial. enjoy
LED SWAP
» Click to show Spoiler - click again to hide... «
really easy to do... as the name implies, remove the original led, and just SWAP to new led's. but you need to know where is +ve, -ve... so here is 4dP pic.. *thx 4dP* wifi and memorycard led powerboard led reassemble the stuff.. and it will look something like this enjoy!
SPRAYING TRIMS AND SILVER RING
» Click to show Spoiler - click again to hide... «
+Well, you have to know to take apart your psp, if you've done that. you can easily pull out the trims +as for the silver ring, i've found a video on youtube that show how to take apart it without damaging the ring.
*now the fun part begins, spraying the stuff. +sand the stuff to get a clear finish. it also give the paint more grip. +spray on a sunny and hot day. +put the can in warm water for 5 - 10 mins, warmer spray gives a more even finish. +spray about 6-8 inches away from the stuff, in a steady sweeping motion to left and right. +remember to start and end the spray off the edge of the piece, that way you won't have build-up on the edges.Go slow and don't over-spray, and you shouldn't have any problems. +gloss it to make it more shiny good luck
*softmod tuto +covered by playboy21
FF modded PSP
Red ring of death
************************************************ ok currently i can do led's, internal 16GB mod, and speaker. i accept any modding request with a small charge. but that have to deal outside this thread. so PM me. reasons= getting bored don't have any psp to mod. i do this as a hobby, profits arent my main interest, want to meet more friends. feel free to ask any question about modding
*also on side note. this thread is also linked to zal thread, post your psp pic there. don't care if its unmodified psp, aka S.T.P (stock tapi power) .. or fully modified... just send the pic, share your moment or hobby with us.. if you got a pic of your psp gathering is even better.* so here is the link http://forum.lowyat.net/topic/456551
psp that ive modded so far our 1st gathering pics!
This post has been edited by wetfusion: Mar 22 2009, 01:38 PM
dunt wory... if got enough money from modding psp. ill buy another ps3 controller, and learn to mod them. wii xbx360 ... the possibilities are endless... just time will tell *** thx for being the 1st to post =)
Nice to see someone helping others to mod their PSPs.. I'm currently using the older generation Fat PSP but with the simple function of having the light beat on the Trigger L & R beat based on the sound made by the PSP via the earphone..
This post has been edited by Sh1mX: Aug 25 2008, 01:51 PM
you mean the led will only be 'on' if you insert a earphone jack? same stuff man... just need to solder the stuff on jack circuit instead of speaker point.
Speaker used: Sony Ericsson MPS-70 Portable Phone Speakers it really booms the sound, but drains your battery like a vampire. will post a mini tut shortly after i disassemble it.
Notes: :: Do note though that I only did this mod. How you wanna customize it, place it, modify it, is fully up to you. I got no resource to make a new backplate to house the newly placed speakers, that's why its sticking out like that. :: Please follow the exact steps in this tut as you can possibly damage your psp permanently. :: Warning, massive pict bomb.
now, lets get started shall we?.
items: a Sony Ericsson MPS-70 Speakers a meter of different coloured 30gauge kynar* wires (depends, if you dont wanna color code, you can use only one color) a soldering kit consisting of soldering iron, solder, soldering paste (flux), a damp cloth (to wipe off the bit of the soldering iron.makes the soldering process cleaner without black carbons) tweezers if you have a hard time handling small parts wire cutter, wire crocodile pliers a solder wick if you got any and of course, a psp. haha
*30 gauge is the size of the wire.
The speaker part.
» Click to show Spoiler - click again to hide... «
first of all, you wanna strip the speakers naked first. to do this, pry along the area. and then continue to unscrew the visible screws in there. should be no problem at all.
these will be the internals of the speakers that little circuit beside it is indeed the amp circuit for the speakers. that means you dont need to buld one from scratch like the soundmod. moreover, it uses 3.6V, just like the psp. it eases the process as you dont need to do any calculations to make it work. after disassembly, desolder the wires that goes to the phone jack. (that part where you stick into the cellphone. )
a closer look at the circuit. the points from left to right: +, -, C, L, R, RA note the C and RA? well, me and the guys at acidmods failed to register the use of it. so we concluded its a Sony Ericsson exclusive point. no need to solder them.
the + should be the +3.6V and is the power in for the amp. the - is the ground. L and R are obviously the input for the amp. the L+, L- and R+, L- are the pins for the speaker output. cut off the wire from the speakers. it eases the fitting.
now, that should clear the speaker part. moving on to the psp part.
The psp part.
» Click to show Spoiler - click again to hide... «
dissassemble the psp, this guide might help: PSP Slim Dissassebly Guide. please make sure you've read and fully understood the process. a wandering mind can really screw things up.
in order to give way to the speakers, the umd reader have to be taken out. i dont think it will be much problem as you guys must've tons of .iso games. also, holes must be drilled on the umd door to locate the speakers.
the amp will be placed under the d-pad, at the left side of the backplate. there is ample space under the mem stick reader, and coincidentally, the amp doesnt bother the mem stick reader at all. just enough space.
cut off the minor supports in that area. drill a hole on the wall beside it to route the wires to the speaker outside. this should do the trick
Soldering the amp to the motherboard.
» Click to show Spoiler - click again to hide... «
take the headphone jack fom the psp, and short the pin 3 and 4. shorting them tricks the psp that there is a headphone jacked in. you can add a switch there to enable on/off functions. but too bad i got none now. the 1 pin is the Left input, and the 2 pin is the Right input. solder them to the L and R pins on the speaker amp.
connect the + pin on the amp to the battery connector on the psp motherboard. make sure you solder it to the lower pin on the right connector. *make sure u dont over use the solder and cause it to touch the other tiny components. that'll be bad*
connect the - pin on the amp to a ground point on the motherboard. now, there are a few ground points on the motherboard also the headphone jack board. but in this case, i soldered them to the motherboard's ground point, easier.
after all that had done, place them orderly in the space we've cleared. a pict might help. remember to insulate the exposed circuit from the mem stick cage. they might short out. for low voltage electronics like this, a simple masking tape is enough. but for safe, use an insulating tape.
note how clean the wires are?. it may take some time for you to tidy up. but trust me, its worth it.
run the speaker wires out the hole in the wall we made earlier to the umd slot, and solder the speakers respectively to their connectors.
After all that is done, reassemble the psp carefully. try not to break anything in the process. test the speaker. done.
This post has been edited by penmarker: Aug 28 2008, 05:25 PM
I've setup a dev environment for softmod in my pc like months ago but never got a chance to sit down and do something hhahahahha I'll just wait for playboy's stuff lol....
yea... he is 15 mine you! too young to know about programming... as i said... maybe, with a lil bit of time and commitment. he can be the next big thing after darkalex.. lol. hahahahahaahaha
that is kinda cool. my current speaker rig is running on headphone jacks too. having a hard time looking for a switch, that local store dont sell any. dont know where to find.
**added remade the cage for the speakers using the stock case for the speakers. gotta trim off some areas to fit it in and the great thing is it can close properly now. snapped some pictures of the new cage for the speakers. damn pda camera. quality bad. haih.
though just supported by some double sided foam, it can close well and less 'ghetto' looking. haha. now im looking for fiber putties to remould the new plate. hey anyone know where they sell those?
This post has been edited by penmarker: Aug 28 2008, 05:26 PM
yup.. nothing new actually... just need +16GB SDHC +usb card reader
solder the stuff to memory card point... *but there are certain ways* * required high level of soldering skills... because its not easy to solder the stuff.
yea... he is 15 mine you! too young to know about programming... as i said... maybe, with a lil bit of time and commitment. he can be the next big thing after darkalex.. lol. hahahahahaahaha
hahaha. xD Nice thread by the way.Thanks wetfusion
Added on August 25, 2008, 7:10 pm
QUOTE(Dark Kai @ Aug 25 2008, 02:21 PM)
I've setup a dev environment for softmod in my pc like months ago but never got a chance to sit down and do something hhahahahha I'll just wait for playboy's stuff lol....
Ah,it's good that you've got the developer environment for the psp installed on your psp.Now,if you do have C/C++ knowledge,then you can easily look through the psp-programming tutorials and build your owm piece of gem.It's very simple if you understand the entire concept of it.
This post has been edited by Playboy21: Aug 25 2008, 07:10 PM
Alright,i've got some pretty good stuff right here.First up,i'll post some good homebrew games that were developed by some developers who have mastered the C/C++ programming language.Here ya' go.
Here is my very own tool named TrickBrick v5 : TrickBrick v5
Simple guide to upgrade your psp from any custom firmware which is higher than 3.52m33-2 to 4.01m33. *Works with 3.52m33-3,3.52m33-4,3.60m33,3.71m33,3.80m33,3.90m33 and 3.95GEN* (The updates on your firmware doesn't matter unless you have 3.52m33)
*More to come in the future including DCv7 and 4.01m33 easy-installation guides* *For XMB Themes (CTF/PTF/Flash0),go here Consolespot * *There are themes for OLD firmwares like 3.40oe-a and up to the latest custom firmware*
This post has been edited by Playboy21: Dec 4 2008, 10:27 PM
yup.. nothing new actually... just need +16GB SDHC +usb card reader
solder the stuff to memory card point... *but there are certain ways* * required high level of soldering skills... because its not easy to solder the stuff.


 Aug 25 2008, 12:27 PM, updated 17y ago


 ..
..


 Quote
Quote


 0.0370sec
 0.95
0.95
 6 queries
 GZIP Disabled