Relationship between Roller Height and Downthrust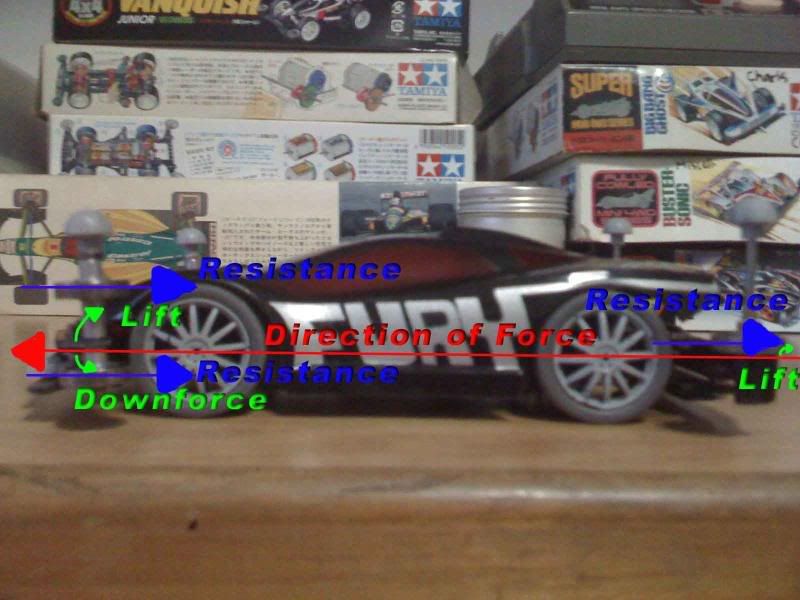 Red: Direction of the force applied or Line of Centre of Gravity (CG Line)
Blue: Resistance due to roller contact
Green: Lift/Downnthrust due to roller heightExplanation:
1. The car moves forward, with red denoting the line of centre of gravity (CG line) which the forward moving force acts upon the car. However there will be resistance that prevents the car from moving forward freely. In this case, we are considering the friction due to roller contact on the walls, denoted by blue.
2.
Due to the relative position of the roller height and the CG line, there will be a passive lift or downforce acting on the car. If the roller is above the line, there will be lift. If the roller is below the line, there will be downthrust.
The significance is that:
1. The further away the roller is placed from the line of centre of gravity, the less stable and slower will be the car.
2. The higher the roller, the greater passive lift experienced.
3. The lower the roller, the greater the passive downforce experienced (i.e you can increase the downforce on the car without having to increase the front angle)
This is why in my previous post I advocated placing the main rollers as near the CG line as possible, best would be slightly above the CG line so that there will not be energy wasted trying to balance the car from the unneccesary lift or downforce, as well as sideway balance, leading to a faster setting. Second, this will allow for the balancing roller to be placed at the bottom as low as possible for quick recovery during jumps and a faster and more stable tilt cornering.
As usual, do discuss and point out if my concept needs amendments.
 This post has been edited by 13lack.12ose: Feb 20 2009, 10:03 PM

 Feb 17 2009, 01:58 PM


 Quote
Quote

 Haha... I think i might not be able to break the record of yet... My rollers stil sux...
 ... How to lighten my car weight? Wat is the minimum weight of a car needed in term to be able to run in hyper dash speed to pass the bridge?


 ...
... 


 0.0521sec
 0.63
0.63
 7 queries
 GZIP Disabled