Welcome Guest ( Log In | Register )

4 Pages  1 2 3 > » Bottom

Outline · [ Standard ] · Linear+

Home Theatre Optoma HD65 Kakis, technical, tweaking, screenshot.........

views
     
ycs
post Jun 6 2008, 12:13 PM

MEMBER
*******
Senior Member
4,229 posts

Joined: Jan 2003
From: Selangor


can anyone give some advice on what type of screen to get for hd65?

i'm thinking of getting a manual pull-down screen since planning to ceiling mount in living room

This post has been edited by ycs: Jun 6 2008, 12:23 PM
ycs
post Jul 1 2008, 12:20 PM

MEMBER
*******
Senior Member
4,229 posts

Joined: Jan 2003
From: Selangor


flying daggers, 720p, mkv - seems not sharp cos shooting on naked wall!! and also maybe not properly aligned.
using std cinema setting

user posted image
ycs
post Jul 1 2008, 03:33 PM

MEMBER
*******
Senior Member
4,229 posts

Joined: Jan 2003
From: Selangor


to get a reasonable screenshot, I'd suggest following:
1. use tripod
2. set on AP or manual exposure and use at least F8-F16, preferably smallest aperture
3. then underexpose little bit by 1/3 or 1/2 stop to get darker blacks cos auto metering will overexpose slightly due to inclusion of black border
4. use ISO 400-800 so that exposure time is bearable, maybe 1 sec.
5. use self-timer to trigger shot
6. do several shots with slight exposure changes.
ycs
post Jul 11 2008, 03:32 PM

MEMBER
*******
Senior Member
4,229 posts

Joined: Jan 2003
From: Selangor


single phase max usually=60A so approx 4-5hp simultaneously on.

i have about 5hp on simultaneously on single phase is ok, which leaves some spare for the water heaters, lights, etc.
ycs
post Aug 12 2008, 02:01 PM

MEMBER
*******
Senior Member
4,229 posts

Joined: Jan 2003
From: Selangor


anyone tried screen goo before? seems fixed screen prices are pretty pricey
ycs
post Aug 16 2008, 08:20 AM

MEMBER
*******
Senior Member
4,229 posts

Joined: Jan 2003
From: Selangor


I've built my own 8' x 4' plywood screen and hang it on the wall.

Going to paint it with matt white murobond paint and primer. Let's hope the result is acceptable. Total cost for plywood, wood frame, brackets, nails, paint = RM180 Verifed that the paint is really matt and don't have hot spots.

The screen goo paint pricing is simply ridiculous i.e. Rm1100 for a 1 litre set of digital grey and base coat!

I also pulled my own cables thru plaster ceiling for HDMI, composite and power. Will pull ethernet cable from upstairs switch later. Got local handyman to install ceiling manhole so that can pull other cables if needed.

» Click to show Spoiler - click again to hide... «


This post has been edited by ycs: Aug 16 2008, 07:48 PM
ycs
post Aug 16 2008, 05:06 PM

MEMBER
*******
Senior Member
4,229 posts

Joined: Jan 2003
From: Selangor


QUOTE(scotty @ Aug 16 2008, 11:01 AM)
what is the height from the floor to your screen? i think is a bit too high. 3ft?
*
yes, the bottom of the screen is 35" high coz my front speakers are 33" tall. ideally, the bottom edge should be about 18" lower but the speakers will get in the way; anyway will try it out first and see if its comfortable or not.

painting can be trickier than putting up cloth but its made a lot easier using rollers.
ycs
post Aug 16 2008, 08:50 PM

MEMBER
*******
Senior Member
4,229 posts

Joined: Jan 2003
From: Selangor


the paint

» Click to show Spoiler - click again to hide... «

ycs
post Aug 17 2008, 10:06 AM

MEMBER
*******
Senior Member
4,229 posts

Joined: Jan 2003
From: Selangor


test shot last night with 2 layers of primer and 2 layers of top coat.

Using normal dvd player via component input; no upscaling; use camera zoom to show hd65 menu.

To naked eye under room lights, there are discernible slightly dark streaks on the plywood screen but in darkroom condition it becomes unnoticeable. Will put as many paint layers to finish the 1 litre bottle. The plywood is really soaking up the paint.

» Click to show Spoiler - click again to hide... «


This post has been edited by ycs: Aug 17 2008, 10:07 AM
ycs
post Aug 18 2008, 01:27 PM

MEMBER
*******
Senior Member
4,229 posts

Joined: Jan 2003
From: Selangor


QUOTE(myqd @ Aug 18 2008, 11:26 AM)
I once make a fix screen with a 4' x 8' plywood,the "mate white non-refletive" type ,the result is ok but even it's non-reflextive,it still reflex some of the light in some bright scene.I then cover the whole screen with a see through grey cloth and the result is better.However,i finally took down the screen becos it doesn't looks good in my living room(no room for HT).Just a frenly advice,if u are using 4' x 8' plywood,it's better u make some black border on left/right/up/bottom to make it real 16:9 measurement which definately looks better and more "pro" ,hehe  thumbup.gif

I also think of another option for DIY screen.Buy a pull down screen,"dismember" it kaw kaw and take out only the screen.Cut it into a 16:9 size and nail it on a plywood.Maybe it works  wink.gif

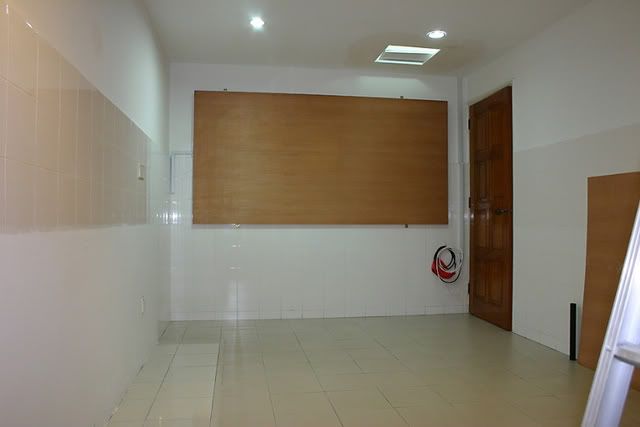
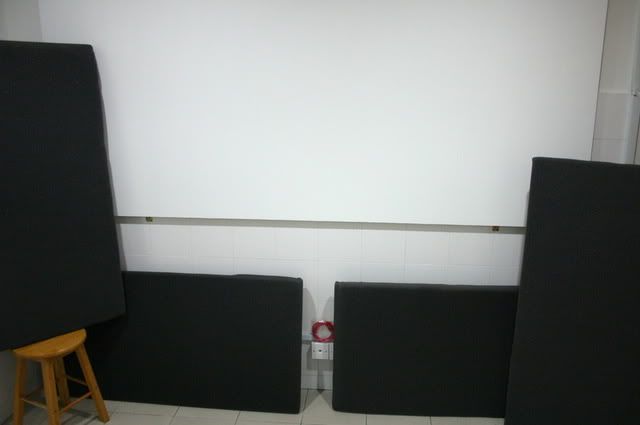
Another thing,i saw from the pic ,ur HT room,all walls are with shinning tiles cover to about 5' tall.If it's using as HT room,i think the sound will be very "harsh"becos of the reflection.It's advice to do some treatment on the wall,especially the 2 side wall and the rear wall.For this,u can use some curtain.....juz my 2 cents  smile.gif
*
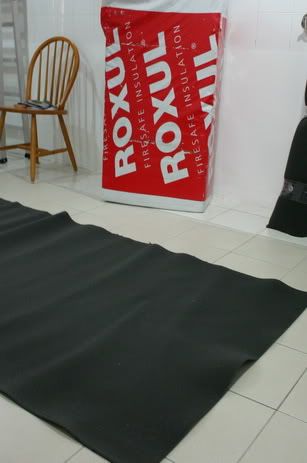
my HT room is previous kitchen thus the 5ft high tiles. I do intend to later on treat the walls; firstly to make it non-reflective by painting, either hang dark heavy drapes and/or build some acoustic panels using polywool.

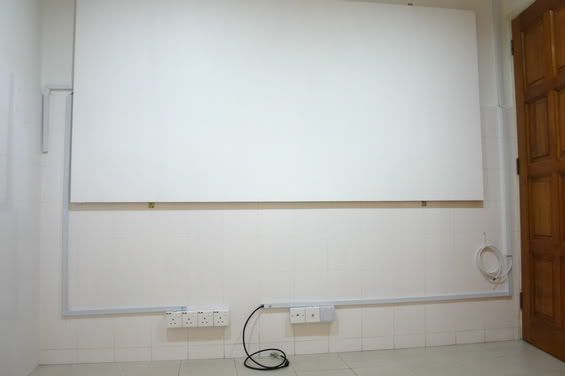
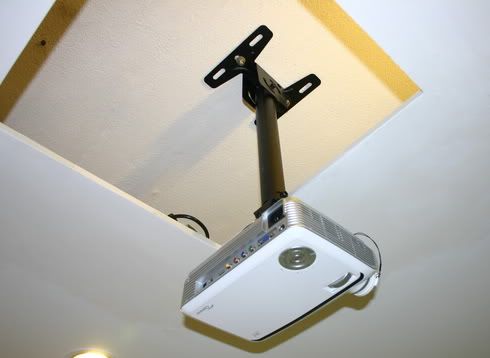
I'll also look for some black velvet cloth to frame up the screen and attach using velcro so that can adjust for different aspect ratios. All these will only come after I finish the basics of the screen, wiring, mounting the hd65, painting the walls, install lights i.e the messy work.

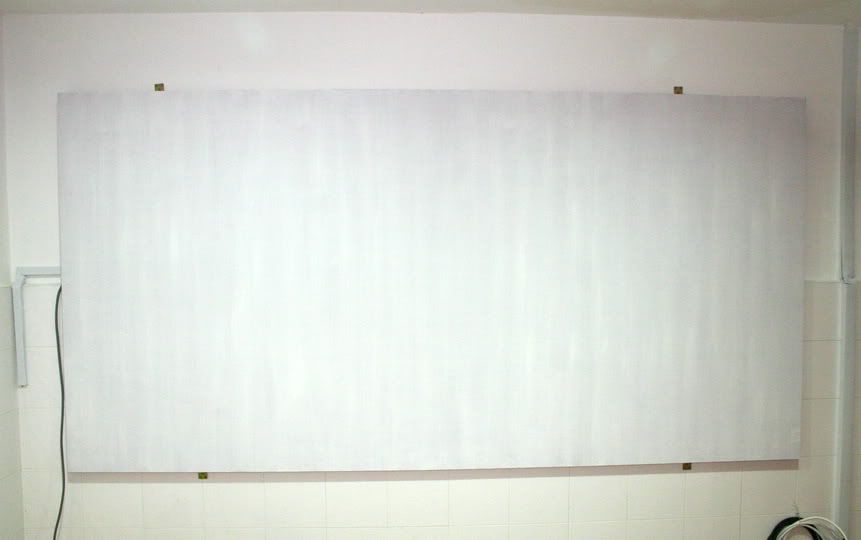
The pic below after 2 coats of primer and 2 top coats of matt white. I'm already into my fifth coat today covering up all of the paint streaks that you see below.
» Click to show Spoiler - click again to hide... «

ycs
post Aug 18 2008, 09:31 PM

MEMBER
*******
Senior Member
4,229 posts

Joined: Jan 2003
From: Selangor


Mostly finished wiring and laying cable casing for electrical, composite video, RJ45 and HDMI (in black).

The screen now have 5 coats of paint and looks quite acceptable to naked eye. Will paint at least 2 more coats to tidy up.

I'm now thinking of painting dark grey the wall behind the screen-not keen on a black wall.

user posted image

The HD65 is already ceiling mounted using an ABTUS ceiling mount which has a quick release mechanism for removing the pj easily.

user posted image
user posted image
ycs
post Aug 20 2008, 01:59 PM

MEMBER
*******
Senior Member
4,229 posts

Joined: Jan 2003
From: Selangor


QUOTE(kiam @ Aug 18 2008, 10:04 PM)
really nice seeing everything falling into place. I'm sure it'll be very satisfying DIY project.

I'm still working on my projector ceiling mount...hmm....
*
Do you mean that you wanna diy your ceiling mount? A new one doesn't cost so much.
ycs
post Aug 25 2008, 09:10 AM

MEMBER
*******
Senior Member
4,229 posts

Joined: Jan 2003
From: Selangor


QUOTE(htkaki @ Aug 24 2008, 11:18 PM)
I wonder what is ycs' progress on the DIY screen.
*
Have finished painting the screen, a total of 7 layers which makes it quite evenly white without discernible patches.

I'm now considering colour scheme for the room and acoustic treatment of the walls and floor. Looks like the front wall got to be black whilst the ceiling may be grey cos don't like too much black.

Planning to diy acoustic panels for walls and still looking for the simplest method. Any inputs/ideas/recommendations will be appreciated.

Currently, searching for polywool and fabrics. Hope to source them this week.
ycs
post Aug 30 2008, 08:48 PM

MEMBER
*******
Senior Member
4,229 posts

Joined: Jan 2003
From: Selangor


QUOTE(htkaki @ Aug 30 2008, 12:43 AM)
Here very expensive. Can be bought from Mediaplex.


Added on August 30, 2008, 1:09 pmbtw, we have 2 more new HD65 members :

madnoren and RMN1110

Welcome to HD65 club!  rclxms.gif
*
welcome guys! ht, ur sales rocketing up nicely ...
ycs
post Aug 31 2008, 01:11 PM

MEMBER
*******
Senior Member
4,229 posts

Joined: Jan 2003
From: Selangor


Have completed 4 acoustic panels - 2'x4'x3" using rockwool and wrapped in PU foam in plywood frame

user posted image
ycs
post Sep 1 2008, 07:22 AM

MEMBER
*******
Senior Member
4,229 posts

Joined: Jan 2003
From: Selangor


The Missing Element:
The missing element in most home theaters is proper acoustical treatment. Why is the room so important? The reason is that sound must eventually travel the acoustic path from the loudspeakers to our ears. The sound that we hear in a
room is a combination of the direct sound from the speakers and the indirect reflections from the room surfaces and room contents. Indirect reflections can cause acoustic distortion, so that you end up listening to the room and not the intended soundtrack. Hence, reflection control is a central problem in creating rooms that allow a suspension of disbelief.


ycs
post Sep 2 2008, 09:13 PM

MEMBER
*******
Senior Member
4,229 posts

Joined: Jan 2003
From: Selangor


QUOTE(silbii @ Aug 31 2008, 11:33 PM)
very interested to have this too..

did u diy? how much did this cost and where to source for materials, esp the foam?
*
yes, i diy'ed the 4 panels myself using 1"x2"x8' timber, 1/8" plywood backing the frame, just nail up the frame with the plywood back.

fill up the frame with rockwool up to 3" thick - i made two 3" thick panels and two 2" thick panels
user posted image
btw, rockwool is cool
user posted image

then wrap up the whole panel with 5mm PU foam using stapler gun.
user posted image

final result
user posted image

approx cost per panel is RM80 each. timber from timber yard wherever you can find them, rockwool and foam from aircon installer

I'm using these panels for first reflections.

next project is to make bass traps for the 4 corners. then tackle front wall and ceiling.

This post has been edited by ycs: Sep 2 2008, 09:17 PM
ycs
post Sep 2 2008, 09:59 PM

MEMBER
*******
Senior Member
4,229 posts

Joined: Jan 2003
From: Selangor


QUOTE(lohlm56 @ Sep 2 2008, 09:28 PM)
Yours is cheaper than me , the different is my rockwool is above the frame then wrapped with fabric . also back is hollow and doesnt cover with plywood.


Added on September 2, 2008, 9:37 pm
DO you interested to diy diffusors , may be we can share how to diy.
*
yes, i'm also looking to make diffusor, looked at some plans but have to see what i can get from timber shop, also i cannot make too big coz back wall got window. thinking of installing some curved plywood strips to diffuse sound.

btw, have you got bass traps too? mind to share your plan. do you also install on ceiling? how?
ycs
post Sep 3 2008, 05:04 PM

MEMBER
*******
Senior Member
4,229 posts

Joined: Jan 2003
From: Selangor


pierreye, nice room setup.

where is your equipment hiding? In the front wall?
ycs
post Sep 3 2008, 05:21 PM

MEMBER
*******
Senior Member
4,229 posts

Joined: Jan 2003
From: Selangor


QUOTE(pierreye @ Sep 3 2008, 05:16 PM)
Thanks. I ask the carpenter to create a frame 3 feet from wall. Then wrap the frame with speaker cloth. All equipment is hidden behind the frame (front speaker, center speaker, receiver, htpc, sub). The panel below the screen can be open to access to the equipment.
*
can have some close-up of the front wall in operation? I'd like to get some idea's if possible. I'm still llooking for the speaker cloth. Didn't you treat your ceiling and wall/ceiling edges?

4 Pages  1 2 3 > » Top
 

Change to:
| Lo-Fi Version
0.0529sec    0.70    7 queries    GZIP Disabled
Time is now: 6th December 2025 - 02:11 PM