QUOTE(007SMH @ Sep 26 2025, 09:02 PM)
My current D400 UG with Reako 6" android screen

how's the video recording quality? ok ka?
What did you do to your bike today?, Or quite recently...
|
|
 Oct 4 2025, 10:50 PM Oct 4 2025, 10:50 PM
|
 
Senior Member
2,801 posts Joined: Jan 2003 From: Darul Aman |
QUOTE(007SMH @ Sep 26 2025, 09:02 PM) My current D400 UG with Reako 6" android screen how's the video recording quality? ok ka? |
|
|
|
|
|
Oct 6 2025, 01:43 PM
|
|
Senior Member
2,801 posts Joined: Jan 2003 From: Darul Aman |
QUOTE(paskal @ Oct 4 2025, 10:49 PM) » Click to show Spoiler - click again to hide... « must be the tyres.  so i ordered new tyres.  changed the front tyre. wobbling solved. the old tyre developed a slight bump (pregnant) in the middle of the thread. hard to spot. only a slight bump but enough to cause the whole front end to wobble. i missed it even after 3 times remove and rebalanced the tyre. perfect balance but just that slight bump. anyway problem solved. hopefully. considered the new anakee road and anakee adventure but in the end still went with anakee adventures. |
|
|
Oct 14 2025, 09:57 PM
|
|
Senior Member
2,801 posts Joined: Jan 2003 From: Darul Aman |
  bought the reako 6" carplay. looks quite high quality. there's 3 different versions of the 6". 3 or 4 version. i just bought one that has high rating and cheapest of the bunch. well 5" is cheaper but gonna be too small on my dash. next weekend project. |
|
|
Oct 14 2025, 10:49 PM
Show posts by this member only | IPv6 | Post
#504
|

All Stars
10,530 posts Joined: Nov 2004 From: Petaling Jaya & Mid Valley |
Yesterday demod the z900 to put it up for sale...not much.. just removed the autogate remote...the shad 3p rack and the scottoiler. 
This post has been edited by mADmAN: Oct 14 2025, 10:49 PM jaycee1, Vincent6596, and 1 other liked this post
|
|
|
Oct 16 2025, 09:55 AM
Show posts by this member only | IPv6 | Post
#505
|
|
Senior Member
2,484 posts Joined: Jul 2008 |
QUOTE(paskal @ Oct 14 2025, 09:57 PM) bought the reako 6" carplay. looks quite high quality. there's 3 different versions of the 6". 3 or 4 version. i just bought one that has high rating and cheapest of the bunch. well 5" is cheaper but gonna be too small on my dash. next weekend project. |
|
|
Oct 17 2025, 11:13 PM
Show posts by this member only | IPv6 | Post
#506
|
|
All Stars
10,530 posts Joined: Nov 2004 From: Petaling Jaya & Mid Valley |
Tore down the v11 a couple of days ago...dear god its like rocket science removing the panels...luckily theres a guide on YouTube on how to undress the bike. Anyway...swapped out the stock horn for an old pair of bosch ec12 and also installed a power distribution block 


Bike still hasnt been reassembled as i do have a number of other accessories to install before i reassemble the bike again.. hopefully can get some done this weekend. jaycee1 liked this post
|
|
|
|
|
|
Oct 21 2025, 05:01 PM
|
|
Senior Member
2,801 posts Joined: Jan 2003 From: Darul Aman |
QUOTE(jaycee1 @ Oct 16 2025, 09:55 AM) Cool. Pls review when done. I'm also looking at the reako unit. Thanks initial impression, testing it on the workbench:1. camera is quite low quality. low light recording is quite bad. 2. unit comes with 64GB memory capacity. swappable microsd card in a removeable panel under the unit. 3. very little customization. lots of things can't be changed like the alert threshold for the TPMS. 4. wireless android auto is quite stable and fast. 5. front and rear camera is huge. hard to find suitable spot for it.  had to remove the front panels, headlight, windscreen to route the wires properly.   tried to swap the original camera unit to an AHD 720p reverse camera that i have lying around. doesn't work. traced the 4 pins to 5V, GND, signal ground and signal but no jive. maybe need to find a camera that has the correct format. and now i remember that i have a few other car cameras i have stored somewhere. maybe can test those out to see if they're compatible. jaycee1 liked this post
|
|
|
Nov 7 2025, 10:10 PM
|
|
Senior Member
2,801 posts Joined: Jan 2003 From: Darul Aman |
update on the reako carplay.
» Click to show Spoiler - click again to hide... « taken the bike out through some bush around my dusun. holding up quite ok through some heavy rain. these are the video recording from the unit: » Click to show Spoiler - click again to hide... « full HD 1080p but the quality is quite low. 1 minute of recording uses around 65MB of storage. i did some night time rainy riding but it was overwritten when i did 5 hours ride to betong last weekend. the wireless android auto frequently disconnect with my poco f3 but rarely disconnect and very stable on my poco f5. TPMS is quite accurate. wireless android auto speed is acceptable for me. |
|
|
Nov 8 2025, 02:03 PM
Show posts by this member only | IPv6 | Post
#509
|
|
All Stars
10,530 posts Joined: Nov 2004 From: Petaling Jaya & Mid Valley |
*long post... lotsa pix.. n not really in order - you have been warned*
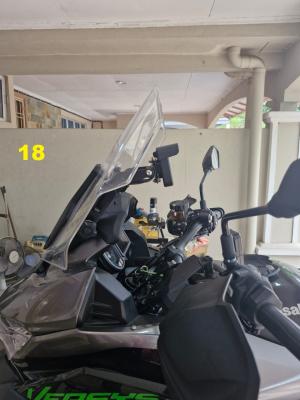
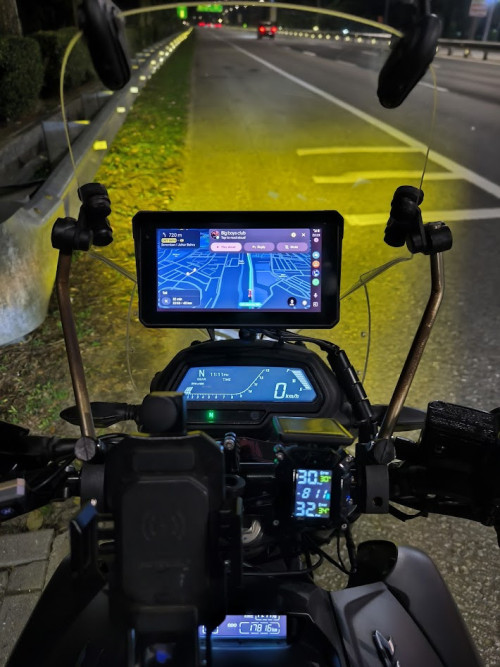
ive numbered the pictures for easier reference and also coz im just gonna copy paste this for other forums/fb etc. also, some notes for kawasaki owners in the end finally.... after 3 weeks of the bike being stripped down... its finally back together. still gotta aim the spotlights better, but at least the bike is rideable again. took 3 weeks coz i had some headaches on wire routing and how to keep it as neat an hidden as possible and also there were quite a number of times i had to go out and go to the bolt n nut shop, hardware shops, waiting for stuff to arrive etc etc. also only had like 3-4 hrs a day to dedicate to this. 01 - how my house typically looked for those 3 weeks lol 
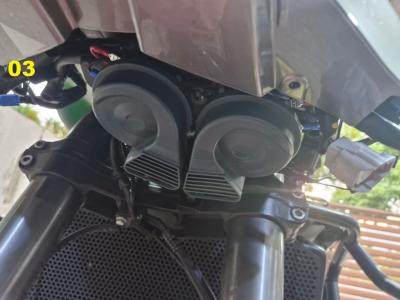
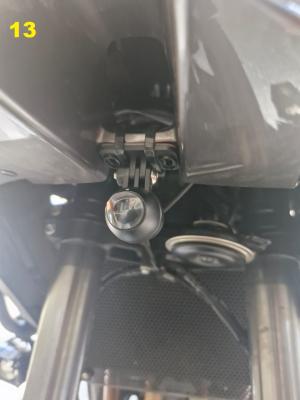
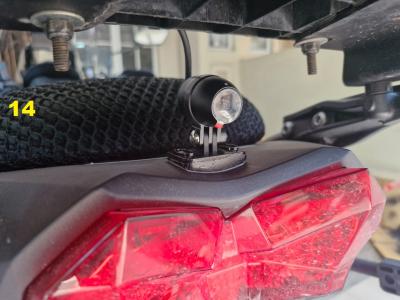
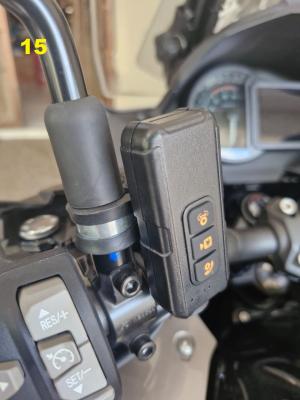
02 - first order of business. a power distribution box. cheap at less than RM50 on shopee. fused and small. these things are really good that even Oxford rebranded it and selling it at higher price lol. downside is that it uses micro blade fuses (not mini) which isnt as easy to find out in the wild but available in shopee when u buy the multi size fuse kit. so thats what i bought n keep a few under the seat. » Click to show Spoiler - click again to hide... « 03 - installed an old set of Bosch EC12 twin horns under the headlamp...chose this location as its out of the elements. these type of horns can easily get water in it and ull have to wait quite awhile before it dries out before it works again. but did a noob mistake and didnt check clearance before finalizing everything. few days later i turned the handle bar and pic 04 happened. back to stock horn til i can think of a better place to mount it away from the elements. » Click to show Spoiler - click again to hide... « 05 - domino switch housing from shopee which i had to painfully (really painfully) modify just to get the middle switch to fit. aint doing this again anytime soon. middle switch was originally just an on-off switch but i needed an on-off-on switch there instead. top momentary switch was also a different colour so swapped it out for a black one. had to resolder all the 8 wires in the back as i wanted the wiring coming out to look cleaner. have not ridden in the rain in this. hopefully its properly waterproof. why this housing? coz conventional switch housings for my use case will be bulky and looks kinda messy on the handlebar. this is smaller and more discreet. looks really good too n im very happy with the end result. there are smaller housings out there but due to all the stuff on the handlebar, i cant even get to the screws in the back to tighten it. this housing has the screws in the front which made it so much easier. switches from top to bottom (they only work when bike is on) momentary - home autogate remote on-off-on - upper spotlight signal switch - this is basically on-off-on switch in a different form which i wired to the lower spotlight » Click to show Spoiler - click again to hide... « 06-08 - the spotlight setup. cheap from shopee. no canbus box or watever just wires. i prefer this type as they are easier to work with. best part is it doesnt have that stupid flashing function. hate those. i can have both colours for either high beam or low beam. or i can run a combo of colours. cheap and properly bright enough. lets see how long these lasts. i actually had issues with the mounting brackets but i thankfully managed to get it figured out in the end after some cutting, cursing, testing, cursing and repositioning, cursing and testing again. this was also the biggest headache to route the wires as there are 3 wires for each spotlight....thankfully i use multi-core cables to get everything to look neat n tidy. but the connections was still a pain to remember lol. » Click to show Spoiler - click again to hide... « 09-11 - installed scottoiler v system...automatic chain oiler. i love this thing. it has made life so much easier on my z900 and previous v1k. finding a location for the reservoir was a lil tough. i cant install it on the frame near the rear footpeg like i did on my previous v1k as this generation has bodywork over the frame. found this spot. not the best in terms of adjustability but it works. had to buy 6mm x 4mm hose to get it to route the way i wanted it. the hose is slightly different than scottoilers weird hose size n cant really find anywhere. this works well enough. had some issues with this install as u can see in pic 09 that the hose is coming out at a pretty tight angle. the diff size + the angle + the stiffness of the hose caused air to leak in the hose which in turns leaks at the sprocket end when the bike is off. managed to sort this out with a 90deg barb connector (pic 11). connector this size isnt easy to find. this connector is meant for car windscreen washer hose. couldnt find at car spare part shops as they only had T n Y connectors. had to order the L from shopee. dont bother with aquarium shops.. went to a few. the only connector they have arent barbed and the hose slowly slips out of the connector. still wanna find hose clamps for this size hose just to be safe. the blue hose is actually a small, forgot size, samco silicon hose. this hose can actually work really well for the whole thing as the sizing n flexibility is pretty dang good. but its not transparent n also pretty expensive compared to the normal clear hose. » Click to show Spoiler - click again to hide... « 12 - the screen! this is the Aoocci C6 Pro. can only order on Aoocci website. TONNES of reviews for this on youtube hence i bought it n it arrived 3 months ago. they also have an aoocci fb group where the admin is pretty active in responding and also shares any firmware updates on any of their models. also in this pic you can see i removed the stock handlebar mounted USB port and also stock 12v outlet. replaced it with the usual USB+Voltmeter in the 12v spot. at least this one supports super fast charging for my samsung. note that the hole in the dash is a little smaller than the USB unit... but u can slowly jam it in and it will fit nicely. » Click to show Spoiler - click again to hide... « 13 & 14 - just where i mounted the cameras front is just cable tied. the supplied base is kinda wide and the bike itself has a curve in that tight spot. cable tie seems to work well enough. rear tail also has a curve so i made a mold using epoxy putty so it can stick properly. same concept as using epoxy putty to make a mold for helmet chin mounted cameras. still unsure if i wanna do this mold for the front. » Click to show Spoiler - click again to hide... « 15 - one of the reasons i went with the aoocci c6 pro. comes with an external remote. ive found the remote to be handy enough to justify it and i do like it alot. originally comes with some stupid handlebar clamp mount. but someone in the aoocci fb group had the idea to use a P clip on the side mirrors so i copied it and it came out perfect. had to mount upside down so the wire is better hidden but thats a small matter. » Click to show Spoiler - click again to hide... « 16-18 - the screen itself comes with those ram ball style mounts. this would make it sit way high up, possibily at the top of the windscreen. and also probably stick out way too close to the rider. the extra height etc will also be more prone to shakes. didnt like that so i custom made my own mount using bar clamps and some sheet metal from the hardware shop. had to order some bolts for this setup which also delayed the process. but in the end i think its totally worth it and i actually enjoyed the whole process. may not be the best looking but im actually really proud of this one. end result is that it sits lower. shakes are minimal from testing and u dont feel like it sticks out too much when riding. only thing is i wish it was a tiny bit lower but in all honesty, i think this position is quite perfect as its easy to reach if needed. theres another option called the navigation bracket for the versys which will make the screen sit way lower. but install is super fiddly and if ur a DIYer who will probably be removing the windscreen hardware again, not worth it. stick with this GPS bar as i find its the best compromise. » Click to show Spoiler - click again to hide... « only thing to note about this GPS bar is that the screws supplied is quite long and sticks out the back as in pic 19. the upper screw is fine and doesnt interfere with anything but the lower screw will block the windscreen from moving its entire range. had to buy shorter screws and even then i had to stack up on washers so it doesnt stick out the back. this solved that problem » Click to show Spoiler - click again to hide... « and just a note to kawasaki owners present and future. a/ when removing body panels, watch out for those stupid well nuts fallilng off. ordering replacements on shopee wont have the same quality as kawasaki supplied well nuts. the brass threads on the shopee ones can actually separate from the rubber housing easily. n the rubber doesnt last long so be super aware of the well nuts. can order original ones from kawasaki and they arent expensive, problem is stock availability. b/ bolts on the bike are like custom made for kawasaki only. u can find the same threads bolt at bolt shops but they definitely wont have the same head design...length of bolt may also be tough to find. u can still use them without issues though. or if ur super picky n insists on ori bolts, can order from kawasaki which will take about a month. c/ some of the bolts are like made from some softer metal. i over tightened the bolts for the windshield bracket and easily stripped the allen heads when trying to remove them again. had to use one of those bolt extractors which thankfully worked after some hardship. i bought replacement stainless steel bolts. diff length, smaller head but works well. so careful when tightening the stock bolts. still have some smaller, easier accesories to install but..... too lazy and will do it in due time. This post has been edited by mADmAN: Nov 8 2025, 02:19 PM |
|
|
Nov 12 2025, 08:09 AM
|
|
Senior Member
2,801 posts Joined: Jan 2003 From: Darul Aman |
QUOTE(paskal @ Nov 7 2025, 10:10 PM) the wireless android auto frequently disconnect with my poco f3 but rarely disconnect and very stable on my poco f5. updated the firmware through wifi and the poco f3 now doesn't disconnect at all.will need a longer ride to confirm. maybe a ride to pak bara this weekend to test? This post has been edited by paskal: Nov 12 2025, 08:10 AM |
| Change to: |  0.0171sec 0.0171sec
 0.23 0.23
 6 queries 6 queries
 GZIP Disabled GZIP Disabled
Time is now: 24th November 2025 - 11:35 PM |
 Quote
Quote