


Seeking ways to design & renovate your house?, Happy Learning Together!
|
|
 Oct 5 2022, 06:24 AM Oct 5 2022, 06:24 AM
Return to original view | IPv6 | Post
#221
|
 
Junior Member
319 posts Joined: Jun 2018 |
|
|
|
|
|
|
Oct 13 2022, 09:49 PM
Return to original view | IPv6 | Post
#222
|
|
Junior Member
319 posts Joined: Jun 2018 |
#NewProject #Renovation Works #CommercialProject #MyMaison
场地考察 Site Recce Tadaa!! 又是一场新Project 啦!这一次,我们随着团队来到了1 Utama Shopping Centre Old Wing 来做考察啦!除了详细了解场地之外,我们也要和负责人接洽,了解规则才能动工啊!看看这些照片,是不是很阴森呢?大家可别太担心,小编相信我们的团队,绝对可以把这一次的难题胜任并完成,相信设计的力量!! 每一次的开始都是一个尝试,究竟还有什么未知的可能性等待我们,关注我们,一起看下去吧! Tadaa!! Here comes our new project! This time, we followed the crew to 1 Utama Shopping Centre Old Wing to do a thorough Site Recce. Beside on knowing the client requirement, the site condition, we also met the management officer to discuss in details! Look at all these photos, it might look dull and bare, but don’t worry! We would definitely convert this into something incredible in future, lets believe the power of designing! Every time we start a new project, there is always a new chance for us to explore the possibilities. Follow us and continue to explore in this journey of renovation! 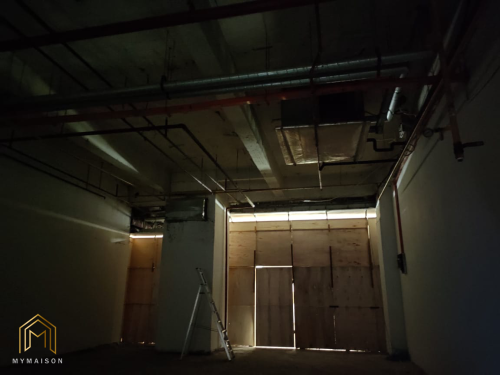 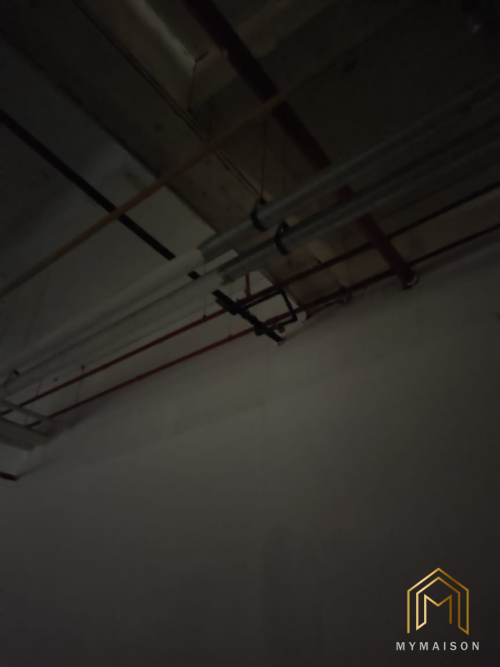 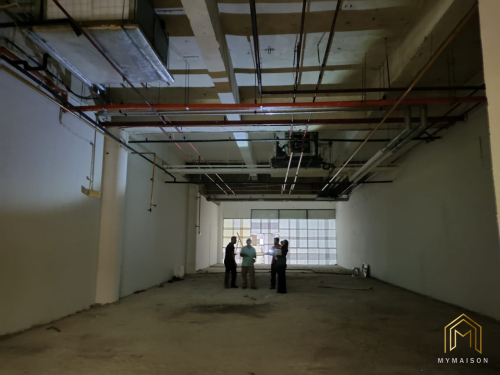 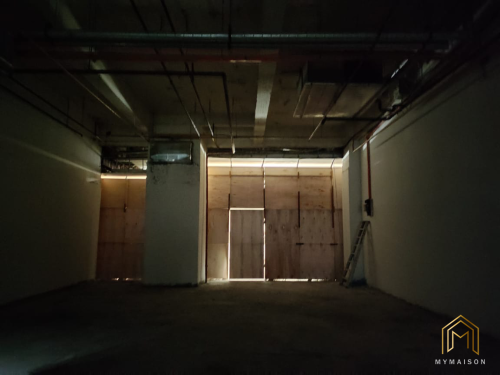 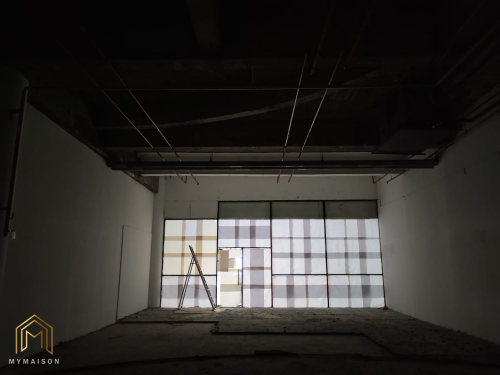 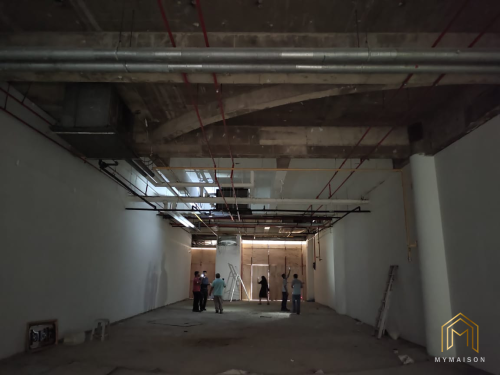 This post has been edited by My Maison: Oct 13 2022, 09:50 PM |
|
|
Oct 16 2022, 11:59 PM
Return to original view | IPv6 | Post
#223
|
|
Junior Member
319 posts Joined: Jun 2018 |
#MaterialTips #MyMaison
亚克力灯箱 Acrylic Lightbox 大家好,今天小编想和大家继续分享材料的小知识,市面上的亚克力灯箱究竟有什么好处? 对于很多的业者而言,甚至是许多连锁店面,你都不难发现他们都应用了灯箱来打造光鲜亮丽的门面。灯箱不仅仅可作为你的品牌标识,丰富化logo的 设计,灯箱更让整体店面的设计更如画龙点睛。在广告牌宣传和装饰上,灯箱的存在吸引了消费者的眼球,无论白天或夜晚都能带来光线亮丽的效果。灯光的营造,也让店铺更加美观。 它之所以优势很大,是因为性价比极高,使用周期很长,维护成本低,安装费也不高。把你想要的设计和想法提交给专业的技术人员,无论是字体的选择、图案、颜色、你都可以得到你像要的效果。😃😃 在板材的选择上,若是使用在户外的灯箱,建议选择较厚和结实的亚克力板。它之所以称之为吸塑灯箱,主要原因即是将塑料片加热使变软,再采用真空将塑料吸附在模具的表面,所以模具的制作过程是非常的重要,它的精准度往往决定了成品的美观。至于图案的呈现就是将它打印在亚克力板上,便可以呈现出画面。最后,选择适合的灯条性质和灯光效果即可完成!🤘🤘 希望大家还喜欢这次的介绍,小编认为亚克力灯箱是一个很不错的选择,但千万记住要选择专业的师傅制作,以避免踩雷吖!🤘🤘😃😃 🙈🤪🤪😃 Disclaimer:图1- 4 为My Maison 所属;图5-7为网络摄取,仅作为参考用途 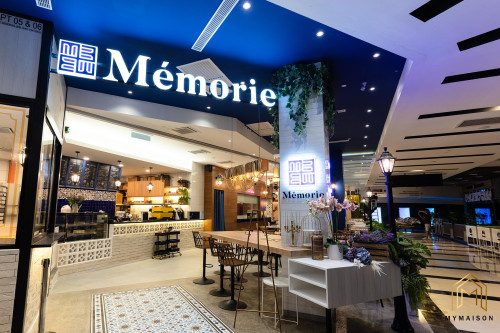  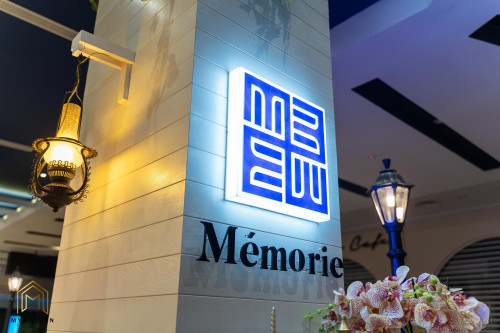 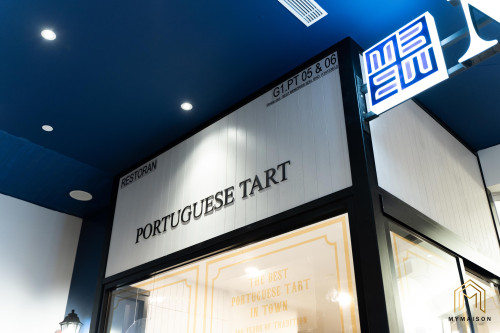    |
|
|
Oct 19 2022, 11:48 PM
Return to original view | IPv6 | Post
#224
|
|
Junior Member
319 posts Joined: Jun 2018 |
#MaterialTips #MyMaison
无把手设计 Non-Handle Profile Design[/B] 说到家里的收纳空间,肯定少不了木工工艺。什么?不想要看见把手在柜子上,觉得碍眼,那就让小编来介绍你一些无拉手设计,喜欢的记得点赞收藏,也许下次装修时,可以派上用场哦!👍🏻😆😁 1. 门板下延1cm - Extend the door panel downward for 1cm 这也许是最普遍、最简单、最易明白、也是最直接的方式来打造你的无把手设计。然而这类型的设计更适用于吊柜。让你的吊柜门板向下延伸1cm, 让手指有足够的空间拉钩门板即可。相较于突兀的把手,这绝对是更好的选择! 2. 2片L 形挡板 - 2 pieces of backboard 这种直接的制作方式不需要特别的技术来制作。木工师傅只需要增加2片挡板在后方,再搭配上延的门板即可。透过这简单的搭配,便可形成小空间以让手指拉钩门板!挡板的颜色可选择与门板不同,让地柜的颜色搭配更有层次感。 3. 45°斜切角门板 - 45° Cut-off shape door panel 常用于抽屉或餐边柜,45°斜切角门板让你的柜子更具有特色。在门板上切出一个45°斜角,手指在拨动门板时也可以摆放得更加舒适。 4. 凹糟门板 /内崁式型材 - Extrusion inserted 凹槽门板的造型更为多样化。你可以和木工师傅讨论你的想法,让师傅设计出适合你的凹槽门板。通常适用于高柜,衣柜、壁柜等。不单单是设计在门板上方,你也可以把凹槽设计在门板侧边,一切根据需求所定!内崁式型材也可以是金属/不同颜色的塑料型材,以达到不一样的层次感! 5. 反弹器 Door panel damper 反弹器的使用需要一个回按的动作,才可以把门板关紧。所以,在你顺手的地方装下然而反弹器不适用于收纳太重物品的抽屉,这也许会导致反弹器失效。🧐🤪 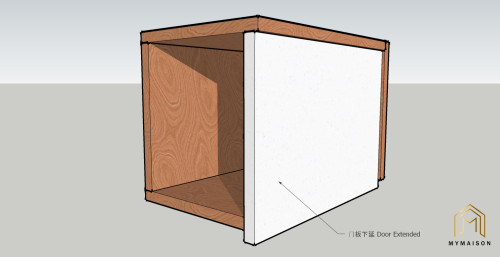 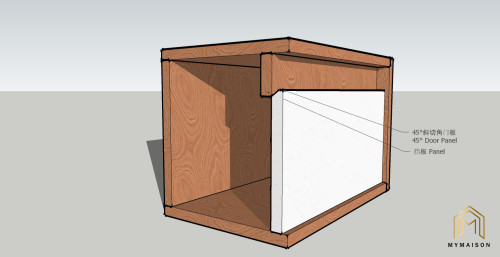 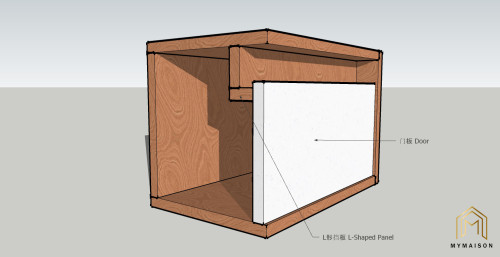 |
|
|
Oct 22 2022, 08:51 PM
Return to original view | Post
#225
|
|
Junior Member
319 posts Joined: Jun 2018 |
#LightingMaterial #DesignTips #MyMaison
线性灯 Strip Lights 又是那一层不变的主灯设计,你是不是一样看腻了那圆圆或方形的射灯了呢?我想要家里有个出彩的地方,到底该要这么做啊 👀👀?别担心,你绝对可以和别人不一样!今天小编想和大家介绍几款线性灯。不瞒你说,这是小编非常喜爱的一款设计哦!线性灯的玩法千变万化,其中包括阳角线性灯、阴角线性、平面线性灯、回光灯槽线性灯、下洗墙线性灯等等!👍🏻 🧐🤨 1. 阳角线性灯 所谓的阳角处,便是两面墙的凸面交界处。在墙角处开槽,把线性灯的型材放入槽中,利用螺丝把它固定在墙上,再利用腻子把型材遮盖到平整即可,最后在槽里贴上灯带便完成啦!装上后的效果绝对可以让你大吃一惊! 2. 阴角线性灯 两面墙凹面交界处,便是所谓的阴角。一样是在阴角处开槽,再以同样的步骤来安装即可!阴角被点亮后,家里整体视觉会更好哦! 3. 平面线性灯 这款线性灯非常的好用,不仅可以固定在墙面,也可以置放在天花板上。设计师有时也会一连把天花板的线性灯一把带到墙身,格外有特色,高级感满满! 4. 回光灯槽线性灯 在吊顶和墙身交界处安装这款回光灯槽,让灯光反射,呈现出来的灯光也更柔和,非常有氛围感,适合用在客厅! 5. 下洗墙线性灯 正如名字一样,这款线性灯直接把灯洗墙,明亮起来但又不刺眼! 总的来说,线性灯绝对可以帮你把家里的氛围感拉满。然而,适当地与射灯做搭配,除了解决了照明功用,一间好看又舒适的家也可以轻松地打造出来! Boring with the typical lighting design, round, rectangular downlight.......🧐. What if I want to have some special design with lighting, what can i do? Don't worry, u can definitely create something different. Let us introduce with some strip lighting design, which we are also in fond with. We can play alot of design with strips lighting. There is much more flexibility and changes you can made based on your preferences and design mood. 1. Strip lights installed at exposed corner of two walls. Just imagine you are having a protruding wall surface, it might look massive. One of the trick to treat the wall corner is by installing the strip lights at the corner. Leaving a small gap for the placement of light extrusion. We lock the extrusion on wall with screws. Skim coat or plaster the extrusion to conceal it from eyesight. Lastly, place your strip light into the extrusion. Its simple and nice. The outcome would be awesome with the line of lights running through the wall surface, so call creating a movement in your house. 2. Strip lights installed at embedded corner of two walls. Not only on exposed corner, we can also light up the embedded corner with strip lights. With same method to install, the dark edges of wall can be lighten up and become the focal point. All of this design depend on how you play with it. 3. Mounted on flat surface Flat strip light has more flexibility when it comes to design. It can be mounted on flat ceiling, even on flat wall as well. The ambient lights created are not eye-striking, suitable to be used in many areas. I would say strip lightings has a lot of potential. You may consider it as it is more sleek in design. Dun worry, it can definitely used and designed together with your main light as well. Hope you like our sharing today. Disclaimer: 图1 为My Maison 所属,图2-4为网络摄取,仅作为参考用途!Pic 1 belongs to My Maison, while Pic 2-4 were taken online for learning purpose only. 📞 : +60 11-1665 0288 MyMaison 官网 💻:https://mymaison.com.my 📩: mymaison.design@gmail.com  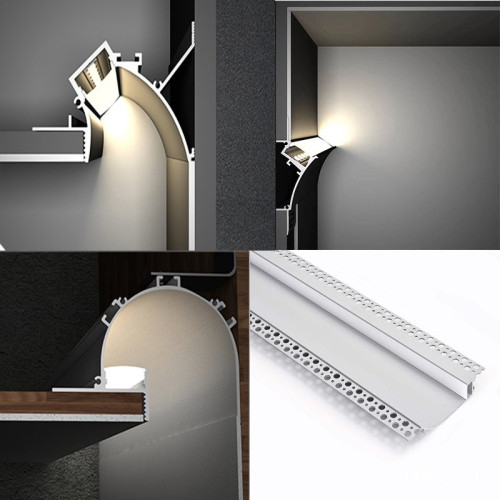  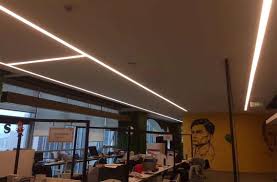  |
|
|
Oct 30 2022, 05:23 PM
Return to original view | IPv6 | Post
#226
|
|
Junior Member
319 posts Joined: Jun 2018 |
#Construction #Architecture #MaterialTips #MyMaison #lightingmaterial
铝扣板 Aluminium Composite Panel Sheets Hi everyone, welcome back to our new sharing session again! Today, let us share with you some of the basic construction material, which is abundantly used in this industry, the aluminium composite panel sheet!🤪😃 Just have a look on your living surrounding, the usage of aluminium composite panel can be seen everywhere. For example, the MRT stations, your condominium building façade design / guard house ceiling, residential housing fascia / false ceiling, building wall panelling, internal office partition and more. So, what is actually ACP panel? It is a lightweight cladding panel, which is so good in enhance the visual appeal and also function as weather resistance of buildings. Made up of two thin sheets of aluminium sheets sandwiching a Polyethylene Plastic (PE) core in the middle, the 4mm thick ACP can withstand more than 10 years after installation. Not only durable, it is light, having high strength, perfect flatness, rigid, bendable for many shapes and weather resistance. Thus, it is always known as a perfect material, to form decorative motive for your building. Don’t you feel that it gives a very classy and satisfying look after installation? 🙈🙈 There are a lot of colours to choose from in the market. Normally, we would give the ACP long lasting finishes. You may decide a powder coated finish or even a pvdf finish. From there, choose the best colour from the available colour chart. I would say it is very versatile and many possibilities of design can be made. For me, workmanship and handling of material is important, especially when we look into the connection of two panel. The joint has to be carefully sealed up and adequate waterproofing as to be done so that no water can seep through the area. For this, it has to be linked to what kind of sealant used. What are each of the types mainly used for? What are the colour we can choose from? Will it be strong enough to hold two pieces of panels together? Will the colour of sealant affect the aesthetic of design? One of our previous project done, hopefully you learn and enjoy something new from us today!!🤘🤘 哈咯大家,又是我们啦!欢迎回到新一期的分享哦!今天想和大家探讨的话题是什么呢?铝扣板,一个建筑业习以为常及普及却令大众都能接受和喜爱的材料。🤪😃 环顾四周, 铝扣板的使用率很高,就如马来西亚的地铁站,公寓建筑设计的建筑材料, 保安亭设计,房子的室外天花, 办公室的隔断,还有很多很多!那铝扣板到底是什么?它是一款轻盈的装饰造型金属材料,增加设计的美感度。厚度仅仅4mm, 但却十分的耐用,可长达10年以上的寿命。它不仅仅轻盈坚固,更拥有平滑的材料表面,也可以被折成想要的形状。不仅如此,适用于户外的它,对下雨也无伤大雅。亮丽的材料可为建筑外层做出设计满满的装饰,也提供了非常Classy 的感觉。🙈🙈 通常呢,选择的材质外层,都会选择提供一层保护层,即应用粉末喷涂 (Powder Coating Surface Finish) 或是PVDF Finish 作为表层。它有一系列的颜色供你选择,取决于供应商,所以你可不用太担心颜色的多元性选择!对我来说,我们更讲求铝扣板的安装细节。两边材质的交界处必须处理好,避免水渗透其中。这是,适当的封密胶就是非常的重要了。不仅仅如此,我们必须确保封密胶足以承担两片铝扣板的重量,还有达到完美的封密性。同样的,封密剂的颜色选择也不容小看,透明?白色?灰色?黑色?🤘🤘 以下是我们的作品,希望你喜欢今天的分享哦! MyMaison 官网 💻:https://mymaison.com.my 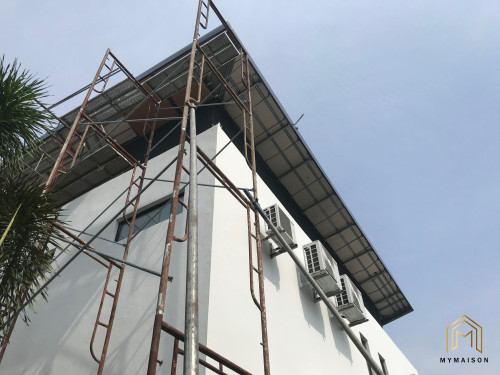 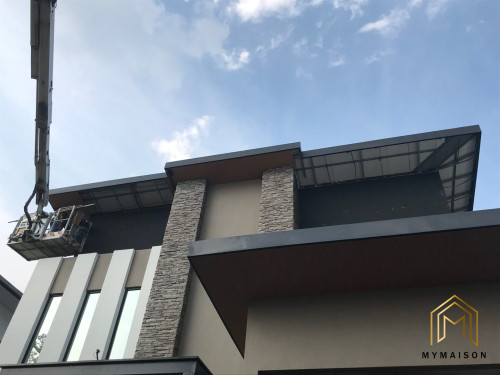 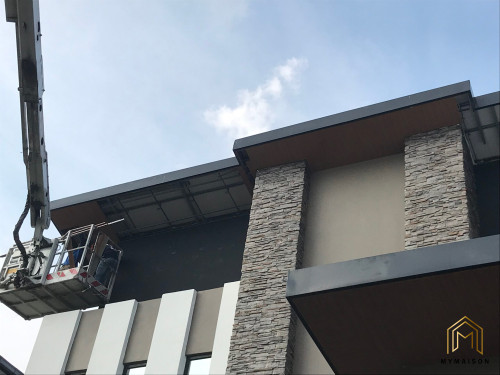 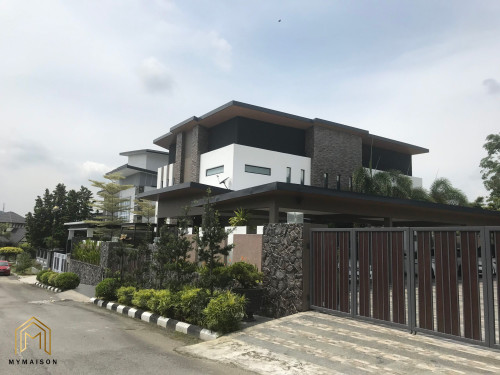 |
|
|
|
|
|
Nov 1 2022, 12:01 AM
Return to original view | IPv6 | Post
#227
|
|
Junior Member
319 posts Joined: Jun 2018 |
#CoatingSurface #MaterialTips #MyMaison
粉末图喷 Powder Coating / PVDF Finish Coating Better? We talked about the aluminium panel in our last topic, so do you know that what are the treatments did to them before the entire product can be now installed by us? 🤪😃 Definitely, they are treated with final protective and decorative layer so that they are more long lasting and even looks better in appearance. The process is called powder coating treatment or either giving them a PVDF finish. Which on to choose from, it depends on the material suitability and where are they going to be used. As compared to normal paint, these two treatments are definitely better in quality, and of course more expensive. Powder coating treatment is applying a layer of protective coating with “powder”, let the particles to cure and solidify in factory while PVDF is in liquid form. Powder coating is thicker as compared to PVDF finish, but it doesn’t mean that it is better. 🙈🙈 Both of these surface finishing treatments give the properties of material to withstand better with impact, scratches, chips and higher traffic. They are suitable to be used at outdoor area, like applying on the aluminium windows, aluminium strips etc. However, one of the advantages of PVDF finish material is it is UV resistant, which means adhere better in direct sunlight. They are not easy to fade as compared to powder coating finish, so in long term wise, I would say PVDF finish is a better choice for you. This also proves that PVDF finish will be more expensive as compared to powder coating finish. In terms of colour choices, powder coatings are available in many colours, whereas PVDF is quite limited. In terms of design, they are so important for decorative purposes and hiding all those surface imperfections of the material. Just like us, bare material would also like to have “dressing” as well. So, that’s all for our sharing today, and I hope you have a little idea on these, when you are choosing the construction material for your house in future!! 🤘🤘 Disclaimer: Photos are taken online for sharing purpose only. 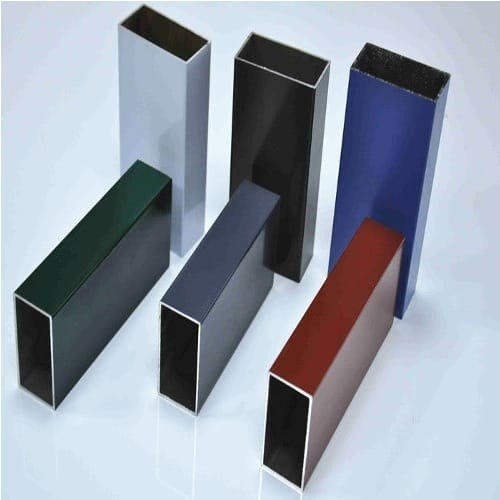  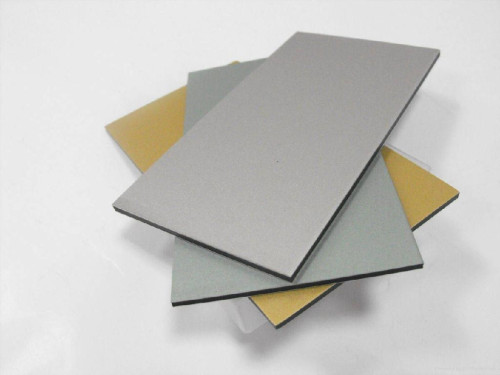  This post has been edited by My Maison: Nov 1 2022, 12:02 AM |
|
|
Nov 9 2022, 07:39 AM
Return to original view | IPv6 | Post
#228
|
|
Junior Member
319 posts Joined: Jun 2018 |
#Construction # Interior #DesignTips #MyMaison
电源开关插座设计Electrical Setting Out Hey it’s me again! Let us back to some interior design tips again for this session. One of the most important aspects during renovation will be electrical point setting out as this is what affecting the loops of wiring system. Please look into some of the plans we shared below to have a better understanding. 🧐🧐 Firstly, for the lighting and fan point, as long as the number is sufficient, it shouldn’t be any big issue to the users. For further lighting design, it can be varied from person and budget. The next one would be socket points. Normally, we would set their height based on the purpose of usage. For example, it can be 300mm above floor, 600mm, 1050mm, 1200mm or even 2300mm and 2700mm above floor. 😁😁 300mm switch socket are normally the one we used in living room, bedrooms. They are like the typical socket used for phone charging, extension, vacuum usage, TV and more. Sound logic right! However, sometimes all of these 300mm socket outlet will designed as 600mm above floor when the unit is specially designed for OKU users. There is occasion whereby there is unit specially designed for OKU in an apartment. This height is definitely serves better ergonomic to them. 600mm height socket will also be used for oven in kitchen, whereby they are placed in the kitchen cabinet compartment, and the position can be different based on your kitchen cabinet design. ☺️😊 1050mm height sockets are special designed for appliances placed on countertop such as bread toaster, some baking machines and more. Light switches in pantry are also specially designed to be 1050mm height as we would not want the plug wiring to be suspended for too long. It looks messy and not user-friendly enough. Next, 1200mm socket will be used for appliances such as refrigerator and also washing machine in your yard. This would be a standard setting out suitable to all brands. Lastly, 2300mm height would normally use for hood point in your kitchen, while 2700mm height socket switch socket would be used for air-conditioning and even heater point in bathroom. For the switches such as lighting, fan, air-conditioning and heater, we would normally set it to around 885mm to 1100mm above floor. Try to take a ruler and measure, this statement sound logical right! Haha! As a conclusion, this is why we say you have to plan well on how you are going to arrange your appliances, furniture layout in before wiring work is completed. Understand what is the purpose of the space, and leave a sufficient number of sockets outlets before everything is too late! Learn something today? Give us a like and share your comment below if you think the sharing today is helpful! 😍😍  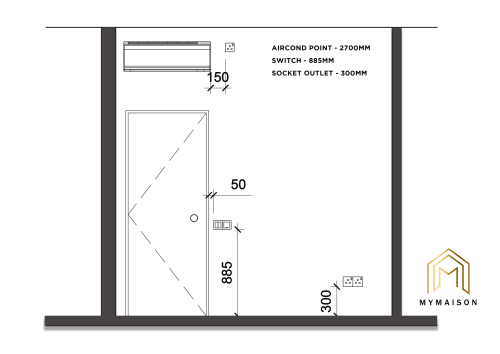 |
|
|
Nov 11 2022, 10:55 PM
Return to original view | IPv6 | Post
#229
|
|
Junior Member
319 posts Joined: Jun 2018 |
#Construction # Interior #DesignTips #MyMaison
Concept of Setting Out Point Every design serves its own purpose, and most of the thing start off with a setting out point. Setting out point refer to a reference point, whereby when you start constructing something, it is the place where you begin. The first setting out point that I would like to highlight here will be tile setting out point. This is very important as it covers the entire area of your unit flooring. A typical tile size can be 300x300mm, 300x600mm,600x600mm etc. A good setting out point can reduce the wastage of tile as it avoids a lot of cutting work on tile at the end of the area. If you simply lay your tiles, you might meet the problem such as having a weird sizing of tile at the end. Just imagine what will the tiles look like if you lay in this way, explore more possibilities and consider if the option can allow the tile line to meet the tile line of another area, just like the interface between bedroom to bathroom. Have a look on the sketch shared below to have a better understanding! 🧐🧐 Secondly, setting out point of sanitary fitting in the toilet. We talked about the importance of ergonomic in this case, just like the electrical point height shared with you previously. A wash basin in the toilet is normally 850mm high from floor finish level. This is what we usually set for while designing. Dimensioning is so important during construction as everything is about coordination. You need to consider is the basin is aligned to basin inlet and outlet point. Where can I install the stopcock or angle valve? Normally, this stopcock and water outlet point is placed 550mm to 600mm above floor. How should I set the offset distance so that all the fittings look nice? 😀😀 Normally, for a head shower, we would set it around 2100mm to 2300mm high while the shower diverter can be 1100mm high. Now, you have to consider if there is any heater, what will be the chosen model? What is the sizing and how can I design it with the inlet? In that case, where will be my heater point, and can the shower head still aligned at the center of the wall? 😊 Next, ask yourself, should the toilet water closet aligned to the window, and will it looks better? Definitely, there is no right or wrong and it can be varied based on the bathroom layout. So, after setting out the WC position, what should be on my right or left? Normally, there will be a tap set at 600mm high on your right of WC, or even a hand bidet depending on design. There can also be a toilet paper with holder set at 750mm above floor on your left. Its all about design. Will there be any other possibilities, such as constructing a low wall with niche to place all the toilet paper, washing detergent etc. 😍😍 For additional information, normally bathroom or toilet of different floors are stacked from each other. This is because they would need to divert all the wastewater away directly from top to bottom. So, we would need access panel in order to service the floor trap or WC above, just in case there is anything happen. Access panel is also needed for you to service if there is any storage water heater tank above. Talking back to the setting out, yes access panel setting out is also important as you would not want something not aligned in your bathroom also right! Haha!! Remember, planning is important, design is important and construction work with site adjustment are all important. Hope you learn something today!! 所有的设计都有它的目的, 而很多的施工工程都从一个Setting Out Point 开始。所谓的Setting Out Point 指的是一个起点,就如铺地砖,总需要一个设立一个起点开始铺。 基本的瓷砖的大小有300x300mm, 300x600mm,600x600mm 等等。一个好的起始点可以减少铺瓷砖时所造成的浪费。如果没有事先想好该怎么铺,最后你可能会发现角落边的衔接处很怪,甚至很难去把它填美。你需要在铺垫前事先做好几种可能性,以达到最好的效果以及让不同空间的瓷砖缝可以完美衔接起来。 第二,浴室内的卫生设备同样也需要Setting Out Point。洗手盆被安置在大约850mm 的高度。尺寸的测量是非常的很重要的。你需确保洗手盆的安装可以与Water Inlet Point & Outlet Point 搭配。那浴室里的旋塞阀该置放在哪里才好看呢?有时,我们会置放在洗手盆下,又或者是在检修口旁。若在洗手盆下,置放的位置大约在550mm 至600mm 的高度。至于花洒,我们会设置在大约2100mm至2300mm的高度,而开关口则在1100mm的位置。两者必须平行摆放才美哦!如果有热水器,我们则需要思考热水器的牌子、大小、摆放位置、热水器插座的设计该如何等等!再来,马桶的摆放也会因厕所的设计而决定。在马桶的左右两侧,右侧会有600mm高的水龙头,又或者是Hand Bidet,而左侧则会有750mm高的厕纸架。这一系列的设计都是方便用户的使用。我们也可以考虑壁龛的设计来置放这些用具等等! 事先的设计再根据实况做出微调整以达到你要的效果。希望今天大家都有所收获,了解尺寸以及测量的准确性在浴室里是格外重要的! MyMaison 官网 💻:https://mymaison.com.my  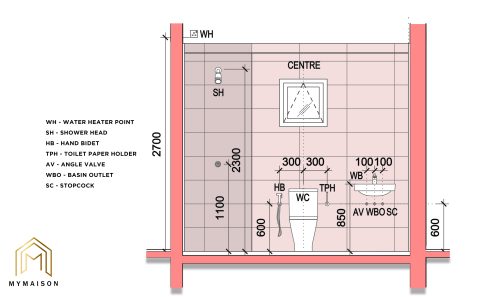 |
|
|
Nov 18 2022, 07:39 PM
Return to original view | Post
#230
|
|
Junior Member
319 posts Joined: Jun 2018 |
#construction #BasicDesignTips #MyMaison 楼梯设计细节 Staircase Design Tips[/B] 家里的楼梯设计,有什么基本的细节要领须知呢?说到底,一个合格的楼梯一定要符合人体工学。在抬起腿时是否方便决定了踏步高度,而楼梯格的深度则必须要容纳脚掌的大小。 当然,在设计学里也有一定的规则,踏步深度与高度往往是有基本的尺寸根据。一个合格的楼梯深度至少是255mm, 高度则为160mm 到180mm 之间。楼梯的宽度通常会设立在1000mm 到1200mm, 以方便两个人同时使用。 除了基本的踏步,每个阶梯之间总会有所谓的Landing。这个landing 是让你有一个“喘息”的空间,也许不是每个人都能一次性上完一层楼高对吧,毕竟设计还是需要考虑到所有用户的使用性。当然这个landing 的大小也必须和楼梯的宽度相同即可。 楼梯的设计选择多样化,有些喜欢基本的混凝土阶梯,铺上瓷砖再搭配简单的把手即可。有些则喜欢悬空的感觉,利用钢材作为主梁,钢铁结构显得更为轻盈,然后再提供楼梯下方一个空间去做些装饰和摆设。若有预算,其实楼梯墙上,我们可以安装一些摆设灯点缀一番,或是在踏板底下安装一些隐藏灯,让空间氛围感提升! 说到扶手,其实扶手的高度也有相应的要求,通常设置在1000mm 的高度,以防止摔倒的事件发生。扶手的设计可多样化了, 有使用基本的钢制扶手,也有精美的钢化玻璃设计!这一切取决于你的预算和想要的设计。下期的分享,我们也会和大家说说扶手的安装方式,让你对施工有一些认识! 如果喜欢这一次的分享,记得点赞并且收藏哦!  To design a staircase with its railing, what are the design tips that need to be considered? A staircase must be able to serve its initial purpose, and with a good ergonomic. When we lift our feet, the riser height should be in a standard height to allow users to get a smooth movement. In terms of depth of tread, it should be able to cater the size of human feet. There are rules and regulation to follow while designing as it involves the safety of users. Normally, the minimum depth of the tread is 255mm as per uniform building by-laws while the riser height should be in between 160mm to 180mm. The width of the entire staircase should set in between 1000mm to 1200mm to allow two users to use at one time.  Furthermore, there is also landing in each flight of staircase. This landing allows you to stop or rest in between two flights of stairs. Design should be relevant and suit to the user usage right. It is impossible to let the user to run through 20 steps continuously without a proper intermediate landing, and of course, the landing width must be same with the width of your staircase. This is what we know as the turning radius. The design of staircase can be varied. Some might like simple concrete steps with final tiling as floor finishes and suited with simple metal railing. Some would prefer to have steel structure serves as the main support, which makes the entire staircase looks lighter. With the extra space below, you can create a space with some planting decoration. If you have more budget, you can consider installing some wall lights at the staircase or even strips lighting below each step of staircase to serve as an ambient lighting. Talking about the railing, each of the railing has a minimum height to follow as well. Normally we would set it at around 900mm for safety purposes. You can choose to have simple metal railing, stainless steel, glass railing with metal support or even frameless glass railing. All these designs depend on your budgetary parameter. In our next sharing, we might share with you some of the installation method for railing, not only for staircase but can be used as a railing for your balcony as well. Hope you learn something today!  Disclaimer: Please note that all the photos are taken online for learning and sharing purpose only. MyMaison 官网 :https://mymaison.com.my 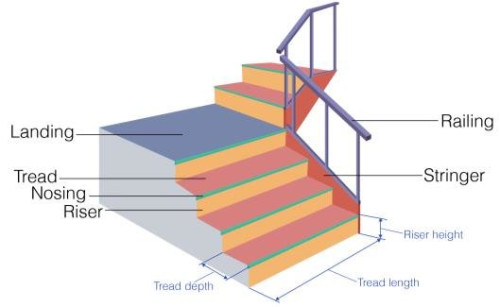 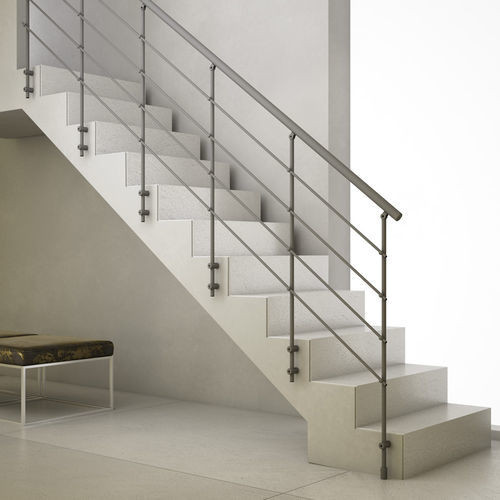  This post has been edited by My Maison: Nov 19 2022, 02:14 PM vignesh77 liked this post
|
|
|
Nov 19 2022, 02:16 PM
Return to original view | Post
#231
|
|
Junior Member
319 posts Joined: Jun 2018 |
Installation of Metal Railing and Glass Railing
We talked about the staircase and railing topic in our previous discussion, let’s talk in detail on how to proceed with the installation of metal railing & glass railing. Some of the tools and equipment needed here would be measuring tapes, markers that can be used to mark on site, welding machine, laser, drill and coring machine, hammer etc. I would say the installation of railing require skilled worker as this can involve a lot of measuring, cutting and welding work. The more precise you are, the better the workmanship, the better the quality it can be. We would need a prelim design on how the railing should looks like. After deciding on the sizing of the baluster, top and intermediate rail, we should proceed with the cutting work of the steel based on the shop drawing. Based on the approved design and installation method, one of the way is to core on the flooring (eg: on tile) to space out an empty space for you to insert the baluster post. I would say the spacing of each baluster should be very consistent. The maximum distance between two balusters is around 1200mm. So, between three to four steps, there will be one baluster post. In terms of design wise, each of the baluster should be placed at the center of the steps. Just then, you can start to weld the top rail and infill steel members together and scrub the welded portion by using grinder or sandpaper. Full weld on joint is necessary to assembly each parts securely. There are actually a few ways to install railing, and it depends on what area you are using for. For typical flight of staircase outside whereby the floor finish material is cement screeding. The installation work is firstly done by anchoring the baseplate directly to the base concrete steps, followed by welding the baluster to the baseplate. Sometimes, the railing can be prefabricated in factory and after each flight of railing is done, they are sent for painting work or galvanizing work before installation on site. The final welding work for the connection elbow must be done on site. However, prefabrication work is not a must, and the welding work can still be done on site directly. Please take note that the installation of railing should not be restricted to staircase only, you can apply the same method as well to your balcony railing as well. For the glass railing, they would need a bottom capping and a setting block to secure the glass. Finishing up with silicone sealant and top capping, the glass railing is done. We would need to look into the glass properties and color when selecting the glass as it can create different effect to the design. Let’s talk about how different types of glass can be chosen in our next sharing. Stay tuned. MyMaison 官网 :https://mymaison.com.my  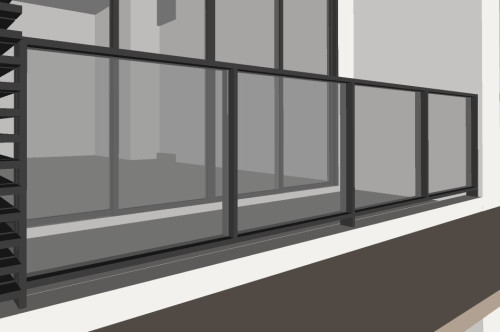 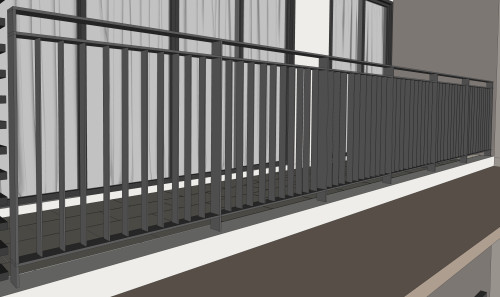 This post has been edited by My Maison: Nov 19 2022, 02:17 PM |
|
|
Nov 28 2022, 09:59 PM
Return to original view | Post
#232
|
|
Junior Member
319 posts Joined: Jun 2018 |
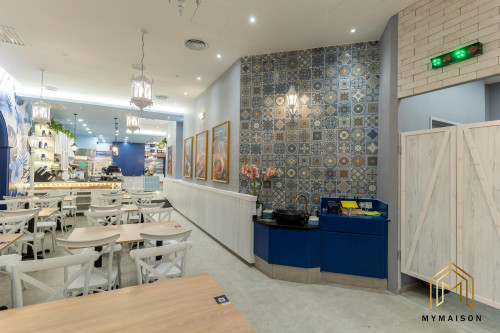
#construction #1utamashoppingcentre #workinprogress
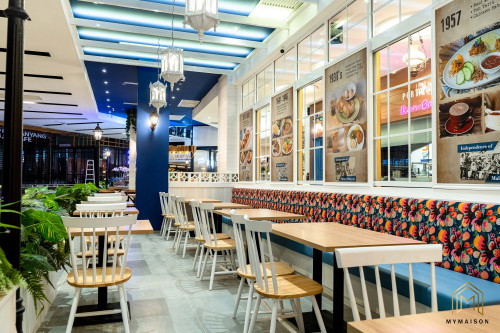
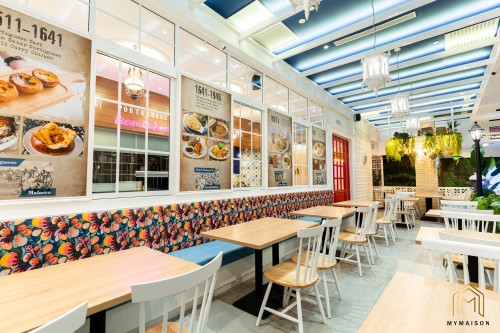
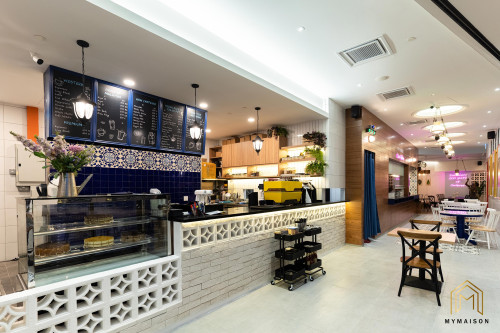
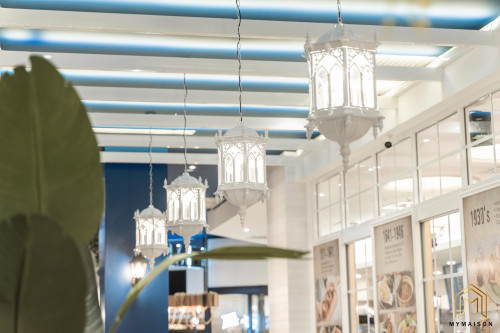
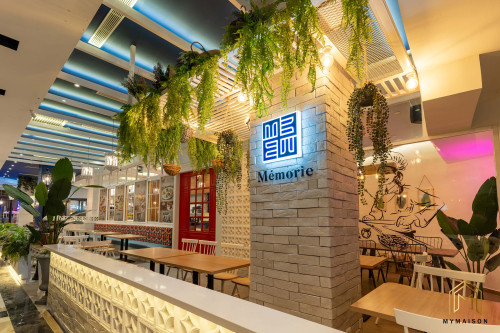
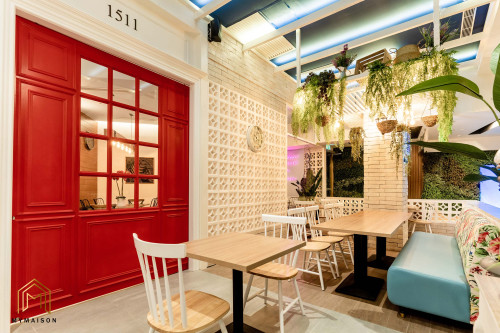
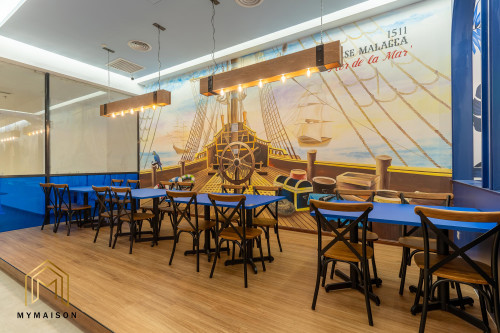
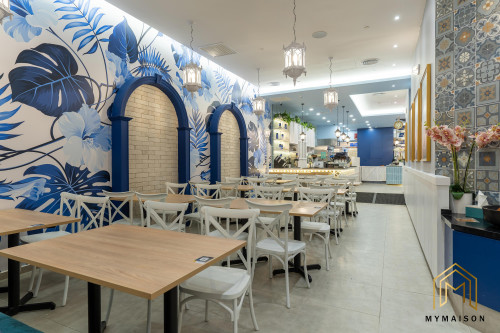
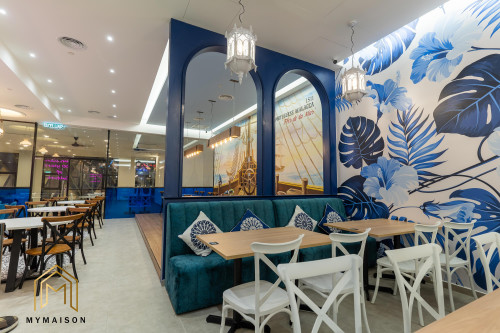
Wah!! Wahh!! 不晓得大家还记不记得小编分享过的Memorie Cafe 呢?这所位于1 Utama Shopping Centre 的分行,装修工程自10 月28 号起便马不停蹄地进行。团队们都打起十二分精神,只为了把最好的作品呈现给雇主。终于啊啊, 我们在 26 Nov 正式完成啦。💓💓 大家是不是也和小编一样很期待呢,那就不要错过接下来的作品影集哦!👍🏻💪🏻 Wahh!! Do you still remember the Memorie Cafe shared earlier? Yes!!! The branch located in One Utama Shopping Centre has been completed. My Maison Design & Build Sdn Bhd and the team have been working hard since 28 Oct for the exciting renovation project, just to serve the best quality for out client! Finally, we are proudly to announce that the entire project is done on 26 Nov. 💓💓 Are you guys excited with the outcome? Dun miss out our project photos and videos soon. 👍🏻 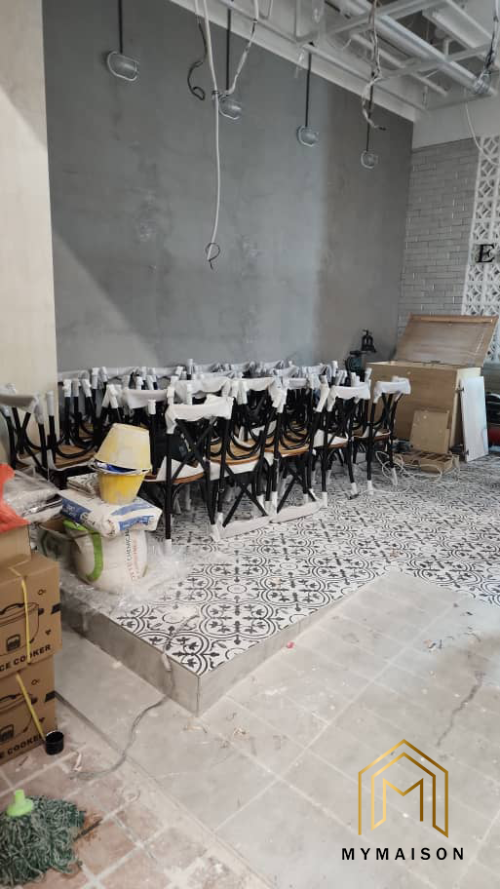 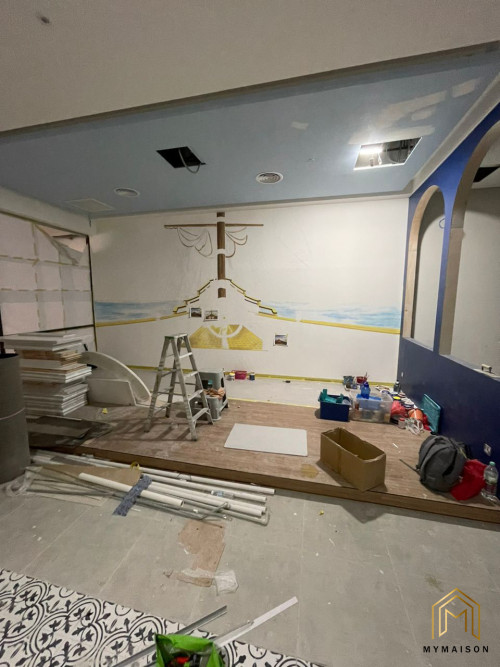  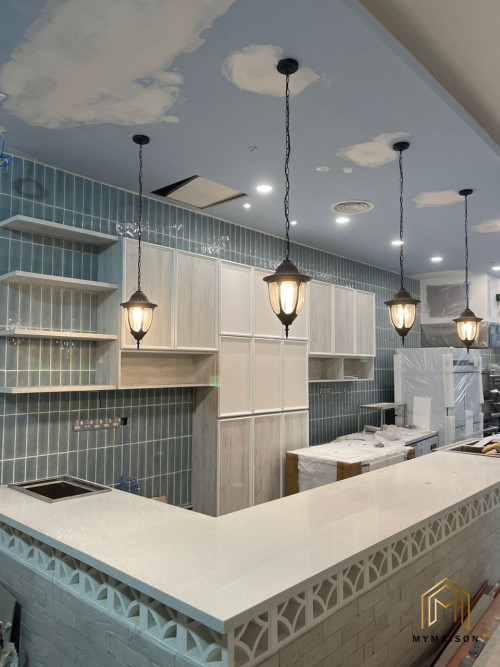 MyMaison 官网 :https://mymaison.com.my This post has been edited by My Maison: Nov 28 2022, 10:00 PM |
|
|
Dec 13 2022, 03:38 PM
Return to original view | Post
#233
|
|
Junior Member
319 posts Joined: Jun 2018 |
#RealProject #construction #renovationproject #1utama
哒哒!万众期待的Project Photo 终于来啦! 位于 1 Utama Shopping Centre, My Maison Design & Build Sdn Bhd 耗时将近一个月的时间,终于把最好的作品提交给顾客啦! 同样的设计风格,却可以让每间分行呈现出独特的风味,Memorie Cafe 在设计这点绝对是值得赞叹!每个空间的设计都做好了规划与主题搭配,再加上 My Maison 团队的手工,这场工程绝对是小编引以为傲的一项作品!🔥🔥🔥 想要寻找专业的装修团队,不妨私讯我们一了解更多详情! Tadaa!! One of the most exciting project is finally here! Located in One Utama Shopping Centre, My Maison Design & Build Sdn Bhd managed to complete the renovation project within one month time, and successfully hand over to our beloved client on time! Same design concept and elements but somehow being able to create different specialty for every outlets, it is definitely a must to provide thumbs up for Memorie Cafe! With their own zone planning, every spaces are well integrated. Thanks to the effort from the team, this is definitely one of the great project for us! 🔥🔥🔥 MyMaison 官网 :https://mymaison.com.my 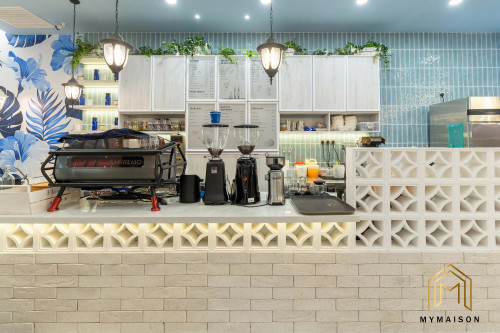 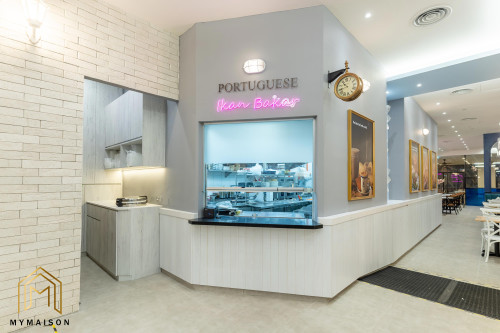 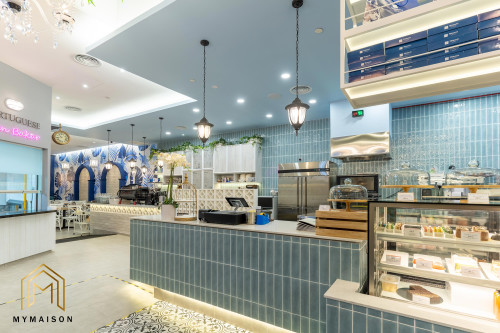 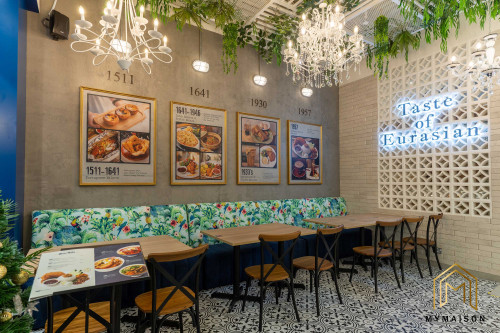 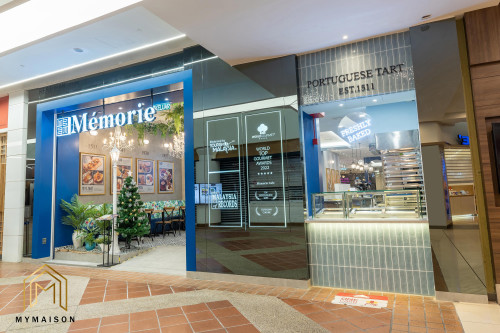 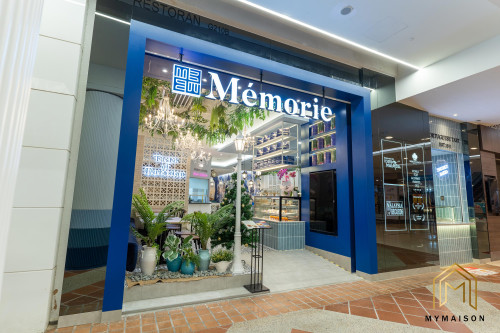 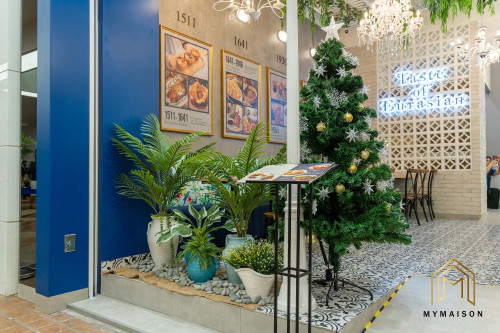 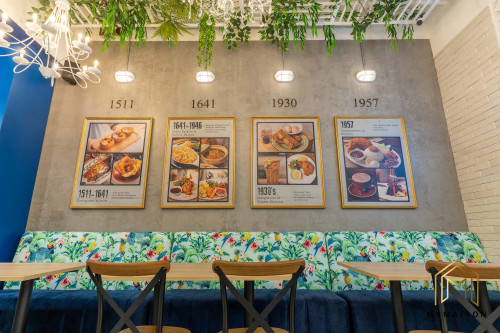  |
|
|
|
|
|
Dec 13 2022, 03:38 PM
Return to original view | Post
#234
|
|
Junior Member
319 posts Joined: Jun 2018 |
       |
|
|
Dec 18 2022, 01:03 AM
Return to original view | IPv6 | Post
#235
|
|
Junior Member
319 posts Joined: Jun 2018 |
#construction #substructure #antitermitetreatment #DPM
Anti-Termite Treatment & Damp Proof Membrane Work I am pretty sure that most of you had heard about anti-termite treatment, but do you know how they are done during the construction stage? The way of applying anti-termite treatment is providing approved chemical barrier to the soil in contact with the building. This is one of the critical works need to be done to the substructure work. Normally, the anti-termite chemical is applied to soil next to the column stump, ground beam, soil below slab, apron etc. The soil to be treated need to be levelled and compacted firstly, and the application should be done on hard surface of hard core or sand binding before the casting of concrete. The anti-termite treatment will not be conducted before or after the rain. Power spray method is used to drench the entire soil surfaces. Once being treated, the soil will be covered with polyethylene sheet to avoid sun heated and rain wash. Casting of concrete should be done within one day after the treatment. Professionalism needed in the treatment work as this involve the usage of chemical. Thus, licensed is needed. Next, we would share about damp proof membrane work, which is also important to prevent the rise of moisture or damp through the structure flooring into the internal. DPM is installed below the ground concrete floor to stop the moisture which originate from the underground. According to JKR, there is actually a requirement of thickness, weight and tensile strength to follow. While laying two membranes, two pieces of DPM shall overlap over each other at both ends. Lastly, cover the DPM with protective layer of screed as soon as possible. Care must be taken to avoid the DPM from damage. I would say a lot of small details need to be taken care even though they might look nothing. However, they are so important as they prevent unnecessary issues from arising in future. Save this post and consult your contractor in future. You might need it for your bungalow or any small-scaled project. Stay tuned for our next sharing! Disclaimer: Photos are taken online for sharing purpose only! MyMaison 官网 :https://mymaison.com.my 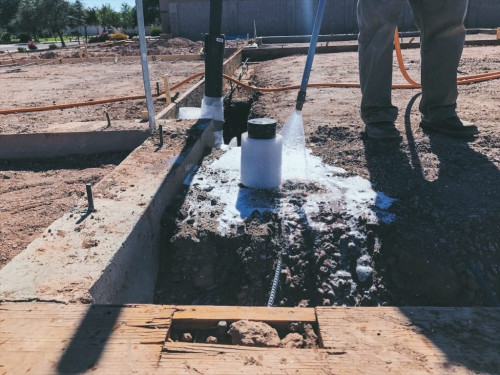 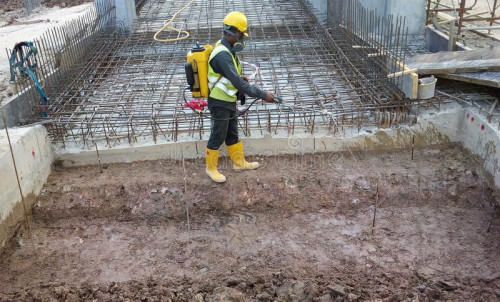 |
|
|
Dec 25 2022, 12:15 AM
Return to original view | IPv6 | Post
#236
|
|
Junior Member
319 posts Joined: Jun 2018 |
#construction #structural #stiffener
Door Frame Installation Work Within Provided Structural Opening (Part 1) You might think that the installation of door is easy, but is it as easy as you think? However, there are still many details you might not know, starting from the selection of the door frame & door quality to the on-site provision of the structural opening and further related to the reinforced concrete wall or brickworks done on site. Let us narrow down our topic today, starting from the wall where the openings are provided. Have a look on the photos shared with you today, the “voids” you see are where the openings located. In this project, the walls are mainly erected with brickworks. In terms of stability of the wall, a reliable contractor will provide stiffener in between the brick wall every 3m apart for both horizontal and vertical direction. Simple way to say, brick wall can never be strong and stable if they are extending all the way from end to end without something in between to hold on. Structural opening is the provision of extra space for the door / window before to be installed on site. The extra tolerance is to provide more flexibility while installing. Finally, the gap will be filled up with mass concrete to give a neat interface. Next, do you realize that there is also rc placed on top of the opening? Yes, it is known as lintel, a supporting structure for the door / window to withstand the force coming from top. They are so important in diverging the load away. All of the information shared with you are some of the basic to know and finding yourself a reliable contractor is so important! With this, we can now proceed to the installation of door / windows. Do not worry about whether you are using metal frame or wooden frame for your door, or even worry that will it be very troublesome for the installation of aluminum extrusion. You just need to know that everything can be done! In our next part of sharing, we will talk more about the details in door frame, door panel and their installation method. Stay tuned! MyMaison 官网 :https://mymaison.com.my 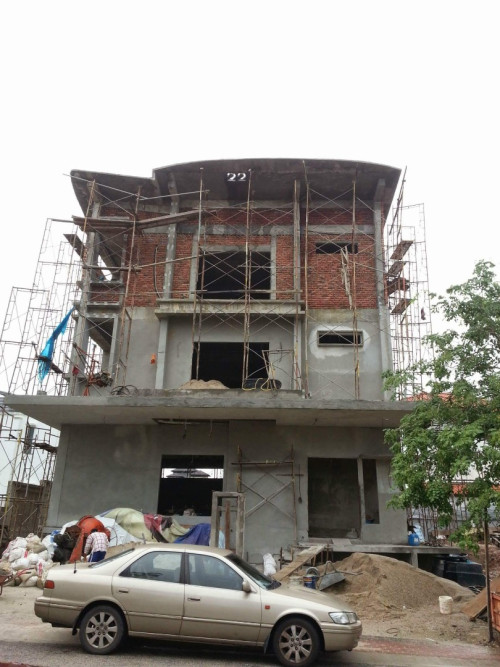 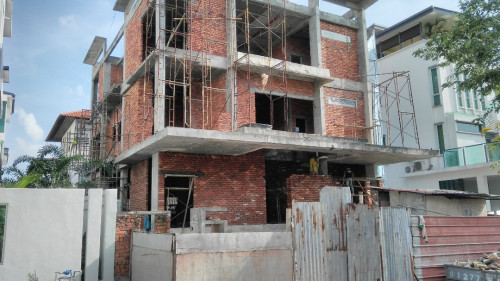 |
|
|
Jan 20 2023, 12:00 AM
Return to original view | Post
#237
|
|
Junior Member
319 posts Joined: Jun 2018 |
Data Centre Kuala Lumpur – Concreting Work
Date Centre @ Kuala Lumpur, one of the most recent commercial projects out team had done in 2022. Let me introduce to you some of the fundamental works in this project. 😇 😇 In a basic construction project, RC or concreting work is a typical practice for us. Traditional formwork is used to cast any RC elements. From the site photos shared, you can clearly see how we use the abundance of timber and plywood to form the shape we want it to be. To achieve a great outcome, we set out the locations, center line and levels for formwork along with the reference line. Just then, we coat the formwork surface with form oil to prevent the concrete from sticking to the timber plank. Once all the formwork panel is done, we erect the formwork with sufficient props and struts, bracing and support and ensure that it can withstand the pressure resulting from placing the concrete later on. Sealing of the formwork gap is important to prevent leakage of cement grout. Before inserting any reinforcement, bar and start concreting, verticality check and squareness of formwork must be checked. Based on the approved schedule, reinforcement bar is cut to the required size and bend to the shape required. The steel bars are arranged with spacing and tied with wire strands before placing them into the formwork. 😁😃 All rubbish, chippings shall be removed from the interior of the formwork before concrete is placed. We can finally start concreting with the approved design mix. Start concreting from a fresh location or a construction joint and continue up to the next construction joint / to completion. Compact the concrete with mechanical vibrator to ensure that the concrete is placed into the corners of structural members. After the concrete is set, apply curing compound which helps to reduce the water or heat loss in concrete to create an ideal condition for concrete to set. Looking into the site photos, these will be their outcome after the formwork is strike off once the concrete has developed sufficient strength to support itself and resist surface damage. A great looking RC are finally formed. Hope you enjoy our sharing today!! Leave us a 👍🏻 if you love our workmanship. 👏🏻 👏🏻 📞 : +60 11-1665 0288 MyMaison 官网 :https://mymaison.com.my 📩 : mymaison.design@gmail.com  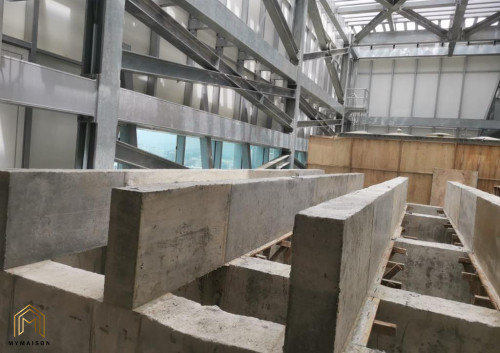 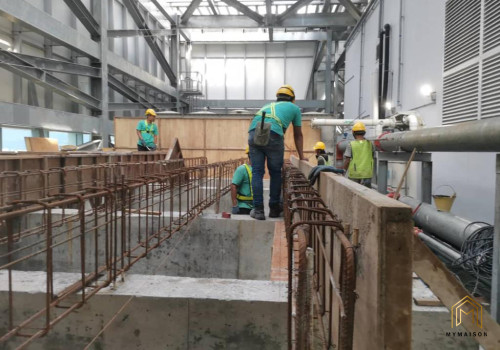 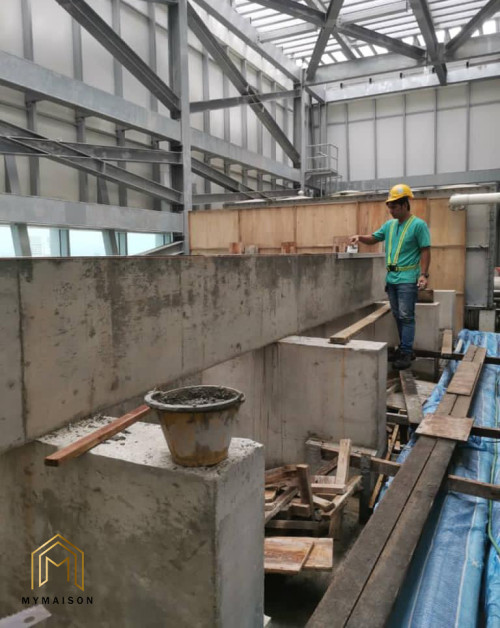  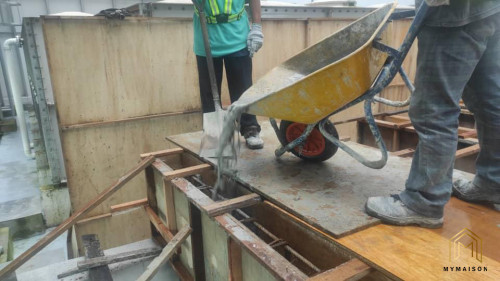   |
|
|
Jan 23 2023, 11:31 PM
Return to original view | Post
#238
|
|
Junior Member
319 posts Joined: Jun 2018 |
Toilet Cubicle Installation
Have you ever heard about phenolic panel before? One of the simple examples of it will be the application of toilet cubicle in shopping mall complex. Phenolic board is also known as High-Pressure Laminate (HPL), which is a highly resistant architectural panel made of natural core material layers (Kraft paper layers) and impregnated with phenolic and melamine resin which are then compressed under high pressure and heat. Today, we will share about the installation of toilet cubicle with you. Attached photos are taken from one of the completed projects done by My Maison Team We completed the phenolic panels installation, vanity top, sanitary wares and more. However, we will be more focusing on the phenolic board application for today’s topic. Let me share with you some of the features of phenolic panel. Suitable to be used at wet area, phenolic board is free from rot, mold, and corrosion. It is tough and has a high degree of resistance to scratches. As the phenolic panels are all readily supplied from factory, it allows a quick construction system to happen, and with great flexibility as well. As they are non-porous, HPL phenolic panels are moisture resistance. 👏🏻 👏🏻 For this project, once all the Tiling works are in order, site measurement of each door and panel can be taken. Fabrication of panel is then done according to the site provision/condition. Pieces of phenolic panel are then transferred to the site for our team to start installing. As the phenolic partition and doors installation are the last trade for the entire works in the toilet, we always ensure that ceiling, tiling, sanitary wares, vanity top installation are all completed first before phenolic board work can start. 😁😃 It is a very direct process by securing the door panels aluminum door frame with hinges, door lockset, coat hooks. Clear all the debris that left over the area after the installation. We checked the condition of phenolic boards as usual to ensure that no chipping / dents occur. Observe the condition and rectify any defects if there is any. Visually, we observe the panel colour to ensure that they are consistent, followed by ensuring a smooth door opening and lockset opening. I hope you get to know more about this material after today’s sharing as phenolic board has such a broad range of application in various industries nowadays. Don’t forget to save this tread if you think that this can beneficial you in future.😇 😇 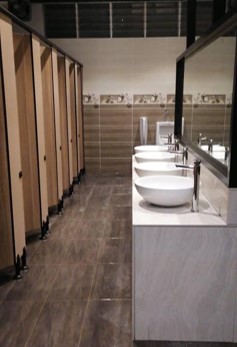 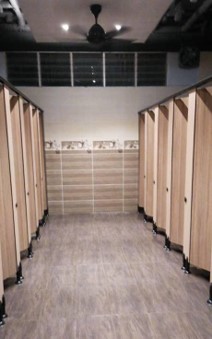 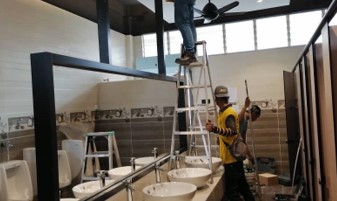 |
|
|
Feb 12 2023, 04:57 PM
Return to original view | IPv6 | Post
#239
|
|
Junior Member
319 posts Joined: Jun 2018 |
#RealProject #construction #metalroof
𝐌𝐞𝐭𝐚𝐥 𝐑𝐨𝐨𝐟𝐢𝐧𝐠 𝐃𝐢𝐬𝐦𝐚𝐧𝐭𝐥𝐢𝐧𝐠 & 𝐈𝐧𝐬𝐭𝐚𝐥𝐥𝐢𝐧𝐠 Metal roofing dismantling and installing work require workers' attention towards the detailing. Dealing with roof detailing are important as to prevent leakage/unwanted collapse from happening due to insufficient support. We always ready to consult the roofing specialist/ supplier on their product's pros and cons, types of roof profile availability, their colours and more. So in today's topic, we are going to share with you one of the past project we had just completed in 2022.👏🏻 👏🏻 Although it is a simple two-sided pitched roof, it is also quite challenging due to its large coverage area. We have to ensure that the roofing is able to withstand with the wind forces and its ability to drain all the rainwater efficiently to both end's gutter using suitable roof gradient. So if u as a client, try a have a great discussion session with your contractor. See whether they provide insulation, any aluminium foil etc. How do they minimise the heat from passing through the roof to internal space? How do they ensure noise reduction? How big is the gutter drain provision? Is the size given enough to cater the rainwater during heavy downpour? How to deal with connection details? These are some of the items to take note.😇 😇 Besides, it is very important that the roof battens are sufficiently fixed to the rafters before any roofing panels can be directly installed to it. The spacing between each roof trusses has a certain standards to follow as well. When installing the metal roofing panels, what kind of roof sealants are used at each junction to properly seal the roof? We all knows that is it impossible to install roof at only one big piece. Every sheets are cut to length in the factory and directly installed on site. This minimise the site-work. While installing, how we walk on the roof to avoid damage to roofing itself is also one of the skill to take note. Experience is the key! It is definitely not an easy job. Website:https://mymaison.com.my 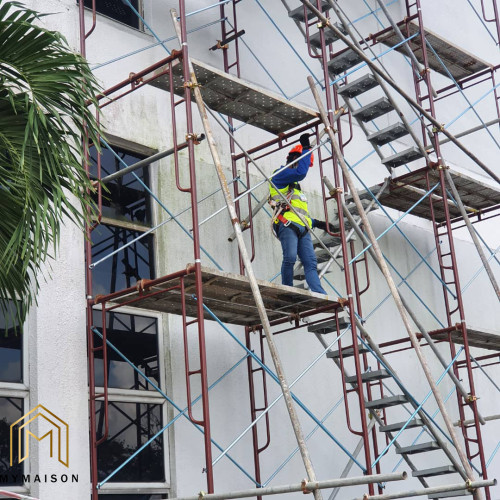 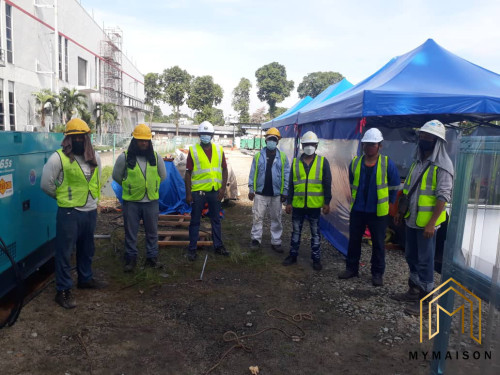 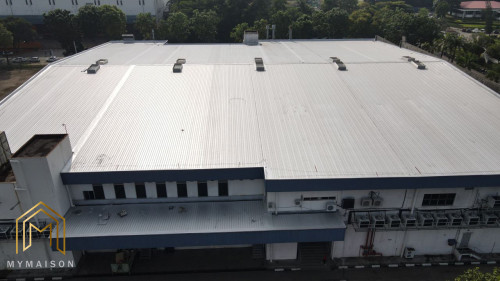 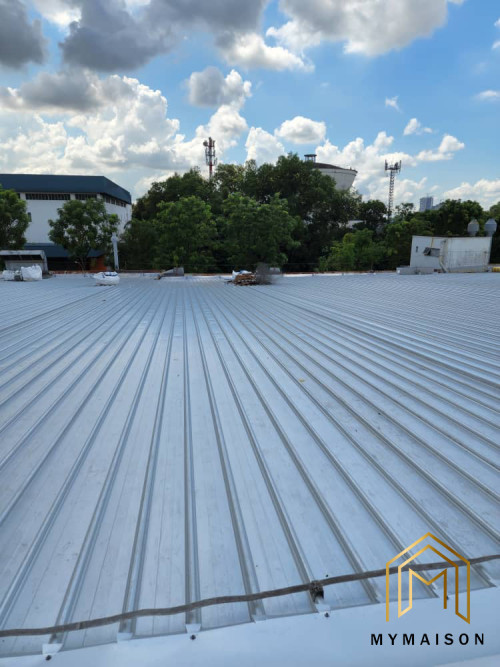 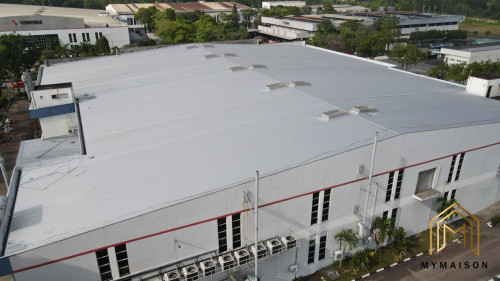 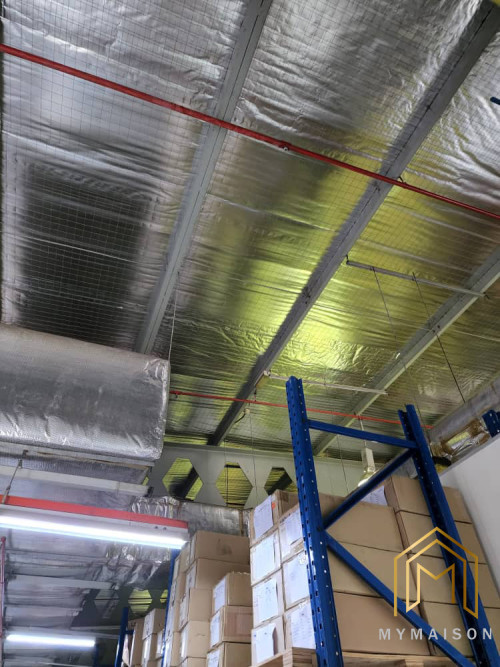  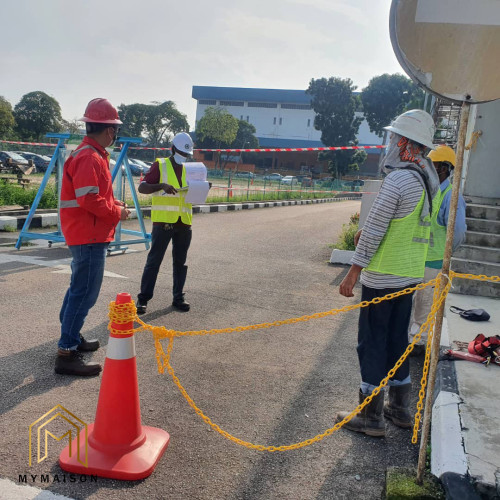 |
|
|
Feb 15 2023, 11:41 PM
Return to original view | IPv6 | Post
#240
|
|
Junior Member
319 posts Joined: Jun 2018 |
#RealProject #commercial #retailshop 𝐑𝐞𝐭𝐚𝐢𝐥 𝐒𝐡𝐨𝐩 𝐑𝐞𝐧𝐨𝐯𝐚𝐭𝐢𝐨𝐧 𝐏𝐫𝐨𝐣𝐞𝐜𝐭 Welcome to our real project sharing session once again. Today will be a very special case for My Maison as our Mr. Owner requested industrial concept as his design intention for this shop renovation project. Industrialise design concept is all about raw and unfinished look to design material. High workmanship from the builder is required as the raw bricks with mortar itself will be the final finish/ appearance. There will no touch-up using render/skim coat to give a smooth plane of finishes. 😇 😇 This warehouse look design emphasize a lot on "raw" and "natural". Exposed pipes and ducts is one of the signature element whereby people always try to conceal them under ceiling. It is a different beauty as compared to other concept of designing. There is no need to provide ceiling as we appreciate the beauty of exposed beams, ducting and pipes under the concept of "inside-out". By using simple cable trays support, the electrical cables can placed on it more neatly, with magnetic track light to lighten up the space. 😁😃 Aluminium fixed glass and swing door allow more natural lighting into the area. I believe that most of you would be curious about what are the items that need to take note on this topic. How do we actually conduct the works and what are the items that we can actually play with in terms of design. Stay tuned on our next sharing which I will share more on aluminium glazing topic!! 👏🏻 👏🏻   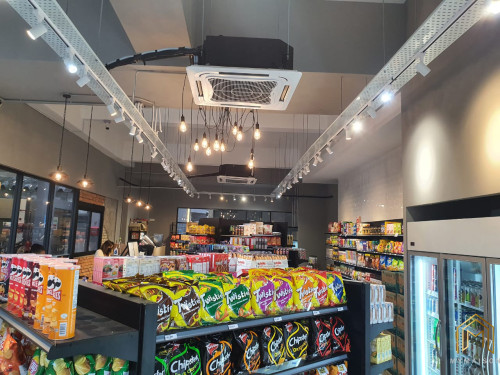 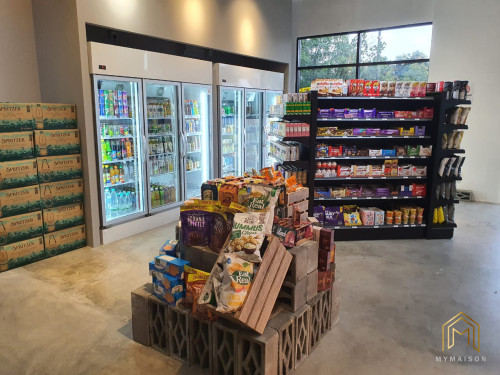  thinkgoodpositive liked this post
|
| Change to: |  0.0513sec 0.0513sec
 0.66 0.66
 7 queries 7 queries
 GZIP Disabled GZIP Disabled
Time is now: 1st December 2025 - 02:10 PM |
 Quote
Quote