QUOTE(yuka @ Dec 9 2006, 10:14 PM)
if just cut only is easy but if wan make it more round will more hard lo & waste time too... i spent liao 2 hours to do it!This post has been edited by j@y !!!: Dec 10 2006, 01:31 PM
Casemod: Project J@y !, have a look............latest update !!!
|
|
Dec 10 2006, 01:10 PM
|
![]() ![]()
Junior Member
215 posts Joined: Aug 2006 From: Ipoh & KL |
|
|
|
|
|
|
Dec 10 2006, 01:18 PM
|
![]() ![]()
Junior Member
215 posts Joined: Aug 2006 From: Ipoh & KL |
Thanks all dude here... now want to collect all the accessories some like led, suiz something to continue this mod! cos something hard to get it in my town...
This post has been edited by j@y !!!: Dec 10 2006, 01:18 PM |
|
|
Dec 10 2006, 05:20 PM
|
![]() ![]() ![]() ![]()
Senior Member
606 posts Joined: Feb 2006 From: St James' Park |
Wow....nice skills u have there
Keep Up the Good Work!! |
|
|
Dec 14 2006, 10:54 AM
|
![]() ![]()
Junior Member
215 posts Joined: Aug 2006 From: Ipoh & KL |
|
|
|
Dec 14 2006, 02:39 PM
|
![]() ![]()
Junior Member
188 posts Joined: Jun 2005 |
I respect u for the courage
U dare to cut without taking out the hardware...... But great skills...... Salute........ This post has been edited by yuying1: Dec 14 2006, 02:40 PM |
|
|
Dec 15 2006, 06:35 PM
|
![]() ![]()
Junior Member
215 posts Joined: Aug 2006 From: Ipoh & KL |
paint the 80mm fan...
this is normal black 80mm fan... i just bought 2 bottle uv paint... lekat the surface of the fan with normal sticker... then tutup the frame by old paper.... first, i paint it with no. 3 silver colour for the 1st layer. cos silver colour can make the 2nd layer colour more bright.... then paint uv green colour. remember dont paint too thick o too many layer on the surface cos it will make the fan more heavy then the speed will decrease(RPM). if use the uv paper lekat on it also not so recommence... after 20 minutes, take out everything... this is the look under uv ccfl... |
|
|
|
|
|
Dec 15 2006, 06:40 PM
|
![]() ![]() ![]() ![]() ![]() ![]()
Senior Member
1,521 posts Joined: Oct 2004 From: Island where you get pearl |
Woah another bling bling fan
AllnGap looks like u hv a future competitor for bling bling fan modding |
|
|
Dec 15 2006, 06:58 PM
|
![]() ![]()
Junior Member
215 posts Joined: Aug 2006 From: Ipoh & KL |
this is the side acrylic. actually it come with 1 blow hole... so i plan to make it dual blow hole, cut another hole beside the original blow hole.
drilled 4 screw holes... then use this tools to make the hole more bigger & smooth! make the side smooth... done! This post has been edited by j@y !!!: Dec 15 2006, 07:03 PM |
|
|
Dec 15 2006, 07:42 PM
|
![]() ![]() ![]() ![]() ![]() ![]()
Senior Member
1,521 posts Joined: Oct 2004 From: Island where you get pearl |
TS ur very good in handling that angle grinder ...
All your cutting looks smooth |
|
|
Dec 15 2006, 10:23 PM
|
![]() ![]()
Junior Member
215 posts Joined: Aug 2006 From: Ipoh & KL |
|
|
|
Dec 15 2006, 11:34 PM
|
![]() ![]() ![]() ![]() ![]()
Senior Member
895 posts Joined: Nov 2006 |
Hi , can i noe wat type of uv u using it ? i use arrow brand also ler but no uv T.T
|
|
|
Dec 16 2006, 02:50 AM
|
![]() ![]() ![]()
Junior Member
444 posts Joined: Aug 2005 From: MMU Malacca |
Admire ur acylic abusing skills
The blow hole is really....a smooth HOLE |
|
|
Dec 16 2006, 02:54 AM
|
![]() ![]() ![]() ![]() ![]() ![]() ![]()
Senior Member
2,823 posts Joined: Jun 2006 From: West Malaysia |
Nice detailing on the blowholes.. added smoothness
|
|
|
|
|
|
Dec 16 2006, 09:23 AM
|
![]() ![]() ![]() ![]() ![]() ![]()
Senior Member
1,464 posts Joined: Dec 2004 |
nice, creative ideas on the fan... blowhole
|
|
|
Dec 16 2006, 10:45 AM
|
![]() ![]()
Junior Member
215 posts Joined: Aug 2006 From: Ipoh & KL |
|
|
|
Dec 16 2006, 10:52 AM
|
![]() ![]() ![]() ![]() ![]() ![]() ![]() ![]() ![]()
All Stars
21,961 posts Joined: Dec 2004 From: KL |
» Click to show Spoiler - click again to hide... « Dammit how the hell u make a round so round !!!!!! U have to teach me !!! U made me want to mod my casing too but i dont have angle cutter... Damm somemore need to cut the sidepanel... Btw i wonder how much would an acrylic of such size... This post has been edited by WaCKy-Angel: Dec 16 2006, 10:53 AM |
|
|
Dec 16 2006, 11:34 AM
|
![]() ![]()
Junior Member
215 posts Joined: Aug 2006 From: Ipoh & KL |
QUOTE(Cloudx @ Dec 15 2006, 08:42 PM) QUOTE(hotdog @ Dec 16 2006, 03:50 AM) QUOTE(J-Slade @ Dec 16 2006, 03:54 AM) QUOTE(WaCKy-Angel @ Dec 16 2006, 11:52 AM) » Click to show Spoiler - click again to hide... « Dammit how the hell u make a round so round !!!!!! U have to teach me !!! U made me want to mod my casing too but i dont have angle cutter... Damm somemore need to cut the sidepanel... Btw i wonder how much would an acrylic of such size... actually the machine- angle grinder just can cut a hole only, it cannot make it round! 
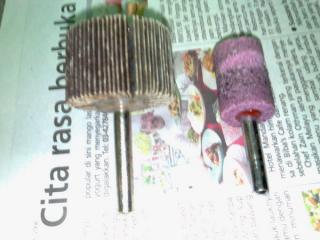
after cut by angle grinder, this 2 things is the important tools to make the blow hole more round... main point the acrylic come with the casing, it original got 1 blow hole already, i just cut another at the side only, make it dual ma....haha This post has been edited by j@y !!!: Dec 16 2006, 11:42 AM |
|
|
Dec 16 2006, 12:23 PM
|
![]() ![]()
Junior Member
215 posts Joined: Aug 2006 From: Ipoh & KL |
the dual blow hole will pasang with this two 80mm uv fan...
if too many cable will look pening bateri 2 cable together... i want make a suiz cos sometime have to off it to jimat electric ma... buy few meters small cable from electronic shop... then doing bateri lo! finished... |
|
|
Dec 16 2006, 01:07 PM
|
![]() ![]()
Junior Member
215 posts Joined: Aug 2006 From: Ipoh & KL |
the switch i will pasang on the cd-rom front cover... so take out 1st!
do a marking then start drilled... test first, try fit o not... ok, no problem, good then drilled another hole standby for other switch..... the hole at the center is for the switch of uv ccfl de. this is the ccfl switch, take off the switch! follow the size & the shape of the ccfl switch... the surface scratched already so i buy the carbon fiber paper to laminate on the surface.... final look This post has been edited by j@y !!!: Dec 16 2006, 01:14 PM |
|
|
Dec 16 2006, 01:13 PM
|
![]() ![]() ![]() ![]() ![]() ![]() ![]()
Senior Member
2,239 posts Joined: Jun 2006 From: K.L |
Wow... 1st time see sm1 combine the wires.. nice nice...
custom made front panel swtiches.. cool. smmore use carbon fibre.. more cool. hahaha.. nice work my man |
| Change to: | 0.0203sec
0.55
6 queries
GZIP Disabled
Time is now: 26th November 2025 - 08:11 AM |