HOW TO SLEEVE SATA POWER CABLE*pictures are for reference only.
-there are 6 ways how to sleeve your Sata Power Cable.
1. The small section of sleeving in-between method without heatshrink- this method requires the absolute correct measurement of the sleeve in between the connectors. A common misconception is that you need heatshrink to hold onto it. The way I get around this is to make the sleeve go from one connector to the other with no gaps, but put a small amount of super glue underneath the sleeve to hold it into place - make sure that they are snug and under the little lip of the pass through connector. I do not have an example of this method on hand as the one I did was for a project for NVIDIA and I did not take any photos, but if you look at the following example it looks very similar.
A. Modified non-heatshrink:
This method will produce the same effect as method one, however you sleeve the full cable first and then cut away a small amount of sleeve to allow the wire to be pushed into the pass through molex terminal. This method will produce amazing results but its is VERY DIFFICULT to master. You will most likely waste tons of sleeve and wires before you get a perfect result. The following picture is one of the best executions of this method I have ever seen!
 2. The small section of sleeving in-between method with heatshrink:
This method requires the absolute correct measurement of the sleeve and the heatshrink in between the connectors. A common misconception is that you need to make the sleeve shorter then the section to have the heatshrink hold onto it. But this only produces a bump that looks terrible. The way I get around this is to make the sleeve go from one connector to the other with no gaps, but put a small amount of super glue underneath the sleeve to hold it into place and then cut smaller sections of heatshrink to put over the ends to close up the end sections of the sleeve - make sure that they are snug and under the little lip of the pass through connector. Here is an example of this method, and one of the best executions of this method to a T.
 3. Using colored wire method:
[/B]
This is simple enough in the way that you use the first method to bring the sleeve up to the first connector but then leave the rest of the connectors with bare wire, but you use colored wire that matches your sleeve to leave a matching look. Here is an example of this method that is sold @ Mod-DIY:
 4. Heatshrink the whole thing method:
This is also simple as you follow method one up to the first connector and then use colored heatshrink to give the matched look on the sections in-between your other connectors. Here is an example of this method, but remember that you can use colored heatshrink as well to make it match better:
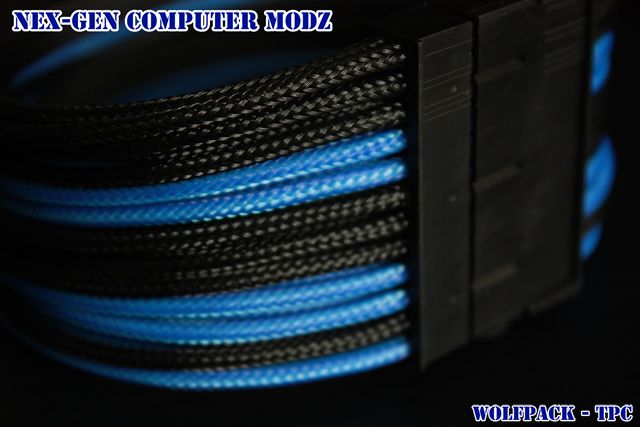
 5. Sleeve and heatshrink the whole bundle method:
As the name of the method states, you sleeve the whole bundle and shrink it in-between the connectors. I would recommend using a bit of super glue to hold it into place a bit better as well as holding the wires flat so they don't look like a round tube, this way you can get it to lay like a flat cable and give it a better look. Here is an example of such a method without laying the cables flat:
 6. Use single crimp style connectors:
This is my favorite method as its the cleanest and best looking out of all of them, however it will depend on how many aux connectors your PSU has and how many sata powered devices you have.
But something to think about is that you can always make an 4pin Molex to crimped sata power connector if you need more sata connectors then your have aux connectors.
Simply put you use the crimp style sata power connectors and use one aux connector on your PSU per sata device, this way you are not compromising having to use the methods above and it provides the cleanest look of all. The downfall is having more sleeved cables to deal with and finding the room for them. Again its up to how many sata devices you have to use. Here is an example of what I mean, and you can see right away why this is my favorite as its the cleanest possible method:

A. Alternate daisy chain method both with heatshrink and without:
This method is if you have to have an extra device you can have the sleeved cables daisy chain off of one of the sata crimp connectors, what this would involve is having to crimp two wires to one crimp and be careful to insert it into one of the crimp sata connectors, this is very difficult to do and I would suggest a small diameter sleeve and a small diameter wires such as the UL1007 wire.
What makes that wire special is that it has a super small outer diameter and will give you the extra room you need to make a double wire into a single pin happen. But even then this takes much practice and patience to get a clean look. Here is a example of this method, while its not the cleanest example if done right with or without heatshrink it can be a saver if you don't have enough aux connectors on your PSU or have enough 4pin Molex power connectors to use - again this method does not bring the sleeve all the way up to the connector which is the cleanest method. Remember this can be done without heatshrink as well but the following photo does provide a good idea of what it looks like:
 -please note that none of the following pictures are my own or of my own work, they are used simply for reference and the credit is fully given to those that have made the photos and took the time to make them-how to sleeve sata data and power cable
thanks lutro0 for the guide
This post has been edited by chrono_kairo: Sep 11 2013, 06:06 PM 

 Sep 6 2013, 12:09 AM, updated 12y ago


 Quote
Quote

O25!~~60_12.JPG)


 0.0207sec
 0.72
0.72
 5 queries
 GZIP Disabled