


By the way,is noise added in?


This post has been edited by BliitzkrieG: Aug 1 2013, 12:33 PM
Photography How is this done?, Pictures inside.Sifus please come in
|
|
 Jul 31 2013, 11:14 PM, updated 13y ago Jul 31 2013, 11:14 PM, updated 13y ago
Show posts by this member only | Post
#1
|
 
Junior Member
431 posts Joined: Dec 2010 From: Kuala Lumpur |
Guys, i need help on editing potrait photos. Any tips on getting this kind of soft brightness/contrast? If possible,kindly explain the steps done in photoshop or any website that teaches you how to do it
By the way,is noise added in? This post has been edited by BliitzkrieG: Aug 1 2013, 12:33 PM |
|
|
|
|
|
Aug 1 2013, 06:53 PM
Show posts by this member only | Post
#2
|

Elite
11,400 posts Joined: Jan 2003 |
Don't do in Photoshop. Bokeh is best done on camera.
 The top picture, in photoshop, roughly select the foreground. (Don't have to be exact, meaning using the lasso tool, and do it in 5 seconds rather than taking 5 minutes to get an exact selection). Then Select > Feather > 95. Repeat the feather 3 times. Then Select > Inverse. Lastly do gaussian blur. Adjust the slider till the picture looks nice. You'll notice that the foreground in the top picture is also in soft focus. So Select > All, and do gaussian blur again. This time, do just a tiny bit to get the soft-focus effect for the foreground. To get the warm colour tone, use levels and/or curves. The bottom picture, bokeh is hard to simulate in Photoshop because you'll note that the bubbles are in sharp focus. Could be done, but takes more time. This post has been edited by dkk: Aug 1 2013, 06:54 PM |
|
|
Aug 2 2013, 12:04 AM
Show posts by this member only | Post
#3
|
|
Junior Member
431 posts Joined: Dec 2010 From: Kuala Lumpur |
QUOTE(dkk @ Aug 1 2013, 06:53 PM) Don't do in Photoshop. Bokeh is best done on camera. Plenty of thanks for your awesome feedback! Btw im not trying to get the bokeh effect by editing it in photoshop.Just the soft and light colour of the whole image.I tried your way.Feather > Gaussian blur did the trick.Btw,i add on soft_warming.look from colour lookup as well.The top picture, in photoshop, roughly select the foreground. (Don't have to be exact, meaning using the lasso tool, and do it in 5 seconds rather than taking 5 minutes to get an exact selection). Then Select > Feather > 95. Repeat the feather 3 times. Then Select > Inverse. Lastly do gaussian blur. Adjust the slider till the picture looks nice. You'll notice that the foreground in the top picture is also in soft focus. So Select > All, and do gaussian blur again. This time, do just a tiny bit to get the soft-focus effect for the foreground. To get the warm colour tone, use levels and/or curves. The bottom picture, bokeh is hard to simulate in Photoshop because you'll note that the bubbles are in sharp focus. Could be done, but takes more time.  Original photo : http://www.flickr.com/photos/59583171@N07/9416225628/ Belongs to PF T.J. Edited photo :  Many thanks once again This post has been edited by BliitzkrieG: Aug 2 2013, 12:56 AM |
|
|
Aug 2 2013, 12:08 AM
Show posts by this member only | Post
#4
|
|
Senior Member
5,542 posts Joined: Dec 2006 |
QUOTE(BliitzkrieG @ Aug 2 2013, 12:04 AM) Plenty of thanks for your awesome feedback! Btw im not trying to get the bokeh effect by editing it in photoshop.Just the soft and light colour of the whole image.I tried your way.Feather > Gaussian blur did the trick.Btw,i add on soft_warming.look from colour lookup as well. did you edit this picture with PF T.J.'s consent/permission?Original photo : http://www.flickr.com/photos/59583171@N07/9416225628/ Belongs to PF T.J. Edited photo : » Click to show Spoiler - click again to hide... « Many thanks once again |
|
|
Aug 2 2013, 12:23 AM
Show posts by this member only | Post
#5
|

Forum Admin
44,415 posts Joined: Jan 2003 |
QUOTE(dkk @ Aug 1 2013, 06:53 PM) Don't do in Photoshop. Bokeh is best done on camera. people ask about soft brightness / contrast and you are talking bokeh?  the best way is just to play around with contrast setting. |
|
|
Aug 2 2013, 12:44 AM
Show posts by this member only | Post
#6
|
|
Junior Member
431 posts Joined: Dec 2010 From: Kuala Lumpur |
QUOTE(amduser @ Aug 2 2013, 12:08 AM) did you edit this picture with PF T.J.'s consent/permission? We were discussing it in the a pic a day thread too.i've posted there,together + quote his photo which he uploaded for this purpose also.I will delete it if its not right.Just want to share the tips as promised |
|
|
|
|
|
Aug 2 2013, 12:47 AM
Show posts by this member only | Post
#7
|
|
Junior Member
431 posts Joined: Dec 2010 From: Kuala Lumpur |
QUOTE(goldfries @ Aug 2 2013, 12:23 AM) people ask about soft brightness / contrast and you are talking bokeh? Haha doesnt matter.hmm just contrast setting? I tried that,certain parts are not balancely exposed. the best way is just to play around with contrast setting.  |
|
|
Aug 2 2013, 12:50 AM
Show posts by this member only | Post
#8
|
|
Forum Admin
44,415 posts Joined: Jan 2003 |
how about just buy this and get it done easily?
 http://www.niksoftware.com/nikcollection/usa/intro.html http://www.niksoftware.com/nikcollection/usa/intro.htmlanyway sometimes editing you can't be lazy lor, have to do multiple layers if need to. |
|
|
Aug 2 2013, 01:12 AM
Show posts by this member only | Post
#9
|
|
Junior Member
431 posts Joined: Dec 2010 From: Kuala Lumpur |
QUOTE(goldfries @ Aug 2 2013, 12:50 AM) how about just buy this and get it done easily? Wow the price can BWM http://www.niksoftware.com/nikcollection/usa/intro.htmlanyway sometimes editing you can't be lazy lor, have to do multiple layers if need to.  well like what you said,have to do multiple layers. Duplicate layer Convert new layer to black and white. Select->color range Click on the brightest spot near the trees and adjust the fuzziness to include just the bright areas, leaving the face out. Set the range to 100% Apply Gaussian blur, it will automatically create a mask, and use ctrl+alt+g to apply the filter only to the bw layer. (clipping the adjustment layer) Increase Brightness by just a little and again use ctrl+alt+g clip the adjustment layer. Merge the bw layer and the adjustments. Change the blend mode of the bw layer to soft light. This works best for the time being |
|
|
Aug 2 2013, 01:14 AM
|
|
Forum Admin
44,415 posts Joined: Jan 2003 |
eh c'mon la. USD 149 only. That's less than RM 500.
it all depends on your original image, for example if you were to choose against the light and also depending on your lens quality and filter quality, there could be areas where the contrast variation is there, some areas have higher contrast and some areas lower. in such cases, you can't apply a ONE LAYER rule to the frame. |
|
|
Aug 2 2013, 07:42 AM
|
|
Junior Member
273 posts Joined: Apr 2009 |
I think the 2 photos in the first post, is not just about post editing to get that kind of effect.
And using Gaussian Blur in the other image doesn't work. It looks fake. I had a similar photo, from my experience, I think it has to do with the lens, large aperture, soft lens, and also slightly overexposed. In the first image (girl looking at her hair), the sky is all washed out, and second picture (blowing bubbles), the flare makes the picture soft too. Try shooting with the light source or bright background at the back of the model. Here's a photo I took 1 year ago, I've edited it to a bit warm, but you can see the flare makes the photo soft. Shot with Nikon 50mm f1.8D lens. 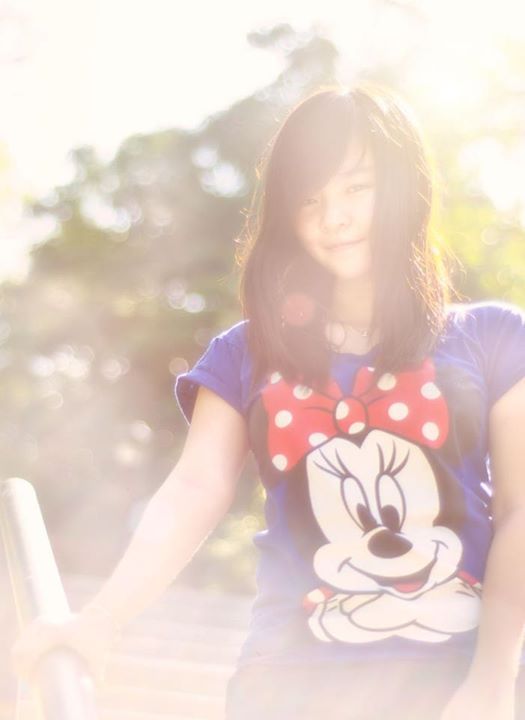 |
|
|
Aug 2 2013, 09:49 AM
|
|
Junior Member
431 posts Joined: Dec 2010 From: Kuala Lumpur |
QUOTE(Nogol @ Aug 2 2013, 07:42 AM) I think the 2 photos in the first post, is not just about post editing to get that kind of effect. Thank you very much for your great feedback.Well im going to try like what you said.gonna try 35mm 1.8g during golden hours.sun light right behind the model And using Gaussian Blur in the other image doesn't work. It looks fake. I had a similar photo, from my experience, I think it has to do with the lens, large aperture, soft lens, and also slightly overexposed. In the first image (girl looking at her hair), the sky is all washed out, and second picture (blowing bubbles), the flare makes the picture soft too. Try shooting with the light source or bright background at the back of the model. Here's a photo I took 1 year ago, I've edited it to a bit warm, but you can see the flare makes the photo soft. Shot with Nikon 50mm f1.8D lens. Good one tho |
|
|
Aug 2 2013, 11:48 AM
|

Elite
24,193 posts Joined: Feb 2010 From: Perak |
QUOTE(amduser @ Aug 2 2013, 12:08 AM) did you edit this picture with PF T.J.'s consent/permission? QUOTE(BliitzkrieG @ Aug 2 2013, 12:44 AM) We were discussing it in the a pic a day thread too.i've posted there,together + quote his photo which he uploaded for this purpose also.I will delete it if its not right.Just want to share the tips as promised Oh, didn't know there is a dedicated thread here haha  Its okay guys, I'm fine with letting TS use the photo... can take the photo, just not the girl inside So it seems there are quite a few factors that leads to a photo-effect like this, interesting |
|
|
|
|
|
Aug 2 2013, 11:55 AM
|

Senior Member
1,589 posts Joined: May 2008 |
Never try using photoshoop cs edit my pics before...dunno how to use it...
lightroom can do this ?? hmmm |
|
|
Aug 2 2013, 11:57 AM
|
|
Elite
24,193 posts Joined: Feb 2010 From: Perak |
QUOTE(mls_gamer @ Aug 2 2013, 11:55 AM) Never try using photoshoop cs edit my pics before...dunno how to use it... Really a lot of work for Photoshop it seems to edit a single photo lightroom can do this ?? hmmm  Lightroom should be able to get something closely similar I guess Need to put in more work with the colors and possibly brushesI still have so much to learn lol |
|
|
Aug 2 2013, 12:02 PM
|
|
Senior Member
1,589 posts Joined: May 2008 |
QUOTE(PF T.J. @ Aug 2 2013, 11:57 AM) Really a lot of work for Photoshop it seems to edit a single photo Yup, lot of work and time...but the output more nice loh Lightroom should be able to get something closely similar I guess Need to put in more work with the colors and possibly brushesI still have so much to learn lol Hmm, i max 10 min edit pic with lightroom..... not willing spend to much time on editing ... |
|
|
Aug 3 2013, 02:14 AM
|

Junior Member
536 posts Joined: Oct 2010 From: 4:44 am |
You may try with Curves setting in photoshop. I personally think curves gives the best manual selection in terms of colour and cross processing it.
*tl;dr - google cross processing curves Open the colour curves, then individually select the RGB while editing it individually, you must individually selecte red, green and blue seperately. for starters, you may want to try to put three points for a colour line, 0 127 and 255 (shadow, middle point and the highlights), then play around it until you're satisfied. ok now for the soft contrast, you may select the whole RGB channel and move the shadow part up while still retaining the other details. hope that helps |
|
Topic ClosedOptions
|
| Change to: |  0.0188sec 0.0188sec
 0.95 0.95
 5 queries 5 queries
 GZIP Disabled GZIP Disabled
Time is now: 24th December 2025 - 11:23 PM |
 Quote
Quote