

It didn't just turn on. It came alive.
ASUS ROG GAMING NOTEBOOKS

This post has been edited by holloway: Mar 8 2014, 12:59 PM
Asus G-Series Notebooks Thread V9, ASUS Welcomes GTX 880M~
|
|
 Jun 13 2013, 04:40 AM, updated 12y ago Jun 13 2013, 04:40 AM, updated 12y ago
Show posts by this member only | Post
#1
|
 
Junior Member
123 posts Joined: Feb 2008 From: On the Ivy Bridge |
It didn't just turn on. It came alive. ASUS ROG GAMING NOTEBOOKS This post has been edited by holloway: Mar 8 2014, 12:59 PM |
|
|
|
|
|
Jun 13 2013, 04:40 AM
Show posts by this member only | Post
#2
|
|
Junior Member
123 posts Joined: Feb 2008 From: On the Ivy Bridge |
THE ALL NEW G46, G55, G75 and of course G750!  BUILT FOR BATTLE ↓↓  INCREDIBLE 3D EXPERIENCE ↓↓  AN INTENSE AUDIO WITH BUILT-IN SUBWOOFER↓↓  GAMER-CENTRIC DESIGN↓↓  INCREDIBLE THERMAL EFFICIENCY↓↓  FEEL THE AWESOME MATT FINISH↓↓.  SUPERB AIR VENTILATION WITH COOL DESIGN↓↓  This post has been edited by holloway: Jun 13 2013, 04:59 AM |
|
|
Jun 13 2013, 04:40 AM
Show posts by this member only | Post
#3
|
|
Junior Member
123 posts Joined: Feb 2008 From: On the Ivy Bridge |
***G55VW WEBSITE SUPPORT AND REVIEWS*** http://my.asus.com/Notebooks/Gaming_Powerhouse/G55VW/ http://www.notebookcheck.net/Review-Asus-G...ok.74851.0.html http://www.laptopersreview.com/680/asus-g5...notebook-black/ http://reviewlaptoptabletpc.squarespace.co...-pc-review.html ***G75VW WEBSITE SUPPORT AND REVIEWS*** http://my.asus.com/Notebooks/Gaming_Powerhouse/G75VW/ http://www.laptopmag.com/review/laptop/asus-g75vw-ds71.aspx http://www.pcworld.com/article/256070/asus...erformance.html  In Progress G46 and G750 review  This post has been edited by holloway: Jun 13 2013, 05:00 AM |
|
|
Jun 13 2013, 04:41 AM
Show posts by this member only | Post
#4
|
|
Junior Member
123 posts Joined: Feb 2008 From: On the Ivy Bridge |
***AWESOME OWNERS OF ROG LAPTOPS*** -Owners of the G750JX- - G750JX-T4059H - » Click to show Spoiler - click again to hide... « -Owners of the G46VW- - G46VW-BHI5N43 - » Click to show Spoiler - click again to hide... « -Owners of the G55VW- - Asus G55VW(3D) - IX044V - » Click to show Spoiler - click again to hide... « - Asus G55VW - S1095V - » Click to show Spoiler - click again to hide... « - Asus G55VW - S1131V - » Click to show Spoiler - click again to hide... « ASUS G55VW-1216H » Click to show Spoiler - click again to hide... « ASUS G55VW-IX190H (3D) » Click to show Spoiler - click again to hide... « -Owners of the G75VW- ASUS G75VW-DH72 » Click to show Spoiler - click again to hide... « -Owners of the G75VX- ASUS G75VX-CV088H (3D) » Click to show Spoiler - click again to hide... « *Owners of the past G-Series Laptop* -Owners of the G53- -Asus G53SX - 3DE- » Click to show Spoiler - click again to hide... « -Asus G53SX - S1208V- » Click to show Spoiler - click again to hide... « -Asus G53SW - xn1- » Click to show Spoiler - click again to hide... « -Asus G53SW - 1X162v- » Click to show Spoiler - click again to hide... « -Asus G53SW - 3D- » Click to show Spoiler - click again to hide... « -Asus G53JW - 3DE- » Click to show Spoiler - click again to hide... « -Asus G53JW - A1- » Click to show Spoiler - click again to hide... « -Owners of the G74- -Asus G74SX-91185V- » Click to show Spoiler - click again to hide... « -Asus G74Sx-BBK7- » Click to show Spoiler - click again to hide... « -Owners of the G73- -Asus G73SW - BST6- » Click to show Spoiler - click again to hide... « -Asus G73SW - A1- » Click to show Spoiler - click again to hide... « -Asus G73JW - 1ATZ- » Click to show Spoiler - click again to hide... « -Asus G73JW - XA1- » Click to show Spoiler - click again to hide... « -Asus G73JW - A1- » Click to show Spoiler - click again to hide... « -Asus G73Jh - BST7- » Click to show Spoiler - click again to hide... « -Asus G73Jh - X3- » Click to show Spoiler - click again to hide... « -Asus G73Jh - 1ATZ- » Click to show Spoiler - click again to hide... « -Asus G73Jh - B1- » Click to show Spoiler - click again to hide... « -Asus G73Jh - A1- » Click to show Spoiler - click again to hide... « -Asus G73Jh - A2- » Click to show Spoiler - click again to hide... « -Asus G73Jh - RBBX05- » Click to show Spoiler - click again to hide... « -AsusG51JX-A1- » Click to show Spoiler - click again to hide... « Any members that owns the awesome G46/G55/G75/G750 and haven't had their name added to the list do PM me. I will add you up  This post has been edited by holloway: Mar 13 2014, 10:21 PM |
|
|
Jun 13 2013, 04:41 AM
Show posts by this member only | Post
#5
|
|
Junior Member
123 posts Joined: Feb 2008 From: On the Ivy Bridge |
TOP SPAMMERS OF ASUS G-SERIES NOTEBOOK THREAD V8 1. holloway - 493 2. horns - 412 3. Unseen83 - 273 4. mansooriqbal - 224 5. explictz - 106 6. edwinlcw - 103 7. xxxcriminal - 89 8. ykgen - 81 9. Arvinaaaaa - 77 10. diadokmai - 51 Very epic superb late counting~ =.=" Sorry for my lazy ass to do this all this while~ This post has been edited by holloway: Dec 13 2013, 09:41 PM |
|
|
Jun 13 2013, 04:41 AM
Show posts by this member only | Post
#6
|
|
Junior Member
123 posts Joined: Feb 2008 From: On the Ivy Bridge |
GUIDE TO DISMANTLE THE G55 COMPLETELY
IF YOU ARE AFRAID OF DESTROYING YOUR MACHINE, DONT ATTEMPT THIS !! tools needed : 1. screwdriver set (those mini screw driver that usually comes in a set of 6 different sizes.. i got mine from Daiso for RM5 2. a towel (use this as a base so you dont scratch you beloved machine) 3. Balls and some common sense 4. OPTIONAL : a small magnet Here Goes : 1. remove the screws in yellow and blue http://imageshack.us/photo/my-images/21/p7032620.jpg/ http://imageshack.us/photo/my-images/829/p7032622.jpg/ http://imageshack.us/photo/my-images/836/p7032624.jpg/ http://imageshack.us/photo/my-images/444/p7032623.jpg/ 2. flip the laptop over and slowly remove this casing http://imageshack.us/photo/my-images/194/p7032626.jpg/ 3.remove the screw highlighted in yellow http://imageshack.us/photo/my-images/201/p7032627.jpg/ http://imageshack.us/photo/my-images/526/p7032640.jpg/ 4. slowly remove the top cover. becareful on at this part.. do not pull it too hard or you risk breaking the clips. http://imageshack.us/photo/my-images/823/p7032629.jpg/ http://imageshack.us/photo/my-images/696/p7032630.jpg/ 5. take extra care when removing this area and also the other side http://imageshack.us/photo/my-images/221/p7032637.jpg/ http://imageshack.us/photo/my-images/40/p7032633.jpg/ 6. slowly remove the top case but make sure you remove this cable 1st.. IMPORTANT !!! http://imageshack.us/photo/my-images/40/p7032633.jpg http://imageshack.us/photo/my-images/221/p7032637.jpg http://imageshack.us/photo/my-images/546/p7032639.jpg 7. TA DAAAAAAA... http://imageshack.us/photo/my-images/256/p7032641.jpg/ To assemble it back.. juz read the post backwards and you should be fine.. GOOD LUCK !! EXTRA ::: some times when you are removing the cable in pic 10.. this cable might come loose also. juz check it before you assemble the top case or you wont be able to power on the machine. http://img507.imageshack.us/img507/8734/p7032643.jpg if you are installing 1 SSD and 1 HDD like me, remember to set the option in bios like this http://img845.imageshack.us/img845/6583/p7032645.jpg If anything goes wrong.. dun flame me.. ill try to help, but if its major i guess ASUS service centre is the only option. I summarize everything into here.. easier to see and read .. for a video help look here http://www.youtube.com/watch?v=zWqDjAQgMaY This post has been edited by holloway: Jun 13 2013, 04:57 AM |
|
|
|
|
|
Jun 13 2013, 04:42 AM
Show posts by this member only | Post
#7
|
|
Junior Member
123 posts Joined: Feb 2008 From: On the Ivy Bridge |
AN EXTRA GUIDE FOR RIPPING APART YOUR G55 This guide is created by tonberry_ax. » Click to show Spoiler - click again to hide... « » Click to show Spoiler - click again to hide... « This post has been edited by holloway: Oct 25 2013, 08:43 AM |
|
|
Jun 13 2013, 04:42 AM
Show posts by this member only | Post
#8
|
|
Junior Member
123 posts Joined: Feb 2008 From: On the Ivy Bridge |
Thanks to horns for this Guide
1. Checking CPU/GPU temperature is essential, but it’s better to test it on games (have fun) instead of doing synthetic test (gpu/cpu benchmark). Take your own sweet time (within the 7 days grace period) and if something went amiss get one-to-one exchange from where you bought it. 2. Check all the common hardware parts that is being used normally (i.e. screens for dead pixel, speakers, keyboard keys, touch pad, rog button, card reads, keyboard backlit, fn keys, usb ports, hdmi/vga/mini display port, wifi and lan, headphone jack, dvd/blu-ray rom etc.) Do check the system info/hwinfo to see whether the specs are exactly as what you are paying for. Other than that run ram test (memtest86+); run it overnight and check results when you wake up in the morning 3. Bios, if there’s nothing wrong with it leave it running stock (there’s no need for an upgrade) 4. Update drivers as updates are usually meant for good things (most of the times) especially Graphic driver as it will support latest games. 5. Getting SSD? Perform clean install is recommended as it has lower chances of heading towards sleepless nights trying to fix. For win8 run disk optimization to trim drives, perform restart, turn of display and leave it til morning this is for system-wide SSD optimization (only after clean If anyone wants to add or saw any misleading guide do let me know together we will fix it towards perfection and beyond!This post has been edited by holloway: Dec 13 2013, 08:12 PM |
|
|
Jun 13 2013, 04:43 AM
Show posts by this member only | Post
#9
|
|
Junior Member
123 posts Joined: Feb 2008 From: On the Ivy Bridge |
reserved
|
|
|
Jun 13 2013, 08:19 AM
|

Senior Member
3,038 posts Joined: Nov 2009 |
QUOTE(holloway @ Jun 13 2013, 05:03 AM) yeah.. i move my kingston ram into the non-user accessible slot.. so easier for me to upgrade later on nice! congratulations ah i've just started V9.. we could discuss there  and thanks a lot for this v9! and thanks a lot for this v9! |
|
|
Jun 13 2013, 08:36 AM
|
|
Senior Member
3,038 posts Joined: Nov 2009 |
lemme help you out with the guide:
-- GUIDE TO DISMANTLE THE G55 COMPLETELY IF YOU ARE AFRAID OF DESTROYING YOUR MACHINE, DON'T ATTEMPT THIS !! tools needed: 1. screwdriver set (those mini screw driver that usually comes in a set of 6 different sizes.. i got mine from Daiso for RM5 2. a towel (use this as a base so you dont scratch you beloved machine) 3. Balls and some common sense 4. OPTIONAL: a small magnet Here Goes: 1. remove the screws in yellow and blue 


2. flip the laptop over and slowly remove this casing 
3.remove the screw highlighted in yellow 

4. slowly remove the top cover. becareful on at this part.. do not pull it too hard or you risk breaking the clips. 

5. take extra care when removing this area and also the other side 
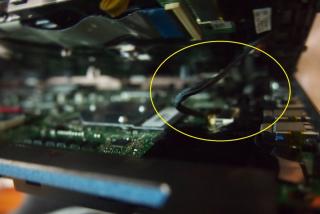
6. slowly remove the top case but make sure you remove this cable 1st.. IMPORTANT !!! 


7. TA DAAAAAAA... 
To assemble it back.. juz read the post backwards and you should be fine.. GOOD LUCK !! EXTRA ::: some times when you are removing the cable in pic 10.. this cable might come loose also. juz check it before you assemble the top case or you wont be able to power on the machine. 
if you are installing 1 SSD and 1 HDD like me, remember to set the option in bios like this 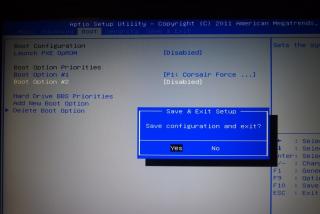
If anything goes wrong.. dun flame me.. ill try to help, but if its major i guess ASUS service centre is the only option. I summarize everything into here.. easier to see and read .. for a video help look here http://www.youtube.com/watch?v=zWqDjAQgMaY This post has been edited by horns: Jun 13 2013, 08:40 AM |
|
|
Jun 13 2013, 09:09 AM
|
|
Senior Member
3,038 posts Joined: Nov 2009 |
fcuk.. MBA is the first laptop with pcie ssd :/
http://www.anandtech.com/show/7058/2013-ma...well-ult-inside |
|
|
Jun 13 2013, 09:26 AM
|

Senior Member
3,304 posts Joined: Mar 2006 From: Chicago(Port25) |
GenTechPC done unboxing and review for G750JW.
And User Manual for G750JW is already available to download. |
|
|
|
|
|
Jun 13 2013, 11:02 AM
|
|
Junior Member
58 posts Joined: Oct 2011 |
check in~ V9
|
|
|
Jun 13 2013, 01:04 PM
|

Senior Member
11,096 posts Joined: Feb 2011 From: Your kokoro |
congrats on the V9 topic.
alien nerdy here.  |
|
|
Jun 13 2013, 02:31 PM
|

Junior Member
452 posts Joined: Sep 2008 From: Haswell |
Cheking in~~
Lets rox the thread V9!!!!!!!! thanks for holloway & horns for the new disassemble guide!! This post has been edited by tonberry_ax: Jun 13 2013, 02:32 PM |
|
|
Jun 13 2013, 04:30 PM
|
|
Senior Member
11,096 posts Joined: Feb 2011 From: Your kokoro |
|
|
|
Jun 13 2013, 04:47 PM
|
|
Junior Member
123 posts Joined: Feb 2008 From: On the Ivy Bridge |
QUOTE(horns @ Jun 13 2013, 08:19 AM) nice! congratulations thanks! and thanks a lot for this v9!QUOTE(riku2replica @ Jun 13 2013, 09:26 AM) GenTechPC done unboxing and review for G750JW. Cool.. thanks for the heads up And User Manual for G750JW is already available to download. time to put up the new asus flagship on the front page!  QUOTE(raymondtong94 @ Jun 13 2013, 01:04 PM) congrats on the V9 topic. thanks alien nerdy here. .. hehe.. QUOTE(tonberry_ax @ Jun 13 2013, 02:31 PM) Cheking in~~ no problem Lets rox the thread V9!!!!!!!! thanks for holloway & horns for the new disassemble guide!! that is only for G55 btw.. non yet for g75 g46  QUOTE(raymondtong94 @ Jun 13 2013, 04:30 PM) Nice video. this one should be really good for the front page~ awesome.. thanks |
|
|
Jun 13 2013, 05:03 PM
|

Senior Member
5,531 posts Joined: Feb 2009 From: Kajang, Selangor |
Sweet, V9 already
 |
|
|
Jun 13 2013, 05:03 PM
|
|
Senior Member
3,038 posts Joined: Nov 2009 |
raymondtong94, yeah a nice video
that's the one that was leaked out before the official launch of g750 lol (and made me dig deeper for more specs at that time)!.. and thanks to tommytan1985 for giving us the clues on their latest pricing, too. still not sure if there is a jh coming to malaysia (it's a very slim hope :/) |
|
Topic ClosedOptions
|
| Change to: |  0.0308sec 0.0308sec
 0.30 0.30
 6 queries 6 queries
 GZIP Disabled GZIP Disabled
Time is now: 1st December 2025 - 07:18 PM |
 Quote
Quote


