Welcome Guest ( Log In | Register )

Bump Topic Topic Closed RSS Feed

Outline · [ Standard ] · Linear+

 [REVIEW] Tuniq Tower 120 Extreme, Complete Review Is Updated

views
     
TSAceCombat
post Sep 27 2009, 08:32 PM, updated 15y ago


Group Icon
Elite
5,432 posts

Joined: Dec 2006


user posted image


Tuniq was formed as a division of Sunbeamtech and took on a whole new direction in product designs. We at Tuniq aim to provide authentic performance through a minimalist approach by stripping down the unnecessary components in product designs. Our research and development team consists of members who have over a decade of experience as well as young designers who are able to think outside of the box. It is this unique merge of experience and fresh ideas that enables us to bring to our customers such exquisite, elegant, top-quality products.
We feel that product design should be Zen-like: simple, functional, harmonious and without frails. Each product from Tuniq aims to combine the virtues of high performance, elegant design, and extraordinary value. When handling a Tuniq product, you will appreciate its impeccable finish and will be pleasantly amazed by its quality and performance.
With the multitude of awards and acclaims that each of our products has received, we have proven that our vision and approach is the right one and we will continue to provide our valued customers with new and better products.

Overview of Tuniq Tower 120 Extreme
The performance king has returned! The much praised Tuniq Tower 120 has gone through a radical redesign and not only looks cooler but its performance has been boosted. The unique wave-like fins display a tremendous visual impact and increase the air-contact area for an unprecedented thermal performance. The nickel-plated surface combined with the LED fan creates a breath taking visual effect!
To ensure that the maximum cooling performance is obtained, we have also included our highest performing thermal compound, the TX-3. Furthermore, our unique adjustable fan controller places the control in your hands!

Features of Tuniq Tower 120 Extreme
1. Core-Contact Technology
2. Silent 120mm MFDB Fan (Magnetic Fluid Dynamic Bearing)
3. 3 PCS High Performance 8mm and 2PCS High Performance 6mm U-shaped Heatpipes
4. TX-3 Thermal Grease Included (0.33ml/1g)
5. Ultra-Silent Low-Noise Level (16db)
6. High performance
7. Fan controller included
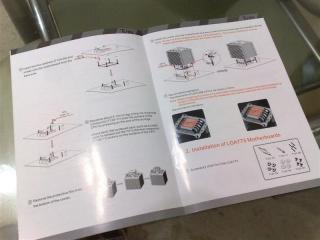
8. Easy Installation Design

Specifications of Tuniq Tower 120 Extreme:
Tower 120 Extreme Specifications
Dimensions(mm):
131(L) × 112.31(W) × 150.7(H)
Weight:
775g (without fan)
Heatpipe:
Ø 8mm x 3 + Ø 6mm x 2

TX-3 Specifications:
Appearance:
Grey
Viscosity:
83500 cP
Thermal conductivity:
6.2 W/mK
Operating temperature:
-45°C ~ 200°C
Specific Gravity:
3.011 @ 25℃
Volume:
0.33ml (1g)

MFDB fan Specifications:
Bearing Type:
Magnetic Fluid Dynamic Bearing
Rated Voltage:
12V DC
Rated Current:
0.16A (Max)
Air Flow:
90.65 CFM (Max)
Noise:
16~20 +/- 10%dBA
Speed:
1000~2000 RPM
Life:
50,000 hours
Thermal Resistance:
0.092 (℃ / W)

Tuniq Tower 120 Extreme Compatibility List


Thanks
AceCombat™
Alive With Adrenaline™


This post has been edited by AceCombat: Sep 28 2009, 06:49 PM
TSAceCombat
post Sep 27 2009, 08:32 PM


Group Icon
Elite
5,432 posts

Joined: Dec 2006


Firstly, I would like to make an announcement, which is, sorry for the not-so-clear pictures because I don't have a high end camera with me (abang goldfries didn't sponsor me cry.gif ) , so I hope that you guys don't mind about this alright?

Now, let's take a look on Tuniq Tower 120 Extreme.
Attached Image x
The box is quite big for a heat sink fan, and Tuniq printed out all the specification and features on the box for easier reference.

Attached Image
Once the box is opened, there's one big black thick box to be taken out, this is where the monster located.

Attached Image
The black box contains the Tuniq Tower Extreme, an accessories box, and a user manual, quite standard.

Attached Image
Attached Image
These are the accessories given by Tuniq
1 x T120-02 Backplate
2 x T120-03 fittings for AM3/ AM2+/ AM2
4 x T120-04 Spring screw caps
4 x T120-05 screws for AM3/ AM2+/ AM2
4 x T120-06 screw caps for Intel
4 x T120-07 screw caps for AMD
4 x T120-08 screws
4 x T120-09 washers for aMD
1 x T120-11 TX-3 Thermal Grease
1 x T120-12 Fan controller
1 x T120-13 Fan controller mounting screw
4 x T120-14 washers for fan

Attached Image
The user manual is color-printed, and the explanation is 10/10

Attached Image
Attached Image
The Tuniq Tower120 Extreme is very well protected from the box, no wory on shipping mishandling, even the base of the cooler is protect from scratches.

It's time to loosen the monster brows.gif


Thanks
AceCombat™
Alive With Adrenaline™


This post has been edited by AceCombat: Sep 28 2009, 02:39 PM
TSAceCombat
post Sep 27 2009, 08:33 PM


Group Icon
Elite
5,432 posts

Joined: Dec 2006


Now,let's move on to the Tuniq Tower 120 Extreme itself,

Attached Image
As usual, old Tuniq Tower and new Tuniq Tower, both are bulky like potato, but this is one big black heavy potato!!!

Attached Image
The famous flame look-a-like design from the old Tuniq Tower 120

Attached Image
The closer look on the fin, stacking design.

Attached Image
On top of the cooler, it shows "Tuniq"

Attached Image
Taken from the old Tuniq Tower 120, not much changing form here.

More Pictures:
Attached Image Attached Image Attached Image Attached Image

Attached Image Attached Image
The contact surface fo the Tuniq Tower 120 Extreme, it has 5 heatpipes, 3 of them are 8mm while 2 of them are 6mm, the heatpipes are coated until the surface area, which is a nice finishing.

Next, I'll take off the fan and do some measurement about precision smile.gif
Attached Image
After taking out the fan by removing the 4 screws at each corners, you can see that there's only 25mm profile fan can be replaced, those 38mm industrial grade fan are not allowed to fit in.

Attached Image
The finishing of the heatpipes on top, 8mm-6mm-8mm-6mm-8mm.

Attached Image Attached Image
I found out that the fins are not soldered on top the heat sink, so i took off the first fin and the second fin to make measurement, the first fin has the thickness reading of 0.46mm while the second fin has the thickness reading of 0.45mm, well, it's quite good in quality control.

Attached Image Attached Image
And I've measured the diameter of the heatpipes too, the 8mm heatpipes I've the reading of 7.90mm while the 6mm heatpipes I've the reading of 5.96mm.


Let's move on to the next step...........


Thanks
AceCombat™
Alive With Adrenaline™

This post has been edited by AceCombat: Sep 28 2009, 02:47 PM
TSAceCombat
post Sep 27 2009, 08:33 PM


Group Icon
Elite
5,432 posts

Joined: Dec 2006


Attached Image
By taking out the fan screw, you can remove the fan from the heat sink and replace any fan as long as it's 25mm profile fan, the stock MFDB fan has the following specification:
MFDB fan Specifications:
Bearing Type:
Magnetic Fluid Dynamic Bearing
Rated Voltage:
12V DC
Rated Current:
0.16A (Max)
Air Flow:
90.65 CFM (Max)
Noise:
16~20 +/- 10%dBA
Speed:
1000~2000 RPM
Life:
50,000 hours
Thermal Resistance:
0.092 (℃ / W)

But personally, I dont think a 0.16A LED Fan has 90CFM in full speed, as for noise, I don't know how silent is a 20dBA rated noise, and I don't have the equipment to test too, the fan has 2000RPM speed and BIOS is showing 2065RPM maximum so it's correct.

Attached Image
Made in China thumbup.gif I've tried to find more information about this fan by Google the part number AGA12025F012 but sadly, no result is returned. But I assume that AGA is model series, while 120 is the size and 25F is the profile, butI've no idea with 012 at the back.

Attached Image
Now this is the interesting part, Tuniq designed a spacer for the Tower 120 Extreme, in case the fan touches peripherals while installing, you can use the spacer for the fan ( part number T120-14 ) to adjust the height so that the heat sink has good compatibilities, all you have to do is just few simple steps.
1. Unscrew the fan's screw
2. Take out the fan's mounting
3. Sticker spacer for the an upon the original washers
4. Replace the mounting in its original location.
5. Screw back on the screw of the fan.
6. Voila rclxms.gif

Attached Image
Overall of the fan and mounting, I found out that Tuniq only put 4 screws ( two on each direction ) to secure the fan instead of 8 screws, it's kinda funny to see that but 4 screws with 2 on each direction is enough to secure a fan.


It's time to move on to the installation of this monster.

Thanks
AceCombat™
Alive With Adrenaline™


This post has been edited by AceCombat: Sep 28 2009, 02:50 PM
TSAceCombat
post Sep 27 2009, 08:33 PM


Group Icon
Elite
5,432 posts

Joined: Dec 2006


It's time to install the monster into the tesbed, I can't wait for this moment anymore......
To install the Tuniq Tower 120 Extreme, you need to use the provided backplate to secure the heat sink, if this cooler is pushpin designed, I don't think i will install onto my mobo, it's killing...

Attached Image
This is the backplate, ( sorry, I forgot to turn off the flash of the camera tongue.gif ),
Installation is very simple, just follow these steps:
1. Insert the four screws ( T120-08 ) from the back of the Backplate and secure with the four screw caps ( T120-06 ).
2. Insert the four washer ( T120-09 ) and install onto the motherboard from the back side.
3. Squeeze about 0.1ml of thermal compound onto the surface of the CPU by pressing on the end of the syringe
4. Remove the protective film from the bottom of the cooler.
5. Install the cooler onto the motherboard and secure with the four screw caps.
6. Voila

It's easy right? But it was a nightmare if you want to install the cooler within the case without removing your motherboard,let's talk about this later.

Pictures of completed installation into the testbed. ( Install without taking off the whole rig, I've chosen nightmare. )
Attached Image
I've to remove the ram in order to screw the bottom right corner.

Attached Image
Not a problem for high profile memory

Attached Image
A monster ( matchbox, potato, or brick? ) inside the testbed and ready to roll.

Challengers:
Thermolab Baram ( Push and Pull with Xigmatek XLF-F1253 Full Speed )----------------------------------------AceCombat's
Thermalright Ultra 120 Extreme Black ( Push and Pull with Xigmatek XLF-F1253 Full Speed )----------------- wxtye's
Prolimatech MegaShadow Deluxe ( Xigmatek XLF-F1253 Full Speed ) --------------------------------------------wormy1034's
Sunbeamtech Core Contact Freezer ( Xigmatek XLF-F1253 Full Speed )------------------------------------------Friend's
Xigmatek S1283 Dark Knight ( Xigmatek XLF-F1253 Full Speed ) -------------------------------------------------shawnlut's
Thermaltake MaxOrb ( Stock fan full speed ) ------------------------------------------------------------------------Loan unit from company
Aerocool Iceland ( Push and Pull with Xigmatek XLF-F1253 Full Speed )-------------------------------------------Friend's

And I'd like to take this opportunity to thank all my friends ( some of them are forumer) to loan me their heat sink, sorry to trouble you guys to take it off from your running rig tongue.gif I'm giving back tonight rclxms.gif


Testbed:
To be fair to all other coolers, I've decided to use Arctic Cooling MX-2 as the thermal compound for all test, and Artic Cleaner will be used for full cleaning.
Intel Core 2 Quad Q9650 VID 1.11v
DFI LanParty UT X48 T2R Flame Freezer Equipped
Patriot Viper Extreme 2x1GB 1066MHz 5-5-5-15 2T
XFX nVidia GeForce GTX275
In Win Commander 1200W DPC
Western Digital 640GB AAKS RAID 0
Cooler Master HAF932 ( front and side intake disabled , only exhaust at the back, roof exhaust disabled. )
Creative X-Fi Titanium Professional Audio Edition

Softwares:
OCCT v3.1.0
Real Temp 3.00
Core Temp 0.99.5

Testing method:
1. No thermalpaste cure in time is given, plug and play concept
2. OCCT run 1 hour per test, each test will be run twice, average reading will be taken. ( 3.0GHz load for twice, 3.825GHz load for twice )
3. Testbed will be turn off for 15 minutes with stand fan blowing in for perfect cooling before the next test proceed. ( Take the reading for idle )
4. 3.0GHz idle and load tempearature will be taken, proceed to method (3. ) then using the same thermalpaste to run 3.825GHz idle and load temperature. ( OC profile saved )
5. Temperature is recorded based on RealTemp minimum and maximum reading.
6. Case closed reading, room has no fan,windows closed, 200% sauna condition, ambient temperature expected to be 32℃

Attached Image
Picture of the cooler is powered on.

Attached Image
Picture of the cooler is powered on.


Thanks
AceCombat™
Alive With Adrenaline™

This post has been edited by AceCombat: Sep 28 2009, 02:52 PM
TSAceCombat
post Sep 27 2009, 08:35 PM


Group Icon
Elite
5,432 posts

Joined: Dec 2006


Result result result............................. rclxm9.gif

Well, before i post the result, let's see how well the Tuniq Tower 120 Extreme surface contact, I didn't spread out the Arctic Cooling MX-2 and I just put a drop at the middle of the processor and this is what I got after taking out the cooler from the testbed.
Attached Image
Look at that! It's simply amazing for the contact performance, it's evenly spread through the whole processor, only the bottom left of the processor ( next picture ) is not contacted, just a little bit.
Attached Image
But with just the pressure applied onto the heat sink when I tighten up the screw, it's already good enough for this 775 processor, if the testbed is an i7 processor, I believe that it cna spread evenly onto the whole surface of the processor since i7 is bigger in size.

Too bad some of the coolers that I taken has no LGA1366 backplate or mounting, therefore, I cannot make a review on an i7 processor..........
Attached Image


Anyway, this is the most important moment in this review.......
Attached Image
Overall

Attached Image
3.0GHz Result

Attached Image
3.825GHz Result


The result is arranged from best to worst thumbup.gif
So far, this cooler is amazing, by replacing a high cfm fan, I expect to have even better result, installation in case is nightmare, the mounting is hard to reach, but it worths what we've gone through so far, this is one ass-kicking cooler and definitely a good buy, a must for air cooling overclockers.

Pros:
1: Superb cooling performance ( It pawned TRUE Black rclxs0.gif )
2: Spacer is included in case the cooler is blocked with some hardwares
3: RM219 is consider cheap for this kind of performance
4: Wide compatibility for motherboard
5: MFDB fan is real silent
6: Fan controller and small TX-3 are given
7: Excellent built quality and quality control
8: Simple installation steps

Cons:
1: Installation inside casing is almost impossible unless you have a slim and sexy hand like Ace meimei.
2: MFDB fan is bullshit in 90CFM rating.
3: Heavy and bulky
4: Outter box is too thin, it's torn when I drag it from top doh.gif

Overall, I rated this cooler 9.5 / 10 and it's definitely an overclocker's need. rclxm9.gif rclxms.gif

Special thanks to:
ckhoong ( who send me the review unit, thanks again for trusting Ace meimei thumbup.gif )
ktek ( who's with me for the whole review and helping me all the times notworthy.gif )
wxtye ( owner of the Thermalright Ultra 120 Extreme )
shawnlut ( owner of the Xigmatek S1283 Dark Knight )
wormy1034 ( owner of Prolimatech MegaShadow Deluxe )

Where to find this cooler in Malaysia?
The answer is here:
http://forum.lowyat.net/index.php?showtopic=1172036&hl=
Forumer ckhoong is a trustable seller and a good friend of mine, he has very good after sales service too brows.gif
Nego, grab it, install, rock and roll !!!111!!!11!11

I iz enjoice thumbup.gif


Thanks
AceCombat™
Alive With Adrenaline™

This post has been edited by AceCombat: Sep 28 2009, 03:03 PM
TSAceCombat
post Sep 28 2009, 01:55 AM


Group Icon
Elite
5,432 posts

Joined: Dec 2006


Be patient, i taking longer time just to make a better reading review to all of you here rclxms.gif
TSAceCombat
post Sep 28 2009, 11:30 AM


Group Icon
Elite
5,432 posts

Joined: Dec 2006


I've added another 3 coolers into the test, stay tuned, doing the reading now rclxms.gif
TSAceCombat
post Sep 28 2009, 02:57 PM


Group Icon
Elite
5,432 posts

Joined: Dec 2006


Full review is completed, you guys may leave comment here rclxms.gif
TSAceCombat
post Sep 28 2009, 03:25 PM


Group Icon
Elite
5,432 posts

Joined: Dec 2006


cry.gif
I forgot that you can have IFX-14, ah bo sure syok one this time cry.gif
wait for my next review then brows.gif
TSAceCombat
post Sep 28 2009, 04:17 PM


Group Icon
Elite
5,432 posts

Joined: Dec 2006


well, with such thick fins and works in isolated and hot environment, Freezer has more advantages than TRUE, True needs good air flow only can work out with good temperature, this is my own experience with True, the fins are too thick to dispate the heat unless u have strong intake. And yes, Freezer mounting is quite tricky, make sure the black plastic mounting is perfectly fitted onto the motherboard holes.
TSAceCombat
post Sep 28 2009, 05:45 PM


Group Icon
Elite
5,432 posts

Joined: Dec 2006


QUOTE(shawnlut @ Sep 28 2009, 05:03 PM)
TRUE shines with 2 (push pull config) high static fans like Scythe S-Flex series or Yate Loon or some other fans, as well as the cooler is lapped & pressure mod...
*
yo bro wave.gif
luckily i managed to get a MegaShadow from my friend laugh.gif
The TRUE operates in very hot condition, so that's why the reading is a bit high.

QUOTE(BlueWind @ Sep 28 2009, 05:41 PM)
I just want to know whether 3rd party HSF manufacturers usually target only for OCers? What if I don't OC? Would it be worth to buy one or just stick with stock?

Nice review you have here Ace. user posted image
*
IF you dont oc, then you will have a low temperature and low noise from ur processor and hsf there, it's strongly recommend to get an aftermarket hsf because it can reduce the heat inside ur casing and give u lower temp when wanna oc brows.gif
TSAceCombat
post Sep 28 2009, 06:45 PM


Group Icon
Elite
5,432 posts

Joined: Dec 2006


I wish someone can sponsor me a nice camera tongue.gif
anyway, Hilmi, I think I need to get loan unit from forumer if wanan see how well V10 perform.
TSAceCombat
post Sep 29 2009, 06:45 AM


Group Icon
Elite
5,432 posts

Joined: Dec 2006


don think so since i gonna send back the review unit already, but the upcoming Gladiator Max mostly will be done by using i7 :-)
TSAceCombat
post Sep 29 2009, 07:13 PM


Group Icon
Elite
5,432 posts

Joined: Dec 2006


Corsair H50 is hard to find here, nobody willing to loan i think laugh.gif
TSAceCombat
post Oct 3 2009, 11:24 AM


Group Icon
Elite
5,432 posts

Joined: Dec 2006


I bump it up for reference purpose rclxms.gif
TSAceCombat
post Oct 4 2009, 10:17 AM


Group Icon
Elite
5,432 posts

Joined: Dec 2006


Ok lo, next review i'll create thread here looking for loan hsf biggrin.gif
TSAceCombat
post Oct 8 2009, 07:54 AM


Group Icon
Elite
5,432 posts

Joined: Dec 2006


Stay tuned for the upcoming review from Ace meimei flex.gif
TSAceCombat
post Jan 18 2010, 04:26 PM


Group Icon
Elite
5,432 posts

Joined: Dec 2006


Depend on ur budget, so far everything is possible, u may proceed ur problem here biggrin.gif

http://forum.lowyat.net/topic/780286

Topic ClosedOptions
 

Change to:
| Lo-Fi Version
0.0221sec    0.26    7 queries    GZIP Disabled
Time is now: 29th March 2024 - 02:15 AM