

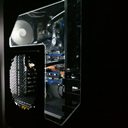
Hi, i jz wondering how to open this cooling pad and clean the fan. Someone can help me? Attaching pictures sure help a lot. i cant fin any screw here. jz 2 at d bottom
CM Infinite, Fan Cleaning
CM Infinite, Fan Cleaning
|
|
 Jan 16 2009, 02:24 PM, updated 15y ago Jan 16 2009, 02:24 PM, updated 15y ago
Show posts by this member only | Post
#1
|
Senior Member
881 posts Joined: Aug 2008 From: Johor Bahru & KL |
Hi, i jz wondering how to open this cooling pad and clean the fan. Someone can help me? Attaching pictures sure help a lot. i cant fin any screw here. jz 2 at d bottom
|
|
|
|
|
|
Jan 21 2009, 06:51 PM
Show posts by this member only | Post
#2
|

Junior Member
449 posts Joined: Dec 2006 |
I encountered the same exact problem as you a few months ago, I searched all around the Internet and came across with this statement from a NotebookReview forum moderator: "You will need a screw driver. Take off the 4 rubber pads on the metal mesh, then you should be able to see the screws.
 " "That didn't helped me a lot, so I decided to tear this cooling pad down myself; it hurts I know, but at least I figured out a way to clean the fan! To clean the Cooler Master NotePal Infinite: 1) Carefully peel off those 4 long rubber strips on the metal mesh.  2) You'll find 4 silver color screws on the top left and right corner on the metal mesh; 4 black color screws on the lower left and right corner of the metal mesh. Unscrew all 8 of them using a proper screwdriver.  Top right corner on the metal mesh; I unscrew one of them already.  Lower left corner on the metal mesh; notice the 2 black screws are still intact. 3) Flip the cooling pad to reveal its black plastic underside, there are 2 prominent black screws at the lower center part of the cooling pad (like you've mentioned earlier); unscrew them as well.  Underside of the cooling pad.  The 2 black screws you've mentioned. 4) Notice those square rubber pads? Peel all 4** of them off carefully; you'll find 2 silver screws on the upper left and right corner of the bottom base and 2 black screws on the lower left and right corner of the bottom base where the rubber pads once hid them from sight. Unscrew all 4 of them. **Note: Alternatively, you can just peel the lower 2 square rubber pads, because the two silver screws on the upper left and right corner of the bottom base doesn't inhibit you from opening the cooling pad. You can leave the silver screws (and the rubber pads on the upper left and right corner) alone if you so wish.  Upper right corner of the bottom base. You can choose not to unscrew this screw and the other one on the left, it doesn't inhibit you from opening the Cooler Master Infinite.  Lower left corner of the bottom base. 5) Once you've done that, you should be able to lift the metal mesh along with a butt shape black color plastic off the black plastic bottom base, refer to the picture below.  But don't yank the metal mesh part just yet, there's a wire attached from the fan to the power supply unit/chip, disconnect the wire carefully.  Notice there's a wire running along from the fan to the power supply/controller/chip. Once the wire is disconnected, you should be able to separate the metal mesh and butt shape plastic combo from the bottom base.  Wire disconnected. This post has been edited by Onyx_black: Jan 25 2009, 10:08 AM |
|
|
Jan 21 2009, 06:54 PM
Show posts by this member only | Post
#3
|
|
Junior Member
449 posts Joined: Dec 2006 |
6) Here comes the painful part, remove the brushed aluminum Cooler Master plate very carefully. Make sure you don't bend the aluminum plate as it's quite soft; if you're going to clean this cooling pad once in awhile I strongly suggest you to remove the aluminum plate and keep it somewhere safe. Once you've done that, there are 4 black screws and 3 silver screws (to secure the fan in place) waiting for you, unscrew the 4 black screws first, leave the silvers ones alone for now
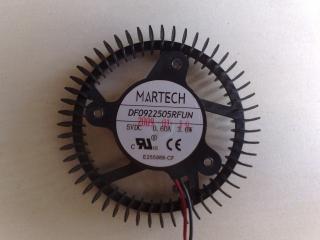
 Remove the aluminum plate and keep it at some place safe.  Remove the 4 black screws first; leave the 3 silver ones alone for now. 7) Flip the metal mesh part, there are a series of latching mechanisms at the sides on the metal mesh. With a firm push you should be able to free the metal mesh from the butt shape plastic.  8) Flip the metal mesh and you'll see the fan; flip it again and unscrew all 3 silver screws.  The fan attached to the metal mesh.  Unscrew all 3 silver screws to free the fan. 9) Slide the wire out of the latch to free the fan; now the fan is all yours for the cleaning.  All the components of the Cooler Master NotePal Infinite,  I hope this guide can benefit the owners of the Cooler Master Infinite.  |
|
|
Jan 22 2009, 10:45 AM
Show posts by this member only | Post
#4
|
|
Senior Member
881 posts Joined: Aug 2008 From: Johor Bahru & KL |
hmm..quite complicated. niways, very usefull guide
 thanks Onyx_black. thanks Onyx_black.1 question, if not use back the CM plate, will it disrupt the air flow, i mean, will the come out from the plate area?? |
|
|
Jan 22 2009, 10:32 PM
Show posts by this member only | Post
#5
|
|
Junior Member
449 posts Joined: Dec 2006 |
QUOTE(speedhunter @ Jan 22 2009, 10:45 AM) hmm..quite complicated. niways, very usefull guide If you don't replace the Cooler Master plate, it will not disrupt airflow, it merely opens a new place for air to enter the fan area. thanks Onyx_black.1 question, if not use back the CM plate, will it disrupt the air flow, i mean, will the come out from the plate area??  To be specific, when the plate is still in place, it prohibits air from entering the fan through the top part, which is the metal mesh. Hence there's only one way the air can enter the fan area: through the back of the Cooler Master Infinite (you know, the black grill part, above it is the switch). That's the default way for air to enter the fan. Now, with the plate removed, there are 2 ways for air to enter the fan area, the part where the plate once is and the back portion of the Infinite. This is just my theory, you don't have to trust me on this: since there are more ways for air to enter the fan area, it effectively increases the amount of air the fan can push at a given amount of time. |
|
|
Jan 24 2009, 07:00 PM
Show posts by this member only | Post
#6
|

Junior Member
92 posts Joined: Jul 2007 |
Wow great guide! This is what I'm looking for. Many thanks to you..
 |
|
|
|
|
|
Jul 24 2009, 02:42 PM
Show posts by this member only | Post
#7
|
|
Junior Member
48 posts Joined: Apr 2008 |
Wooz,Great tutorial! do u know how to make my fan silent? i compare my 1 with my friend same model and same data bought. i can feel my fan a little bit noise
|
|
|
Jul 24 2009, 05:10 PM
Show posts by this member only | Post
#8
|
|
Senior Member
881 posts Joined: Aug 2008 From: Johor Bahru & KL |
try changing the fan speed
|
|
|
Jul 24 2009, 10:52 PM
Show posts by this member only | Post
#9
|
|
Junior Member
48 posts Joined: Apr 2008 |
ntg much different
|
|
|
Jul 26 2009, 07:54 PM
|

Senior Member
7,864 posts Joined: Oct 2006 From: Klang |
any guides for cleaning Zalman NC1000?
|
|
|
Jul 31 2009, 12:06 AM
|
|
Junior Member
47 posts Joined: May 2009 |
vote for sticky
 . .nice guide u have there |
|
|
Mar 29 2011, 07:58 PM
|
|
Junior Member
161 posts Joined: Jan 2009 |
i couldn't see all the picture. Help..
|
|
|
Mar 31 2011, 09:35 PM
|
|
Senior Member
881 posts Joined: Aug 2008 From: Johor Bahru & KL |
the pictures still work for me
|
|
|
Oct 24 2011, 04:38 PM
|

Senior Member
9,590 posts Joined: Jan 2008 From: S'wak||KL||SG |


Just followed the guide to clean it and assemble everything back. It's ssooooossosososooooo dirty after 2.5 years of usage. It runs cooler now xD |
| Change to: |  0.0198sec 0.0198sec
 0.47 0.47
 6 queries 6 queries
 GZIP Disabled GZIP Disabled
Time is now: 1st December 2025 - 11:17 AM |
 Quote
Quote