

This post has been edited by B0ss_ku: Today, 07:06 PM
Wireman come in
|
|
 Today, 07:04 PM, updated 2h ago Today, 07:04 PM, updated 2h ago
Show posts by this member only | Post
#1
|

Junior Member
282 posts Joined: Dec 2021 |
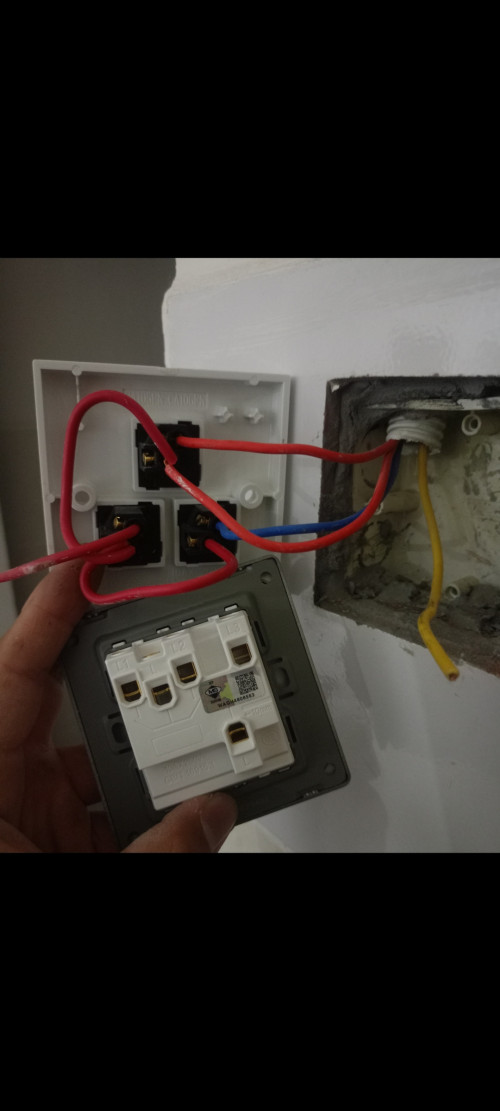
Can any one tell me which one is L1, which one L2, which one L3, which one live?
This post has been edited by B0ss_ku: Today, 07:06 PM |
|
|
|
|
|
Today, 07:10 PM
Show posts by this member only | IPv6 | Post
#2
|

Junior Member
109 posts Joined: May 2013 |
The one chained to other switches is from distribution board breaker, everything else is going to your light/fan fixtures
L is the one from the db, judging by your new switch there are two L123 is everything else |
|
|
Today, 07:16 PM
Show posts by this member only | Post
#3
|
|
Junior Member
282 posts Joined: Dec 2021 |
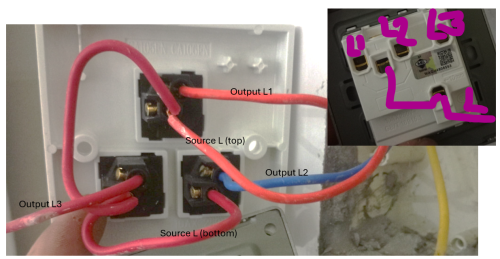
Can draw how to change to the new switch board? Which wire goes to which slot?
|
|
|
Today, 07:16 PM
Show posts by this member only | Post
#4
|

Junior Member
539 posts Joined: Dec 2016 |
i knw right answer but what will ts give me?
|
|
|
Today, 07:16 PM
Show posts by this member only | Post
#5
|
|
Junior Member
282 posts Joined: Dec 2021 |
QUOTE(Quantum Geist @ Dec 13 2025, 07:10 PM) The one chained to other switches is from distribution board breaker, everything else is going to your light/fan fixtures Can draw how to change to the new switch board? Which wire goes to which slot?L is the one from the db, judging by your new switch there are two L123 is everything else  |
|
|
Today, 07:17 PM
Show posts by this member only | Post
#6
|
|
Junior Member
282 posts Joined: Dec 2021 |
QUOTE(Ludwig. @ Dec 13 2025, 07:16 PM) i knw right answer but what will ts give me? I wish you next year huat huat |
|
|
|
|
|
Today, 07:18 PM
Show posts by this member only | Post
#7
|

Senior Member
3,581 posts Joined: Oct 2007 From: everywhere in sabah |
i know this exact problem
i always open my broke wall anything thn go to mr.diy and discovered in front is the same but behind is totally different like how do you expect me to change it? so i keep finding until i found the one that matches exactly behind |
|
|
Today, 07:19 PM
Show posts by this member only | IPv6 | Post
#8
|

Senior Member
2,378 posts Joined: Dec 2005 |
QUOTE(B0ss_ku @ Dec 13 2025, 07:04 PM) Can any one tell me which one is L1, which one L2, which one L3, which one live? whatever you do, off the DB breaker.secondly, use test pen to get your answer. |
|
|
Today, 07:26 PM
Show posts by this member only | Post
#9
|
|
Junior Member
109 posts Joined: May 2013 |
QUOTE(B0ss_ku @ Dec 13 2025, 07:16 PM) Can draw how to change to the new switch board? Which wire goes to which slot? I don't know TS, judging from the picture looks like whatever explanation I give is just gonna be confusing if you're not familiar with home electrical circuits. Get an electrician. |
|
|
Today, 07:31 PM
|

Junior Member
164 posts Joined: Mar 2007 |
Ni pusing2 je
|
|
|
Today, 07:34 PM
|

Senior Member
3,448 posts Joined: Jan 2003 From: Sarawak |
if you have to ask...you better dont do anything
But if you need to know, COM or L is the one yang is common antara 3 switches itu, the one looped. |
|
|
Today, 07:53 PM
|

Senior Member
2,201 posts Joined: Jan 2003 |
 |
|
|
Today, 07:56 PM
|

Junior Member
191 posts Joined: Oct 2021 |
keep ambulance/bomba phone number ready
|
|
|
|
|
|
Today, 08:01 PM
Show posts by this member only | IPv6 | Post
#14
|

Junior Member
336 posts Joined: Mar 2017 |
This is L1
That is L2 Last one is L3 Good luck TS |
|
|
Today, 08:02 PM
|
|
Junior Member
167 posts Joined: Mar 2014 |
My Gemini wireman:
(Kalau kaboom not my fault sue Google, sekadar post as a joke not real advice) Based on the photos provided, you are replacing an old 3-gang wall switch with a new 3-gang switch. ⚠️ WARNING: DANGER OF ELECTROCUTION Before doing anything, go to your fuse box/consumer unit and turn off the main power or the specific breaker for the lighting circuit. Do not touch any wires until you are sure the power is off. Step 1: Understand the Wiring The Old Switch (Top): The "Loop" (Live In): Notice the short red wires "jumping" from one switch module to the next? That is carrying the power (Live) to all three buttons. The wire coming from the wall that feeds this loop is your LIVE IN. The Outputs (Switched Live): There are 3 distinct wires (two red, one blue) leaving the individual switch modules. These go to your lights/fans. The New Switch (Bottom): L: This is the Common Input (Live In). L1, L2, L3: These are the outputs to your three different lights. Note: Your new switch appears to have an internal bridge (one single "L" terminal for all three switches), which means you do not need the messy jumper wires from the old switch. Step 2: Wiring Instructions Here is exactly where each wire goes: Identify the Main Live Wire: On the old switch, find the red wire coming from the wall that connects to the "jumper loop" (it looks like it's connected to the top switch's center terminal). Action: Remove this wire and connect it to the terminal marked L on the new switch. (Discard the short jumper loops; the new switch doesn't likely need them). Connect the Lights (The Outputs): Take the wire connected to the Top switch output on the old unit. Connect it to L1 on the new switch. Take the wire connected to the Bottom Left switch output on the old unit. Connect it to L2 on the new switch. Take the wire (the blue one) connected to the Bottom Right switch output on the old unit. Connect it to L3 on the new switch. The Yellow Wire (Earth): You have a yellow wire loose in the wall box. This is the Earth wire. If the new switch has a metal terminal marked with the Earth symbol (⏚), connect the yellow wire to it. If the new switch is all plastic and has no Earth terminal, wrap the exposed copper end of the yellow wire with electrical tape to make it safe and tuck it into the back of the box. Summary of Connections Red (Source from wall) →→ L Red (Light 1) →→ L1 Red (Light 2) →→ L2 Blue (Light 3) →→ L3 Step 3: Finish Up Double-check that all screws are tight and no loose copper wire is visible outside the holes. Screw the new switch plate into the wall box. Turn the power back on and test the buttons. Note: If you find that only one button works after installation, the new switch might not be internally bridged. If that happens, you would need to use short wires to bridge the "L" terminals together, but looking at your photo, the single large "L" suggests you don't need to do this. |
|
|
Today, 08:09 PM
Show posts by this member only | IPv6 | Post
#16
|
|
Junior Member
282 posts Joined: Dec 2021 |
QUOTE(lj0000 @ Dec 13 2025, 07:53 PM) Wish you huat huat next year! 6907 4D lj0000 liked this post
|
|
|
Today, 08:19 PM
Show posts by this member only | IPv6 | Post
#17
|
|
Elite
2,554 posts Joined: Jan 2003 |
Kabooom
|
| Change to: |  0.0147sec 0.0147sec
 0.39 0.39
 5 queries 5 queries
 GZIP Disabled GZIP Disabled
Time is now: 13th December 2025 - 10:57 PM |
 Quote
Quote