


How to fix torn ceiling fan holder?
How to fix torn ceiling fan holder?
|
|
 Aug 15 2024, 11:50 AM Aug 15 2024, 11:50 AM
|
 
Senior Member
1,225 posts Joined: Nov 2017 |
you can get your preferred color duct tape easily.
|
|
|
|
|
|
Aug 15 2024, 12:08 PM
Show posts by this member only | IPv6 | Post
#22
|

Senior Member
1,063 posts Joined: Apr 2020 |
Kdk bought by panasonic inm
My father's house kdk ceiling, all already 30+ yrs, still working fine... 😂 |
|
|
Aug 15 2024, 12:15 PM
Show posts by this member only | IPv6 | Post
#23
|
|
Senior Member
9,041 posts Joined: Jan 2003 |
I DIY using a Coke bottle and sprayed white. netflix2019 liked this post
|
|
|
Aug 15 2024, 12:32 PM
Show posts by this member only | IPv6 | Post
#24
|

Senior Member
4,350 posts Joined: Oct 2010 From: KL |
1. rip off
2. tape or glue. 3. buy new. |
|
|
Aug 15 2024, 12:51 PM
Show posts by this member only | IPv6 | Post
#25
|

Senior Member
1,880 posts Joined: Jan 2007 From: The Long river ... |
|
|
|
Aug 15 2024, 03:47 PM
|
|
Junior Member
500 posts Joined: Dec 2019 |
good news: cheap item, easily available
bad news: need to take down the ceiling fan to change the part personally, I would change it. maybe get someone to help you with it if you do not know how. |
|
|
|
|
|
Aug 15 2024, 05:04 PM
Show posts by this member only | IPv6 | Post
#27
|

Junior Member
77 posts Joined: Jul 2013 |
Just change new ceiling holder
If tape or glue wont last long due to vibration This post has been edited by urnicksux2: Aug 15 2024, 05:07 PM |
|
|
Aug 15 2024, 09:30 PM
Show posts by this member only | IPv6 | Post
#28
|
|
Senior Member
5,532 posts Joined: Aug 2011 |
I tried to tape it but it was breaking off, so brittle.
So I just decided to cut it and remove. Now it looks "naked" like the pictures below. 1. Can the fan still be used as normal? 2. If I don't replace the cover, is there any danger? 3. Other than aesthetic purposes, does the cover serve any other purpose? 4. Is there a way to fix a replacement cover without taking the entire fan down?  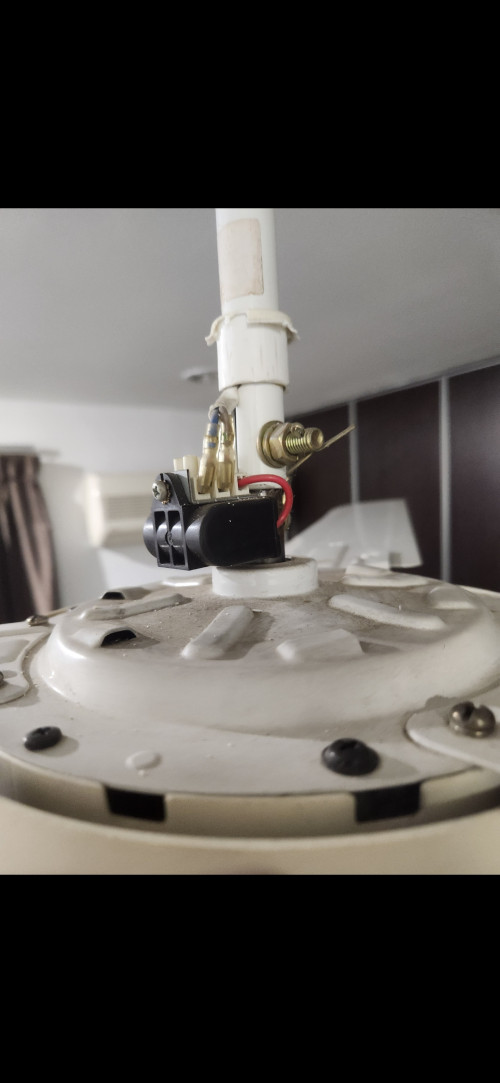 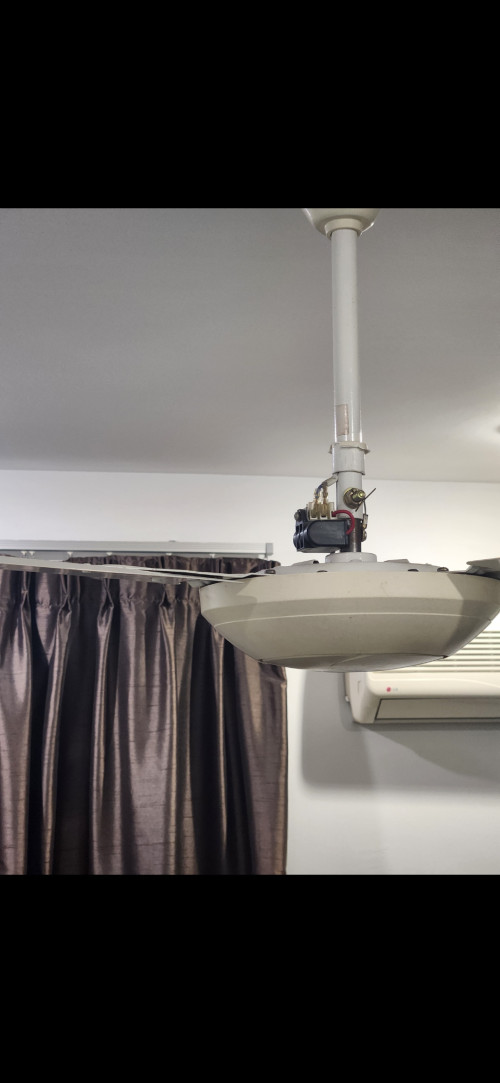 This post has been edited by contestchris: Aug 15 2024, 09:31 PM |
|
|
Aug 15 2024, 11:44 PM
Show posts by this member only | IPv6 | Post
#29
|

Senior Member
1,887 posts Joined: Mar 2013 |
The fan will still work without the cover. I think it's purpose is to prevent you from touching the electric motor when cleaning the fan.
It's not that complicated to remove the fan. Just need a ladder and remove a few screws. Be careful of the weight of the fan. And remember to tie the cable into a knot around the ceiling hook and then screw it to the fan. The cable should be up here. Take a video of how it's assembled before you remove the fan. 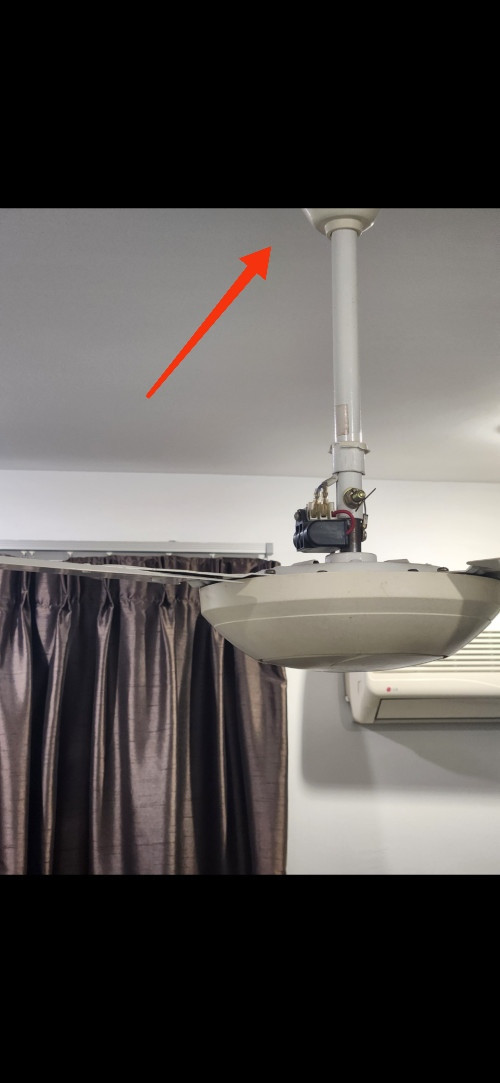 |
|
|
Aug 16 2024, 12:04 AM
Show posts by this member only | IPv6 | Post
#30
|
|
Senior Member
1,887 posts Joined: Mar 2013 |
Eh never mind, here's a tutorial video from KDK. You can remove the blades to make it lighter to carry.
https://youtu.be/y4qMTn42Hf8 This post has been edited by JohnL77: Aug 16 2024, 12:05 AM |
|
|
Aug 16 2024, 01:23 AM
|

All Stars
11,667 posts Joined: Jan 2003 From: Klang/Subang |
Just buy the cover first. Disconnecting the rod is quite straightforward per above video. These 3-bladed fans are designed to have rod replacements (you can drop them from high ceilings) so in other words it is definitely possible to swap out the tupperware cover
|
|
|
Aug 16 2024, 01:49 AM
Show posts by this member only | IPv6 | Post
#32
|

Junior Member
359 posts Joined: Dec 2008 From: NoT WoRTh TelLiNg |
QUOTE(contestchris @ Aug 15 2024, 09:30 PM) I tried to tape it but it was breaking off, so brittle. 1) CanSo I just decided to cut it and remove. Now it looks "naked" like the pictures below. 1. Can the fan still be used as normal? 2. If I don't replace the cover, is there any danger? 3. Other than aesthetic purposes, does the cover serve any other purpose? 4. Is there a way to fix a replacement cover without taking the entire fan down? 2) No danger assuming no one in your house tall enough to reach & touch that thing, or family member that could fly. Joke aside, also to protect wireman when wanna change your fan and not get zap by that capacitor. The capacitor zap not gonna kill ya & doesn't hurt much (when off ok), but the zap is enough to catch you off-guard, and it's dangerous cuz you on a ladder, terkejut, lost balance... jatuh..TLDR safety for the worst case scenario etc. 3) Prevent dust to those components I guess. But afaik, there are only wires + a capasitor, not something that dust would kill an appliance imo. 4) Honestly speaking,looking at the back & forth TS in this thread, I gonna assume TS is not gonna go through the trouble to disassemble the rod. Yeah it's easy for us DIYers & who have done it before. But looking at how concerned TS is with the questions, don't think TS has the confidence to do it nor wanna go to the trouble even if TS manage to figure it out. So here is my wild idea: [Idea 1] 1) Go back and look at your old cover. Inspect it and determine if it is made from "elastic-plastic" or "brittle plastic". A brittle one is like a plastic that breaks when you tear it with pressure, if it is elastic, you can put pressure and it will just lose shape and stretch a little. 2) If you think it is made from something that can deform but not break when applied little pressure go next, 3) Go buy the same spare part that forumers has posted before . Shop around. 4) When item arrive, inspect again and test if it can be applied pressure without breaking. If everything good go 5 5) Determine where is the screw hole. 6) We gonna make a straight cut so it can be "open" or in malay word "kangkang" the cone open a little bit. But don't make cut on the screw area. We need that screw to secure the cone back to the fan later. 7) After made the straight cut, try to kangkang the cone open just enough so it can slide through the Metal Bar of your Ceiling fan. Careful not to break it. Hence why I say this is only possible if the plastic cone is made from plastic that is somewhat elastic (even a little will do) and not hard hard brittle plastick that will break if you kangkang it. 8) After safely slide inside into position, screw it. And the straight cut that you made before, glue back or just tape. 9) Done... and then... 10) Sit down and contemplate whether or not it is worth doing the DIY at the cost of 'probably' not long-lasting solution as the structural integrity of the cone might not be 100%. Before sleep maybe you'll ask yourself "its a new cone I should have done it the proper way perhaps"  [Idea 2] 1) Go search around a similar cone that is elastic like a cone for a lamp. Just diy and do same procedure above. Straight cut, kangkang, slide, close, tape. 2) Go shopee search "PVC Lampshade" or "tudung Lampu". You'll see those old style bulb cone cover thingy as top seach. Maybe something like this will do [it is just an idea]. 3) But I would suggest you not buy online, but go physical store so that you can test test if it is elastic or hard plastic. Juzz throwing out wild ideas only. At least with Idea 1, you can first buy the cone and then decide whether you wanna do it properly or do the DIY ones. Good luck. |
|
|
Aug 16 2024, 01:54 AM
Show posts by this member only | IPv6 | Post
#33
|
|
Senior Member
5,532 posts Joined: Aug 2011 |
QUOTE(pergilahsayang @ Aug 16 2024, 01:49 AM) 1) Can Thanks but I don't see any screws to fasten the lower cover.2) No danger assuming no one in your house tall enough to reach & touch that thing, or family member that could fly. Joke aside, also to protect wireman when wanna change your fan and not get zap by that capacitor. The capacitor zap not gonna kill ya & doesn't hurt much (when off ok), but the zap is enough to catch you off-guard, and it's dangerous cuz you on a ladder, terkejut, lost balance... jatuh..TLDR safety for the worst case scenario etc. 3) Prevent dust to those components I guess. But afaik, there are only wires + a capasitor, not something that dust would kill an appliance imo. 4) Honestly speaking,looking at the back & forth TS in this thread, I gonna assume TS is not gonna go through the trouble to disassemble the rod. Yeah it's easy for us DIYers & who have done it before. But looking at how concerned TS is with the questions, don't think TS has the confidence to do it nor wanna go to the trouble even if TS manage to figure it out. So here is my wild idea: [Idea 1] 1) Go back and look at your old cover. Inspect it and determine if it is made from "elastic-plastic" or "brittle plastic". A brittle one is like a plastic that breaks when you tear it with pressure, if it is elastic, you can put pressure and it will just lose shape and stretch a little. 2) If you think it is made from something that can deform but not break when applied little pressure go next, 3) Go buy the same spare part that forumers has posted before . Shop around. 4) When item arrive, inspect again and test if it can be applied pressure without breaking. If everything good go 5 5) Determine where is the screw hole. 6) We gonna make a straight cut so it can be "open" or in malay word "kangkang" the cone open a little bit. But don't make cut on the screw area. We need that screw to secure the cone back to the fan later. 7) After made the straight cut, try to kangkang the cone open just enough so it can slide through the Metal Bar of your Ceiling fan. Careful not to break it. Hence why I say this is only possible if the plastic cone is made from plastic that is somewhat elastic (even a little will do) and not hard hard brittle plastick that will break if you kangkang it. 8) After safely slide inside into position, screw it. And the straight cut that you made before, glue back or just tape. 9) Done... and then... 10) Sit down and contemplate whether or not it is worth doing the DIY at the cost of 'probably' not long-lasting solution as the structural integrity of the cone might not be 100%. Before sleep maybe you'll ask yourself "its a new cone I should have done it the proper way perhaps" [Idea 2] 1) Go search around a similar cone that is elastic like a cone for a lamp. Just diy and do same procedure above. Straight cut, kangkang, slide, close, tape. 2) Go shopee search "PVC Lampshade" or "tudung Lampu". You'll see those old style bulb cone cover thingy as top seach. Maybe something like this will do [it is just an idea]. 3) But I would suggest you not buy online, but go physical store so that you can test test if it is elastic or hard plastic. Juzz throwing out wild ideas only. At least with Idea 1, you can first buy the cone and then decide whether you wanna do it properly or do the DIY ones. Good luck.  |
|
|
|
|
|
Aug 16 2024, 03:30 AM
Show posts by this member only | IPv6 | Post
#34
|
|
Junior Member
359 posts Joined: Dec 2008 From: NoT WoRTh TelLiNg |
QUOTE(contestchris @ Aug 16 2024, 01:54 AM) Thanks but I don't see any screws to fasten the lower cover. If you refer to JohnL77 video at minute 6:06, the screw fastener of the cone looks like that.If you really cannot find it, either it broke off when you tear it off, or the screw/screw hole that holding it is still at your fan since from the picture it does seem like you did not 100% tear them off completely. But if you really cannot find the screw after all that, could be your fan design just doesn't have a screw to fasten for the lower cone like the old KDK KY15D, so it is being held on by sheer pressure between the cone and the metal bar. But I'm afraid if this is true, if you were to find the exact same replacement part with same exact design, you cannot do the wild idea DIY I just mentioned because this design tend to have a long 'inner stocking' (for lack of better word) so hard to cut because you need to cut the inner 'stocking' part too. It will get destroyed. Only confident in doing those wild stuff if it is using the newer KDK cone design with screw like forumer posted before. But I can't say for certain if those cone fits your old model; be it if you wanna install it properly or wanna do the cut cut diy thing, so you need to do some digging first or see shoppee comment section. p/s:cone = canopy. |
|
|
Aug 16 2024, 09:02 AM
|
|
Junior Member
481 posts Joined: Jan 2010 |
remove or use epoxy glue or super glue to stick it back. this is just dust cover.
|
|
|
Aug 16 2024, 09:12 AM
|

Senior Member
1,258 posts Joined: Jan 2003 |
tldr...
Sooo, either bear with the naked look, or buy a new fan, these basic models aren't very expensive. And get someone to install it. |
|
|
Aug 16 2024, 11:28 AM
Show posts by this member only | IPv6 | Post
#37
|
|
Senior Member
1,880 posts Joined: Jan 2007 From: The Long river ... |
Ding dong ding dong ... pay someone to do it la.
|
|
|
Aug 16 2024, 11:34 AM
Show posts by this member only | IPv6 | Post
#38
|

Senior Member
1,237 posts Joined: Sep 2006 From: Ampang. KL. |
if u dont mind the aesthetics, i believe just let it be.
if not just buy a new cover/canopy and install them. |
|
|
Aug 16 2024, 11:38 AM
Show posts by this member only | IPv6 | Post
#39
|

Senior Member
1,403 posts Joined: Jun 2009 |
Change to dc motor ceiling fan. You won't miss the humming noise from ur ac motor fan
|
|
|
Jul 13 2025, 02:02 AM
Show posts by this member only | IPv6 | Post
#40
|
|
Senior Member
5,532 posts Joined: Aug 2011 |
Just curious, do they sell replacement canopies in two halves? Such that you just screw them together, negating the need to remove the whole fan. It’s a laborious process.
I installed the Panasonic Bayu DC fan a couple weeks ago, the canopies come in two halves. I was thinking of getting one, and try it, but I can’t find the spare parts online. |
| Change to: |  0.0227sec 0.0227sec
 0.49 0.49
 5 queries 5 queries
 GZIP Disabled GZIP Disabled
Time is now: 3rd December 2025 - 11:03 AM |
 Quote
Quote