

Attached thumbnail(s)

Resize plaster ceiling down light hole, Trying to DIY by 2 inch
|
|
 Dec 28 2020, 11:37 AM, updated 5y ago Dec 28 2020, 11:37 AM, updated 5y ago
Show posts by this member only | Post
#1
|
 
Junior Member
260 posts Joined: Nov 2005 |
Hi anybody have experience DIY down sizing the downlight hole by 2 inch? Recently changed the recessed ceiling light to led but size much smaller size.
Attached thumbnail(s)
|
|
|
|
|
|
Dec 28 2020, 11:46 AM
Show posts by this member only | Post
#2
|
|
Senior Member
5,650 posts Joined: Mar 2012 |
its easier to buy bigger led. 6inch
its brighter too. |
|
|
Dec 28 2020, 11:52 AM
Show posts by this member only | Post
#3
|
|
Junior Member
260 posts Joined: Nov 2005 |
QUOTE(fireballs @ Dec 28 2020, 11:46 AM) its easier to buy bigger led. 6inch Yes easier if just buy bigger size but in terms of luminescence this size 12w is good enough. Currently with this 12w size already way brighter than before. 😂 so just need to resize the ceiling Hole.its brighter too.  |
|
|
Dec 28 2020, 11:55 AM
Show posts by this member only | Post
#4
|
|
Senior Member
5,650 posts Joined: Mar 2012 |
i tried that.. its a big mess. and i absolutely hated fiberglass
end up buy 6" easier. i am hunting for 6" recessed casing for e27 bulbs. so i dont have to open the plaster ceiling everytime change the lamp. like this https://www.lazada.com.my/products/btg-66-6...s641274092.html This post has been edited by fireballs: Dec 28 2020, 11:56 AM |
|
|
Dec 28 2020, 12:10 PM
Show posts by this member only | Post
#5
|

All Stars
11,667 posts Joined: Jan 2003 From: Klang/Subang |
Resizing need to cut a new piece to fit along w existing hole, then drop in w backing support n mud back the lines
|
|
|
Dec 28 2020, 12:32 PM
Show posts by this member only | Post
#6
|
|
Junior Member
121 posts Joined: Nov 2017 |
Measure the hole size and cut a portion of plaster ceiling according to the hole size. Then cut the required new lighting hole out of the earlier piece.
Then use plaster ceiling stopping compound to attach the piece to the hole. Prolly can't attach steel support since the difference is small. I did mine the same way but mine is round shape (changed from 4" to 3" as 3" looks more modern). |
|
|
|
|
|
Dec 28 2020, 01:35 PM
Show posts by this member only | Post
#7
|
|
Junior Member
260 posts Joined: Nov 2005 |
QUOTE(fireballs @ Dec 28 2020, 11:55 AM) i tried that.. its a big mess. and i absolutely hated fiberglass I thought of it but 18W is a little too bright considering the number of downlights output i have in the room size. end up buy 6" easier. i am hunting for 6" recessed casing for e27 bulbs. so i dont have to open the plaster ceiling everytime change the lamp. like this https://www.lazada.com.my/products/btg-66-6...s641274092.html QUOTE(ceo684 @ Dec 28 2020, 12:10 PM) Resizing need to cut a new piece to fit along w existing hole, then drop in w backing support n mud back the lines QUOTE(Cyberbullies @ Dec 28 2020, 12:32 PM) Measure the hole size and cut a portion of plaster ceiling according to the hole size. Then cut the required new lighting hole out of the earlier piece. I thought of buying a sheet of plaster board then cut out a small L piece and join it back to the ceiling. Not sure whether that is how it works though. Does it need steel or something to reinforce? Then use plaster ceiling stopping compound to attach the piece to the hole. Prolly can't attach steel support since the difference is small. I did mine the same way but mine is round shape (changed from 4" to 3" as 3" looks more modern). 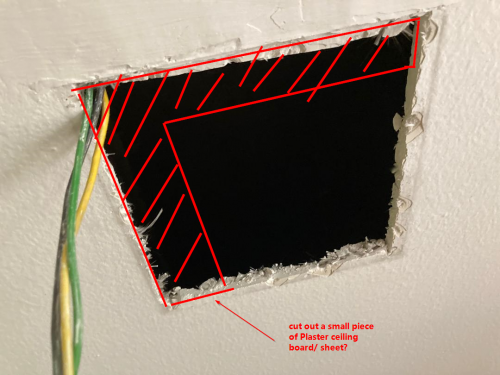 |
|
|
Dec 28 2020, 01:53 PM
Show posts by this member only | IPv6 | Post
#8
|
|
All Stars
11,667 posts Joined: Jan 2003 From: Klang/Subang |
QUOTE(longpants @ Dec 28 2020, 01:35 PM) I thought of it but 18W is a little too bright considering the number of downlights output i have in the room size. The L piece is unsupported. Please note gypsum board doesn't "glue" to themselves that well.I thought of buying a sheet of plaster board then cut out a small L piece and join it back to the ceiling. Not sure whether that is how it works though. Does it need steel or something to reinforce? I suggest making an "adapter" with border around it as the NEW light spring clips also need a surface to bite onto. This post has been edited by ceo684: Dec 28 2020, 01:56 PM Attached thumbnail(s) 
|
|
|
Dec 28 2020, 02:26 PM
Show posts by this member only | Post
#9
|
|
Junior Member
260 posts Joined: Nov 2005 |
QUOTE(ceo684 @ Dec 28 2020, 01:53 PM) The L piece is unsupported. Please note gypsum board doesn't "glue" to themselves that well. The adapter you are referring to is the wooden sticks that is to be reinforced against the L piece? any suggestion on hold the L piece board against the wooden stick? should i screw it together?I suggest making an "adapter" with border around it as the NEW light spring clips also need a surface to bite onto.  |
|
|
Dec 28 2020, 02:35 PM
Show posts by this member only | IPv6 | Post
#10
|
|
All Stars
11,667 posts Joined: Jan 2003 From: Klang/Subang |
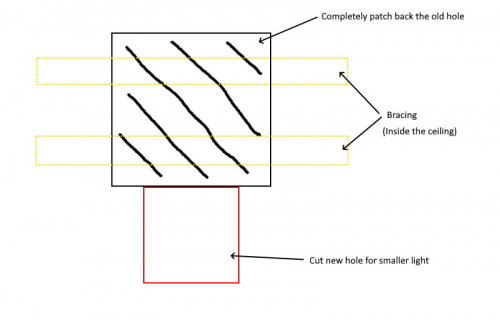
QUOTE(longpants @ Dec 28 2020, 02:26 PM) The adapter you are referring to is the wooden sticks that is to be reinforced against the L piece? any suggestion on hold the L piece board against the wooden stick? should i screw it together? I suggest to cut the whole outline (square to fit existing old hole) and new hole inside it (round or square but for simplicity I draw as green circle - rather than L piece. Because (if u installed these drop in lights) each time u replace them the hole gets looser and more condemned every time u pull out the old light the "outline" of the hole gets damaged by the spring clips.Whole outline one, can treat as sacrificial outline. Want to revert back to old hole also easy. You can screw them together (wood sticks to the adapter) by using screws in the gypsum board of the adapter. Plywood adapter also can if u can get the same thickness as existing board. How to attach it to the existing plaster ceiling u can hot glue or just leave it as is. This post has been edited by ceo684: Dec 28 2020, 02:36 PM |
|
|
Dec 28 2020, 02:42 PM
|
|
Senior Member
5,650 posts Joined: Mar 2012 |
try do one first.
remember to put on mask and full cover clothing. later wash the cloth separately. else itch die you |
|
|
Dec 29 2020, 04:30 PM
Show posts by this member only | IPv6 | Post
#12
|
|
Senior Member
1,132 posts Joined: Apr 2014 From: Shah Alam, Selangor |
Could you move the location of the new lights slightly? Cut new holes for them, and completely patch back the old holes. This might be easier to do than making the existing hole smaller with the "L" piece.
 This post has been edited by stormer.lyn: Dec 29 2020, 04:43 PM |
|
|
Oct 5 2021, 11:35 AM
|

Junior Member
414 posts Joined: Feb 2008 From: Penang |
anyone knows if this is sold in malaysia?
 .jpg) https://www.boscolighting.com.au/downlight-...nd-repair-holes https://www.micalighting.com.au/white-downl...plate-70mm.html |
| Change to: |  0.0193sec 0.0193sec
 0.68 0.68
 6 queries 6 queries
 GZIP Disabled GZIP Disabled
Time is now: 21st December 2025 - 01:37 AM |
 Quote
Quote