

QUOTE(lohwenli @ Dec 10 2007, 11:19 PM)
Later I post up multimeter readings..

It will be SCARY... 
When i saw the readings in front of my own eyes for the first time, i was like wtf...

Wat kind of a muthaf***a PSU is this i was asking myself...
Project: Legacy, MEC case, 13/12 -Rev. Beta in progress
|
|
 Dec 13 2007, 09:49 AM Dec 13 2007, 09:49 AM
|
 
Senior Member
2,386 posts Joined: Jan 2003 From: Many calls it "Hell" |
QUOTE(lohwenli @ Dec 10 2007, 11:19 PM) Later I post up multimeter readings.. It will be SCARY... When i saw the readings in front of my own eyes for the first time, i was like wtf... Wat kind of a muthaf***a PSU is this i was asking myself... |
|
|
|
|
|
Dec 13 2007, 05:16 PM
|
|
Senior Member
1,237 posts Joined: Jul 2006 From: espie-prai |
keep going bro..want see more ur handwork..i and my friend before this also use manual to make a hole for side panel..borrow drill from my lec and cut it with gergaji besi...
 but i'm just helping him.. his 1st mod.. but we not creative as u TS... nice job... but i'm just helping him.. his 1st mod.. but we not creative as u TS... nice job...did u mind i post that pic here??? This post has been edited by tapirus: Dec 13 2007, 05:41 PM |
|
|
Dec 13 2007, 06:09 PM
|
|
Senior Member
971 posts Joined: Aug 2006 From: Penang |
QUOTE(@meno @ Dec 13 2007, 09:49 AM) It will be SCARY... The look on your face was priceless When i saw the readings in front of my own eyes for the first time, i was like wtf... Wat kind of a muthaf***a PSU is this i was asking myself...  QUOTE(tapirus @ Dec 13 2007, 05:16 PM) keep going bro..want see more ur handwork..i and my friend before this also use manual to make a hole for side panel..borrow drill from my lec and cut it with gergaji besi... Sure, why not? I always welcome ideas and inspiration. As it is I've revised this casemod at least 3 times already, might post a changelog when I'm satisfied with it. but i'm just helping him.. his 1st mod.. but we not creative as u TS... nice job...did u mind i post that pic here??? |
|
|
Dec 13 2007, 06:41 PM
|
|
Senior Member
1,237 posts Joined: Jul 2006 From: espie-prai |
QUOTE(lohwenli @ Dec 13 2007, 06:09 PM) The look on your face was priceless but it only simple mod by newbie like me and my friend... Sure, why not? I always welcome ideas and inspiration. As it is I've revised this casemod at least 3 times already, might post a changelog when I'm satisfied with it.   |
|
|
Dec 13 2007, 07:48 PM
|
|
Senior Member
971 posts Joined: Aug 2006 From: Penang |
Nice job you did there, even if its just a fan hole. The edges are pretty well done, especially considering its done by hand tools, first time some more. I myself have never done any major metal cutting before this, but I have some experience with hardware stuff. Nearly all my tools were inherited from my late grandfather. Guess I took after him in that sense.
Another long overdue update. 4 - Case painting I actually did this at the same time as the PSU mod, painted both cases together. As you can tell from this pic, I've obviously got a lot to learn about spray painting. For starters, you might notice that I did not sand the original paint at all, much less strip it off 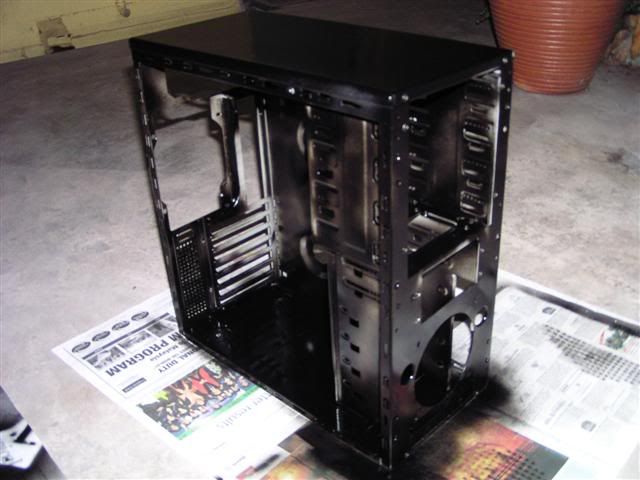 The side panel and the front panel 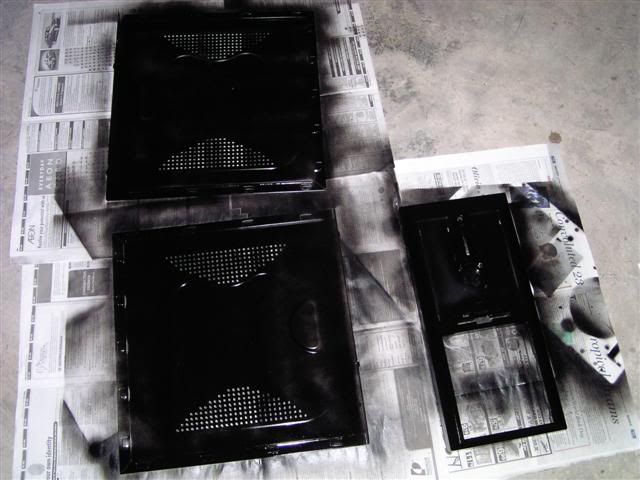 Another mistake I made was to use three, yes THREE different brands of black paint. So if you look carefully, you can actually see 3 different shades of black here. To make things worse, one of them was candy paint (no, its not sweet or edible  ) and one of them was flat/matt black. However, I did take a liking for the candy black (you'll see why in a minute) without realising it, and set it aside to use as a final coat for the exteriors. After roughly 3-6 coats of paint total, I let it dry for a week then washed off all the excess paint dust. Here's a shot of the casing drying outside my house. ) and one of them was flat/matt black. However, I did take a liking for the candy black (you'll see why in a minute) without realising it, and set it aside to use as a final coat for the exteriors. After roughly 3-6 coats of paint total, I let it dry for a week then washed off all the excess paint dust. Here's a shot of the casing drying outside my house.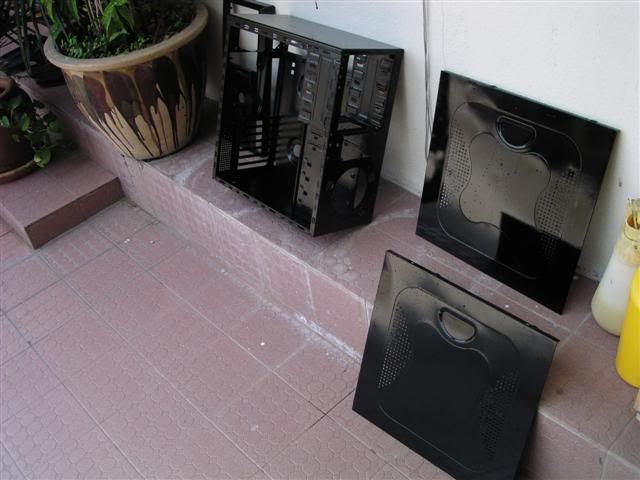 Shiny, isn't it? Even without smoothing and polishing, and its because of the candy paint final coat followed by a protective clearcoat.The whole thing reassembled, but without screws as I wanted to take it apart in a moment. Now you can really see how shiny the side panel is. 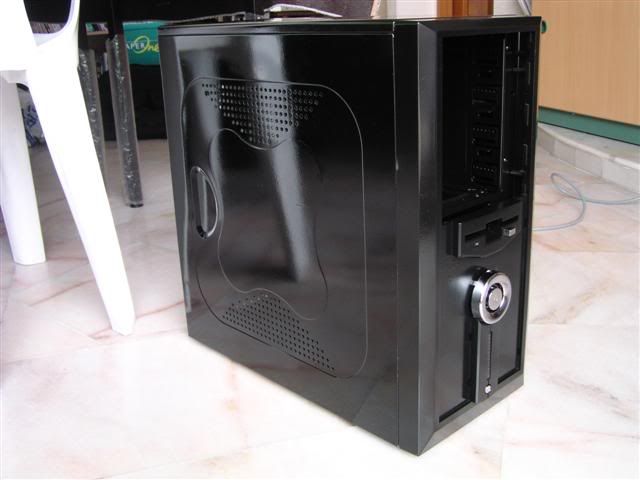 The contrast between the inside and outside is really striking here. Inside is really dark, which means the only thing that can be seen is the hardware, which was my whole idea all along.  This post has been edited by lohwenli: Dec 13 2007, 07:50 PM |
|
|
Dec 13 2007, 07:51 PM
|
|
Senior Member
971 posts Joined: Aug 2006 From: Penang |
reserved for
5 - Front panel, drive mods & my 5 cents so far -to be uploaded this weekend or shortly after. Moving in to hostel tomorrow. This post has been edited by lohwenli: Dec 13 2007, 07:53 PM |
|
|
|
|
|
Dec 13 2007, 10:33 PM
|

Senior Member
2,827 posts Joined: Mar 2007 From: MALAYSIA |
You should sand it first bro.Then apply some coating (primer).
If you want the paint to stay longer,apply a can of clear coat. IMO,Im sure,after u done everything,u installed your hardware,there will be minor or small scratch. How many coating did u apply? |
|
|
Dec 14 2007, 07:17 AM
|
|
Senior Member
971 posts Joined: Aug 2006 From: Penang |
QUOTE(ocz @ Dec 13 2007, 10:33 PM) You should sand it first bro.Then apply some coating (primer). Yeah, gonna do that in Part 2/revision beta of my casemod.. getting some paint stripper this week..only need a bit of free time..If you want the paint to stay longer,apply a can of clear coat. IMO,Im sure,after u done everything,u installed your hardware,there will be minor or small scratch. How many coating did u apply? About 3-6, lost count halfway though..was kinda busy with other stuff.. This post has been edited by lohwenli: Dec 14 2007, 07:18 AM |
|
|
Dec 14 2007, 08:09 AM
|
|
Senior Member
2,827 posts Joined: Mar 2007 From: MALAYSIA |
QUOTE(lohwenli @ Dec 14 2007, 07:17 AM) Yeah, gonna do that in Part 2/revision beta of my casemod.. getting some paint stripper this week..only need a bit of free time.. Keep up bro. About 3-6, lost count halfway though..was kinda busy with other stuff..  Its ok as this is ur 1st time mod.But seems to be interesting.  3-6 coting is more than enough,but normally that can make a mirror/gloss effect already. Do some rubbing (compound) and it will be more shinier,and also apply scratch remover. |
|
|
Dec 15 2007, 11:22 PM
|

Senior Member
592 posts Joined: Nov 2006 |
the secret if u wanna get a mirror look is....flat surface..but need hardwork and time to get the absolute flat surface..have to sand many time..again and again until it is FLAT and FLAT!!!then..u can even c ur image from the painted surface!!
|
|
|
Dec 16 2007, 02:27 AM
|
|
Senior Member
2,827 posts Joined: Mar 2007 From: MALAYSIA |
QUOTE(verz84 @ Dec 15 2007, 11:22 PM) the secret if u wanna get a mirror look is....flat surface..but need hardwork and time to get the absolute flat surface..have to sand many time..again and again until it is FLAT and FLAT!!!then..u can even c ur image from the painted surface!! What do u mean by flat surface bro?I painted my panel mirror effect just by wet sanding using 400 and 800 grit. Applied 3 layers of coatings and a layer of primer. |
|
|
Dec 16 2007, 11:59 AM
|
|
Senior Member
971 posts Joined: Aug 2006 From: Penang |
Actually mine already can see reflection..thanks to the candy paint..
But I'm not planning to make it mirror finished, even as it is with a not so smooth finish its already a horrible fingerprint magnet..if mirror teruk le... Hehe, forgot to celebrate getting another star in LYN ranking  |
|
|
Dec 16 2007, 03:46 PM
|

Senior Member
705 posts Joined: Jan 2003 From: Kuala Lumpur |
WOW NICE JOB
Ganbatte man !!! really nice job, especially with the PSU looks like some high end PSU hmm to get those mirror effect need to wet sand only ar ??? how about normal sanding ??? |
|
|
Dec 16 2007, 04:56 PM
|
|
Senior Member
971 posts Joined: Aug 2006 From: Penang |
You have to wet sand it, then polish it with car polish. Preferably, wax it too.
|
|
|
Dec 16 2007, 06:51 PM
|
|
Senior Member
2,827 posts Joined: Mar 2007 From: MALAYSIA |
QUOTE(lohwenli @ Dec 16 2007, 04:56 PM) You have to wet sand it, then polish it with car polish. Preferably, wax it too. Thats a good point.Other that that,do apply some rubbing compound and it will remove the small dots on the surface and will last longer the paint. |
| Change to: |  0.0190sec 0.0190sec
 0.88 0.88
 5 queries 5 queries
 GZIP Disabled GZIP Disabled
Time is now: 20th December 2025 - 09:54 AM |
 Quote
Quote