

 Apr 18 2007, 10:59 PM, updated 19y ago
 ) & gotten real pissed off with PSU makers that lie or attempt to mislead buyers with their wattage specifications (I swear I'll never buy one of theirs for my own use).
Ok, enough with the ranting; back to reality-my gf's PC, which runs a P4 Northwood 1.6GHz, was using a cap ayam PSU since 2002. Naturally I was worried it would give way any time soon (and possibly take her PC down with it-thats what happened to me) so I made arrangements to get a (decent) replacement into her set.
After some digging, I found this gem on lelong.com for RM9

http://members.lelong.com.my/Auc/Archive/D...20&When=2007-02
(the link will be useless eventually)

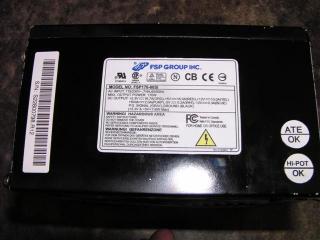
A look at it up close

Model : FSP170-60SI
 One of the most reliable PSU brands.
3.3V-16.7A
5V-16.0A
12v-10.A
5vsb-2A
-5-0.2A
-12-0.3A
3.3V & 5V = 118W max
Passive PFC
Auto fan speed control based on temp
Oh yes, if you're wondering why such a low wattage PSU-FYI most PC don't really take up that much power-PSUs blow because the maufacturer was dishonest or only gave the MAX power rating (which it can only handle for a short time-continuous power rating is what you should be looking at). Her PC takes barely 120W even at full overclock-measured with a digital multimeter.
As luck would have it, my gf's PSU blew -just- a fortnight or so after I got the 'new' PSU. So I was now on a deadline to get it done; before she drives me insane because she can't listen to ther MP3s. So I got started.
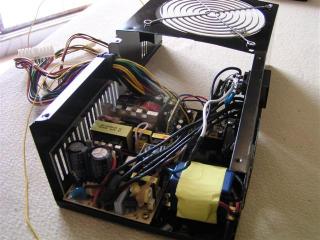
The dead victim

Autopsy : leaking capacitor.
The stuff laid out for the transplant operation

As you can see, the new PSU is -not- of the standard ATX design
 , so I'll need to mod and put it in a ATX PSU case. So what more convenient than the already dead PSU's case? So I started by drilling holes to match the smaller PSU's PCB.
Here I've added the spacers needed to keep the new PCB from shorting itself out on the metal case. And I thought-my gf hates noise, so how about upgrade the 80mm fan to a 120mm?


Ok, I'm a noob at case cutting (gotta get better tools
 ). Guess what I used..a chisel. Yes, the bloody thing normally used to make grooves & slots in wood. Had to go at it with a file for nearly an hour to get off the hundreds of sharp edges and hammer it back into shape from all the pounding it took (talk about brute force). But in the end, it was done.
Ok, I'm a noob a spray painting too

This (the filter MOVs & capacitor) were a real b**** to desolder off the old PSU-they was coiled around the contact, THEN soldered. Had to melt the solder AND uncoil it while the solder was still molten. Thankfully soldering it onto in the new casing was much easier. And oh, the acyllic is to close up the previous intake vents so the 120mm fan wouldn't blow hot air back into the casing (trapping air in a vicious cycle).
And here's the auto fan speed controller board modded to fit a 3 pin fan AND allow for PSU fan speed monitoring
 (the yellow wire).
All the wiring done now. The PFC inductor can be clearly seen here (the yellow wrapped blue transformer block).
The 120mm ADDA fan installed. It was !@$ to fit it in so close to the power cables so I didn't feel like opening it again to take photos (yes I did take it into consideration when I cut the hole, but the squeeze was unavoidable
 )
)
Hell, I figured since I made a cool PSU might as well give the proper credit to FSP for the plumbing.
Finished! Tested it out, and oh boy were the voltages stable. Easily pawn my Cooler Master Realpower 550W SLI in voltage regulation (FSP rocks!!
).
This post has been edited by lohwenli: Apr 18 2007, 11:00 PM
 Quote
Quote


 Ok, here's the secret-the stickers are those plastic based ones, not paper based. So they don't tear that easily, and I could remove them by sliding a blade under the sticker to remove the adhesive.
 i thought it will bit koyak or stretch when you strap it from the older one


 0.0244sec
 0.66
0.66
 6 queries
 GZIP Disabled