Welcome Guest ( Log In | Register )

Bump Topic Topic Closed RSS Feed

Outline · [ Standard ] · Linear+

Model Kits Gundam & Mecha Modelling Thread V39

views
     
heally82
post Oct 3 2017, 11:42 AM

New Member
*
Newbie
3 posts

Joined: Jun 2011
QUOTE(advocado @ Oct 2 2017, 09:11 PM)
you can get 100 LEDs for under rm10 from ebay china... got many colors, want blinking, double color also got, size goes as small as you can solder. round, square, flat...

resistor starter pack another rm10

wire also under rm10

battery holder rm5 for 10 pcs.

micro switch also under rm10.

the mini manual drills 1 set slightly more expensive under rm30.
*
Some references for those whom is interested in diy:

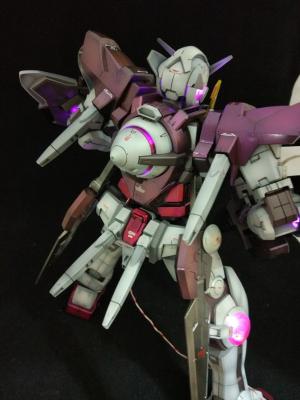
1) inner condenser all cut and replaced with clear parts duplication and added with UV leds
2) outer condenser cover sprayed with clear red luminescent paints
3) head eyes replaced with clear duplication parts and added yellow led
4) shoulder and other belts replaced with laser stickers and clear cut out phone covers
5) details scribing and pla plates mod
6) 3rd parties 1/60 decals

it is possible to achieve it cheaper way, but sure is heck of a work to do... rclxub.gif rclxub.gif

and now there is another interesting tech called fiber optics, sure will make it more interesting!

This post has been edited by heally82: Oct 3 2017, 11:50 AM


Attached thumbnail(s)
Attached Image Attached Image Attached Image Attached Image
heally82
post Oct 3 2017, 01:59 PM

New Member
*
Newbie
3 posts

Joined: Jun 2011
QUOTE(advocado @ Oct 3 2017, 12:05 PM)
so where do you get clear part duplicates and aren't the LED vs Non-LED version same except no LED? at least for the latest PG.

do you use internal batteries or A/C plug or external battery? how do you work on the plugs? can't find one that is small enough to look good.
*
I used SMD (Surface mount led) and those clear parts i duplicate my self using epoxy. i connect external power and you might notice theres a wire there.. nod.gif nod.gif nod.gif .

usually smd doesnt require much voltage to work with, but for those small sizes smd sure is hard to solder and handle. so if you r looking at rgb smd for that cool color change effect that would be another level of led mod... (require programmable board such as arduinno)
heally82
post Oct 3 2017, 05:06 PM

New Member
*
Newbie
3 posts

Joined: Jun 2011
QUOTE(advocado @ Oct 3 2017, 04:30 PM)
what you used for the mold & cast? i think duplicating all the parts takes the most time. you should have just made few sets and sell it on ebay.
*
i bought those clear epoxy for those usually used in key chain souvenirs that you saw in beaches (clear cast keychains with tiny crabs inside),
longer curing time clearer results.

resin and epoxy duplication takes a lot of try and errors without proper tools... i might go crazy... rclxub.gif rclxub.gif rclxub.gif

now trying to duplicate tokugawa mk2 helmet also giving me hell of a time now...
heally82
post Oct 4 2017, 10:09 AM

New Member
*
Newbie
3 posts

Joined: Jun 2011
QUOTE(advocado @ Oct 3 2017, 05:18 PM)
you used epoxy to reproduce, what about the mold or you call it cast what material you used?

and where you get them? i know Central market sells them but expensive.

and since you already have the cast, why not make more and sell them?

btw did you do it in well ventilated area as they are suppose to be real toxic.
*
For large parts i used silicone mold, but for small parts like this 1/60 exia i just used Oyumaru Reusable Molding Stick.

making mold is as difficult as resin duplication, i have ended with a final silicone mold after 6 trials still the casting result requires lots of touch ups.

summore silicone mold making are all one off unlike reusable molding stick.

reusable molding stick also strictly for simple parts only... too complex the molding stick cant reach to the details.
heally82
post Oct 4 2017, 11:02 AM

New Member
*
Newbie
3 posts

Joined: Jun 2011
QUOTE(advocado @ Oct 4 2017, 10:27 AM)
how much time & money those clear parts cost?
*
below rm50 can cover a few cast and mold process, enough for you to do 3-4 duplication if everything runs smooth.

as for time the curing for clear epoxy takes a day, resin faster within minutes (hence chance to fail at success cast also fast as you rushing)

that also depends mix ratio correctness (if you hands on you will see why you need a weight balance for it, after a few casting to container already need to change. hell of a messy work to do)

resin casting are way more hazardous and strong smell and messy (my spare room already become workshop) thats why its a so demeaning work to do...

also silicone molding process is messy and sticky and hard to clean (normal detergent and thinner wont work in this case)
heally82
post Oct 4 2017, 11:42 AM

New Member
*
Newbie
3 posts

Joined: Jun 2011
QUOTE(advocado @ Oct 4 2017, 11:04 AM)
the mould (the one to make the parts), you just take out the material and press on the part you are replicating and leave it to dry, or still need mixture?
*
mold stick just dip in hot water and press on the parts and leave cold, for silicone you need to mix a small ratio of hardening agent and also will solidify within 20 minutes depends on how much you have added. too less will be disastrous, you have a half solidify oily sticker silicone basically can throw away whole thing (imagine your parts are in it)
heally82
post Oct 4 2017, 04:04 PM

New Member
*
Newbie
3 posts

Joined: Jun 2011
QUOTE(TheEvilMan @ Oct 4 2017, 02:32 PM)
How to prevent water decals from peeling off after apply?
I had seen video of people doing water decals in one go
I usually did fine together with mark setter and softer, i avoid touching any decals i just apply while doing the rest of the part, but once in a while the decals just went missing and i can't even spot them anywhere sweat.gif
*
it really depends on which type(or brand) of decals you are using, i have used decals from Bandai, China 3rd party, Daling and even diy decals.

all of them are different in a way that China 3rd party is the thickest and require more wait time for mark softer to kick in and soften the decals, as for Bandai and Daling tends to be thinner and senang koyak (Bandai is the worst, even cutton bud rub a bit harder also koyak). Lastly diy will depend on how much clear coats were applied after printer print out.

from my experience, merely dip water, transfer decals with a bit excess water on it (to avoid too dry), cutton bud press a bit to hold. then lastly apply mark softer to further soften the decals (for me i waited awhile for around a few seconds) and give it a final cutton bud press.

for the last resort clear coat application also will further secure your decals and another few more coats you can even loose the decal edge marks.
heally82
post Oct 5 2017, 09:36 AM

New Member
*
Newbie
3 posts

Joined: Jun 2011
QUOTE(TheEvilMan @ Oct 5 2017, 07:31 AM)
Thanks for the tips, I enjoy water decals more than anything, but sometime hesitation to get things done cause me trouble, usually I will do one side, let it dry for hours and do the other side, guess I should just stick to the principle to avoid the mentioned problem, now doing it at slower pace like what I did with psycho Zaku, took two weeks to apply all decals
*
from my experiences, water decals doesnt go well if your kit is unpainted, especially straight oob and assembled the kit without washing it add the risk of decals doesnt stick. oob runners tends to have slight residue of oil (although i find bandai kits were the least) and smooth plastic surface also another reason water decals doesnt stick.

now all my kits were painted before decals process but i got that issue when i commission my clients kit with portion that skip paintings.

my rule of thumb is:

1)dip water decals with time just enough the decals able to slide out, bandai (when i try gouf custom decals) tends to take longer to separate.

2)when slide to the target area, cotton bud press slightly on the middle of decal (to ensure decals hold in place), then roll press from side to apply even pressure in order to remove excess water underneath.

3)Finally slightly apply mark softer just enough solution to cover the decal and wait a few seconds, repeat the cotton bud press and roll process.

this way has worked like a charm for all my kits even without coating, even after leaving it months or years, decals still hold. (reason i dont coat it is chrome painted kits tends to loose its shine after clear coat...)

Attached Image
heally82
post Oct 5 2017, 10:09 AM

New Member
*
Newbie
3 posts

Joined: Jun 2011
QUOTE(advocado @ Oct 5 2017, 09:56 AM)
you did not use mark setter?

the mark softener should be used from 1 edge to the others then on mid to avoid floating the decal.
*
lol nope mark softer works the 1st time till now so i dont see the need...
heally82
post Oct 19 2017, 10:21 AM

New Member
*
Newbie
3 posts

Joined: Jun 2011
QUOTE(:3mushy:3 @ Oct 19 2017, 10:07 AM)
I remember there was a third party waterslide decal for PG granddaddy, but definitely not Dalin or Samuel.
*
you remembered correctly...

Attached Image

Topic ClosedOptions
 

Change to:
| Lo-Fi Version
0.0834sec    0.96    7 queries    GZIP Disabled
Time is now: 12th December 2025 - 06:04 PM