Welcome Guest ( Log In | Register )

Outline · [ Standard ] · Linear+

 ASSASSIN'S CREED MOD - Update 7/7 - Complete, Bitfenix Pandora case mod worklog

views
     
TSsnjvirtual
post Jun 21 2015, 11:14 PM

Getting Started
**
Junior Member
116 posts

Joined: Jul 2013
Let's take a look at the EK-XRES DCP 2.2 combo, this is the pump and the res for this kit.
It's in a well designed box, first it's covered with a sleeve

user posted image

remove the sleeve there's the box
user posted image

Open it up and there's the installation manual
user posted image

Flip that cover and the Pump Res Combo and the accessories are inside protected by sponge underneath, and inside separate plastic packets
user posted image

and finally the mounting brackets below the sponge to make sure they dun scratch the pump.

user posted image
user posted image
user posted image


TSsnjvirtual
post Jun 21 2015, 11:14 PM

Getting Started
**
Junior Member
116 posts

Joined: Jul 2013
Same goes for the EK-Supreme LTX UNI CSQ (2013)
Sleeve
user posted image

Box
user posted image

Open it up, and there's the mounting kit and the installation guide.

user posted image

user posted image

and then there's the block and the thermal paste
user posted image

Once again below the sponge (under the block) is the rear mounting bracket
Here's the block
user posted image


TSsnjvirtual
post Jun 21 2015, 11:16 PM

Getting Started
**
Junior Member
116 posts

Joined: Jul 2013
Unboxing the EK Coolstream PE 240 Dual Rad

user posted image

user posted image

Inside the bubble wrap it's the Rad

user posted image

Then The EK Vader F3-120 fans, there are two of them for 240 Rad
user posted image

They are not anything special, but high static pressure fans with 1850 RPM ( I won't be using them for the build)

user posted image

Last But not least the fittings and the EK Coolant Evo (concentrated)
user posted image
user posted image


TSsnjvirtual
post Jun 21 2015, 11:16 PM

Getting Started
**
Junior Member
116 posts

Joined: Jul 2013
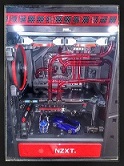
So coming back to the modding part. Here, is the motherboard cover I made for the Gigabyte GA-H97M Gaming 3 mATX board. This one I made by laser cutting unlike in my previous mods.

Used red colour to add more detail to it.
user posted image

Then I painted only the top with white so to leave little bit of red colour and also to be able to add LEDs in future if I want to. So, how it holds to the mobo is in the design, the tight fitting of it makes sure it doesn't fall after connecting all the components, specially the USB3 connector and 8 pin connector with make it fit , but just to make sure I used double side tapes in some places.
(Note that I have painted the mobo as well which I will explain in next update)
user posted image
user posted image
user posted image
TSsnjvirtual
post Jun 26 2015, 01:26 PM

Getting Started
**
Junior Member
116 posts

Joined: Jul 2013
Hi guys, Back with a new update, today's update is the painting of mobo and WC parts and modding of the Blitz mem modules.

So Ill start with the mobo paint, it was simple, cover the rest of the mobo with paper and tape, and first paint it with white then pain it with red (otherwise red will be too dark)
user posted image
user posted image
user posted image

So after paining the motherboard, I took apart the EK Rad and other WC parts and painted them in White.
user posted image
user posted image
user posted image
user posted image

I got made the extensions using pre-sleeved cables and this is the theme i wanted to go with. i wanted to bring out more white and little bit of red to go with the build
user posted image


TSsnjvirtual
post Jun 26 2015, 01:26 PM

Getting Started
**
Junior Member
116 posts

Joined: Jul 2013
At the same time I bought the fittings for hard tubing, they are bitspower fitting, i wanted to get the small ones, but these were the only ones available.

user posted image
user posted image
user posted image
user posted image
user posted image

And now it's time to do the lighting work. added 6 red LEDs around the block as well, so now the block will glow as well
user posted image
user posted image
user posted image
user posted image

This is the last step before assembling everything together. I wanted to make the Lighting of the Blitz memory to spread out evenly,
so this is what I did
user posted image

I did this to all 4 mem sticks, In the following video you can see the difference between the original (on top) and the modified (bottom) mem stick lighting.


TSsnjvirtual
post Jun 28 2015, 12:24 PM

Getting Started
**
Junior Member
116 posts

Joined: Jul 2013
Hi Guys. a tiny update before final pics, I had a problem after this video, when I powered on the system I figured out that the mobo was faulty, so I had to send it for RMA.

SO after that only I repainted the block, painted the screw red and also changed the cable management a lil bit.
Forgot to mention that bending tube was a pain in the ass coz the system was too compact, and also this is my first time doing a custom loop, didn't have a silicon tube, so instead i used a power cable to retain the cylindrical shape of the tube

So here's me adding Mayhem Blood Red to the loop.


This post has been edited by snjvirtual: Jun 28 2015, 12:26 PM
Zzorro
post Jul 5 2015, 04:56 AM

*retirementâ„¢
******
Senior Member
1,023 posts

Joined: Mar 2012
From: Land of Malay legendaryâ„¢

Wow.. super nice Mod n Wc setup thumbup.gif
TSsnjvirtual
post Jul 7 2015, 12:46 PM

Getting Started
**
Junior Member
116 posts

Joined: Jul 2013
QUOTE(Zzorro @ Jul 5 2015, 04:56 AM)
Wow.. super nice Mod n Wc setup  thumbup.gif
*
Thank you Zzorro
TSsnjvirtual
post Jul 7 2015, 12:51 PM

Getting Started
**
Junior Member
116 posts

Joined: Jul 2013
user posted image
user posted image
user posted image
user posted image
user posted image
user posted image
user posted image

TSsnjvirtual
post Jul 7 2015, 12:51 PM

Getting Started
**
Junior Member
116 posts

Joined: Jul 2013
user posted image
user posted image
user posted image
user posted image
user posted image
user posted image
user posted image
Loverboz
post Jul 12 2015, 10:39 AM

New Member
*
Junior Member
16 posts

Joined: Nov 2007


nice AC theme biggrin.gif
TSsnjvirtual
post Jul 12 2015, 12:13 PM

Getting Started
**
Junior Member
116 posts

Joined: Jul 2013
QUOTE(Loverboz @ Jul 12 2015, 10:39 AM)
nice AC theme biggrin.gif
*
Thanks Loverboz smile.gif
TSsnjvirtual
post Jul 12 2015, 06:11 PM

Getting Started
**
Junior Member
116 posts

Joined: Jul 2013
Hei Everybody, So here I'm back with the pics of the inside of the build. here we go smile.gif
user posted image
user posted image
user posted image
user posted image
user posted image
user posted image

TSsnjvirtual
post Jul 12 2015, 06:12 PM

Getting Started
**
Junior Member
116 posts

Joined: Jul 2013
user posted image
user posted image
user posted image
user posted image
user posted image
user posted image
user posted image
user posted image

ealt
post Oct 12 2015, 09:11 AM

Getting Started
**
Junior Member
246 posts

Joined: Nov 2009
How do you manage to install the graphic card with that vertical water cooling piping?
TSsnjvirtual
post Oct 12 2015, 07:26 PM

Getting Started
**
Junior Member
116 posts

Joined: Jul 2013
QUOTE(ealt @ Oct 12 2015, 09:11 AM)
How do you manage to install the graphic card with that vertical water cooling piping?
*
Yep that was the issue, but it can fit any ITX GPU. so no worries.
on top of that there is no other place to fit the pump. the LED controllers for the side panels and all fan cables had to be tucked bellow the pump/res combo
manparadoks
post Oct 12 2015, 07:31 PM

New Member
*
Junior Member
18 posts

Joined: Aug 2014


congrat, nice walkthough...
ever think to make a desk mod one anytime soon?

This post has been edited by manparadoks: Oct 12 2015, 07:32 PM
ealt
post Oct 12 2015, 08:58 PM

Getting Started
**
Junior Member
246 posts

Joined: Nov 2009
QUOTE(snjvirtual @ Oct 12 2015, 07:26 PM)
Yep that was the issue, but it can fit any ITX GPU. so no worries.
on top of that there is no other place to fit the pump. the LED controllers for the side panels and all fan cables had to be tucked bellow the pump/res combo
*
nicely done..good job bro..

TSsnjvirtual
post Oct 13 2015, 08:59 AM

Getting Started
**
Junior Member
116 posts

Joined: Jul 2013
QUOTE(manparadoks @ Oct 12 2015, 07:31 PM)
congrat, nice walkthough...
ever think to make a desk mod one anytime soon?
*
Thanks Manparadox, Would love to do one, but have two builds lined up. Doing a mod for Tt atm, and have to do one for Bitfenix beginning of next year. After that probably I will be able to do.

QUOTE(ealt @ Oct 12 2015, 08:58 PM)
nicely done..good job bro..
*
Thanks bro. Will start the worklog on the new one soon smile.gif

3 Pages < 1 2 3 >Top
 

Change to:
| Lo-Fi Version
0.0251sec    0.60    5 queries    GZIP Disabled
Time is now: 29th March 2024 - 06:25 PM