Welcome Guest ( Log In | Register )

Outline · [ Standard ] · Linear+

 Project: Black & White Vector Desk PC, Watercooled Haswell-E Build

views
     
TSowikh84
post Dec 25 2014, 01:09 AM, updated 11y ago

i7 Clan
Group Icon
Elite
8,711 posts

Joined: Nov 2007
From: Butterworth, PG / Machang, Kelantan


The original article can also be found at Project: Black & White Vector Desk PC

Hi everyone,

It's been quite a while since my last build in 2013 which was based around the LittleDevil PC-V8 casing, Intel LGA1155 socket and Z68 chipset:

user posted image

user posted image


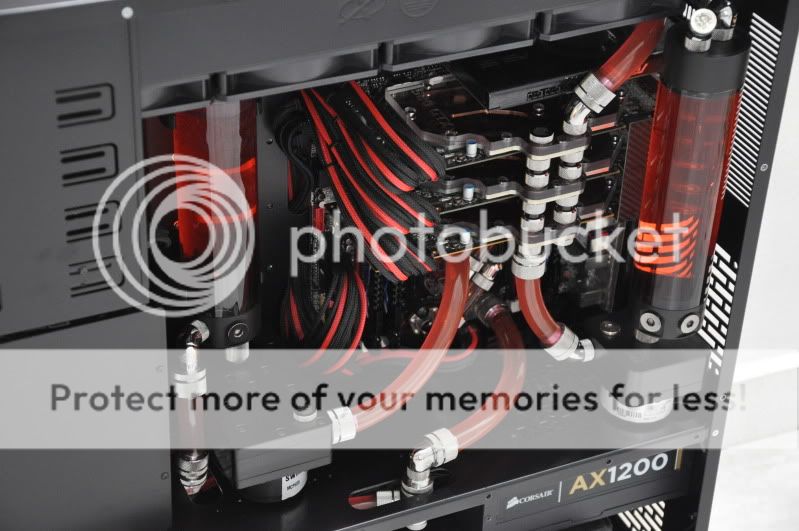
Now, I would like to share my new build with you guys. It’s a black and white themed single-loop watercooled system in a Vector Desk. Inspired by ASUS GOLIATH desk build, it will be based on Intel’s new X99 chipset, LGA 2011-v3 socket and Haswell-E CPUs.

First and foremost, I would like to take this opportunity to thank all my sponsors for making this project possible.

Sponsors:

user posted image

user posted image

user posted image

user posted image

user posted image

user posted image

user posted image

Hardware:

Processor: Intel Core i7-5960X Intel Core i7-5820K
Motherboard: ASUS Rampage V Extreme
Memory: G.Skill Ripjaws4 DDR4 2666MHz C15 4x4GB
Graphics Card: ASUS ROG Matrix R9 290X Platinum
Storage: 2x Plextor M6 S 128GB + Western Digital Caviar Black 1TB
ODD: LiteON DVD-RW
Power Supply Unit: Corsair AX1200i Seasonic Snow Silent 1050W
Casing: Vector Desk
Monitor: Dell Ultrasharp U3011 30” 2560×1600
Operating System: Windows 7 Ultimate 64-bit
Keyboard: CM Storm Quick Fire TK Mechanical Keyboard
Mouse: CM Storm RECON Gaming Mouse
LED Strip: AVF Multi Colours 30cm LED Strips x4 UT White LED Strip 1-m from Unequal Technologies
Fans: Cooler Master JetFlo 120 Case Fans x12
Cable Management: UT PSU Cable Extenders & Combs from Unequal Technologies
Thermal Interface Material: Cooler Master Extreme Fusion X1
Speaker: Logitech Z5500 5.1 Surround Sound Speaker


user posted image
Some of the hardware.

This post has been edited by owikh84: May 15 2015, 10:49 PM
TSowikh84
post Jan 28 2015, 08:54 PM

i7 Clan
Group Icon
Elite
8,711 posts

Joined: Nov 2007
From: Butterworth, PG / Machang, Kelantan


The original article can also be found at Project: White Vector Desk PC

user posted image
Sponsored items from Cooler Master Malaysia.

WaterCooling Parts:

Bitspower AIX99R5E Nickel Plated Full-Covered-Block (Clear) x1
Bitspower CPU Block Summit EF (Intel) (Acrylic Top Version) x1
Bitspower VG-AR9290XAMX Acrylic Top With Stainless Panel (Clear) x1
Bitspower None Chamfer Crystal Link Tube OD 12MM – Length 500MM x7
Universal RAM Module Water Cooling Set For 4 Banks 2-DIMMs x2
Bitspower Deluxe White Enhance Dual Multi-Link For OD 12MM x1
Water Tank Z-Multi 250 (Limited White POM Edition) x3
G1/4″ Deluxe White CaseTop Water- Fill SET x4
Bitspower G1/4″ Deluxe White Enhance Multi-Link For OD 12MM x20
Bitspower Deluxe White Enhance 90- Degree Dual Multi-Link Adapter x10
Bitspower Deluxe White Enhance 45- Degree Dual Multi-Link Adapter x4
Bitspower Deluxe White Enhance Rotary G1/4″ 90-Degree Multi-Link Adapter x14
G1/4″ Deluxe White Low-Profile Stop Fitting x10
Bitspower Deluxe White Enhance Dual Multi-Link For OD 12MM x2
Deluxe White Q Plus-Block x2
G1/4″ Deluxe White Rotary 90-Degree IG1/4″ Extender x8
G1/4″ Deluxe White Rotary 45-Degree IG1/4″ Extender x8
G1/4″ Deluxe White Dual Rotary 90- Degree IG1/4″ Extender x4
Deluxe White Mini Valve With Black Handle x1
G1/4″ Deluxe White Temperature Sensor Stop Fitting x1
G1/4″ Deluxe White IG1/4″ Extender-15MM x8
G1/4″ Deluxe White IG1/4″ Extender-20MM x2
G1/4″ Deluxe White IG1/4″ Extender-30MM x2
G1/4″ Deluxe White IG1/4″ Extender-40MM x2
G1/4″ Deluxe White IG1/4″ Extender-50MM x2
Dual D5 MOD TOP (POM Version) x1
D5/MCP655 MOD KIT (White) x2
XSPC AX360 White Radiator x2
Swiftech MCP655 (D5) Pump x2


user posted image
Sponsored water cooling parts from Bitspower.

user posted image
Deluxe white water cooling fittings from Bitspower.

user posted image
Water cooling parts & tools from other vendors.

Currently I’ve got all the hardware and watercooling parts already while waiting for some other things such as extension cables, LED strip lighting, coolant and so on. By this weekend i’ll be disassembling some of the components from my previous casings. Please stay tuned for more updates.

Unboxing:
Here is picture gallery of some hardware components and water cooling parts being used in this project:

user posted image
Intel Core i7-5960X eight-core Intel Core i7-5820K six-core desktop processor featuring Haswell-E architecture.

user posted image
ASUS Rampage V Extreme motherboard, which features Intel LGA 2011-v3 socket and X99 chipset.

user posted image
G.Skill Ripjaws 4 DDR4 2666MHz CL15-15-15 4 x 4GB memory kit, which is designed to take full advantage of X99’s quad-channel capability.

user posted image
ASUS ROG Matrix R9 290X Platinum graphic card.

user posted imageA pair of Plextor M6S 128GB Solid State Drives, featuring Marvel controller and comes in an attractive silver chassis.

user posted image
Seasonic Snow Silent 1050W power supply unit.


This post has been edited by owikh84: May 15 2015, 10:49 PM
TSowikh84
post Jan 28 2015, 09:02 PM

i7 Clan
Group Icon
Elite
8,711 posts

Joined: Nov 2007
From: Butterworth, PG / Machang, Kelantan


user posted image
Cooler Master JetFlo 120 cooling fans. There are twelve pieces in total in this build.

user posted image
CM Storm Quick Fire TK Mechanical Keyboard & CM Storm RECON Gaming Mouse.

user posted image
EK-HD Tube D.I.Y. Kit, for acrylic tube cutting.

user posted image
UT PSU Cable Extenders and Combs from Unequal Technologies.

user posted image
Bitspower AIX99R5E Nickel Plated Full-Covered-Block (Clear) all-in-one CPU & motherboard block, which include Bitspower CPU Block Summit EF (Intel) (Acrylic Top Version).

user posted image
Bitspower Dual D5 MOD TOP (POM Version) pump top.

user posted image
A pair of Swiftech MCP655 aka D5 pumps from my existing water cooling system. The pump's cables are sleeved with MDPC-X sleeving kit to give a neater look than the original cables.

user posted image
A pair of Bitspower D5/MCP655 MOD KIT (White) for D5 pumps.

user posted image
Bitspower VG-AR9290XAMX Acrylic Top With Stainless Panel (Clear) GPU block and Deluxe White GPU Backplate V2.


This post has been edited by owikh84: May 5 2015, 10:31 PM
TSowikh84
post Jan 28 2015, 09:06 PM

i7 Clan
Group Icon
Elite
8,711 posts

Joined: Nov 2007
From: Butterworth, PG / Machang, Kelantan


user posted image
A pair of XSPC AX360 (White) radiators, which is able to hold up to six 120mm cooling fans in push and push configurations.

user posted image
Three pieces of Water Tank Z-Multi 250 (Limited White POM Edition) reservoirs.

Installation of Vector Desk

user posted image
The Vector Desk ships in a huge carton which is shrink-wrapped. Unboxing the package reveals the Vector modular which are also shrink-wrapped individually to protect the parts from damage during transportation.

user posted image
The modular components of the Vector Desk. It is designed and moulded with high precision. Each component was designed with ease of assembly in mind.

user posted image
Inside the big carton we found a small carton containing a huge package of accessories such as the drive bay brackets, double-sided adhesive tape, USB port extension cable, Power & Reset buttons, bolts, washers, spacers, screws and other goodies.

user posted image
Installation appeared to go smoothly thanks to the included installation manual.

user posted image
I started assembling the Vector Desk by attaching its legs into one piece. The build quality is very nice and made out of strong and sturdy metal bars and plates. Here you can see the ergonomic design of the desk to ensure comfortable seating.

user posted image
I then assembled the top compartment of the Vector Desk. This chassis is made by extremely light aluminium which can be lifted without a sweat. On the installation aspect, seriously it was pretty straight forward. All you need is just follow the instructions illustrated in the installation manual and you are good to go.

user posted image
Four 5.25″ drive bays are available to accommodate your storage and optical drives.

user posted image
The motherboard panel which supports form factor from mini-ITX all the way to XL-ATX. What a wide range of compatibility. Also spotted, a total of eight expansion slots to hold your PCIe cards!


TSowikh84
post Jan 28 2015, 09:12 PM

i7 Clan
Group Icon
Elite
8,711 posts

Joined: Nov 2007
From: Butterworth, PG / Machang, Kelantan


user posted imageThe rear compartment which is able to hold a pair of 360 (3x 120mm) radiators. But of course to route the tubing from the main chassis to this area you have to get your hands dirty with some mod jobs in the form of hole sawing.

user posted image
You can see there are two blue-illuminated switches for Power & Reset buttons as well as a pair of USB 3.0 ports and HD Audio and Microphone port.

user posted image
Next up, I attached the main compartment onto the leg by using four sets of bolts and washers. Both left and right sides of the desk can hold a 240 (2x 120mm) radiator at each side. 3x 120mm is not possible because one of the fan holes is partially covered by the middle metal plate, unfortunately. Therefore we would like to witness triple fan radiator compatibility on this area in their next revision.

user posted image
Finally, the 8mm-thick tempered glass was installed on top of the desk. Vector provide a set of rubberized adhesive tape to provide cushioning between the tampered glass and the main chassis. But of course I will put that up when I’m done with the hardware component assembly inside the main body.

user posted image
Specifications of the Vector Desk.

Update 18/1/2015: It’s been a while since my last update biggrin.gif. I was away frequently to settle my dad’s post-funeral ceremonies, overseas family trip, and house cleaning after a huge flood in my hometown. After few weeks of absence, I’m now back to continue my desk build.

user posted image
For bling-bling effect I decided to add the AVF Multi Colour LED Strip to each side of the desk’s leg. In case if you’re interested, this AVF LED Strip is available in the local market for RM 25 each.

user posted image
So here’s the end result of the LED strips. The AVF Multi Colour LED Strips allows users to customize the colour of LED up to 15 different colours of choices.

Next up, I’ve spent the whole night to install the water cooling parts onto the hardware components.

user posted image
G.Skill Ripjaws 4 DDR4 2666MHz C15 memory kit was installed with the Bitspower Universal RAM Module Water Cooling Set For 4 Banks 2-DIMMs. The heatspreaders fit nicely onto the DDR4 modules.

user posted image
ASUS Rampage V Extreme motherboard with Bitspower AIX99R5E Nickel Plated Full-Covered-Block (Clear). The memory kit was placed into the DIMM slots with Bitspower RAM blocks spanning on top of the memory modules.

user posted image
ASUS ROG Matrix R9 290X Platinum graphics card with itspower VG-AR9290XAMX Acrylic Top With Stainless Panel (Clear) GPU block.


This post has been edited by owikh84: May 5 2015, 10:32 PM
TSowikh84
post Jan 28 2015, 09:15 PM

i7 Clan
Group Icon
Elite
8,711 posts

Joined: Nov 2007
From: Butterworth, PG / Machang, Kelantan


user posted image
Turning over to the other side of the graphics card, we have the Bitspower Pure White aluminium backplate V2.

user posted image
A pair of D5 pumps fitted with Bitspower Dual D5 MOD TOP (POM Version) and of D5/MCP655 MOD KIT (White).

user posted image
The Bitspower D5/MCP655 MOD KIT (White) works as an attractive outfit for the D5 pumps.

user posted image
It’s all done! Well at least for the water block installations. There are still many water cooling setup jobs to be done in the next few days which include acrylic tube cutting and of course, some hole drilling work on the desk’s middle plate.

user posted image
Each of the XSPC AX360 radiator is installed with three pieces of Cooler Master JetFlo 120 fans.

user posted image
The UT PSU 8-pin EPS cable extender that I received came with an non-separated connector therefore I decided to modify it to a separated 4+4-pin connector taken from my existing Corsair PSU. The job was done with the Sunbeamtech PSU modding tool kit. It took me merely around 5 minutes. Very easy indeed!

user posted image
Meanwhile, some of the essential hardware components and water cooling parts were installed inside the desk’s top compartment. From here I should be able to measure length of the acrylic tubes and placement of the circular holes that are to be cut off later.

user posted image
The motherboard tray containing the liquid-cooled motherboard, graphics card and memory kit.

user posted image
Three units of reservoirs, a pair of white triple-fan radiators and dual pumps, all comes in white outfit.

user posted image
Another angle of the Vector Desk filled with part of the hardware and water cooling components.


TSowikh84
post Jan 28 2015, 09:18 PM

i7 Clan
Group Icon
Elite
8,711 posts

Joined: Nov 2007
From: Butterworth, PG / Machang, Kelantan


Update 21/1/2015:

user posted image
After confirming the length of the acrylic tubing that is needed for the loop I’ve proceeded for tube cutting. The acrylic tube is the Bitspower None Chamfer Crystal Link Tube OD 12MM which came pre-cut in 50 cm per pack. This acrylic tube cutting job is done with the help of the specially-designed hacksaw from the EK HD-Tube D.Y.I. kit.

user posted image
Here’s the end result of the acrylic tube cutting. Both ends of the acrylic tube were then sanded with sand papers to ensure that the edges are smooth enough to be inserted into the Multi-Link adapters while preventing the O-ring from any damage.

user posted image
The first acrylic tube was assembled, joining the two Bitspower DIMM blocks with a pair of Bitspower Deluxe White Enhance Rotary G1/4″ 90-Degree Multi-Link Adapters.

user posted image
After that more acrylic tubes were cut into a suitable length and various types of Multi-Link adapters and fittings were used to make bridges between the DIMM blocks, CPU+motherboard combo block, GPU block and the Vector’s middle plate.

user posted image
At the rear compartment of the Vector Desk, the twin XSPC AX360 White radiators were connected to each other by an accurately cut acrylic tube with a pair of Multi-Link Adapters. The bottom G1/4 thread of each of the radiators was connected with several 45-degree adapters and to be connected to a compression fittings later.

user posted image
Meanwhile on the other side of the desk, the three Bitspower reservoirs were connected to each other and the most-right one was connected to the dual D5 pumps.

user posted image
Next, the pumps are connected to the GPU block with multiple lengths of acrylic tubes in “Z” shape. I’d say that this ‘Z” shape might not be the final design because I might link the pumps and GPU block to the middle plate of the Vector Desk and route them to another acrylic tube at the rear compartment of the desk. This is to minimize the exposure of visible long acrylic tube at this area.

user posted image
Another angle shot of the water cooling loop around the motherboard tray area.

user posted image
Overall the water cooling loop will look like this, before I proceed to the next step, which is metal (case) drilling.


TSowikh84
post Jan 28 2015, 09:23 PM

i7 Clan
Group Icon
Elite
8,711 posts

Joined: Nov 2007
From: Butterworth, PG / Machang, Kelantan


Update 26/1/15:

Today I have free time to drill out holes for the Bitspower Deluxe White CaseTop Water- Fill SET fittings. There are two holes to be made in total and it’s my first time doing this hole sawing job so I think it will be fun.

user posted image
The High-speed Steel (HSS) Hole Saw measuring 20mm in outer diameter (OD), which matches the diameter of the Bitspower Deluxe White CaseTop Water- Fill SET fitting. You can purchase this hole saw locally at RM 20 shipped from ehardwarestore.

user posted image
Schematic diagram of Bitspower Deluxe White CaseTop Water- Fill SET fitting. You can see that the diameter of thread is M20 (20mm).

user posted image
The first 20mm hole made by Black & Decker KR554RE Hammer Driller and HSS Hole Saw 20mm.

user posted image
The second 20mm OD hole is done! It was quick and easy actually, you just need to concentrate and don’t slip from the marking.

user posted image
Here’s the result of the metal hole drilling job. Perfect! It looks very nice as expected.

user posted image
The Bitspower Deluxe White CaseTop Water- Fill SET fitting fits nicely into to hole.

user posted image
Then connected it to the DIMM block. I’m glad that it didn’t slip away from the measurement. Awesome!

user posted image
The other hole is connected to one of the Bitspower Water Tank Z-Multi 250 (Limited White POM Edition) reservoirs.

user posted image
Then bridge it over to the rear compartment. Coolant filling and draining system goes here, which is consisted of a Bitspower Deluxe White Q Plus-Block and a Deluxe White Mini Valve With Black Handle.

user posted image
Not the best shot but here’s the water cooling loop at the rear compartment of the Vector Desk. Initially I was planing to use PVC tubes to connect both radiators to the middle plate but in the end changed my mind, I go for a fully acrylic tubing loop instead. Looks much neater than flexible tubing I guess.

Stay tuned for more update…


This post has been edited by owikh84: Feb 27 2015, 03:41 PM
leslie0880
post Jan 29 2015, 02:10 AM

Enthusiast
*****
Senior Member
728 posts

Joined: Feb 2005
From: Johor


Nice setup bro.
but horrible for the money.........

letze
post Jan 29 2015, 10:31 PM

~Beyond The Hourglass~
*****
Senior Member
933 posts

Joined: Aug 2010
From: City of Light


Cant wait for final result. rclxms.gif notworthy.gif
TSowikh84
post Jan 29 2015, 11:53 PM

i7 Clan
Group Icon
Elite
8,711 posts

Joined: Nov 2007
From: Butterworth, PG / Machang, Kelantan


QUOTE(leslie0880 @ Jan 29 2015, 02:10 AM)
Nice setup bro.
but horrible for the money.........
*
HAHA... but bro, this X99 build looks imperfect without multi-GPU configuration.
Anyhow I will try looking for more cards, hopefully.

QUOTE(letze @ Jan 29 2015, 10:31 PM)
Cant wait for final result.  rclxms.gif  notworthy.gif
*
Will try my best bro to complete this Desk build. Meanwhile I'm still looking for some parts which is unavailable such as white coolant and fancy fan controllers etc... Still far from finished biggrin.gif
leslie0880
post Jan 30 2015, 10:50 PM

Enthusiast
*****
Senior Member
728 posts

Joined: Feb 2005
From: Johor


QUOTE(owikh84 @ Jan 29 2015, 11:53 PM)
HAHA... but bro, this X99 build looks imperfect without multi-GPU configuration.
Anyhow I will try looking for more cards, hopefully.
Will try my best bro to complete this Desk build. Meanwhile I'm still looking for some parts which is unavailable such as white coolant and fancy fan controllers etc... Still far from finished biggrin.gif
*
Bro, go for quad SLI. Since i know i can't afford that haha…
actually y u no go for server processor and server board.
since u can afford that. Dual E5 + sever board + 64GB Ram……
haha

And about white coolant, i have saw frozenCPU B4 u can try on that,fan u wanna silent or PWM?
maybe u can try some industrial fan?as i know per piece is about RM105
leslie0880
post Jan 30 2015, 10:58 PM

Enthusiast
*****
Senior Member
728 posts

Joined: Feb 2005
From: Johor


O ya
i forget, should u change ur PSU?
go for Leadex Superflower Platinium, whole White with White LED whn u connect with modular cable
It is amazing bro.
TSowikh84
post Feb 4 2015, 08:43 PM

i7 Clan
Group Icon
Elite
8,711 posts

Joined: Nov 2007
From: Butterworth, PG / Machang, Kelantan


user posted image
Yesterday was Thaipusam Holiday, so I managed to spend a little time with my Vector Desk build. First off, I’ve mounted the Plextor M6S 128GB solid state drives to the SilverStone FP58, a 5.25 inch bay adapter for mounting up to four 2.5″ drives and a slim optical drive.

user posted image
Now, it’s time to fill the water cooling loop first with distilled water as the coolant, before going for the actual coolant, which is white in colour. I’ve decided to scrap my initial plan of having the drain/ filling port at the rear compartment. I have difficulty filling the loop with coolant from that area because the pump is located a little far away from the the valve and there are huge air packets in the reservoirs restricting the pump flow. So I’ve installed the Bitspower Deluxe White Mini Valve With Black Handle on the top inlet of the pump block.

user posted image
Then connected it to a new reservoir, which holds the coolant to be filled into the loop.

user posted image
After filling the loop with the coolant, I then proceed for leak test. I used the power supply jump start connector to power up the pump without running the motherboard. The bleeding process will be taking several hours or days to get the loop out of air bubbles. So I’ve done with the installation and the Vector Desk is ready for testing.


Zzorro
post Feb 5 2015, 03:54 AM

*retirement™
******
Senior Member
1,023 posts

Joined: Mar 2012
From: Land of Malay legendary™

Wow.. drool.gif no words to say .. just waiting for something awesome thumbup.gif
TSowikh84
post Feb 25 2015, 07:32 PM

i7 Clan
Group Icon
Elite
8,711 posts

Joined: Nov 2007
From: Butterworth, PG / Machang, Kelantan


Update 24/2/15:

user posted image

Today I received the Seasonic Snow Silent 1050W Power Supply Unit from Sea Sonic Electronics Co., Ltd, which features 80+ Platinum Certified Super High Efficiency, Seasonic Patented Hybrid Silent Fan Control, and snow white chassis!

user posted image

To investigate the temperatures of the CPU and motherboard under water cooling with the Bitspower water blocks, I’ve run Prime95 v27.9 in-place Large FFTs stress test for maximum heat output. Prime95 will stress all cores and threads to 100% usage, which will help us to understand how hot this processor can get in worst case scenarios. It should be noted that the ambient temperature during the testing was 30°C, in a non-air conditioned room. The graph above showed that while the Core i7-5960X processor was on stock clock and mounted with the Bitspower water blocks registered an core temperature of 62°C at full load. When this processor was overclocked to 4.4GHz, the Bispower water blocks did well when it was able to keep the core temperature at 86°C, which is still within the specifications of Intel (105°C maximum). Meanwhile, the motherboard’s VRM and PCH temperatures obtained during overclocking were 61°C and 40°C, respectively. As for the water cooled ASUS Matrix R9 R9 290X Platinum graphics card, I decided to test it on Battlefield 4 game. The GPU temperature obtained was 39°C on idle and 55°C on full load.The Core i7-5960X CPU was then replaced with the i7-5820K because the former was a loan unit from ASUS Malaysia.


This post has been edited by owikh84: May 5 2015, 10:33 PM
gxthelord
post Feb 27 2015, 04:24 PM

Tech Enthusiast
*******
Senior Member
2,313 posts

Joined: May 2009


owikh84 before u adding in the coolant, would u record the video seeing how it will turn the clear distilled water to the colour of ur choice? biggrin.gif I can only imagine the beauty ><
TSowikh84
post Feb 27 2015, 09:13 PM

i7 Clan
Group Icon
Elite
8,711 posts

Joined: Nov 2007
From: Butterworth, PG / Machang, Kelantan


QUOTE(gxthelord @ Feb 27 2015, 04:24 PM)
owikh84 before u adding in the coolant, would u record the video seeing how it will turn the clear distilled water to the colour of ur choice? biggrin.gif I can only imagine the beauty ><
*
Good idea! That would be sweet wub.gif laugh.gif
Actually I've been waiting for the white coolant to restock since last December! LOL
Currently it's nowhere available in the local market (at least the stores that I'm familiar with)
and that's why it's holding the completion of my Desk build. sad.gif
What's in my mind now... ermm... I was thinking of downgrading to an i7-5820K CPU while adding another 290X Matrix with the extra fund biggrin.gif
gxthelord
post Feb 28 2015, 02:25 AM

Tech Enthusiast
*******
Senior Member
2,313 posts

Joined: May 2009


QUOTE(owikh84 @ Feb 27 2015, 09:13 PM)
Good idea! That would be sweet  wub.gif  laugh.gif
Actually I've been waiting for the white coolant to restock since last December! LOL
Currently it's nowhere available in the local market (at least the stores that I'm familiar with)
and that's why it's holding the completion of my Desk build. sad.gif
What's in my mind now... ermm... I was thinking of downgrading to an i7-5820K CPU while adding another 290X Matrix with the extra fund biggrin.gif
*
definitely would look much nicer with the 2nd 290x matrix! biggrin.gif
Didn't know white coolant is still so hard to find. doh.gif will wait for ur new pics and video bro. ^^v
TSowikh84
post Feb 28 2015, 11:31 PM

i7 Clan
Group Icon
Elite
8,711 posts

Joined: Nov 2007
From: Butterworth, PG / Machang, Kelantan


Update 28/2/15:
user posted image
The Seasonic Snow Silent 1050W PSU is installed at the rear compartment of the Vector Desk and it fits just nicely between the middle panel and the acrylic tube connecting the radiators.

user posted image
The overall look of the components at the rear compartment.

user posted image
Rear compartment viewed from the front. smile.gif


hafdin
post Mar 7 2015, 02:18 AM

Getting Started
**
Junior Member
162 posts

Joined: Feb 2010
wow. superb!
TSowikh84
post Mar 8 2015, 09:58 AM

i7 Clan
Group Icon
Elite
8,711 posts

Joined: Nov 2007
From: Butterworth, PG / Machang, Kelantan


QUOTE(hafdin @ Mar 7 2015, 02:18 AM)
wow. superb!
*
HAHA thanks boss
LIKE your build too! wub.gif
TSowikh84
post Mar 22 2015, 12:48 AM

i7 Clan
Group Icon
Elite
8,711 posts

Joined: Nov 2007
From: Butterworth, PG / Machang, Kelantan


Update 21/3/15:
It’s been quite a while since my last update. Actually recently I’ve been away from this project and went back to my hometown to settle my family issues and now I’m back to Penang to continue this Vector Desk build.

user posted image
Finally I’ve received the long-awaited EK-EKoolant Pastel White Concentrate! Thanks to my good friends at APES.my for helping me in obtaining this pastel.

user posted image
Without wasting time, I mixed a bottle of 250 ml concentrated white pastel with 750 ml of distilled water to produce a total of 1 L of pre-mix white coolant. The picture above demonstrates the Bitspower Full-cover VGA block for ASUS Matrix 290X Platinum graphics card filled with the resulting coolant solution. It looks really stunning! More to come after I finished assembling the whole liquid cooling system. biggrin.gif
user posted image


user posted image
The Vector Desk is designed to have the left 5.25″ drive bay located quite far off the motherboard tray that you seriously need an extra long SATA data cable to connect the drive mounted on the drive bay to the motherboard’s SATA port.

user posted image
Due to limited option of long pre-sleeved SATA data cable available in the market, I’ve decided to sleeve a 70 cm SATA data cable with black MDPC-X sleeving kit. Not so perfect but better than exposing too much of the original yellow colour. It was then replaced with the 1-m sleeved SATA data cable from Unequal Technologies.

user posted image
Early this morning I received a small parcel shipped directly from Taiwan. The package contains some Bitspower Cold Cathode Light Kits, enhanced thermal pads as well as pre-wired 3mm and 5mm white LEDs.

user posted image
Million thanks to our friends at Bitspower International Co. for the generous sponsorship! I’m pretty sure that the CCFL kit will enhance the lighting inside the Vector Desk.

Stay tuned for more update…


This post has been edited by owikh84: May 5 2015, 10:53 PM
TSowikh84
post Mar 24 2015, 06:12 AM

i7 Clan
Group Icon
Elite
8,711 posts

Joined: Nov 2007
From: Butterworth, PG / Machang, Kelantan


Update 23/3/15:

user posted image
The Bitspower 5MM and 3MM Pre-wired LEDs are sleeved to black colour to improve its aesthetic looks.

user posted image
Finally today I’ve made decision to paint the ASUS Rampage V Extreme motherboard from red to white! First of all I insulated everything that I don’t want to spray, leaving the red components exposed to be painted later.

user posted image
So I started to paint the motherboard to white using Satin White Krylon Fusion for Plastic spray paint. The paint job took around 2 hours to complete. I’ve done three layers of paint in total to ensure that the paint will not fall that easily.

user posted image
So here’s the result of the paint job. I’d say it’s not 100% perfect of course but sufficient to hide that original red colour.

user posted image
ood news is the motherboard is tested working perfectly!

Stay tuned for more update…

tupai1113
post Apr 21 2015, 03:23 PM

Getting Started
**
Junior Member
124 posts

Joined: Oct 2009


This just defines EPIC PC build!
Keep it up...
TSowikh84
post May 5 2015, 10:36 PM

i7 Clan
Group Icon
Elite
8,711 posts

Joined: Nov 2007
From: Butterworth, PG / Machang, Kelantan


Update 2/5/15:

Things have been busy these two months with several funeral ceremonies in my hometown. Now I’m back to where I stay to continue my desk build.

user posted image
I’m not quite satisfied with the AVF Multi-Colour LED Strip that I purchased previously because it tends to glow in bluish white colour rather than pure white. So I’ve decided to ditch the AVF and go for Bitspower’s Cold Cathode Light kit which features white LEDs. The result looks promising, the white colour is true white.

user posted image
Finally the watercooling system is now filled with white coolant.

user posted image
Here’s another angle of the desk. You can see the ROG panel and the WD Caviar Black 1TB HDD mounted on the left drive bay, alongside the ASUS Blu-Ray burner and SSD adapter on the right bay.

user posted image
Sitting on the left tray is the trio Bitspower Water Tank Multi-Z 250 reservoirs and the D5 pumps which are installed with Bitspower’s pump top and white housing. To be honest I’m not quite satisfied with the fact that there are some big air pockets built up inside the reservoirs and looks like it’s not possible to eliminate these things within a few hours. But now the two reservoirs from the left are getting less bubbles already and I’m expecting the reservoir on the far right will be free of air pockets soon. The trick is I’m still able to fill the white coolant while lifting this reservoir up to stand vertically.


user posted image
On the right tray, we have ASUS Rampage V Extreme motherboard, Matrix R9 290X Platinum graphics card and G.Skill Ripjaws 4 DDR4 2666C15 4X4GB memory kit, fully watercooled by Bitspower watercooling gears in white colour scheme. Also spotted is the black/white UT PSU cable extenders, paired cleverly with cable combs to provide a neat cable management.

user posted image
Moving backward to the rear compartment, we have the white Seasonic Snow Silent 1050W power supply as well as the acrylic tubing which is filled with white coolant.

user posted image
A view from the left.

user posted image
A sight from the right side of the Vector desk.

TSowikh84
post May 5 2015, 10:40 PM

i7 Clan
Group Icon
Elite
8,711 posts

Joined: Nov 2007
From: Butterworth, PG / Machang, Kelantan


user posted image
The last picture before the system is powered up.

user posted image
This is how it looks like when the system is powered up.

user posted image
Closeup a little bit.

user posted image
Viewed from another angle.

user posted image
Switching off the room’s light will show you the Vector desk in the dark environment.

user posted image
Closer shot of the desk shot directly from front.

user posted image
Another angle of the desk in dark environment.

user posted image
The triple Bitspower Water Tank Multi-Z reservoirs and the twin D5 pumps.

user posted image
The right tray which contains the motherboard, graphics card and memory kit.

user posted image
The Matrix R9 290X Platinum graphics card which is fitted with Bitspower’s VGA block and white backplate.

TSowikh84
post May 5 2015, 10:44 PM

i7 Clan
Group Icon
Elite
8,711 posts

Joined: Nov 2007
From: Butterworth, PG / Machang, Kelantan


user posted image
A shot from the left.

user posted image
And a view from the right.

user posted image
Not to forget the rear compartment which consists the Seasonic Snow Silent 1050W power suppl, a pair of white XSPC AX360 radiators as well as Cooler Master’s JetFlo 120 case fans.

user posted image
After confirming everything is working perfectly I’ve decided to assemble the 8-mm thick tampered glass onto the top of the desk with the help of the rubberized adhesive tape.

user posted image
A closer shot from the front.

user posted image
A view from another angle.

user posted image
A closer shot from this angle.

user posted image
The rest of the important hardware are also assembled, to make it a perfect gaming machine. These include the Dell Ultrasharp U3011 30″ monitor which is running at 2560 X 1600 resolution, Logitech Z5500 5.0 surround sound system, as well as the black & white themed CM Storm QuickFire TK mechanical keyboard and Recon gaming mouse.

user posted image
Now it’s time to test the Grand Theft Auto V game on this Vector Desk!

user posted image
A shot from the front.

TSowikh84
post May 5 2015, 10:46 PM

i7 Clan
Group Icon
Elite
8,711 posts

Joined: Nov 2007
From: Butterworth, PG / Machang, Kelantan


user posted image
The black & white themed CM Storm QuickFire TK mechanical keyboard and Recon gaming mouse, alongside Bitspower’s white watercooling gears.

user posted image
Just another angle of the desk.
user posted image

user posted image
After months of delay, finally it’s all done… the Black & White Vector Desk project, featuring watercooled Haswell-E platform is now completed.

Last but not least, gratefulness I wish to once again express my gratitude for everyone who have been helping me during the process of the desk project. Thank you Vahn for sponsoring the Vector desk. I love it so much especially for its brilliant design. Big thank goes to my friends at Bitspower especially Roger who has been very supportive and generous in answering all my inquiries.

Thank you Sanko from Cooler Master Malaysia for the keyboard, mouse, thermal paste and the case fans; ASUS Malaysia for the board and card; G.Skill for the memory kit; Plextor for the solid-state drives; Seasonic for the power supply; Teck Teck from Unequalteck for the cable management and lighting kits. Also, a sincere appreciation to my friends who have been supporting me throughout the project. You guys are awesome!

I am dedicating this project to the dearest figures in my life, my late father, who passed away on the same day I received the Vector Desk on November 6th, 2014.

May your soul rest in peace Ah Pa…


Thank you everyone for reading!

BuckRoger
post May 7 2015, 01:10 AM

Sakit Perut
*****
Senior Member
903 posts

Joined: Dec 2008
nice stuff u have there smile.gif.

Btw, Sorry to hear about the loss of your father.

TSowikh84
post May 7 2015, 06:32 AM

i7 Clan
Group Icon
Elite
8,711 posts

Joined: Nov 2007
From: Butterworth, PG / Machang, Kelantan


QUOTE(BuckRoger @ May 7 2015, 01:10 AM)
nice stuff u have there smile.gif.

Btw, Sorry to hear about the loss of your father.
*
Thanks bro. No problem. Life's still moving on.
kherel77
post May 7 2015, 12:49 PM

Noobie
******
Senior Member
1,435 posts

Joined: Apr 2011
From: Blank Space


Beautiful system, even only looking at it I've already chilled...
NewbieTech
post May 11 2015, 01:21 PM

Getting Started
**
Junior Member
83 posts

Joined: Dec 2014
From: Kuala Lumpur


Condolence to u and family sir...
U have really done good job with this rig rclxms.gif
POKAUS
post May 28 2015, 02:32 PM

Getting Started
**
Junior Member
182 posts

Joined: Mar 2009
From: Pandora


nice one sir


Change to:
| Lo-Fi Version
0.3742sec    0.55    5 queries    GZIP Disabled
Time is now: 17th December 2025 - 03:20 PM