

i just come across this thread.
i am using a smilodon casing. bought it in penang PC depot for 299.
will try to write up a short review if there are interest and i have some time.
The Raidmax League, Pimp ur Raidmax here
The Raidmax League, Pimp ur Raidmax here
|
|
 Nov 18 2007, 01:35 PM Nov 18 2007, 01:35 PM
Return to original view | Post
#1
|

Junior Member
27 posts Joined: Dec 2005 |
i just come across this thread.
i am using a smilodon casing. bought it in penang PC depot for 299. will try to write up a short review if there are interest and i have some time. |
|
|
|
|
|
Nov 21 2007, 12:43 PM
Return to original view | Post
#2
|
|
Junior Member
27 posts Joined: Dec 2005 |
QUOTE(Revamperz @ Nov 21 2007, 12:19 PM) the side panels are both removeable BUT to put it back, the hinges are quite a pain in the **** to put back you mean the bottom hinges?i think with practice you'll get the hang of it. a few tips from my experience when putting the panel back, don't try to immediately slot in the hinges (3 of them) try to use the right edge of the panel (for the transparent panel side) and align it with the gap on the casing where th eplastic front panel connects witht he casing. then slide it in to align the hinges. it will be easier this way. also try to angle the panel when inserting the hinges. approx 20 degrees aggle to the casing (almost in closed position liao) i find that the hinges are very hard to slot in when the panel is placed flat on the ground hope it helps |
|
|
Nov 21 2007, 09:29 PM
Return to original view | Post
#3
|
|
Junior Member
27 posts Joined: Dec 2005 |
ok got some time tonight, so i took some photos of my casing and the points that i like/dislike
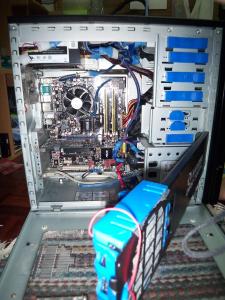
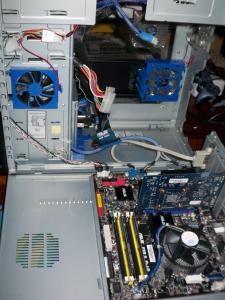
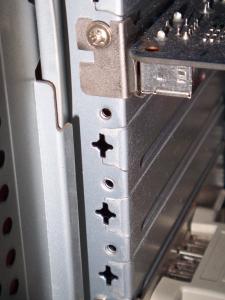
likes (Most are already listed in the raidmax webbie, so i'll list the ones that i personally like and not listed): 1. removeable side panel. in fact even the platform where the mobo sits on can also be removed, but i don't see much point in removing that platform since the panel is removeable 2. fan fans and fans. not just the quantity, but they are very strategically placed. for example, the side panel (transparent side) the intake fan is directly on top of the processor HS which means that it draws fresh air directly to your processor HS. there is an exhause fan which is below the intake fan and it is positioned directly in front of the cards slots which pulls out all the heat generated by the GC/other cards. 3. The casing comes with a bar ad the side panel. the exhause fan is attached to it. but what is interesting is that the plastic cage where the fan is house has adjustable 'fingers' that can be ised to 'hold' up the cards. I think it's an overdesign but i am using a light graphic card. probably it will helo to add additional support for heavier cards. 4. Removeable hdd cagethe hdd cage can be swivelled out to ease hdd installation and can even be taken out. and i think the quick release hdd mounting mechanism is probably the easiest to remove design i have come across. 5. Because of the removeable sidepanel, i can easily hide the 24pin power, ide, and other misc cables behind the drive bays. 6. of yeah the tool box dislikes (some are mere muinsense but some coule be dealbreaker, but it all depend on individual taste): 1. Because of the removeable side paned, one have to be careful when opening the panel. with the mobo installed and the 8pin atx power attached, you could easily do some damage if you open the paned without remembering to remove the atx power cable. the cable might not be long enough and will tug on your mobo. 2. weak door magnet. the front panel door is held by 2 small and weak magnet which makes the door feels like it is not shut securely. But i have a fix to that  3. placement of front usb and audio jacks. the jacks are placed at the bottom of the front panel. this means that you will need to have the door opened in order to use the jacks. placement at the bottom also makes you waste extra length of yout cables esp headphone cable. 4. due to the door design, even though you have a 120mm front intake fan, the front door essentially blocked most of the surface area tha that makes it less efficient 5. due to the placement of the hdd cage at the lower front of the casing it essentially created a 'tunnel' of sorts to the intake from the 120mm intake fan and this gives only a small path for the fresh air to be circulated aroung the mobo area. 6. heavy, but i sort of fix that problem 7. dark power on button. the texture of the button is very similar to the front panel, and this makes it hard to look for the button in the dark. not really a problem, but would be nice if it is more distinguishable. 8. the metal plates for the card slots are 'permanent'. dunno how to put it. but it's something like this. as stock the covers are attached to the casing, and if you need to remove them, the removal is permanent, means you sort of 'tear' it off the casing (refer to last photo). another thing is even though raidmax mentioned that this is a toolless casing the cards still need to be screwed in the traditional way. Fixes, actually i wouldn't wanna call it fixes, but more to improvements. i did 2 so far and they are. 1. I got myseld some magnet strips. it looks like rubber strips but are magnetized. put double sided tape on one side and stick it onto the front panel wherer the door closes. this solved the stock weak magnets issue. 2. i swapped the bottom support pads with castor wheels. I got some mini castor wheels and some plastic washers (to increase the load beating area of the wheels). the remove the pans and put on the wheels. photos. 1. magnetic strip for the door 2. castor wheels 3. side panel (left side) opened, the lue box at the tip of the black bar is the exhaust fan casing 4. side panel (mobo side) opened. notice that there are spaces behind the drive bays where you can hide your wires. 5. the sucky card panels oh ya, sorry for the long winded post. This post has been edited by webster: Nov 21 2007, 09:30 PM Attached thumbnail(s) 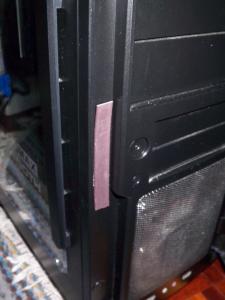

|
|
|
Nov 21 2007, 09:39 PM
Return to original view | Post
#4
|
|
Junior Member
27 posts Joined: Dec 2005 |
QUOTE(Revamperz @ Nov 21 2007, 12:47 PM) thanks!! i took a short video of my method of closing the side panel. imagine everything on the mobo allready fixed in and i tried to put in the hinges.. it was a nightmare!  hope it helps. gosh... my voice sounds so freaky ...  Attached File(s)  100_1424.MOV ( 7.34mb )
Number of downloads: 42
100_1424.MOV ( 7.34mb )
Number of downloads: 42 |
| Change to: |  0.0290sec 0.0290sec
 0.24 0.24
 7 queries 7 queries
 GZIP Disabled GZIP Disabled
Time is now: 8th December 2025 - 02:21 AM |
 Quote
Quote