Welcome Guest ( Log In | Register )

Outline · [ Standard ] · Linear+

Troubleshooting How to change your 3DS Circlepad Plastic Analog, A simple guide for newbies

views
     
TSblah2blah
post Feb 20 2014, 04:37 PM, updated 12y ago

Enthusiast
*****
Senior Member
748 posts

Joined: Aug 2009
DISCLAIMER : I DO NOT HOLD RESPONSIBLE IF ANYTHING HAPPEN TO YOUR 3DS/3DSXL/3DSLL WHEN YOU FOLLOW MY GUIDE. IS ALL YOUR RESPONSIBILITY TO BE CAREFULLY DISASSEMBLE YOUR CONSOLE. YOU MAY NEED TO SEEK FOR THE ONE THAT KNOW WHAT THEY'RE DOING AND LOOK FOR THEIR ASSISTANCE IF YOU'RE NOT CONFIDENT ENOUGH TO FIX IT YOURSELF.


Some of you might encounter this before but didn't see anyone posted this problem as well. Well if you're a Gold Medal earner of Mario Kart 7 or a HR hunter in Monster Hunter series, this problem should arise on your 3DS. Welp, mine was on my first 3DSLL white. I brought a new LL eventually. On the other hand my analog was fine. It was just the plastic of the analog that is broken. So on the second thought I would like to try to replace this handheld by using a pretty similar accessories that we have, which is the CirclePad Pro (CPP). Here's a glimpse on my broken plastic analog

» Click to show Spoiler - click again to hide... «


So now this simple DIY task (I rate it 3 out of 5, if it is a normal 3DS then will be 4 out of 5) will be shown to you with some picture to guide you. Hope it helps.

Apparatus that you need is :-

1) Your 3DS/3DSXL/3DSLL
2) Triwing screwdriver
3) Philips screwdriver
4) CirclePad Pro (normal or big one)

» Click to show Spoiler - click again to hide... «


Take out the cover of the back of your 3DS. This can be done easily.

» Click to show Spoiler - click again to hide... «


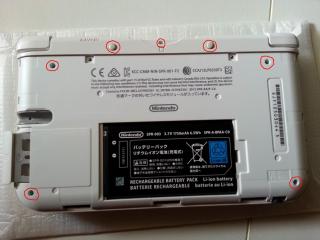
Next take out the screw on the red circle that I shown. Easy job here as well.

» Click to show Spoiler - click again to hide... «


You're good to go on lifting up the cover. Do be caution as there's a 2 ribbon attached on the 3DS MoBo itself (the L and R button) that I circle with green color. So be gentle and pluck out the ribbon. There you will see your analog with 2 red color circle as well. Take that out.

» Click to show Spoiler - click again to hide... «


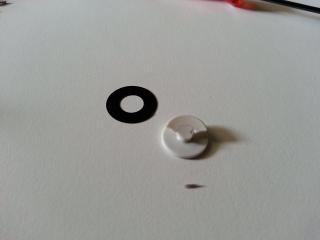
Now you will see that you will need to replace this plastic that I circled using green color.

This post has been edited by andrewcha: Feb 20 2014, 05:28 PM
TSblah2blah
post Feb 20 2014, 04:37 PM

Enthusiast
*****
Senior Member
748 posts

Joined: Aug 2009
» Click to show Spoiler - click again to hide... «


Next one is to dissamble your CirclePad Pro. It should a simple task as well so I just take this screenshot of after dissamble

» Click to show Spoiler - click again to hide... «


Now from here is another ribbon that's attached on the Analog. Do note that the ribbon is tiny (in mm), so pluck out the ribbon lock first before you pull the ribbon out. You'll notice 2 screw are at the same exact location on the analog. Unscrew them.

» Click to show Spoiler - click again to hide... «


This is the one that's broken from my console itself.

» Click to show Spoiler - click again to hide... «


This is the one that you take out from the CPP.

» Click to show Spoiler - click again to hide... «


Now just place it back to the console and you're ready to do the reverse process to assemble your console back. PLEASE NOTE THAT THE ANALOG HAS 2 WASHER, DO NOT MISS THE WASHER when you assemble it back.


This post has been edited by andrewcha: Feb 20 2014, 05:21 PM
TSblah2blah
post Feb 20 2014, 04:38 PM

Enthusiast
*****
Senior Member
748 posts

Joined: Aug 2009
» Click to show Spoiler - click again to hide... «


This is the final product after the assembly. Now my analog plastic is black in color instead of the usual grey. Of course after you stick the rubber back it is in grey.

» Click to show Spoiler - click again to hide... «


A comparison of the initial 3DS analog and the one that I'd fix. You can see that your CPP plastic analog is actually larger in diameter compare to the console one itself.

» Click to show Spoiler - click again to hide... «


So now my CPP analog is left with this. I am not sure if it is still useable. At least you do not have to fork out much more money to buy a new 3DS or spare part. This is the cheapest solution that I can find. DO NOTE THAT MY ANALOG IS NOT SPOILT. IS ONLY THE PLASTIC THAT"S ATTACHED TO THE ANALOG is broke.

UPDATE : The CPP works just fine. Just a little odd when I tried to play with MH4. Just need to adapt the new *analog* itself.


So here you go. Drop some question/comment below if you need some assistance. Thanks and have a good day.

This post has been edited by andrewcha: Feb 21 2014, 09:23 AM
TSblah2blah
post Feb 20 2014, 05:39 PM

Enthusiast
*****
Senior Member
748 posts

Joined: Aug 2009
QUOTE(kenjixx @ Feb 20 2014, 06:19 PM)
wah.. so pro wei.. why spoiler every picture? Nice DIY
*
Thought the picture will be too big. Never know i can't attach the picture link via FB (maybe of my privacy setting). Eh, check your whatsapp.
TSblah2blah
post Feb 22 2014, 11:54 PM

Enthusiast
*****
Senior Member
748 posts

Joined: Aug 2009
QUOTE(TheUndead @ Feb 22 2014, 06:45 PM)
Great guide bro! Salute, salute!! notworthy.gif

But allow to me chime in my dear bro,
wouldn't it be more nice if we can just buy
the analog nub replacement rather than swapping
it with the one found in the CPP?

wont this guide will render ur CPP useless after?
surely there is somewhere we can buy the analog replacement, yes?
*
i am not sure if there's people who's selling the plastic thingy. cos the only way to get this one is either on the console itself or CPP. besides my analog for CPP is still good to go after swap.


Change to:
| Lo-Fi Version
0.0191sec    0.32    7 queries    GZIP Disabled
Time is now: 3rd December 2025 - 12:18 AM