Welcome Guest ( Log In | Register )

Outline · [ Standard ] · Linear+

 Building Plastic Car model (Low Cost) Tutorial, Cant afford hobby tools, paints etc??

views
     
TSblueric94
post Nov 23 2013, 12:36 PM, updated 12y ago

Getting Started
**
Junior Member
85 posts

Joined: Nov 2013


Im preparing this thread to guide modellers who cant afford expensive tools, paints and accessories only! No professional tools needed, and its all based on my experience biggrin.gif

Pros out there please give comment if you want to thumbup.gif

Ok today im going to share with you all how a plastic model (Tamiya, Gundam etc) can be done without having to spend much on the tools and paints. I will use a tamiya car as my sample tongue.gif

So here we go. Here are the things you will need at least:

The model itself, of course
user posted image

Paints (normal paints, Rm6-7 each) and paint bottles like this
user posted image

Marker pen (for panel lines and small parts. these are the only 2 markers that i used)
user posted image

Water color brushes (for this one i suggest you get a good one!)
user posted image

Any colour plate
user posted image

Any lier & stationery cutter
user posted image

As shown (for glue, what i used is actually like UHU)
user posted image

And also you will need thinner as solvent for paint.

After preparing everything stated above, we shall proceed to working now rclxms.gif

This post has been edited by blueric94: Nov 28 2013, 10:46 PM
TSblueric94
post Nov 28 2013, 09:46 PM

Getting Started
**
Junior Member
85 posts

Joined: Nov 2013


There are a few things you need to do before starting the project.

1. Fill paint bottles with paints.

Very simple, just spray the paints directly into the bottle. And dont be greedy! The blue and red paints are bad example. Fill the paint as much as what I did for the yellow paint. Otherwise you will have difficulties shaking and pouring out the paints. Do the same for thinner solvent, just pour into the paint bottle.
user posted image

2. Make your own stick with clip


This is very simple too. Get a few wooden sticks (wooden chpsticks,"satay" stick) and attach clip on it. Then, use masking tape to fix the clip. Remember! only use masking tape on one of the ends of the clip only. Otherwise you wont be able to open the clip!
user posted image

So here are the basic things you will need to prepare. Now, time to assemle! thumbup.gif

This post has been edited by blueric94: Nov 28 2013, 10:36 PM
TSblueric94
post Nov 28 2013, 10:32 PM

Getting Started
**
Junior Member
85 posts

Joined: Nov 2013


To cut:

Use the plier as shown above. After cutting the parts that you want out, there will still be spots where you can see the attached area is not smooth. It will look like something pops out and that is ugly. To solve this, just use the paper cutter to cut off the pop out thingy. Many people should not have problem on this I guess rclxms.gif

To paint:

Ok here is the most challenging part of all. This is also where the cost of building plastic models differ the most. There are two things which you will need to use spray instead of hand painting: 1) For big parts (car body, bumper, spoiler, base etc) 2) For things that need shinny/smooth surface (exhaust, chrome-coloured parts)

Reason: Using hand painting for big parts is a really bad idea. You will leave some inevitable brush strokes which will spoil the smooth surface. Spraying will definitely make it look a lot better as that can give it an even and smooth paint job.

For small parts, i recommend you to use hand painting (this is what we prepare the paints in the paint bottles for). For most of the time, I will paint the parts first before cutting them out. This will be easier as you dont have to hold such a tiny part when you paint. The procedure are as follows:

1) Pour out the paints you need on the colour plate. No need too much, 1-2ml will suffice (since the paint comes out the bottle drop by drop, this will not be a problem).
2) Add a few drops of thinner (warning! inhaling the fume of thinner is not good for your health) to thin it. Test the paint by painting it on a piece of papaer, plastic or anything. If you feel the paint is over diluted, all you need to do is to wait for a while so that the excess thinner evaporates. Conversely, if the paint is too sticky, add a few more drops of thinner and mix thoroughly. Note: if the paint is too diluted, it will flow easily from one area to another are when you are painting which is a bad idea. if the paint is too sticky, you will easily leave brush strokes on the surface you are painting. So make sure you thin the paint in the correct ratio everytime.
3) And now is time to paint with brush! The reason I suggest you get a good brush is that it wont leave the "fur" of the brush on the painting surface otherwise it will be very difficult to clean up once it sticked on the paint. Also, good brush leaves brush strokes less obviously. While painting, remember to check the paint on the colour plate constantly as it dries and become sticky very fast. Add thinner when needed.
4) Dont have the paint colour needed? Mix it like what we usually do in water colour. Of course for this you will need some advacned artistic knowledge.

Example of painting with brush:
user posted image
user posted image
user posted image

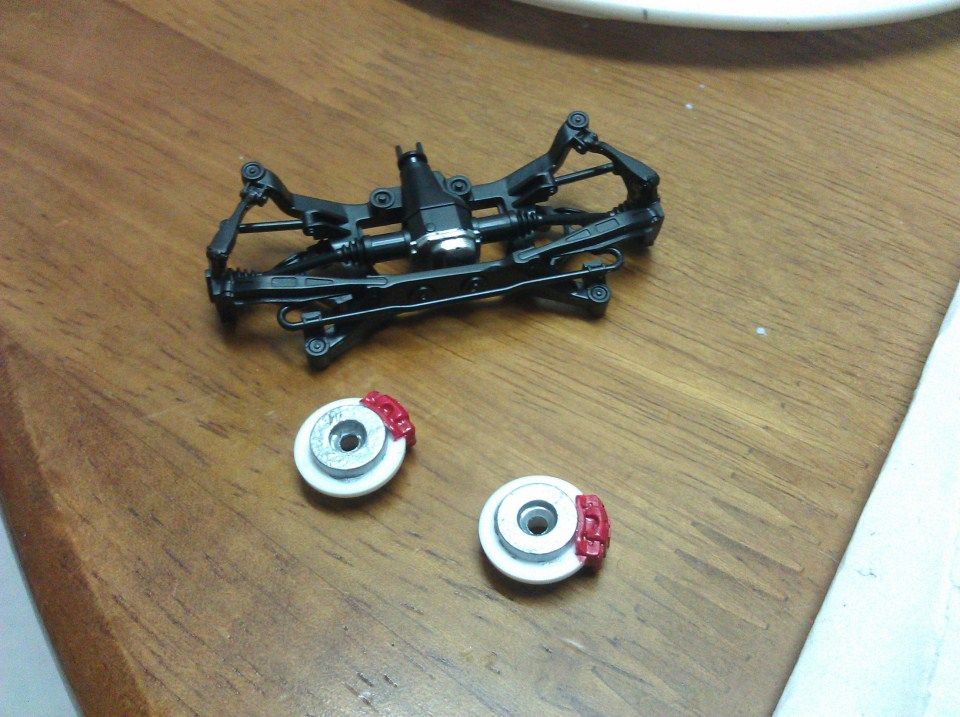
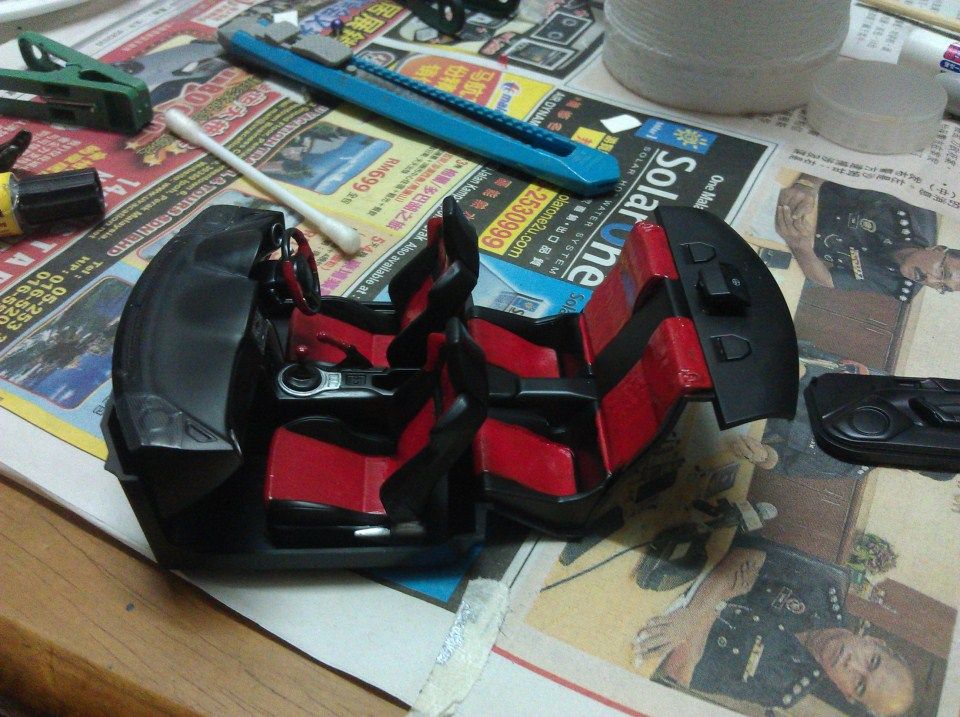
There are some parts where it is more convenient to paint them with marker. As for me, i only used them for part which is silver. For panel lines, i used the 0.4mm black permanent marker as shown above. If you accidentally draw the line wrongly, no worries! All you need to do is waiting for it to dry, then you can easily rub it off by using eraser thumbup.gif

To glue:

This is also quite challenging. The difference of UHU-liked glue and Tamiya cement is so significant. UHU is very sticky, and you will need to use a niddle to transfer to glue to the are needs to be glued. By saying it is sticky, i mean it will look like cheese of a pizza, where the glue wont break easily and will be pulled into very long. Try not to let it touch any area you are not going to glue, as it will be extremely difficult to remove! To remove dust, stain or glue if you accidentally drop it on the plastic, use masking tape. This is a very effective way, just paste the masking tape on the surface you want to clean up and pull up repeatedly.

After all, this is the result of my project thumbup.gif
user posted image

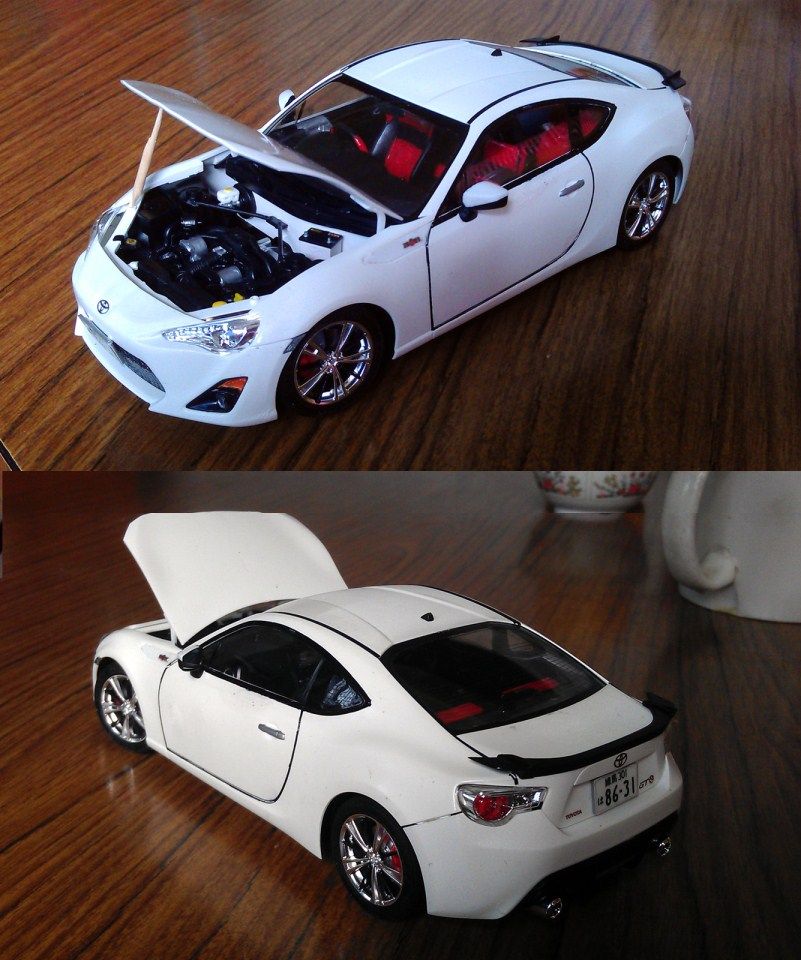
All i want you to be reminded is that i have not used any tools or paints from Tamiya or any other brands of hobby tools other than the car model itself. I think i might have left out a lot of important things i want to share about this project though, and will edit this post once i figure out more.

Any question will be welcomed and i will try my best to answer rclxms.gif

This post has been edited by blueric94: Nov 28 2013, 10:38 PM
Naka7a
post Nov 29 2013, 03:07 PM

St. Neo
*******
Senior Member
5,417 posts

Joined: May 2006
From: Bear Hill, Malacca


not too shabby... but there are smudges on the body panels of the car. =/
Sauron76
post Nov 29 2013, 03:14 PM

New Member
*
Junior Member
32 posts

Joined: Sep 2008
From: Dalam jamban..
Nice tips!
chyll2
post Nov 29 2013, 04:48 PM

New Member
*
Newbie
0 posts

Joined: Aug 2013
nice tips. btw, can you post more of the build ups? like what pieces that you usually detailed in a car kit?

i am mostly a gunpla builder, and will try in the future Hasegawa Macross VF 25F. Car model is something that I want to try as well.
TSblueric94
post Nov 30 2013, 11:40 AM

Getting Started
**
Junior Member
85 posts

Joined: Nov 2013


QUOTE(Naka7a @ Nov 29 2013, 03:07 PM)
not too shabby... but there are smudges on the body panels of the car. =/
*
yea there are a few mistakes i learnt from this project, one is panel line. I should have used the 0.2mm ultra fine one, it will look much better, and that cost less than Rm5 only thumbup.gif
and one of the biggest mistakes, when the panel line colour accidentally came out, i use white colour paint to cover it instead of using eraser.. thats why =/

QUOTE(Sauron76 @ Nov 29 2013, 03:14 PM)
Nice tips!
*
thanks yo rclxms.gif
TSblueric94
post Nov 30 2013, 11:49 AM

Getting Started
**
Junior Member
85 posts

Joined: Nov 2013


QUOTE(chyll2 @ Nov 29 2013, 04:48 PM)
nice tips. btw, can you post more of the build ups? like what pieces that you usually detailed in a car kit?

i am mostly a gunpla builder, and will try in the future Hasegawa Macross VF 25F. Car model is something that I want to try as well.
*
Actually since this is my 1st project, i follow exactly the recommended colour in the instructions other than a few parts (brake pads, interior etc)
btw what do u mean by pieces that i detailed? cz i just followed everything shown in the instructions and hardly any modification biggrin.gif

so here are the pictures. thumbup.gif
user posted image
user posted image
user posted image
user posted image
user posted image
user posted image
user posted image
TSblueric94
post Nov 30 2013, 11:55 AM

Getting Started
**
Junior Member
85 posts

Joined: Nov 2013


QUOTE(kevinlowl @ Nov 29 2013, 05:02 PM)
Not bad, perfect for beginners like me. biggrin.gif

BTW, won't the thinner dissolve the pallet since it's made of plastic?

Also, get some larger wheels for your 86 dude! tongue.gif
*
thx biggrin.gif
yes it will, very little bit, at the surface only. if you use it to remove excess paint, u can see the unremovable mark, not very obvious though. It is so corrosive cry.gif

i prefer they look in factory default style. later on im going to get a few new sets including r32, ae86 and fd rx7. Those are cars from initial d *initial d fans here tongue.gif

SUSadvocado
post Dec 4 2013, 08:59 PM

Look at all my stars!!
*******
Senior Member
2,948 posts

Joined: Jun 2007
I have a few problems:

1.Cannot get Chrome effects on tailpipes etc.

2.Cannot paint the seamlines properly because they are too small.

3.Cannot paint Window Black rubber properly.

4.Cannot get real Glossy finishing. Only semi-gloss despite spraying Gunzo Glossy Finish.

5.Can't cut Rubber Tyre properly, still have seamlines.
TSblueric94
post Dec 4 2013, 10:56 PM

Getting Started
**
Junior Member
85 posts

Joined: Nov 2013


QUOTE(advocado @ Dec 4 2013, 08:59 PM)
I have a few problems:

1.Cannot get Chrome effects on tailpipes etc.

2.Cannot paint the seamlines properly because they are too small.

3.Cannot paint Window Black rubber properly.

4.Cannot get real Glossy finishing. Only semi-gloss despite spraying Gunzo Glossy Finish.

5.Can't cut Rubber Tyre properly, still have seamlines.
*
Based on my opinion only:

1. Do you use spray or air brush? Hand painting will never produce chrome colour effect due to uneven paint, the surface wont be shinny unless it is completely smooth. biggrin.gif

2. I see some people use very very small brush which is just small enough for panel lines (i suppose u mean this) . As for me, i used 0.4mm perm. marker which available in any book stores.

3. This part i used black perm. marker as well. I dont know why, but my flat black works extremely bad when hand painting. The paint is very sticky and difficult to thin even with thinner, which is unlike other colours.

4. For this im not so sure, but i believe how shinny it is will depend on the colour of paint u use on the body.. hmm.gif

5. What do you mean cut it? I thought most of the car rubber types come unattached that you dont have to do anything, like my tamiya and aoshima.

e30
post Dec 5 2013, 02:20 AM

JFT 96
******
Senior Member
1,189 posts

Joined: Sep 2006


Just wanna ask, what did u use to mask the windows when painting the body? Or was it seperate parts? Sorry i am not into scale car building, just looking for cheapo tips to paint my rc car bodyshell. It is in one piece of a lexan shell
chyll2
post Dec 5 2013, 04:54 AM

New Member
*
Newbie
0 posts

Joined: Aug 2013
QUOTE(e30 @ Dec 5 2013, 02:20 AM)
Just wanna ask, what did u use to mask the windows when painting the body? Or was it seperate parts? Sorry i am not into scale car building, just looking for cheapo tips to paint my rc car bodyshell. It is in one piece of a lexan shell
*
dont know if it is still applicable to all tamiya kits but check 3:35 onwards


limfreelance
post Dec 5 2013, 11:02 AM

Casual
***
Junior Member
343 posts

Joined: Jul 2011
From: Land of SaberLion :3
well, nice...remind me when i was 1st start to enter Plamo.

1) Chrome effect cannot be achieve in brush or airbrush, it only can be done by plating.

2) Anchor Chrome Spray Can- when this color meet a heat temperature (room ) it become sticky & melt.

3) For Gloss surface, it cannot acheived by normal Spray can & airbrush. A must use industrial Paint with 5mm Airbrush gun.

4) Spray Can Not economic, bcos waste quite a lot of paint. Small detail easy overlapping by the paint. Effect not as good as AB (airbrush). Bside, color scheme is limited.

Modeling now aday quite costly, but painting a model cost u more in term of paint, time & effort.


TSblueric94
post Dec 5 2013, 01:39 PM

Getting Started
**
Junior Member
85 posts

Joined: Nov 2013


QUOTE(e30 @ Dec 5 2013, 02:20 AM)
Just wanna ask, what did u use to mask the windows when painting the body? Or was it seperate parts? Sorry i am not into scale car building, just looking for cheapo tips to paint my rc car bodyshell. It is in one piece of a lexan shell
*
For plastic car models the windows and windshield always come seperated. For what you have now, i suppose it cant be seperated so you will need to use masking tape to mask the windows properly before you apply the paint to the body biggrin.gif
TSblueric94
post Dec 5 2013, 01:49 PM

Getting Started
**
Junior Member
85 posts

Joined: Nov 2013


QUOTE(limfreelance @ Dec 5 2013, 11:02 AM)
well, nice...remind me when i was 1st start to enter Plamo.

1) Chrome effect cannot be achieve in brush or airbrush, it only can be done by plating.

2) Anchor Chrome Spray Can- when this color meet a heat temperature (room ) it become sticky & melt.

3) For Gloss surface, it cannot acheived by normal Spray can & airbrush. A must use industrial Paint with 5mm Airbrush gun.

4) Spray Can Not economic, bcos waste quite a lot of paint. Small detail easy overlapping by the paint. Effect not as good as AB (airbrush). Bside, color scheme is limited.

Modeling now aday quite costly, but painting a model cost u more in term of paint, time & effort.
*
Actually we have many brands of spray can which offer chrome colour, but not all of them give us desired effects. I tried 2 brands before, 1 works ok (shinny, but not as shinny as plating of course) and another 1 just like metallic silver, so so bad. Im using anchor btw, so far no problem biggrin.gif

Spraying small parts will waste a lot of paint of course. Thats why i hand brush them using the paint in the can tongue.gif
denieru
post Dec 16 2013, 09:39 PM

New Member
*
Junior Member
43 posts

Joined: Sep 2008


the UHU glue wouldnt leave a foggy effect when use on transparent part like windows and headlights? as far as i know, superglue will. sadly my place tamiya cement out of stock atm
TSblueric94
post Dec 16 2013, 10:57 PM

Getting Started
**
Junior Member
85 posts

Joined: Nov 2013


QUOTE(denieru @ Dec 16 2013, 09:39 PM)
the UHU glue wouldnt leave a foggy effect when use on transparent part like windows and headlights? as far as i know, superglue will. sadly my place tamiya cement out of stock atm
*
when UHU dries it will leave significant mark, therefore you can only glue the part of windows where it is not visible.. As for head and tail lights, same thing you can only glue the areas where it is not so obvious to see the glue mark.. but still ok la, for lights wont be obvious anyway, not like windshield n windows biggrin.gif
edwardc
post Dec 26 2013, 08:40 PM

Getting Started
**
Junior Member
175 posts

Joined: Aug 2007


Good effort making this thread BLueric. I need a LIKE button. hehe
TSblueric94
post Dec 28 2013, 05:11 PM

Getting Started
**
Junior Member
85 posts

Joined: Nov 2013


QUOTE(edwardc @ Dec 26 2013, 08:40 PM)
Good effort making this thread BLueric. I need a LIKE button. hehe
*
u inspired me by helping me to get an FC too. biggrin.gif

2 Pages  1 2 >Top
 

Change to:
| Lo-Fi Version
0.0213sec    0.85    5 queries    GZIP Disabled
Time is now: 12th December 2025 - 02:20 PM