Welcome Guest ( Log In | Register )

23 Pages « < 17 18 19 20 21 > » Bottom

Outline · [ Standard ] · Linear+

 The makeover of my humble abode, Sharing my renovation journey

views
     
TSmaxxon
post Apr 14 2014, 05:18 PM

Enthusiast
*****
Senior Member
773 posts

Joined: Dec 2010


QUOTE(supersound @ Apr 14 2014, 04:30 PM)
So want to boast about trigonometry to wow me whistling.gif
You may draw the diagram to further wow me on this whistling.gif
Just because I never put the term "level", you no need to use trigonometry to boast around. This is nothing to do with trigonometry. Must know where and when to use a concept or a law doh.gif
*
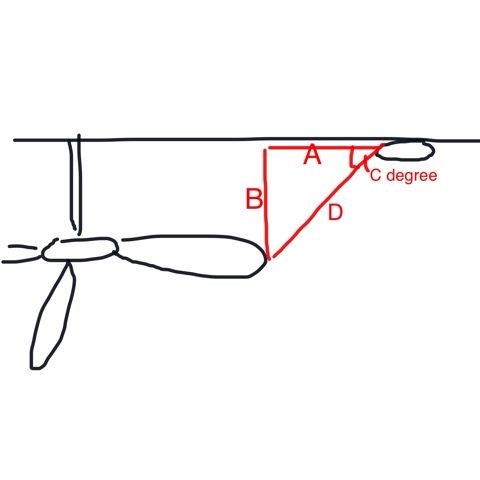
In this case i must agree with mrgoodgood on the degree of projection. As we know light projects and travels in straight line and LED lights especially have a stronger projection intensity and specific projection degree. (Eg. eyeball spot light has very narrow projection degree). Normal downlight is not so specific with such projection degree and that's why i said the light is softer or less intensed.

As such if we use these led downlights, we should either move the light further away from the fan blades or use a shorter fan rod so that to avoid the wide projection 'kena' the blades causing shadow flickering (provided the rod is short enough for that certain degree the lights has)... So, longer the rod, easier to 'kena' the light projection.

I know you will say avoid led downlights... but that's still personal choice, as nothing is perfect and each has got its strength and weakness. Although led downlights with more intensed projection but the flickering can be avoided by method suggested. That's one of the benefit of this forum that we learn from people's experience and we find a way to avoid errors...
TSmaxxon
post Apr 14 2014, 07:35 PM

Enthusiast
*****
Senior Member
773 posts

Joined: Dec 2010


QUOTE(dp82 @ Apr 14 2014, 07:03 PM)
I had the same issue where the LED downlights are too near to my ceiling fan. Fan is KDK 60" regulator. Had the issue of flickering all the way fr ceiling to floor. Its too damm annoying.

Ended up i change to Deka Baby G 42" after a few days. It drastically changed everything.

I think mainly the issue is due to longer blades.
*
Yup, the 2 variables which could cause the flickering is either:
1) the distance between ceiling and blades of fan
2) the distance between light and blades of fan

This post has been edited by maxxon: Apr 15 2014, 09:47 AM
TSmaxxon
post Apr 14 2014, 07:45 PM

Enthusiast
*****
Senior Member
773 posts

Joined: Dec 2010


QUOTE(fremont88 @ Apr 14 2014, 06:03 PM)
I found it! anyway, you are right, let me search in more detail first next time.....anyway, really appreciate your efforts in this thread.....

i saw your master bedroom, all led eyeballs only....looks good!
*
Love the eyeballs lighting effect... and the brightness is actually just nice for a bedroom. smile.gif

Thank you for following my journey... and wish you a smooth one too..
Keep sharing yours ya, coz im one of the follower too... wink.gif
TSmaxxon
post Apr 14 2014, 10:49 PM

Enthusiast
*****
Senior Member
773 posts

Joined: Dec 2010


QUOTE(supersound @ Apr 14 2014, 09:47 PM)
Down light and make sure it is projected.
As said before, don't bring in some technical terms like trigonometry to make things more complicated doh.gif
What you need to do is measure the fan blade's length, measure the ceiling width and length, measure your down lights coverage[attachmentid=3930720]
This is my master bedroom's down light and fan. I got 5 total and 3 of them I already raise white flag on changing them doh.gif
The gap are about 1-1.5ft.
*
Err... Pls pardon me but i really don't understand how is your fan in the picture is below the fan level?
Also, what's to do with measuring the fan blades length (instead of distance from blade to light?), and also why is it the ceiling width and length?

Actually the trigonometry formula is the right thing to calculate. It's not a technical term either. It's what we learnt in secondary math, you had definitely learnt it but you've perhaps forgotten or didn't notice what it calls already.

I've drawn a simple diagram below, with my simple tablet app. Just done it very quickly with free-hand. So, again, pls don't laugh at me!! flex.gif

user posted image

We have got the distance of fan from the ceiling = B
We have the light beam degree already (derived from our light degree, which varies from different models of lights, eg my light is 112 deg) = C degree
So, we need to calculate what's the minimum A or D to avoid the light beam hitting the fan blades.

To simplyfy my explanation, let's refer to the lighting expert's post on this similar issue and the method of calculation from the following link, post#237.
https://forum.lowyat.net/topic/2938110/+220

Edit: this calculation is to ease those plan to install LED light in a small medium room. Whether it works or not you can tell us after you've tried it. Thanks.

This post has been edited by maxxon: Apr 15 2014, 08:21 AM
TSmaxxon
post Apr 15 2014, 08:03 AM

Enthusiast
*****
Senior Member
773 posts

Joined: Dec 2010


QUOTE(supersound @ Apr 14 2014, 11:46 PM)
I think I already said it before, either you make it the lights level lower than fan or make sure the down lights are projected and make sure it is far away from the fan blade.
And you your self said projected doh.gif
I go to point B from point A directly(take measurement and make sure it is far away, projected), but if you still choose going to point C(using trigonometry) before reaching point B is up to you.
Those wireman know what to do to counter shadow, even without an ID.
Also, light bulb if not projected, it is travel in wave form. Can trigonometry be used on this case doh.gif
And now I understand why you guys like to use trigonometry(which in the first place no need) because of some SKL that make it "pro" with some stupid calculations, from your link whistling.gif
*
Come on bro, your layman method who don't know?? It's only applicable to a bigger room! Especially master room. I am more in a position to tell you this because I experienced before with LED downlight in a small medium room. Did you?? If you refer to my previous post, I already did your layman method which all wiremen do, just common sense right? To distribute it as far as possible and in a uniform way. No need a teacher to teach also a school boy will know! Did you see my few attempts which I move the light further and further away until no more space, until the wall already? The calculation method is here to assist those who haven't install but planning to use LED in a small or medium room, at least they can do something before purchasing and minimize the chances of failure. Of course people can choose to 'try and error' like what I did and of course they need not f**cking worry if their room is big enough! Of course, I need to reinforce again, to use LED or not is a personal choice.

Whether the calculation is working or not, neither me or you can comment, let those who use it and comment. Finally, i don't know whether my post will offense you but I can tell you that I'm very much offended this 'seven morning, eight morning' got to read all these negativity!
TSmaxxon
post Apr 15 2014, 08:14 AM

Enthusiast
*****
Senior Member
773 posts

Joined: Dec 2010


QUOTE(yenhan @ Apr 14 2014, 11:38 PM)
Boss, hows the workmanship for grill... mind to pm me the contractor's number? thanks!
*
Grill is good. Eventhough there is some part of my main gate they did brought back to factory and reworked but overall still good including their after sales services.
https://www.facebook.com/pages/Three-Kim-Me...219963244769158

This post has been edited by maxxon: Apr 15 2014, 08:23 AM
TSmaxxon
post Apr 15 2014, 08:41 AM

Enthusiast
*****
Senior Member
773 posts

Joined: Dec 2010


QUOTE(supersound @ Apr 15 2014, 08:24 AM)
Is you that want to see things negatively doh.gif
I do understand your feeling, in the middle of happy mood, suddenly someone tells you there's something wrong and you can accept it, simple as that.
*
I'm offended that you simply like to deny people's effort and call them stupid. In your world, no need ID, no need expert, no need technical studies.... Ok, let's stop all these nuisance.
I have done and very happy with my lightings, so let other people to tell us their experience and result.
TSmaxxon
post Apr 15 2014, 08:49 AM

Enthusiast
*****
Senior Member
773 posts

Joined: Dec 2010


QUOTE(nicknyhk @ Apr 15 2014, 08:16 AM)
Sorry I don't mean to change the topic but I do believe that light does indeed travel in a wave form. Edit: But it does travel in a straight line for the subject that we are talking about.

Physics aside, good luck with the renovation TS.
*
Thanks. Reno almost done....pheww...long journey... sweat.gif
TSmaxxon
post Apr 15 2014, 06:52 PM

Enthusiast
*****
Senior Member
773 posts

Joined: Dec 2010


QUOTE(ghoz705 @ Apr 15 2014, 03:58 PM)
being reading this thread since this morning.. very nice job TS!
*
Thanks... Hope my little sharing helps in some ways...
I didn't post only good and beautiful jobs but my errors thru out the process and vendor reviews too... Hope you guys find a way to avoid error as mine. wink.gif
TSmaxxon
post Apr 18 2014, 12:30 PM

Enthusiast
*****
Senior Member
773 posts

Joined: Dec 2010


QUOTE(zoe33 @ Apr 18 2014, 09:46 AM)
Nice! brilliant idea... to avoid any mistakes on color application by the person who carries out the job
where did u buy the paint from?
*
Haha.. Thanks...i think that's the simplest thing I can do in merely less than 15 minutes. If i just put one dot, i afraid the contractor overlook coz my exterior involved a few smaller parts with different colors, so i might as well just dot-dot-dot with my finger using the ipad drawing app.

I used Nippon paint in and out.


QUOTE(monkey9926 @ Apr 18 2014, 10:33 AM)
i m not sure about maxxon but the dulux sample board really screwed up my reno a bit, and it's too time and money consuming to repaint to the color of my choice.

so end up i have to live with whatever color on the wall.

i give example:- my roof turned out pink instead of red, my exterior looks more like white than grey, my dark grey looks purplish.
*
You know what I did? I brought the color charts to my friend's house which is painted in Nippon paint too. I put the chart on several of her walls to compare if there is any difference of its color on the actual wall. I find the chart's colors are just as close as to the actual. Then, I have more confident on my color selection. All my color selections turns out into what I wanted except for one of the interior wall color "hush white" which is off too creamy to my liking. If you notice, there is none of a single earth tone (choco, muddy, cream, beige,yellow) on my walls.

I agreed with jootat that the only slightly-off-abit is the roof color.
I actually went around my neighbor hood to survey the colors others did and I find the following which I personally want to avoid:
1) no red/chocolate or creamy roof to go with gray exterior
2) no purplish white or reddish white on exterior wall (I prefer pure white or white with cream-tone on exterior wall)

Btw, color choices are just too personal and beauty is in the eye of the beholder.

Agreed with jootat too that interior is more important... smile.gif

TSmaxxon
post Apr 18 2014, 11:35 PM

Enthusiast
*****
Senior Member
773 posts

Joined: Dec 2010


QUOTE(canineslave @ Apr 18 2014, 01:54 PM)
Maxxon,

Cheer up, you've done a great job generously sharing your experiences and journey. Some people just always have to have the last say in things. You're the one staying in this house, so to hell with them on their silly remarks. Some people just can't see others being happier.

Continue to focus in making this dream home a reality.
*
Dear Canineslave,

Really thank you for your warm and comforting words.... I sometimes did wonder why is the hack that I'm so keh-poh-chi and so free, updating all details of my reno journey, revealing my privacy to others.... Just for the sake of showing off, I shall better post the final furnished photos and wait for compliments...isn't it better? whistling.gif
Like my hubby said, why should I bother to tell things that I learnt and the best price that I've got, it's not like people will appreciate these...... Only one word lor, keh-poh. hmm.gif

There are a few times that I've got demotivated and thought of to abandon this thread... but i just can not tahan to let it be hanging half way, incomplete without an ending....
So, i will definitely continue my journey and I know the last chapter is near... biggrin.gif

TSmaxxon
post Apr 22 2014, 02:17 PM

Enthusiast
*****
Senior Member
773 posts

Joined: Dec 2010


QUOTE(canineslave @ Apr 19 2014, 12:43 AM)
We'll said, do this for yourself and not others so don't bother what people say. Like I said some ppl just need to have the last say. To show that they know better, they are greater.

I appreciate your generosity in sharing contractor info as well as personal review about him. Will be looking forward to your final journey in this dream home creation.
*
QUOTE(zoe33 @ Apr 19 2014, 03:17 AM)
thanks for being generous in sharing your knowledge and journey of house reno.
your readers (and those who benefit) may be more than you thought of. so will you be uploading any new pics (of anything new) since it is weekend? smile.gif
*
Thanks you guys for following...sorry, have not been updating much lately as there are nothing much at this final phase...will post more pictures later.. wink.gif


TSmaxxon
post Apr 22 2014, 02:38 PM

Enthusiast
*****
Senior Member
773 posts

Joined: Dec 2010


QUOTE(amy_tan @ Apr 19 2014, 01:58 PM)
user posted image

Hi maxxon! Lovely renovation work, thanks for sharing! Would you mind telling how you achieved the rendered cement effect for your bedroom wall and how much it costed you? I read a mention of sand blocks? If its by the contractor could you please share the contact? Many thanks smile.gif
*
Long story regarding the wall actually....
Tried a couple of methods with cement and also plastering material...not successful though. Sometimes with weird patches after it totally dried out...sometimes with 'dusty' surface...sometimes with very fine hairline-crack after dried...
It is easier to get the result on a wooden platform but all kind of surprises will occurs when it dries on a wall after days.... Others may accept the hairline-crack as it is still consider very fine but I do not want it that 'raw' as this is still a bedroom and I afraid I would be regretted it one day.

Thus, I decided to go simpler with San Cora textured wall paint, UNO series. The primer layer is now done but pending the top layer. Will show pics when things done. wink.gif
TSmaxxon
post Apr 22 2014, 06:46 PM

Enthusiast
*****
Senior Member
773 posts

Joined: Dec 2010


I didn't go too 'raw' as yes, it is an in style now, but how if many has starts doing that in their house? I think the trend has got too 'viral' already now as it is seen everywhere in many shops and cafe especially in mall. Sometimes feel jelak already... So, i'm giving myself an option of easy alteration if I want to change the theme in future...it shouldn't involve too much work, just in case I get bored then. As we know, whatever in trend will definitely go 'out-trend' when you can see the same thing everywhere. A commercial retail should follow or lead the trend but i will remain slightly conservative on own residence as we are sure not going to refurbish every 2 years...
As, we have already tried out several methods including the methods that mrgoodgood suggested. I gave up and shall go for the matte textured wall.

Amy,
The lightweight blocks that u asked me in previous post is actually a lightweight brick (bigger piece) that I used to build the partition wall between entrance foyer and living room. Do you intend to use the cement looks tiles for living hall but not bathroom? Would the 2 feet grouts looks nice in a living hall?

This post has been edited by maxxon: Apr 22 2014, 06:52 PM
TSmaxxon
post Apr 22 2014, 07:13 PM

Enthusiast
*****
Senior Member
773 posts

Joined: Dec 2010


Cementum on kitchen is nice... I thought you wanna do cement-like tile in other area like living hall, then it will be a little awkward with those grouts... tongue.gif
TSmaxxon
post Apr 22 2014, 11:23 PM

Enthusiast
*****
Senior Member
773 posts

Joined: Dec 2010


QUOTE(mrgoodgood @ Apr 22 2014, 04:23 PM)
My tiler told me cement will definitely crack. I'm using white cement for my brick wall grouts, and the tiler added in some fine sand to prevent it from cracking. I don't think it can fully prevent cracks though. Also, the finished surface is very rough and raw - probably not what you want.

I read from some other source that you can paint a layer of epoxy paint on top to prevent the surface from producing fine dust as well as cracking. I supposed some research is needed on this.

I thought of doing cement render walls in my house to, but ultimately didn't go through with the plan, as my wife isn't too fond of the 'raw' effects. As a compromise I'm going for cement-looking tiles tongue.gif.

I think San Cora or Nippon Momento paint looks great under the right lighting. Hopefully your painter is up to task and create a random yet consistent pattern. Please do post the final results.
*
I think even if it cracks, yours are still fine coz just on grouts, so it will still looks nice unlike mine previously, a few as long as 800mm crack lines across the wall is really shakehead.gif and it is in a bedroom which it supposed to be 'softer'.... rclxub.gif

Don't forget to show us your feature brickwall, it sure looks stunning. smile.gif
TSmaxxon
post Apr 23 2014, 03:56 PM

Enthusiast
*****
Senior Member
773 posts

Joined: Dec 2010


QUOTE(jesline @ Apr 23 2014, 01:15 PM)
Hi Maxxon,

Can recommend someone doing painting?
Thanks
*
You mean general interior and exterior painting? My main con did that...
TSmaxxon
post Apr 23 2014, 08:36 PM

Enthusiast
*****
Senior Member
773 posts

Joined: Dec 2010


QUOTE(jesline @ Apr 23 2014, 04:57 PM)
I just need someone to do the painting works (interior & exterior).
Tks.
*
Err... but i don't think my main con want to take the job if it's only painting... I'll see if my friend has any contact. Will PM you if i get it.

QUOTE(monkey9926 @ Apr 23 2014, 07:40 PM)
U and Mr goodgood should shake hands. He installed suzuka at living n some cement tile at kitchen. R u his wife????
*
Adui! Laugh die me~ biggrin.gif
TSmaxxon
post Apr 27 2014, 02:47 AM

Enthusiast
*****
Senior Member
773 posts

Joined: Dec 2010


QUOTE(windwong @ Apr 26 2014, 07:46 PM)
BELIEVE IT OR NOT, I SEE YOUR HOUSE COLOUR BEAUTIFUL AND UNIQUE!

Is like a person sitting, wearing red hat, white shirt and grey pants.
In fengshui, it is light on top and heavy at the bottom. it is good! cheers brother!
*
If not mistaken, I think the light on top and otherwise, is more refering to interior ceiling and floor color. Ceiling should be light so that we don't feel pressed, while floor should be darker in color so that we feel more stable and not 'floating'. Feng shui is about science of what's the best environment setting to make us more comfortable (psychologically in particular).

In this case of exterior maybe make us psychologically feel more stable to have the bottom part in darker color and the house is not floating lor...hehehe~ tongue.gif


TSmaxxon
post Apr 27 2014, 02:57 AM

Enthusiast
*****
Senior Member
773 posts

Joined: Dec 2010


QUOTE(deviladrian10 @ Apr 26 2014, 09:16 PM)
» Click to show Spoiler - click again to hide... «


Hi Maxxon, would like to know if you could share with me where you bought the vent blocks at? or its supplied by your main con? I'm currently looking for vent blocks but so far I found one company supplying vent blocks is PBM.

Btw, would also like to know hows the DCMoto 925w working? Coz im deciding on the autogate system and been quote E8 brand for RM1700 and MAG brand for RM2000. Size of my gate should be about 20ft and I'm not sure if the arms and prices depending on the size of the gate too?

Thanks.
*
My vent blocks were supplied by the main con. I dug out the brochure that he let me chose the pattern, it was from CKC. Found their website for your ref: http://choifooksing.blogspot.com

I'm very happy with my autogate DCMoto925w thus far. They are working perfectly fine. My gate is around 15', not sure what's the max length/weight it can handle. You may want to check with the vendor.

This post has been edited by maxxon: May 1 2014, 03:32 AM

23 Pages « < 17 18 19 20 21 > » Top
 

Change to:
| Lo-Fi Version
0.0376sec    0.55    7 queries    GZIP Disabled
Time is now: 3rd December 2025 - 01:42 AM