

 Feb 9 2013, 02:23 AM, updated 13y ago

With the Arcam amplifier restoration nearing completion, I took a look at the Tannoy Mercury M2's that came with the amp. Now these speakers aren't as old as the amp and were bought to replace a pair of Mission speakers that the owner's younger brother took. But like the Arcam, they were stored in a damp apartment and had not been used for a number of years.
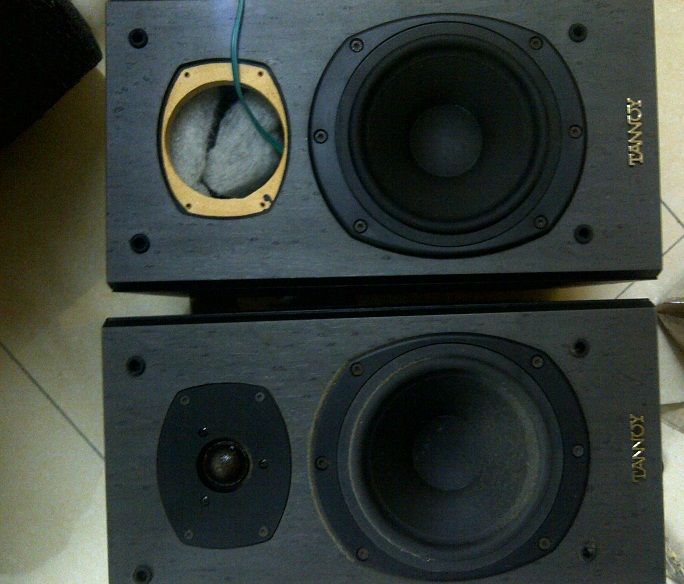
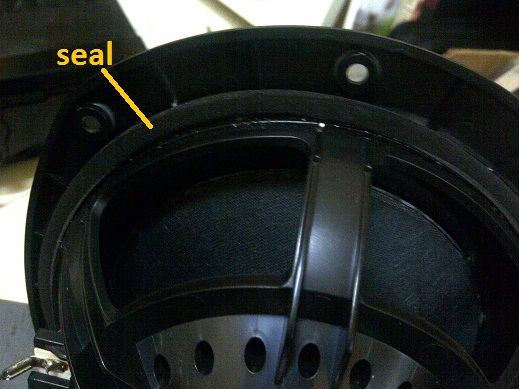
As you can imagine, dust had set in and at first, the surface dust was vacuumed off. Next I removed the drivers and the binding posts at the rear of the cabinet. Make a note about which cable goes to which driver and the positive and negative terminals before removing the cables from the drivers. The crossover is built into this unit so things came off pretty easily. A quick check showed that the woofers were still in good condition. They were still flexible. The rubber edges had not turned brittle or dried and the seal at the rear was still in good condition. They also tested ok with a multimeter.
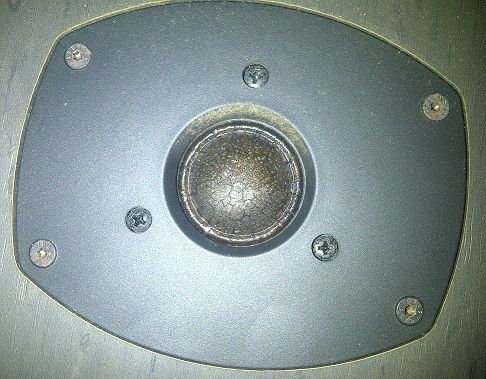
The tweeters however were a different story. There was a film of oil on and around the dome. As if the tweeter was leaking oil. This is actually ferrofluid. You can read about ferrofluid here: Ferrofluid Wikipedia Page
As ferrofluid is important in damping and cooling the tweeters and the tweeters dome is damaged from the leak, I've decided to leave the units out and look for new ones. Will have to wait till after CNY for the price and to check with the owner if its ok and then we'll either go ahead and replace them or reuse the old ones somehow.
I cleaned the cabinet with a damp cloth, wiping away the dust and what looked like some sort of moisture. Some places had to be scrubbed a bit hard for the fake wood grain to look good again. Will use a pvc cleaner or wood shine to bring the cabinets back to life. Overall the cabinets are actually in alright condition. There were some bugs but drying them out in the sun took care of that.
Reassembly
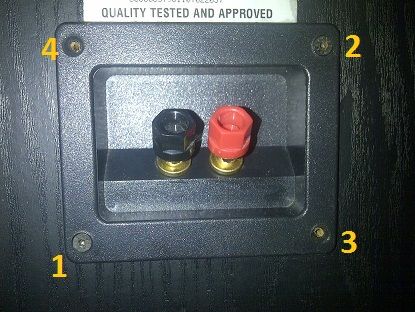
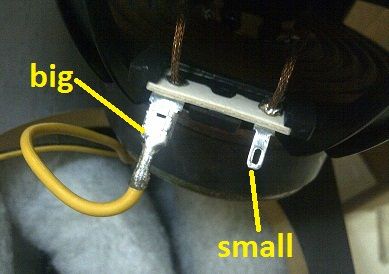
After checking the crossover and making sure all components were still within tolerance, I cleaned the binding posts gold plated contacts with contact cleaner. This brought back a shine to them. I then proceeded to install the binding posts back into the cabinet. Making sure which cables go to which driver was simple as the crossover board had one cable marked with a "T" (tweeter) and one marked with a "W" (woofer). So guide the cables to the respective holes at the front of the cabinet and then tighten the screws of the binding post box. There are four screws and ideally you want a good seal as the speaker tends to push air and you only want air escaping from the ports if your speaker has any. Below I've marked in the picture on how to tighten the screws in order. Kinda like changing the tire of a car. If you tighten the top screws first and then the bottom, you risk leaving a gap in the middle of the box or even worse, breaking the plastic casing the binding posts are in.
Next I installed the woofer back. Reinstall the cable. With speakers, chances are you'll either see a red dot or the + and - symbols on the speaker and the red cable goes to + and black to -. Of course the colors can be different so to be safe, always mark your cables before removing. With the Tannoy's the positive terminal and negative terminal are different sizes so its almost impossible to get them wrong.
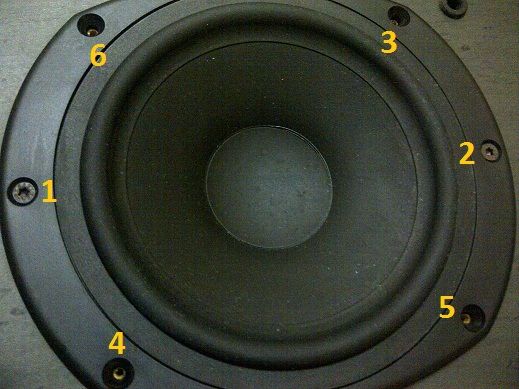
The Tannoy woofer has 6 screws and I tightened them in a cross pattern to ensure a good seal. Don't tighten the screws at first, make sure all the screws go in smoothly, if you tighten 1 or 2 screws, the speaker's screw holes might not be aligned with the cabinet and there's a risk of damaging the cabinet by tightening a misaligned screw. So make sure all screws can be turned easily and once they're all in, tighten as in the pattern shown below. Don't overtighten the screws as you can break the thread in the cabinet and a loose screw in a speaker isn't a good thing unless you like rattling or other weird sounds

Now just have to do the other unit and wait for the tweeters. I will suggest replacing these tweeters as they did sound kinda soft on initial tests when I first got the speakers and the damage to the dome and leaking ferrofluid is cause for concern. Speakers need to be used and cleaned from time to time. Rubbers dry up, contacts get dirty and tweeters, well, you can see what happened to these. Refilling the tweeters is an option but ferrofluid for speakers is generally expensive and buying some just to do two tweeters isn't gonna be cost effective. And you can't use just any ferrofluid you can find, you gotta use the correct type for speakers.
Anyway, that's about it for now. Most equipment can be given a 2nd shot at life. So don't throw away that old 80'set your dad stored away, bring it out. Restore it and enjoy it. It might surprise you how good it actually is.

Cheers!
This post has been edited by Black Octagon: Feb 9 2013, 02:28 AM
 Quote
Quote
 0.0139sec
 0.44
0.44
 5 queries
 GZIP Disabled