

 Oct 8 2012, 04:19 AM, updated 14y ago

Started out with 1" by 1" steel hollow tube. Had to cut into dimensions. First time used a cutoff


Then got some goodies all the way from Malaysia. Waited so long and had to make so many arrangements to get all of them here to Maldives.

Started my first sleeving job. Thought it was going to be really hard. But all i needed were some big staples, scissor and a lighter. (The sleeving was from toppazatale. Thnx alot for the great sleeves)


Heres the first of my 6pin and 8pin extension cables

A close up view of the sleeving.

24pin extension cable also done. (going to get all black connectors later)

Got another surprise from Malaysia. UV reactive acrylic sheets. Thanx Niclasteoh for the great packaging. Items were in excellent condition. The sheets when not under UV look almost 100% transparent. No colour at all.

But when put under UV light BAM!! let there be light!!. First UV source that i had my hand on was the money tester :S.

Started the wood work. First time doing anything like this. So at first the cuts were all over the place.

Got my brother to help out with some of the work.

The cut outs for the casing backpanel and for the cable routing

Finally got the thing mounted on the wall. It looks HUUUGE! (5ft long, 2ft wide)

Started laying out the foam padding so that i could easily route the cable underneath them. Was really worried about static charge


Finally got the motherboard tray cut from the UV reactive Acrylic sheet. Cut slots for the 24pin, 6pin power connectors. Also cut a slot for the sata data cables. Didnt want to ruin the plastic by removing the safety paper from plastic until everything was in order

Wanted to find a way to mount the hard disks inside the desk and came up with this idea. Had some extra hard disks to check the dimensions for the spacing of the hard disks and also the mounting holes.

Tested the plastic under a UV light. Looks pretty good. The cut pieces arent the final pieces. They are just for testing.

Got some cables in. The sata data cables were a pain to sort out.

Got the sata data extension cables (1m cables).

Didnt like how the foam padding looked since it didnt look even. So found some black plastic sheets and used them to lay on the foam padding.

Layed out the sheets in the desk. Now it looked even and level.

Started assembling the watercooling components. Wanted to check the shortest routing for the hoses. (Thnx to Jibek for the watercooling components)

Got the water block on the gfx card (570GTX). first time disassembling a graphics card. Was a pretty intense experience.

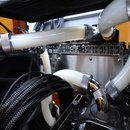
Got the cables and waterblocks sorted out. Looks pretty good. and yes i know i forgot about the black ring like thing on the CPU water block.

Now am waiting for the arrival of a few fittings from EK. have to wait 18 days till they arrive.

Added on October 8, 2012, 4:37 amwhen finished the box will be painted black. the painting will be done after the system is fully assembled and up n running.
This post has been edited by muhymin: Oct 8 2012, 03:38 PM
 Quote
Quote


 regarding drainage... u could mount reservoir vertically (bitspower water tank if i not mistaken) and use its bottom plug next to pump intake for drainage.. use its top port for refilling... this method also for efficiently eliminates water bubble.. should make everything a lot easier
 0.0282sec
 1.09
1.09
 6 queries
 GZIP Disabled