----------------------------------------------------------------------------------------------------------------------------------------------------------------------------------------------------------------------------------------------------------------------
This is my guide on being a tactician. And just for your info, being a tactician requires thinking instead of the normal rush and kill or hide and kill. It requires stealth too, it’s one of the key components to being a good tactician. Well, read on….
What is a tactician Basically a tactician is a person with the skills of commanding. He no the ‘Boss’ in the team rather he is the advisor. If his team mates cannot follow him, thus he will not be a successful tactician. A tactician is a person that is able if read the opposites movements. The key components to being a good tactician is stealth, instinct and a witty mind. It’s easy to say that if you have all these 3 you can already be a tactician but the truth is you still need a lot of experience. Just reading this guide won’t instantly change you into a tactician. What I’m explaining here is my experiences and my theories.
A tactician is like a person figuring out a Rubiks Cube. You know there is a formula to finish the Rubiks Cube. In SA, a tactician is a person predicting enemy movement. The reason why enemy movement is predictable is because of human errors. People tend to repeat a certain strategy most of the times so their movement is predictable. You must know that AI has it’s limits and some human’s minds acts like that. They repeat and repeat until they truly learn their lessons. And it’s another round of thinking after they really do learn their lessons.
Also, Tacticians also have to sacrifice their lives sometimes, at the beginning of the game. Not many people like this profession because their K/D tends to decrease a lot. So usually tacticians play in mission maps only. However after the first 2 rounds, the tactician must die the last. I will explain this in the next section.
The basic nature of a tacticianThe basic thing about tacticians is that their kinda boring. Though if you like to think SA as a chessboard then it can be fun. A tactician is supposed to hide majority of the time. Why, that’s because they have and they HAVE to die last to command the team. However in the first few rounds you must die early. The reason is to check up on your opponents movements. In this 2 round you must answer these questions. Which ones are the campers? who are the rushers? How many campers are there? How many rushers are there? How many riflers are there? How many snipers are there? Where are the snipers? In which direction do the rushes intersect through? Do the sniper change places? These are the basic questions a red team and blue team tactician have to face.
There are other questions but they split between blue and red. Such as in the red team ‘Who are the people guarding A site and B site? How many riflers and snipers are there is each base? How many of them will come look for us instead of guarding the bomb sites?’ All these are for red team. For blue team however would be ‘From which direction they usually come from. How many enemies will head to B site and how many will head to A site? After planting the bomb where do they hide?’ Usually that what the blue team faces.
Also, a tactician is usually the guy who takes out the 1st, 2nd or 3rd ranked guy in the other team, by looking at their movement and then hiding at a good spot to Back Shoot them. That’s why prediction is the essence of making a plan.
A tactician also makes heavy use of the radar to sniff out enemy sentries. But you must know your North and South well. Because there is nothing on the map but your team mates and you in the middle. If there were a small map as in a pathways and what not, it would be easier. Usually you must refer to the commands your buddies give you to see out the enemy. Such as ‘Enemy spotted’ then ‘B site’ This shows you there are enemies there. Or ‘B site’ then ‘Area clear’. That means that B site has no enemies. But rather, if he says that and then gets killed this shows there is an enemy hiding there. So you should be more careful when moving in the area.
You must be a fast typer also, so that you can send messages to your mates quickly. The faster the better. It will sometimes save their lives. Or sometimes just give out commands like ‘Enemy Spotted’ ‘B site!’. It will clearly show him that he must be on his guard when walking in that area or rather so that he does not go to that area.
Also, you need to have a cense of equality. When you spot a sniper, ask another sniper to shoot that guy down, don’t ask a rifler to shoot him down, it’s soo obvious that rifler will be a goner…..
Requirements to be a tacticianI’ll just write this is point form.
Requirements:
-Patience
-Stealth abilities
-Good commanding abilities.
-Improvising abilities
-Fast getaway tricks
-Fast typing skills
-An understanding of overcoming your enemy
-A sence of equality
-A good understanding of the radar.
-common sense
-A winning caption (Just kidding XD)
The pros and cons of a tacticianI’ll also write this in point form
Pros:
-You get to survive through the whole round.
-You’ll get the command a whole team
- It’s fun because it’s like chess? (jkjk….)
-You get the glory (Sometimes….)
Cons:
-You’ll have to throw away your ‘Rushing’ ability if you do have and change to camping.
-It’ll be a bit more boring, since it’s a game of mind.
-You’ll have to sacrifice heavy guns because they make too much noise (Your Choice)
-You will be criticized if your plan doesn’t work (Sometimes….)
Skills of a tacticianSubtitles:
- Basic knowledge of a tactician
- Using the radar + Enemy movement prediction
- The uses of a tactician’s skill in the game
- Understanding the laws of stealth
- Basic tactician equip
- Standard procedures of a tactician
Basic knowledge of a tacticianBasically this is a summary of the 4 topics above. I’ll write this is point form. If you didn’t read the long essays up there, then read this. If you have, then skip this section. I still recommend you to read this however, because there are other things I needed to add.
-You must have stealth. That means…HIDE!!!!!
-Use the radar to your fullest capability
-Answer all the questions in ‘The basic nature of a tactician’ when in game.
-Know your enemy’s whereabouts, their regular routes.
-Go ‘Solo’ sometimes.
-Have a quick get away trick
-Use a less noisy gun so that you don’t attract much attention.
-Get all the requirements in ‘requirements to be a tactician’
-Try to stay out of enemies sights.
-Always equip main weapon (Unless you use a sniper, you’ll have to change to a hand gun)
-Use the walk and crouch button intensively to minimize your footsteps to be heard.
-Improvise on hiding. Use a wall, a container, anything! Remember everything that hides you is your friend.
-You must remember, time is of the essence. You must move quickly but silently to stay out of your enemy’s sight. As a tactician, avoid combat. Unless it’s a BS, Cause you’ll definitely get a free kill.
-Try to trick your enemies to get a free kill, a tactician usually gets a lot of BS because he is constantly hiding.
Using the radarThe radar is your best friend as your tactician. Why? It tells you everything. However, you must know the radar well, it’s North and South poles tells you everything actually. You just don’t notice. You have to visualize the map in your mind and then place it in the radar. So you’re making your own map on the radar. Once, one of your mates dies, quickly check your radar and look at what weapon was used to kill him. If it was a sniper you know the possibility of getting shot from far away is high. If it was a rifle, the possibility of it being a close range shot is higher. With this, try to estimate the position of your enemy. Okay, let me give you a scenario.
------------------------------------------------------------------------------------------------------------
Scenario 1:
Your radar shows you the North pole which is on the top and the south pole on the bottom. You base in on the South pole while the enemies base in on the North. A teammate near the North Pole gets shot and is defeated. The enemy is using a rifle.
This most likely means that the enemy is camping. It gives you a rough idea that they are playing a game of time. You can plan your strategy of how to guard your base from there. Just from a few defeats and you can know where your enemy is and what strategy are they playing at.
------------------------------------------------------------------------------------------------------------
Now we go to the next part. The radar also can tell you where your enemy is going or is at. Such as B site or A site in a bomb match. See the pattern of how your team mates are being defeated and you will know. Here is the next scenario.
------------------------------------------------------------------------------------------------------------
Scenario 2:
Your radar show A site and B site. 2 people are in A, 2 people are in B and 3 people are going to enemy territory/rushing. The 2 people in B site are defeated. One is killed by a rifle and one is killed by a sniper.
In this scenario, it’s clear that the enemy is in B site. But 1 is being killed by a sniper. This map is most probably 3rd supply base, because 1 group of people should be rushing to be site while the snipers are sniping from far away. You can inform your mates to go around and kill the snipers first and then take care of the riflers
------------------------------------------------------------------------------------------------------------
Okay. Now the most important function of the radar. Look at the commands your mates give and look at the radar to see who is giving the commands. Such as ‘B site’ ‘Enemy Spotted’. It’s obvious the enemy is there. Unless that guy was making some stupid joke.
I won’t give a scenario for this one cause it’s clear cut.
The uses of a tactician’s skill in the gameIt’s rather simple, you are the guy who hides all the time and let’s other people do all the work for you. Easy, but be aware. This is also something bad. If you’re all for EXP it’s fine, however if you’re here for K/D it’s a different story. Your kill will definitely be lower than your death. The reason, You don’t move so people can shoot you easily. However, if you’re fast on your fingers you can shoot them back or even defeat the. I propose trying to hone the skills of HS. It’ll serve a far greater perpouse in the survival of a tactician.
Usually a tactician earns more money and a little less EXP however it’s also almost as same as a guy who rushes and gets defeated. It’s all easy going for the tactician actually, it’s like a security guard monitoring camera’s and when it’s time to go, you go!
Also, a tactician must be fast on their feet too. If you’re a full time tactician, it’s best that you carry light weapon with a high accuracy, low gun sound and extremely light. And usually in a full time gun battle the tactician is the guy who gets away first. Because he’s the fastest in the team(Unless you’re carrying a heavy weapon). Remember, a tactician must live to the end because he needs to constantly monitor the enemies whereabouts.
Your team mates depend on you to give them direction and for info on the enemy and their tactics so you must live to the end.
Just incase you’re wondering why a tactician like a scaredy cat. The reason is he needs to live to the end and besides that he's carrying a light gun with low damage in a gun battle. It’s obvious he can’t win!
Understanding the laws of stealth
As I have said about 5 times already, stealth is very important. I won’t go around blabarring why already cause it’s down right boring. I’ll get straight to the ‘How to use stealth to your advantage part’.
The theory of sight comes into play here. If you can’t see your enemy they can’t see you. But if your rifle’s end is too long, you’ll get spotted easily cause it can chuck out of the wall blocking you. The trick here is to wait until your enemy comes. Usually an enemy runs all around the map unless they know that somebody is hiding somewhere. If you go to your hiding spot at the beginning of the round, most likely your enemy will run around the map throughout the round. Usually that’s the case, so you can hear foot steps of your enemy coming, unless they are extra careful.
In the red team, this tech in not really useful cause the red team is the one who plants the bomb. In the red team, to make stealth to your advantage you must move around the map a lot. As in using the long way to get to a bomb site so that you can BS your enemies. Also, what stealth can do in the red team is pretty amazing too, one of the techniques I like to use is going ‘Solo’. For the first 2 to 3 round just follow your team wherever they go. Soon the enemy will know your tracks. After that, go solo. As in, your whole team goes to B site. However, you go to A site. With this it’s easy to say that there are less enemy sentries there about 1-2. But you can defeat them easily if you use stealth to BS. Since you’re the fastest moving character, you should always walk. To reduce footsteps in maps. Always try to run for cover and wait to see if you hear any footsteps. If there is none just go ahead and find your next cover. It’s like tactical espionage. The tactician usually can plant the bomb this way. However inform your team first and bring 1 person along with you, just in case anything happens.
Always improvise on things that can block you, cupboard, trash bins, walls and anything else that is big to fit you in.
Team AssemblyI this section I will list out what I highly recommend you to gather as a tactician in a team. In each team, there is the camper, the rusher, the sniper and Mr. 1 hit KO man. Basically, a team needs to be strategic. Remember, each map, no matter how different it is must always have each of these people. Without it, winning will be hard. Even if you are in airport, thogh it is a sniper match, I believe if a rifler and a sniper gets into battle, the winner would be the rifler. Now let's get started.
8-8 Round
Blue team
Team type 1 : Defend/Camper
-2 shot gunners :This person should be placed at an enterance such as a door. But not a huge door, just a small one, to make it more accurate
-4 riflers :I believe they are the ones that has the upper hand when fighting close combat with a sniper. I recommend both of them to be put in bomb sites.
-2 sniper:This is essential, snipers are the people who clear the path in the long distance area. In order to use these people to the fullest I recommend them to be either put in somewhere high.
Team type 2: Defend/Camper
-2 TRG quickzoom users: Place them near doors
-2 snipers: Place them in high positions.
-4 riflers: In this case, the riflers have to guard all bomb sites, so 2 in B site and 2 in A site too.
Team type 3: Defend/Camper
-4 Uar/G36K users: Place them as snipers. They are useful at near range and long range combat.
-4 riflers: Place them at bomb sites.
Team type 4: Offend/Rush
-8 riflers: Make sure 2 stay in each bomb site. The other 4 go strong head on with the opposing team.
Red team
Team type 1: Offend/Rush
-2 snipers: They are the support from behind. Riflers will go in strong ahead. These sniper when placed behind of them give them extra support, especially TRG users
-6 riflers: They are all Rushers. Place them in front.
Team type 2: Defense/Rush (I call it: Turtle shell offence)
-8 riflers: 4 constantly moving in front, 2 constantly watching the back and 2 watching from the sides.
Team type 3: Defense/Rush
-2 shot gunners: Important after bomb is planted.
-2 snipers: shoot down all far ranged enemies
-4 riflers: Go ahead strong to nail down a bomb site.
Team type 1 E.N.D: Defense/Camper
-2 sniper: high places where the bomb is visible.
-6 riflers: guarding bomb sites at hard to see places. Must be close to bomb. Also, at the starting try to nail down the bomb site fast.
Team type 2 E.N.D: Defense/Camper
-8 riflers: Everyone must guard the area. Place about 2-4 at hard to see places. After the remaining has lost, these 2-4 must come out and attack.
Team type 3 E.N.D: Defence/Camper
-2 shot gunners: Guard all doors.
-2 snipers: Try to get to high places where bomb is visible
-4 riflers: Guard bomb site if shot gunners fail to guard the doors.
4-4 Round
Blue Team
Team type 1: Defensive/Camper
-3 riflers: All guard 1 bomb site. Rush after bomb has planted.
-1 snipers: Shoot down any enemy in far range. Also guard in same bomb site.
Team type 2: Defensive/Camper
-4 riflers: All guard bomb site. Split 2 to 2.
Team type 3: Defensive/Camper
-2 riflers: Split 1 to 1 to guard bomb site.
-2 TRG quickzoomers: Guard bomb site from above or at hiding spots.
Red team
Team type 1: Defensive/Rush
4 riflers: frontal attack, move over to next bomb site if attacked.
Team type 2: Offensive/Rush
-3 riflers: Frontal attack
-1 sniper: Back support.
Team type 1 E.N.D: Defensive/Camper
-4 riflers: 1 constantly guarding. 2 hiding at doors. 1 hiding near bomb site unseen.
Team type 2 E.N.D: Defensive/Camper
3 riflers: Hiding near by
1 sniper: Hiding at a spot that has 75%-100% visual sight of the bomb.
[B]Basic tactician equip
I will recommend some items for the average tactician which I have found useful. the stars show how highly rated are they. 10 are the maximum.
Main weapons:
M4A1 Carbine (******* 7/10)
Damage:32
Firing Rate:82
Accuracy:87
Recoil :54
Ammo:30/120
Info: Quite a good gun, but it produces too much noise
K2 (****** 6/10)
Damage:32
Firing Rate:82
Accuracy:87
Recoil :64
Ammo:30/120
Info: Overall quite good, but recoil is too high and the sound is loud.
MP5 (********* 9/10)
Damage:20
Firing Rate:86
Accuracy:87
Recoil :35
Ammo:30/150
Info: Very good, my best recommendation. It’s just that the damage is low. But it’s great for HS
UAR (****** 6/10)
Damage:32
Firing Rate:82
Accuracy:99
Recoil :64
Ammo:30/120
Info: It’s too loud, it’s more for defence actually. And it’s scope can be used to see enemies from afar.
Scout SR-69 (******** 8/10)
Damage: 85
Firing Rate:0
Accuracy:100
Recoil:45
Ammo:10/60
Info: It’s light, the sound is quite soft too. It’s good for a 1 person BS, but if one group comes, it’s bad.
Pistol
C.USP(******** 8/10)
Damage:19
Firing Rate:80
Accuracy:67
Recoil :27
Ammo:12/48
Info: It doesn’t cost a cent and it’s firing rate is high. Good for a tactician
Bombs
G400 Grenade (****** 6/10)
Damage:100
Firing Rate:0
Accuracy:0
Recoil :0
Ammo:1
Info: Personally, I don’t like this. Because it never hits.
F401 Flash Bang (***** 5/10)
Damage:0
Firing Rate:0
Accuracy:0
Recoil :0
Ammo:2
Info:I don’t really like flash bangs. It doesn’t really help much
S402 Smoke Grenade (******** 8/10)
Damage:0
Firing Rate:0
Accuracy:0
Recoil :0
Ammo:1
Info:I like this better, you can make a hasty getaway with this. It’s also easier to defuse bombs if you throw this
Standard procedures of a tacticianOkay here are some normal procedures for a person who doesn’t have strong weapons. Like tacticians
Number 1, BS enemy using sound
If you see an enemy not far away, randomly shoot around him. The hide behind something. The sound of the weapon will make him turn behind and look. He might go after you. Make sure you do not reload. If you’re hiding behind a trash can of something, most likely he won’t check. He will think you just came out from a door. Because your low sound weapon will make that effect. After he walks pass the thing you’re hiding behind, BS him and quick.
Number 2, Get away from a 1 or a group of enemies.
Try to run to a 2 way junction. Quickly throw a smoke bomb there. Hide in the smoke. The enemy will choose one way and he well go wither right or left. After he is gone, make a quick get away by going back where you came from.
Number 3, Always look around
If you are in a sniper match, look around the whole map at one glace, quickly. Then go back into hiding, repeat this a few times and then locate the enemy sentries. Ask your sniper friends to go shoot them down giving them exact location. Start shooting at enemy to get he’s attention, then let him spot you for a while. Go into hiding. Ask your friend use the other way to shoot him. Then rinse and repeat.
Number 4, Go Solo
After the 2nd or 3rd round. try to go solo once in a mission map. Take a buddy with you. But from the 1st to 3rd round repeat your pattern. Make your opponents think you only know that route. Later, take 1 of your mates and go to another site. make sure the rest of your team uses the usual road. This will trick the enemy, they'll kill all of them, and before they can even finish plant the bomb. Ask your other mates to try to stall the enemies too. This is only applicable for red team.
PsychologyThis part is a special part where I will be showing you the most effective way of trying to get more BS and end up winning the game. Basically, before we move on to each map, you must try to understand the laws of psychology.
Trail and error is one of the most effective way for a human to think. But this rule does not apply for people who think outside the box(Tacticians). Basically a 1st time thing can always happened a 2nd time and even a 3rd time. But this is one simple question, will it happen the fourth? This question can be answered in SA if we take in all the probable actions. These questions are for the blue team to answer.
- Hiding spots terrain
- Visibility of planted bomb
- How it can be changed into numbers
Basically, in this part, you have to understand ratio 1:2, 2:1, that kind of stuff. For example in 3rd supply base there are 3 hiding spots for my guide. Let's take an example, there are 5 matches and the hiding spots are arrange like this:
Entrance of A site : A site behind containers : A-B connective tunnel
Basically, to decipher this, we have to take distance, walking time and also visibility into hold. Because A-B connective tunnel is harder to get to and there are 5 rounds, the chance of that happening in normal circumstances is for me, is put as 1/5. On the other hand A site behind containers is also quite easy to get to so I would put that as 3/5. And finally the entrance of A site, though it is near, visibility is actually quite good. Seeing you there is very easy once the enmy spots you, they can walk past the first time and get shot and the rest of the times they would always check. So in this case the ratio for Entrance of A site : A site behind containers : A-B connective tunnel-is 1:3:1
his means that checking behind the containers is important. However, you must also know the fact that the person you are playing with is a human and can think just like you with this knowledge. So it is up to you to see their pattern of movement to conclude their hiding spots in every match.
Now for the red team, these are the questions they have to answer.
-Hiding spot terrain
-Vision of bomb site
-How to change it into numbers.
These are the usual factors. Once more you have to account for distance, walking time and also visibility. But there is one more thing. Match time. If 1 minit has passed, you should understand that the enemy could have changed his position and place. It's only normal for a person to be not patient, So if A site had 1 rifler, the possibility of him gone is actually increased. So that means no one is guarding A, however there is also a possibility that there is a person there. Now you have to account for the following things here.
-How many matches has the person been there for
-does he ever move before the bomb is planted
-What is his K/D
Basically now, if the person has been there alot of matches, the probability of him staying there is increased. Also, if he is not there sometimes, the probability of him being there before the bomb is planted in decreased. If he has had alot of kills there, the probability of him there would be increased. In this case, you can see that the percentage of him being there after 1 minuite is about 66.66666% or so. If you take a calculator to check you can get that number. So that means that the chance of him being there is actually higher than that of the average camper. That means if you want to break through the walls of his defense bring alot of people there about 3 to 4, let the rest distract the people at B site.
Now on to the maps and the strategic points.
Deduction Techniques (Newly Added!)
I believe deduction techniques are the least used in SA. I hardly ever see people deduct from a the positioning of your dead buddy. In this part I will teach you the skill of instant autopsy (Used in SA only...obviously)
Now, when was the last time you walked through a path and suddenly see your dead comrade and think 'The enemy is nearby'. When seeing this situation, you will scan the perimeter for enemies. However sometimes your search turns oblivious and you don't see anyone.
In this part I will teach you how to track an enemy and deduce his/her position.
The very fact of deducing a dead person is not very simple. You need to look at a few signs when deducing, it is this:
-Position of Body
-The terrain of the map
-The positioning of the particular area in the radius of about 10 meters
-Your buddies gun
After seeing all these fact's turn and ask yourself these questions:
-How is the position of the body?
-Are there any low areas, high areas, ladders?
-How many of exit points are there to the area?
-Is your buddy's gun the same as before or has it been swapped?
These are the things you need to look out for. Body position will tell you great details of how he lost his life in combat. I will be posting some pictures of the positions of bodies in different circumstances later.
Now, why is it soo important? if your buddy was hit on the leg, there will be a definate body position. Getting shot in the leg could mean 2 things and I will explain below.
Getting Shot In The Leg:
-Proves that enemy was either walking on the same level or at a lower level than your friend
-Proves that enemy could not have shot from a high position
Getting Shot In The Hand:
-Proves that enemy encountered victim at a side position.
-Proves that enemy could not have been walking face to face or come from behind.
Getting Shot In The Body:
-Proves enemy encountered victim face to face
-Proves enemy could have gotten some damage
-Proves enemy is moving in in the opposite direction of the victim
-Proves enemy could be reloading in a covered area (If any)
Getting Shot In The Back:
-Proves Enemy was either in a blank spot and still waiting or was following silently behind
-Proves enemy did not get any damage
-Proves enemy is moving in the same direction of the victim
-Proves enemy still has large amount of bullets left
Getting Shot In The Head In Front:
-Proves enemy encountered victim face to face
-Proves enemy could be shooting at a high area or same area as victim
-Proves enemy is moving in the opposite direction of the victim or could be in hiding waiting for the next victim
-Proves enemy could be reloading
-Proves enemy could have suffered damage
Getting Shot In The Head Behind:
-Proves enemy did not encounter victim face to face
-Proves enemy could be shooting at a high area of same area as victim
-Proves enemy is moving in the same direction as the victim or could be hiding in wait for the next victim.
-Proves enemy has a large amountof bullets left
-Proves enemy should not have suffered any damage
Please note: most of the time enemies will head towards the direction they originally planned to so the body position tells you which direction the enemy is walking towards. Exit points are probability. Let's say there are 3, you entered through one, so that makes life easier knowing the enemy could only have travelled either 2 ways OR is still in the area hiding.
If your buddies gun is swapped it could mean 2 things, the enemy ran out of bullets or he is more experienced with that gun. Pick up and see the amount and throw it again and repick your gun. If there are little bullets left it could mean he is using a gun he is not so experienced with, if he has tons of bullets left, it means he has a better gun so be careful.
I will post pics on body position soon, I hope this helps you!
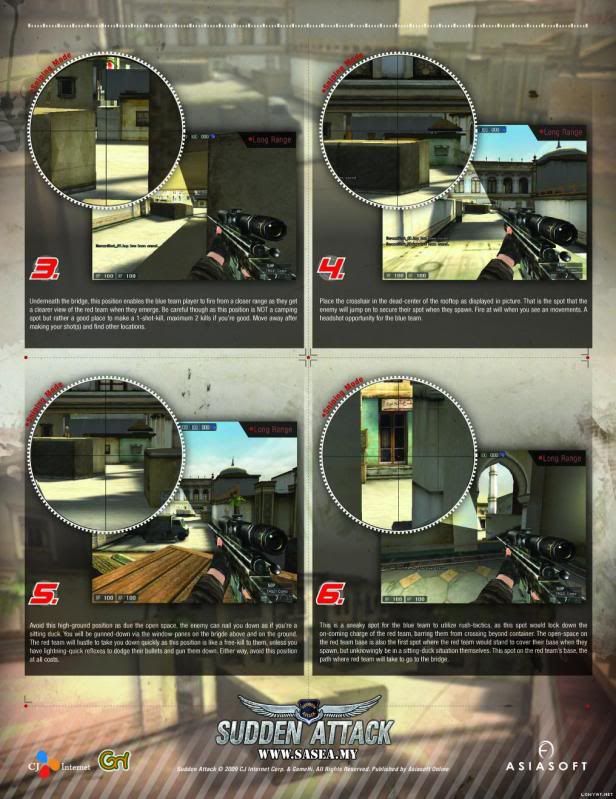
Maps and strategic points3rd Supply Base
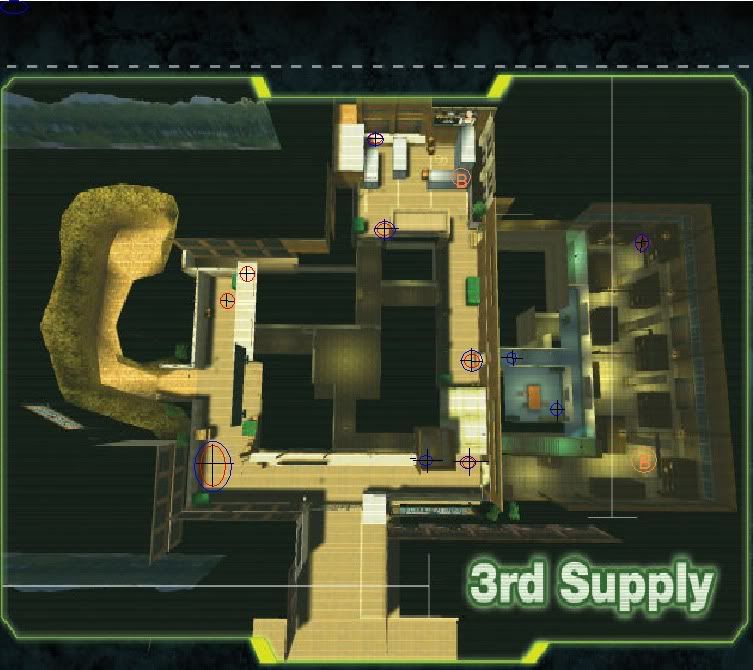
It's quite simple. All of the crosshairs below shows where red or blue team can hide and also where to plant the bombs.
Basically you can see my bombs are located at extremely noticable and can be easily reached. But there is a reason. As you can see for A site, my recomended bomb site is up there on top of the containers. Basically, this method is to stall enemies for a period of about 4-6 seconds at most. 4-6 seconds is a really long time already considered they have no flaws jumping up there. If they fall, they will have to climb up again taking a longer time. I recommend you to stall the people instead going 1 on 1 with them. Since I am an mp5 user, my attack power is not strong so I use this tech alot. Time is your friend remember, sometimes your gun can be your worst enemy.
Next is B site. As you can see B site is in the middle. Why? Quite simple. Easy for you to see and shoot. No matter if you are using a rifle or a sniper rifle, you will be able to see the red flashing light as long as you use burst fire mode or randomly shoot the place your enemy will try not to diffuse the bomb instead he will try shooting you, which means you get to stall time. Basically if it is a sniper try to shoot a few bullets then hide. They will definately come look for you and if you hear them diffusing, shoot a few more bullets and he'll get distracted, do not and DO NOT try to go 1 on 1 with a sniper. What ever you do, that is one of the worst possible movements. If the guy is holding any sniper whether he can quick zoom or not, do not go near him, even if he shoots blindly he might be able to shoot you too. Try distracting the sniper, if he comes after you, the chances of you getting to defeat him first is increased.
Okay, now at the arrow points. I'll start with red team.
After planting the bomb, choose the three locations at B. 1 is at the 1st entry point of A, behind the crate at A, and also the B and A back door connecting point. These three places are strategic. because the 1st and 2nd positions are BS points. Your chances of BSing is increased here unless your enemy checks. The 3rd position is basically for playing time, just shoot blind shots and squat far about 4-5 seconds after per round of shots. He will get distracted and eventually at the 7-8 second, he will try to diffuse it. Try to get as many accurate shots as possible to the body using burst fire mode, an AK-47 here would be useful. But you will have to shoot at a faster rate with a low fire power to get it done with.
For B site, after bomb is planted, hide at the places closest to B site, the corner outside of B site, Do not hide behind the box! DO NOT HIDE! Enemy sentries always check there! Basically hide here of at the end of B long. Like earlier, shoot random rounds to distract the enemy, make as much noise as possible and make sure he is shooting back, remember to get cover cause an Ak-47 bullet can cause quite some damage. Doing this will make the enemy come after you. This method works when there is 1 or 2 enemies left. doing this with 3 enemies might not work. If there is 3 however and 1 is defusing the bomb, try to shoot him and give him as much damage as possible. The more damage you give the higher the chance he will stop defusing the bomb. However this is after planting the bomb.
If you want to be at a defensive position, you can hide at any of the points which have a red circle. These are hiding spots which are good for BSing people. I recommend some Rushers situated at A-B connective tunnel. If there are 3-4 enemies and they start to diffuse ask them to go in for them. With this, the riflers will be busy, try to take down the guy diffusing the bomb then.
Now turn your attention to blue team.
In blue team, I highly recommend you stay in the office at the end point of it. Stay out of enemy sights at all costs. Because if the bomb is planted at B, you play a vital role in looking out for your other team mates.
Basically, if you are blue, you should check all of the red team points above before defusing the bomb.
In the defensive manuver, majority of these points are pretty strategic. If you want to BS at least 2-3 I would recommend hiding behind the wall down the stairs and the 1st entrance to A site. Enemies walk blindly there, not many check. If one of you is hiding there, station another one of your team mates to stay behind the containers at A site too. If you get shot first, they won't check behind the crates, if your friend gets shot first, they won't check the entrance somehow that's how it works. I would recommend 1 sniper and 1 rifler at the back door of the A-B connecting tunnel. The rest should be stationed up-stairs in the office and at the window. 1 should be down the stairs and if possible try to sneak a sniper over to B long.
Dragon Road
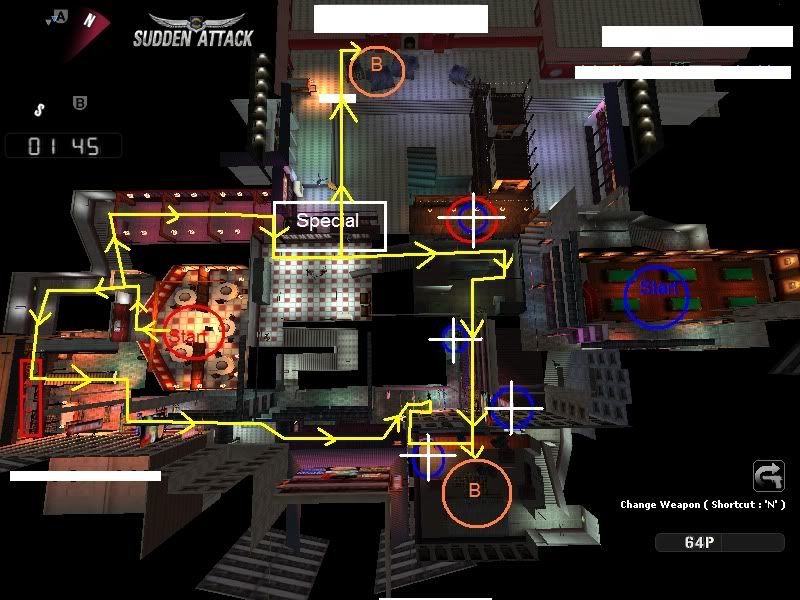
Now this map has something wrong let me just tell you this first. I don't know how the game designers thought of this map, but no matter how I look at it, it's just very weird. Take a look at my strategy for a minuite.
Now as you can see in this image, only read team moves out. (Please note also, red team is the yellow line cause the map is dark and using red would make it unclear) Now the problem here is what about blue team? Wierd huh? No matter how many time I look at this map from soo many angles, the answer just keeps hitting me on the face 'There are no offensive tactics for blue team. Rushing is seriously out of the picture for blue team. Now let me continue with my explanation.
First is red team, Basically follow these routes, route 1 which runs through B long actually is not such a good idea. you have to have jumping skills for this one. To jump the sign boards. Also, you must take out the sniper above first before proceeding to make life much more easier. Route 2 is using the normal stairs way. For red team, you can see here that it splits into 2 routes.One heading B and one heading A. For those who have no skill in jumping the sign boards I recommend you use this path to go to B. For those who wanna go to A just go this way. I don't recommend you to waste your bullets shooting at the wood at where I marked 'special' cause you're just wasting bullets if you hit nothing. I suggest a 1 whole team of people to rush, usually this rush tactic in this map is very good.
Next is Blue team, as you can see, blue team also has an upper hand in this match, their uniforms, just like red team in the airport where they blend in with the brown grass. Because this map is dark, blue team actually can hide at quite a few places. I especially like the dead end which has the tanks, most of the time when blue team hides there, the colour blends in soo well, you just don't notice a person there, unless you take time to look. I suggest to put a sniper at B site, it's your first line of defence. The second guy for B is the guy behind the barrels. In A site, I suggest hiding on top of the building, people just don't like to check, it's psycology. I suggest a defensive manuver, I can't find any offensive ones.
A site 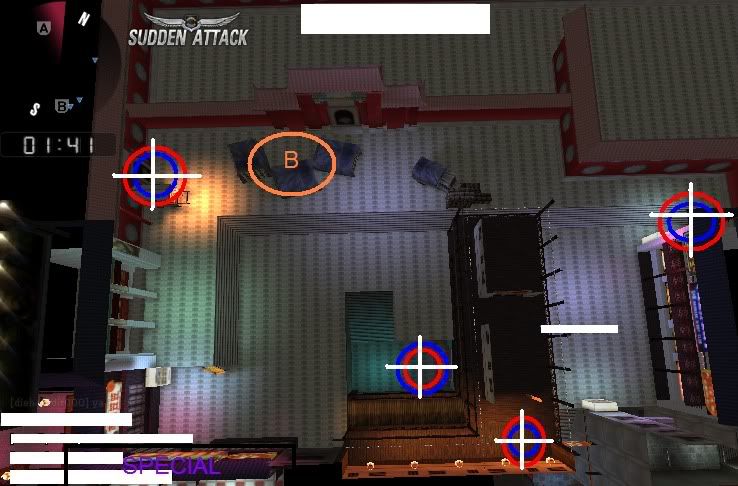
Now turn your attention to A site. You can see here that actually there are a few defensive points for blue and red. It's obvious, the blue points are for people to hide before the bomb is planted, the red spots are for people who hide after the bomb is planted.
Now, as said earlier, these few spots are the spots best (I think) for hiding and BSing. Do notice the cart there. I suggest putting a TRG quick zoomer there, people usually just walk through that door without thinking twice. I don't know why but it's like that. Also, in this map the bomb can be planted anywhere cause it's soo darn simple to find. I suggest for grenades here. If people are defusing the bomb, throw it, it's a sure hit, if people are planting the bomb, same thing, it's a sure hit.
B site 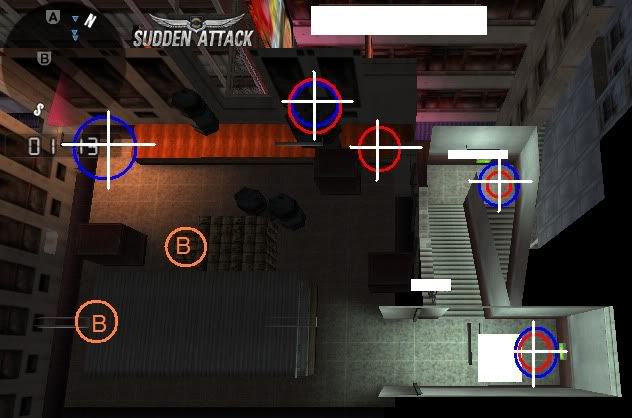
Now for B site. As you can see in this photo above. B site is a much more strategic point. B site has 2 ways of shooting, through the window and rush attack. For red team, plant the bomb where you like, at the 2 spots. if you plant it at the crates outside, make sure there is a sniper looking at the window. Now the second spot is actually a very psycological spot, put a person at the end of the place as you can see behind the wall of the stairs, the person will check without defusing the bomb, I have no idea why they don't check, but it's like that. If you like hide at the stairs, people hate to check there. Also, place a shot gunner or TRG quick zoomer on top of the tanks. This is to shoot down anyone when they come in through that route.
Blue team's turn. Now blue team as said earlier, hide at the window. Put a sniper at the window. Make sure the guy shoots down anybody that comes. Place a TRG Quick Zoomer or Shot Gunner on top of the crates. The same reason above. Also, place somebody to guard the stairs. it helps alot. If that guy fails, make sure there is somebody behind the stair's wall.
-more updates coming!-
ConclusionSo in conclusion. If you wanna be a tactician make sure you understand all of this. But you can also apply your own theories too. Some of these methods can be used for other type of people like campers. A tactician can sometimes be boring and if your team mates are already very good in the game, you can let them go. Just try to manage the weaker ones, that’s all. But all in all, after reading this. You can’t be a tactician just yet. You need a few weeks of getting used to the radar and getting a hold of some of your own theories. Well, good luck then!
Hope you enjoyed this guide.
P.S.: If I have made any mistakes or what so ever please don’t hesitate to comment. Also comment on this guide. And mind the bad English.
Well, tea anyone?
Cheers,
HoiHoiSoi
Credits go to HoiHoiSoi for this guide~!
Well basically is very useful for those who are still new to FPS game. enjoy it, n learn what u had miss it...


 Jul 7 2012, 01:41 AM, updated 13y ago


 Quote
Quote


 0.0281sec
 0.82
0.82
 5 queries
 GZIP Disabled