Outline ·
[ Standard ] ·
Linear+
Worklog: Project UV-CMA64, Updates: Finished (failed)... pic bomb
|
SUSAcey
|
 Dec 31 2005, 02:01 AM, updated 20y ago Dec 31 2005, 02:01 AM, updated 20y ago
|

|
I made up my mind on the measurements but been busy with my work lately which is ending on January 2nd. Will be getting the acrylic then. Here is my old P4 1.6 system (remember Project Murderdolls). Currently still having a few problems: funding for acrylic, funding for more CoolerMaster stuffs, and tools. Since I'm upgrading almost the whole PC, I find it no point to stick to ready-made casing as..ahem.. they dont appeal me at all. So I'll just show a few pix first before I post new ones after I get the $$$ and acrylic by the first week of January  Will be based on something like Antec P180's idea which is no cooling fan will be sticking to the exterior panels at all.
This is my mod. No, not my laser printer. A lot of stuffs are still missing frm my plan. Especially the fat box of Athlon 3000+ / 3200+ processor (wait for market price to stabilize). Getting more CM stuff soon (CoolViva, RAM Heat Spreader, Front Bezel, DualStorm, IDE etc etc). A lot of stuffs are still missing frm my plan. Especially the fat box of Athlon 3000+ / 3200+ processor (wait for market price to stabilize). Getting more CM stuff soon (CoolViva, RAM Heat Spreader, Front Bezel, DualStorm, IDE etc etc). Finally, an introduction to the one-man-gang tool I will only use through out the whole project (except for drilling holes that is heh) Finally, an introduction to the one-man-gang tool I will only use through out the whole project (except for drilling holes that is heh)
 Will update this as soon as I start cutting the acrylic. Hope I have the time and faith to finish this project a.s.a.p possibly a week after Chinese New Year cos I'll be fn busy with my double module final project then. Check for updates soon. This post has been edited by Acey: Mar 3 2006, 08:57 PM |
|
|
|
|
|
Awan Afuqya
|
Dec 31 2005, 06:09 AM
|
|
|
Good luck for your project. Looking forward for regular updates, hehe. Love acrylic.
|
|
|
|
|
|
SUSAcey
|
Jan 3 2006, 07:56 PM
|
|
|
Found a piece of black reflective acrylic (a broken signboard) its badly scratched but still very reflective. Using it for my PSU's Ugliness vs. Warrantee issue. Its gonna be bent to cover my PSU. Lemme introduce you to my friend, mr. candle, whos gonna help me melt the acrylic a bit.  This is just a test mode cos this is my first time bending acrylic. Well, the candle is useful cos I saw before how it cracked a glass window when I placed the candle underneath it. And the big piece cut out following 3 sides of my PSU's measurement.   And the final result... cheap-as$ candle from RM5 shop (around 20 bijik of them) gets the job done on 3mm acrylic.   And it fits. Too bad my cheque havent been cleared, that means another few days without updates cause I cant purchase any acrylic now. Maybe after 2-3 days I'll update this worklog again. Stay tuned. |
|
|
|
|
|
ccy1989
|
Jan 3 2006, 08:41 PM
|
|
|
wow your PSU really looks cool just like a person wearing a tuxedo. smart and clean look .Acey keep up the good work dude..looking forward to see ur completed project.hehe
|
|
|
|
|
|
SUSAcey
|
Jan 3 2006, 09:53 PM
|
|
|
Thanks... Im doing cheap modding cos very tight budget now... cant afford those nice tools others have
|
|
|
|
|
|
shocker
|
Jan 4 2006, 06:41 AM
|
|
|
QUOTE(Acey @ Jan 3 2006, 07:56 PM) good job done on the PSU modding  ...looks clean, nice and neat ....cant believe that a candle can do such a nice bending  ....awaiting for u to finish off ur whole case modding  ...hehehe...good luck  !!! edit: just would like add if u would like to put a 120mm fan over the black arcylic, would provide a better cooling for ur PSU...but u need to make a 120mm blow hole upfront....  This post has been edited by shocker: Jan 4 2006, 08:18 AM This post has been edited by shocker: Jan 4 2006, 08:18 AM |
|
|
|
|
|
Torniquet
|
Jan 4 2006, 12:30 PM
|
|
|
question : how did u bend the aryclic just nice to ur PSU size...
did u place it on ur PSU then heat it to bend?
|
|
|
|
|
|
SUSAcey
|
Jan 4 2006, 09:43 PM
|
|
|
^ nope... i measure the top n side panels of the PSU, cut out the acrylic, leave/add 0.4cm free for bending, slice 2 thin lines to mark the boundary and bend...the top got a bit of space left cos the PSU corners wont be able to fit into the bending curves
btw, its just an "on-top" cover for the psu, im not gonna replace the psu cover cos its brand new n under 2 yrs warantee from CM... hehe.. but I can consider taking off the cover on second thoughts...
This post has been edited by Acey: Jan 4 2006, 09:45 PM
|
|
|
|
|
|
ccy1989
|
Jan 5 2006, 10:19 PM
|
|
|
any more update on ur project ?
|
|
|
|
|
|
Torniquet
|
Jan 5 2006, 10:37 PM
|
|
|
wanna ask how long does it that for the aryclic to bend....i mean heat up to bend,.....
|
|
|
|
|
|
SUSAcey
|
Jan 6 2006, 01:10 AM
|
|
|
@ccy1989 - Not for now, bankrupt from the bills n expensive food at part-time workplace... will try to resume a.s.a.p... oh ya, acrylic price rising... RM11 to RM13 for 5mm
@Tourniquet - I use those candle the acrylic can be bent after 4-5 minutes... but not almost-perfectly-square corners cos the heat spreads over large areas...
Update: 20-Jan-06
This post has been edited by Acey: Jan 20 2006, 07:07 PM
|
|
|
|
|
|
SUSAcey
|
Jan 20 2006, 07:27 PM
|
|
|
Long time since the last update. Just brought in a piece of 2x3 acrylic yesterday and start cutting out the panels today. Casing gonna be 45cm (H) x 21cm (W) x 52cm (L) Dont have the right tools and time now to cut the inside so leave that to after CNY. Just big enough for 4 panels and some extra stuffs. Front, back, bottom, PSU holder and mobo panel.  Went to look for a clamp in Giant but cant find one. Too lazy to go Carrefour so I used my XL (Xtra Long) leg to clamp the acrylic. Mr Plastic Cutter one man show Lucky can get straight cuts after looking and learning more at how DY's employee cut n break 5mm with cutter.  Thats all for now. Not much. Gonna bring in another 2x3 after CNY (goin back to hometown for 10 days), its with my friend in Selayang now. Got it at much cheaper price (RM8 per sq ft) while I bought in SS15 for RM11. Side panel will be using 2.5mm acrylic. What I'll be updating in one shot after CNY is:
- Get PSU sleeved and molex changed.
- Cut the next 2x3 acrylic and start drilling/cutting inner holes for the back and mobo panel only
- Sanding the sides and putting up the back, bottom, and mobo panel first.
So I guess there'll be a bigger update with more pix after CNY. Now no money  This post has been edited by Acey: Jan 21 2006, 09:13 AM This post has been edited by Acey: Jan 21 2006, 09:13 AM |
|
|
|
|
|
ikan_semilang
|
Jan 20 2006, 07:33 PM
|
|
|
QUOTE(Acey @ Jan 20 2006, 07:27 PM) Acey, where u bought acrylic cutter and how much for it?  |
|
|
|
|
|
SUSAcey
|
Jan 20 2006, 07:36 PM
|
|
|
^ RM19.. bought it at one of the hardware shops opposite Darusalam mamak in SS15 Subang. Dont really recommend it. Cos I saw DY guys using a red color one, the front hook is of different build, he drag 5-6 times on 5mm can break d, mine need around 10-20 drags.
|
|
|
|
|
|
ikan_semilang
|
Jan 20 2006, 07:42 PM
|
|
|
QUOTE(Acey @ Jan 20 2006, 07:36 PM) ^ RM19.. bought it at one of the hardware shops opposite Darusalam mamak in SS15 Subang. Dont really recommend it. Cos I saw DY guys using a red color one, the front hook is of different build, he drag 5-6 times on 5mm can break d, mine need around 10-20 drags. Thanks. Actually i want to find acrylic cutter but afraid if wrong tool maybe make my acrylic broken.  This post has been edited by ikan_semilang: Jan 20 2006, 07:42 PM This post has been edited by ikan_semilang: Jan 20 2006, 07:42 PM |
|
|
|
|
|
SUSAcey
|
Jan 20 2006, 07:43 PM
|
|
|
as long as its plastic cutter can already lar, depends on how straight u drag the line only and how u break it
|
|
|
|
|
|
ikan_semilang
|
Jan 20 2006, 07:45 PM
|
|
|
QUOTE(Acey @ Jan 20 2006, 07:43 PM) as long as its plastic cutter can already lar, depends on how straight u drag the line only and how u break it Yaya..err.. red colour like this ar?  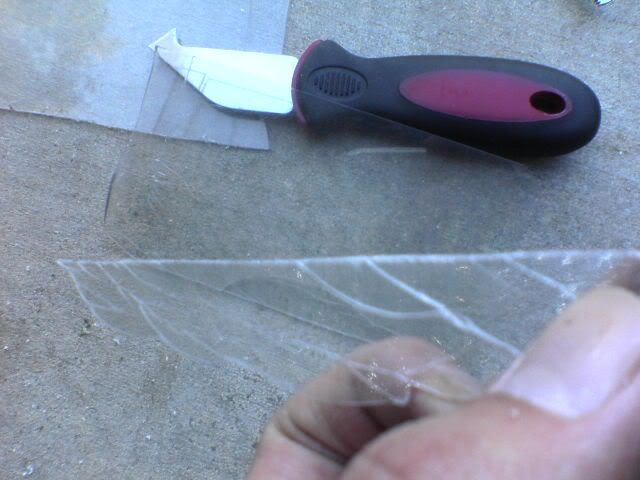 |
|
|
|
|
|
sherren
|
Jan 20 2006, 07:46 PM
|
|
|
woah how long did it takes to cut one straight line with that plastic cutter?
|
|
|
|
|
|
SUSAcey
|
Jan 20 2006, 07:47 PM
|
|
|
not that type, semilang... whole thing red in color, looks very paria but very good in cutting 5mm...
@sherren... 3-5 minutes for me to cut n break one panel
|
|
|
|
|
|
SUSAllnGap
|
Jan 20 2006, 08:26 PM
|
|
|
good luck on ur projects !!!!!! anyway, i think u need to cut ur toe nails. pretty long nails de This post has been edited by AllnGap: Jan 20 2006, 08:27 PM |
|
|
|
|


 Quote
Quote


 0.0191sec
 0.54
0.54
 5 queries
 GZIP Disabled